

使用Optuna进行PyTorch模型的超参数调优
source link: https://www.51cto.com/article/756926.html
Go to the source link to view the article. You can view the picture content, updated content and better typesetting reading experience. If the link is broken, please click the button below to view the snapshot at that time.

使用Optuna进行PyTorch模型的超参数调优
Optuna是一个开源的超参数优化框架,Optuna与框架无关,可以在任何机器学习或深度学习框架中使用它。本文将以表格数据为例,使用Optuna对PyTorch模型进行超参数调优。
Optuna是一个开源的超参数优化框架,Optuna与框架无关,可以在任何机器学习或深度学习框架中使用它。本文将以表格数据为例,使用Optuna对PyTorch模型进行超参数调优。

Optuna可以使用python pip安装,如pip install Optuna。也可以使用conda install -c conda-forge Optuna,安装基于Anaconda的python发行版。
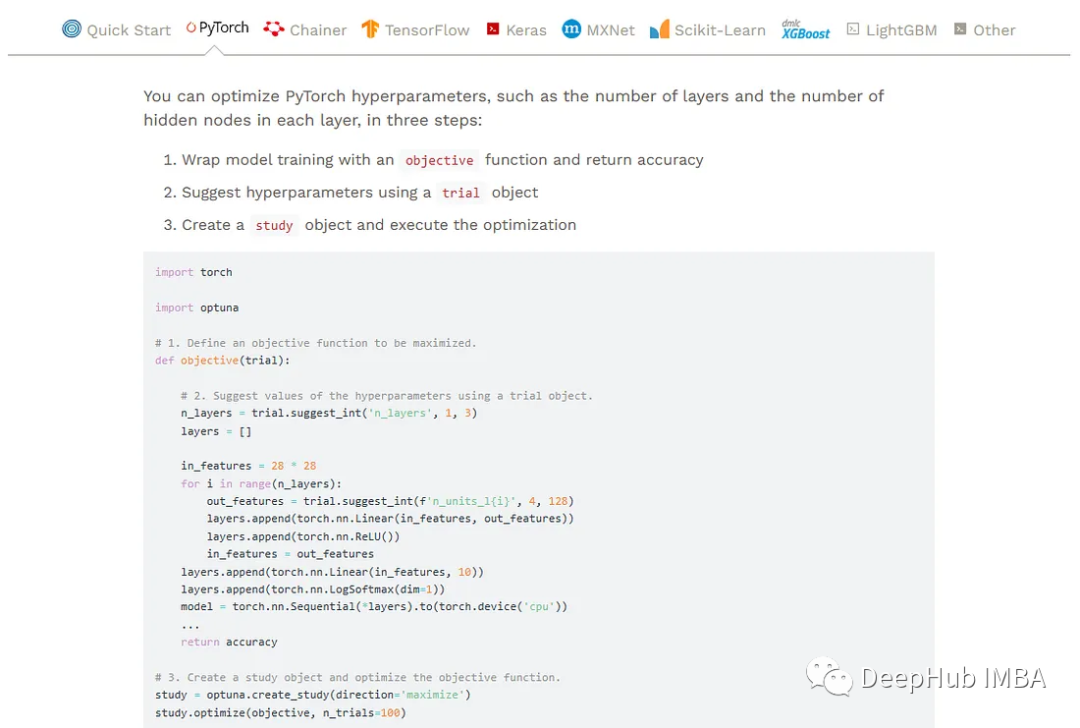
正如您所看到的,使用基本python语言的几行代码,您可以为任何神经网络创建并执行试验。
OPUTNA有一个简单的基于API的实现,允许用户定义要优化的度量和要调查的超参数空间。只需要调用一个函数来执行优化过程。它支持广泛的优化算法,包括随机搜索、网格搜索和贝叶斯优化。并且它可以支持连续、整数和分类超参数的优化,以及具有复杂依赖关系的超参数。
Oputna的简单介绍
让我们先了解Oputna框架的基本术语。
Trial:-Trial是评估一个目标函数的过程。该对象传递给目标函数,提供获取参数建议、管理试用状态和设置/获取试用自定义属性的接口。
Study:一个Study对应于一个优化任务,即一组试验。该对象提供了运行新试验、访问试验历史、设置/获取研究本身的用户定义属性的接口。
Study中包含了一个重要的create_study方法,它是创建新的Study对象方法重要参数如下:
- Objective :目标函数是Optuna优化超参数选择的核心。虽然暴力网格搜索也是寻找最小化目标函数,但它实际上并没有考虑到超参数的哪种组合效果好或不好。
- Sampler :是一个采样器对象,实现了值建议的后台算法。如果指定None,则单目标优化时使用TPESampler,多目标优化时使用NSGAIISampler。
- Pruner :是一个修剪器对象,决定提前停止没有希望的试验。如果指定None,则使用MedianPruner作为默认值。
- Study_name:研究的名称。如果此参数设置为None,则自动生成唯一的名称。
- Directions : 多目标优化过程中的方向序列。
Pytorch模型
为了适应Oputna的超参数是搜素,我们需要一个函数来根据不同的参数返回不同的Pytorch模型,大概是这个样子的:
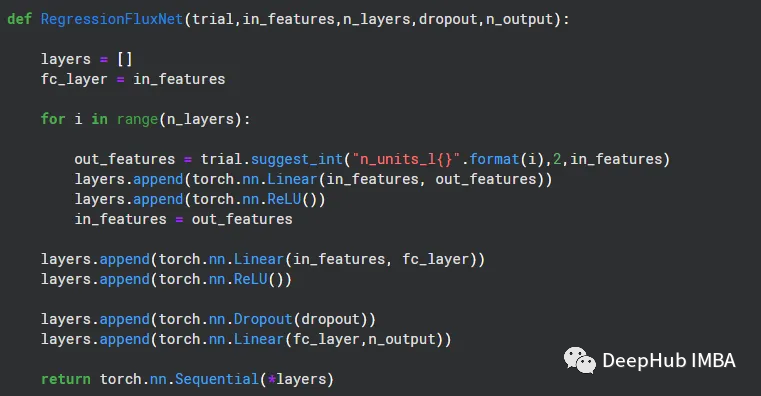
我们几个超参数包括,In_Features ,N_Layers ,DropOut 和N_ouput
而trial 是Oputna传递的Trial 实现。
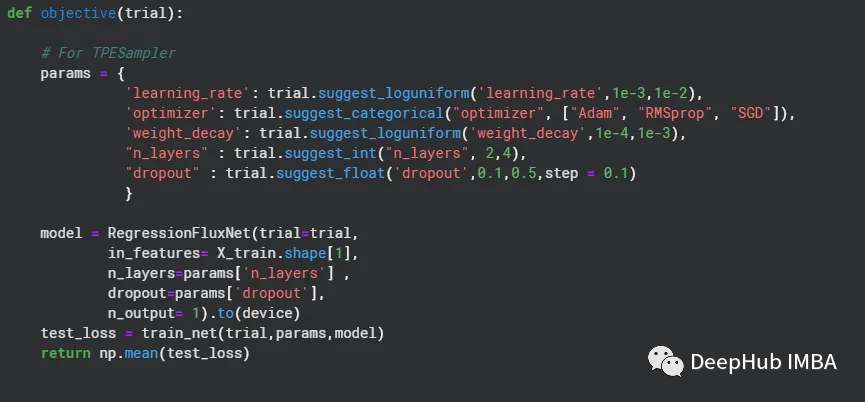
目标函数由我们要优化的超参数组成。在我们的例子中,除了上面的模型的超参数外,还需要优化learning_rate、weight_decay和不同的优化器,所以定义如下:
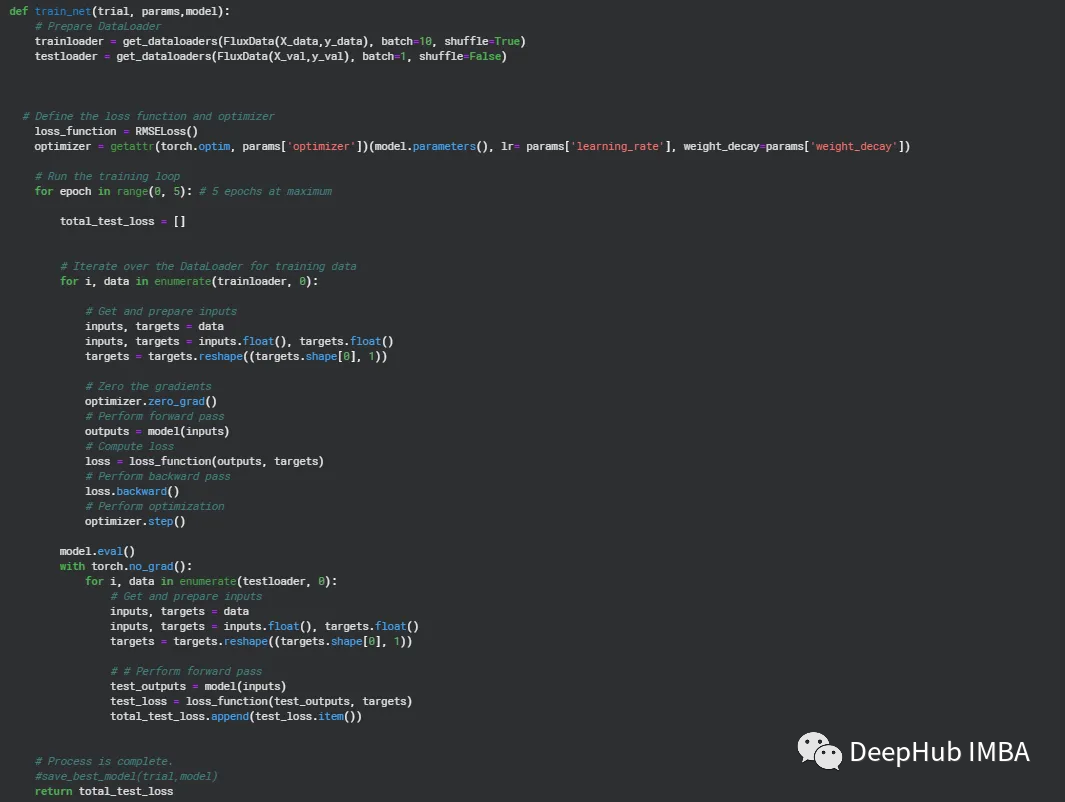
训练循环是Optuna中最重要的组成部分。在下面的例子中,我们对定义目标函数的参数字典进行参数化。
Study
正如我们上面所说的,Optuna研究在数据集中进行了多例试验,我们使用损失函数为RMSE,所以方向是最小化RMSE。在这个中使用TPESampler.Tree-structured估计器。
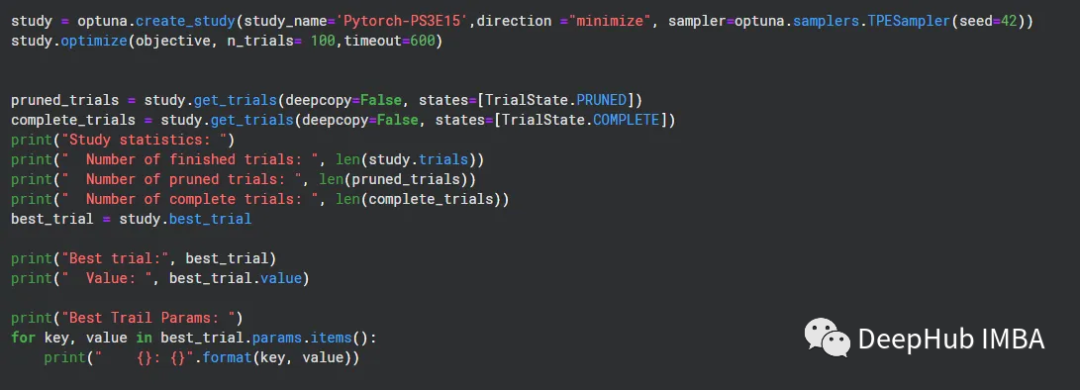
由于数据集非常小,试验在25个循环内结束。以下是细节。下面给出了最佳试验和超参数组合,将RMSE最小化到0.058。
Study statistics:
Number of finished trials: 25
Number of pruned trials: 0
Number of complete trials: 25
Best trial: FrozenTrial(number=18, state=TrialState.COMPLETE, values=[0.058233041420927334], datetime_start=datetime.datetime(2023, 5, 21, 5, 9, 43, 683621), datetime_complete=datetime.datetime(2023, 5, 21, 5, 10, 7, 935450), params={'learning_rate': 0.0010084133367699304, 'optimizer': 'Adam', 'weight_decay': 0.00013535005248600755, 'n_layers': 2, 'dropout': 0.2, 'n_units_l0': 7, 'n_units_l1': 6}, user_attrs={}, system_attrs={}, intermediate_values={}, distributinotallow={'learning_rate': FloatDistribution(high=0.01, log=True, low=0.001, step=None), 'optimizer': CategoricalDistribution(choices=('Adam', 'RMSprop', 'SGD')), 'weight_decay': FloatDistribution(high=0.001, log=True, low=0.0001, step=None), 'n_layers': IntDistribution(high=4, log=False, low=2, step=1), 'dropout': FloatDistribution(high=0.5, log=False, low=0.1, step=0.1), 'n_units_l0': IntDistribution(high=8, log=False, low=2, step=1), 'n_units_l1': IntDistribution(high=7, log=False, low=2, step=1)}, trial_id=18, value=None)
Value: 0.058233041420927334
Best Trail Params:
learning_rate: 0.0010084133367699304
optimizer: Adam
weight_decay: 0.00013535005248600755
n_layers: 2
dropout: 0.2
n_units_l0: 7
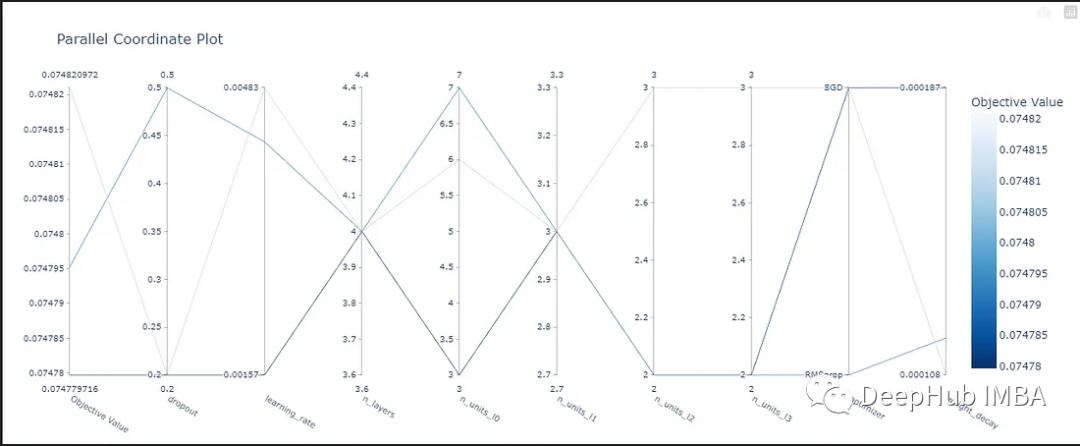
n_units_l1: 6我们还可以通过下面的函数进行结果的可视化
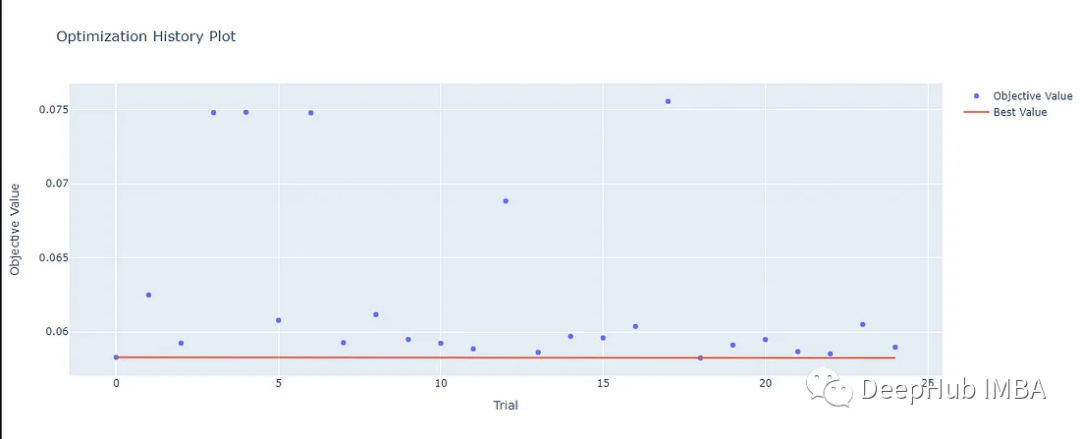
optuna.visualization.plot_optimization_history(study)
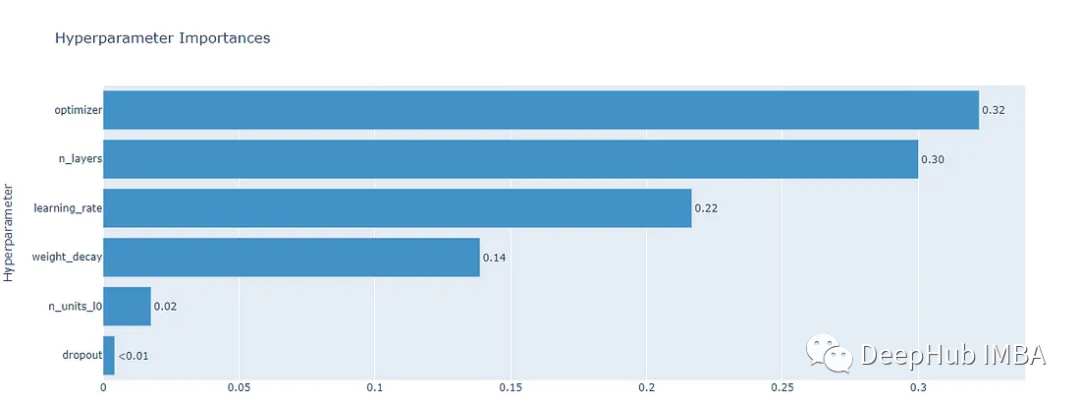
optuna.visualization.plot_param_importances(study)
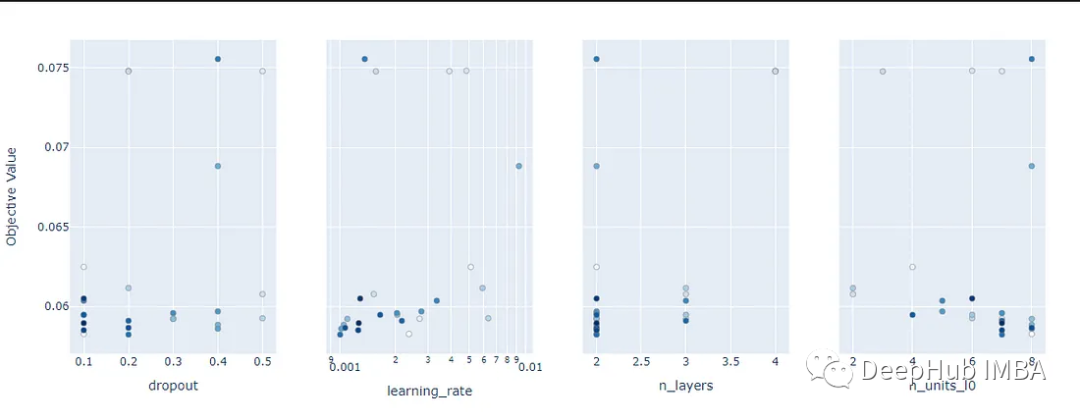
optuna.visualization.plot_slice(study)
optuna.visualization.plot_parallel_coordinate(study)
以上就是使用optuna调优Pytorch模型的全部过程,本文的源代码在这里,并且有完整的运行结果,如果你想自己调整或者学习,请看这个连接:https://www.kaggle.com/code/averma111/pytorch-ps3e15-optuna
Recommend
-
67
-
397
What is Zuul? 官方介绍: Zuul is the front door for all requests from devices and web sites to the backend of the Netflix streaming application.As an edge service application, Zuul is built to en...
-
47
-
5
在日常工作中用到的比较多的还是树回归模型,由于LightGBM不需要的类别数据进行预处理所以用得特别多,中间涉及到超参数优化时通常使用随机参数优化方法。在算法模型自动超参数优化...
-
4
Using Optuna to Search for Tiny RL PoliciesApril 29th 2021 new story7
-
6
Pytorch入门教程16-Pytorch中模型的定义和参数初始化 2020年10月15日07:06:11
-
7
README.md ...
-
7
公号:码农充电站pro 主页:https://codeshellme.github.io 本篇文章来介绍随机森林(RandomForest)算...
-
10
PyTorch 迁移学习之模型结构修改和参数微调发表于2023-06-05|更新于2023-06-05|technology
-
19
damaoooo's blogPython / PyTorch 性能调优指南发表...
About Joyk
Aggregate valuable and interesting links.
Joyk means Joy of geeK