

12 Things You Should Stop Doing On Your Android Phone Immediately
source link: https://www.slashgear.com/1295832/things-stop-doing-android-phone-immediately/
Go to the source link to view the article. You can view the picture content, updated content and better typesetting reading experience. If the link is broken, please click the button below to view the snapshot at that time.

12 Things You Should Stop Doing On Your Android Phone Immediately
In the fast-paced world of mobile devices, Android phones have become essential tools for productivity, communication, and entertainment. However, to ensure their optimal performance, it is important to be aware of certain actions that can degrade functionality or hinder the overall experience. By avoiding these actions and adopting best practices you can maximize performance and potentially enhance the longevity of your Android phone.
Here we will delve into a variety of topics, including but not limited to the risks associated with installing apps from unknown sources, the significance of data backups, and the consequences of neglecting software updates. We will also touch upon the dangers of overlooking essential security measures and the importance of utilizing power-saving modes.
Whether you're an Android veteran or a newbie to the platform, you're bound to learn something that you've never considered before. Oh, and as an added bonus, we've also gone ahead and given you step-by-step instructions on how to rectify these issues where necessary. It's never too late to revise your Android device usage habits!
Ignoring software updates
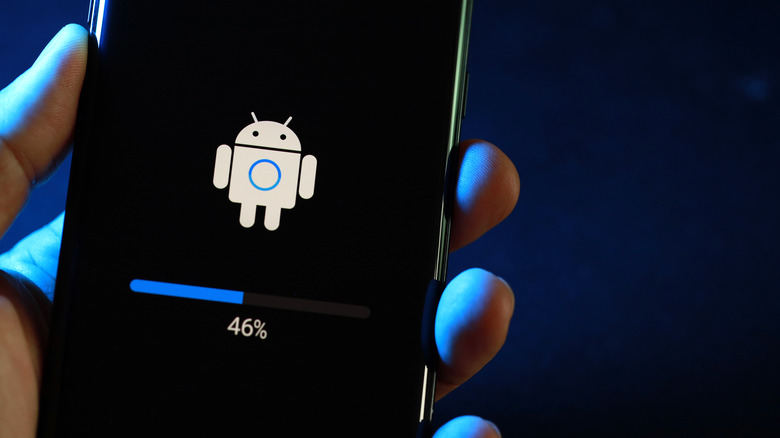
Every now and again your Android OS will release a software update. These are created to add new features, improve performance, patch security issues, and fix any persistent bugs. In most cases, your Android phone will inform you when a software update is available, but it's on you to initiate the process. Unfortunately, a lot of users ignore this request.
Updating your Android phone can take time, so it's no surprise many people decide to opt out. The phone has to reboot, and users may have to accept new terms and conditions. It's not exactly a fun process if you're busy or going about your day-to-day activities. With that said, it's absolutely necessary, and although your Android phone may be functioning for now, it can have underlining issues that need to be fixed. If you're unsure whether your phone needs to be updated, you can check the current status and Android version within your Settings app.
Here's how to install the latest Android software update:
- Open the Settings app.
- Scroll to the bottom, select System, and tap System Update.
- If there is an update available, tap the Install button.
- Continue to follow the on-screen steps.
- Alternatively, if you receive a notification regarding an Android update, tap it, and follow the same procedure.
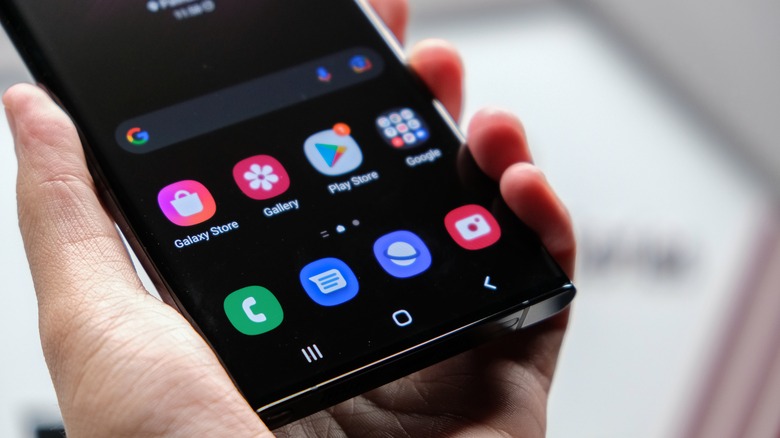
Allowing excessive background processes

The longer you hang onto your phone, the more apps you tend to install over time. While Android devices can handle multiple apps at once, excessive background processes can have an impact on battery life and memory consumption, which may lead to reduced system performance.
You should therefore know which apps are continuously running in the background and how to close them. This way, you can prioritize the important apps while closing the ones that are consuming system resources and reducing battery life. You may even be surprised to find an app that you haven't used in months hiding in the background!
Here's how to see what apps are running in the background and check their battery usage:
- Open the Settings app.
- Select Battery and tap Battery Usage.
- A list should appear indicating the amount of battery life used within a time frame.
Now that you know which apps are running in the background, you may want to close some of them. To do this, open the Settings app, select Apps, and Force Stop the app you want to close. Note that the app may relaunch when you restart your phone. If you'd like to get rid of the app completely, uninstall it from your device.
Overloading the home screen with widgets
Widgets are the small interactive components located on your Android phone's home screen. They provide relevant information and quick access to app functions, making them convenient for users on the go. Unfortunately, more isn't always better in this case, and too many widgets can lead to a cluttered interface and difficulty navigating the home screen.
As you continue to insert widgets, the device will also create additional home screens. This removes the functionality of quick access altogether because you'll now need to scroll through multiple windows to access the information you want — which is technically about the same effort as opening an app the regular way.
Furthermore, there's still the impact widgets have on the CPU and battery life of your Android phone. Since they're running in the background to provide real-time information, they will consume precious system resources. Therefore, in an effort to improve performance, it's advisable to remove the widgets that are unnecessary.
Here's how to remove widgets on your home screen:
- Navigate to the home screen that contains the widgets you want to remove.
- Tap and hold the desired widget until a small pop-up menu appears.
- Tap the Remove option in the menu.
- Alternatively, once the pop-up menu appears, you may need to drag the widget into a Remove Bin.
Note that removing a widget from the home screen does not delete it from your phone — you can still use the app and replace the widget later.
Running out of storage space
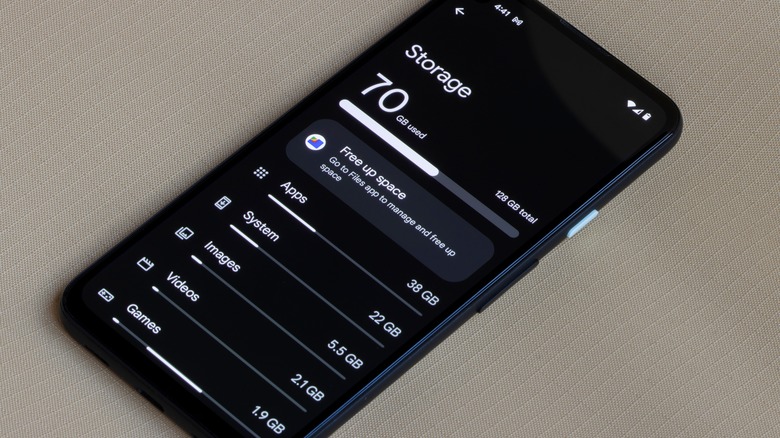
It might take a few months or a few years, but eventually your Android will notify you that you've reached your storage capacity. When this occurs, you'll no longer be able to install new updates, take photos, or save files onto your phone. Furthermore, leading up to this event, you may notice a decline in your device's overall performance. Apps can struggle to open or respond, while UI menus could become sluggish.
To prevent this from happening, it's in the interest of Android users to regularly maintain their storage space and ensure it does not run out. This can be done by checking how much storage space is currently being used and where their data is being located.
Here's how to check your Android's current storage usage:
- Open the Settings app.
- Scroll down until you find Device Care or About Device.
- Tap Storage.
- You should now see used and available space.
According to Google, most users will notice performance issues when their Android phone has less than 10% of its storage space remaining. If you have checked your current storage usage and this is applicable to you, it might be time to free up some space. Delete unnecessary media, unused apps, and downloaded files that have become irrelevant.
If you'd like to keep certain files but free up device storage, you can also consider cloud services or external storage options like MicroSD cards. Examples of reliable cloud services include Google, OneDrive, and Amazon Prime. However, not all Android phones come with MicroSD support, so cloud services may be your only option.
Installing apps from unknown sources
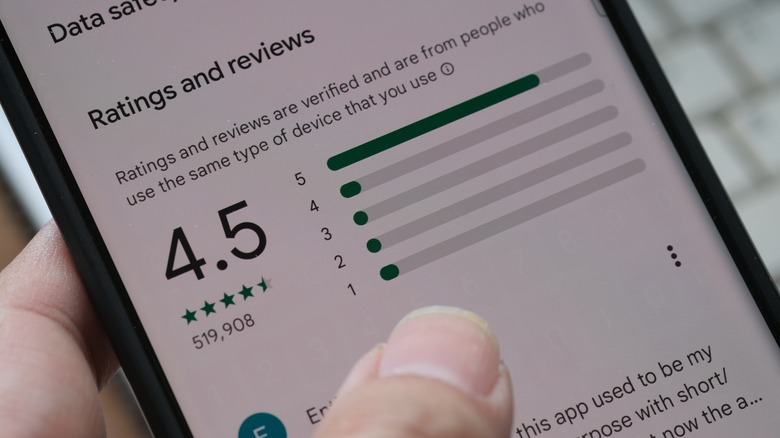
The Google Play Store is a trustworthy platform for users to download apps on their Android devices. The digital distribution service has strict regulations for app developers and examines each app before its available for download, ensuring they are safe and free of malicious code. Any other downloadable app source can therefore be considered unknown and may pose a risk to your Android phone.
In most cases, these potentially fake apps from unknown sources have not been tested for security vulnerabilities. They can contain harmful software, which opens users to cybercriminal attacks such as spyware and phishing. The malicious app could monitor Android activity, steal sensitive information, or gather personal data. Additionally, users may even experience stability issues on their phones. Poorly optimized apps can lead to crashes or interference with other apps.
To stay ahead of potential threats, look for strange activities when installing new apps. A good starting point would be investigating the app's permissions. For example, if a music app asks for messaging or camera permissions, this should alert your suspicions. If you have already installed apps from unknown sources, or experienced any of the above, now would be the time to remove the potentially compromised apps from your device.
Here's how to delete an app from your Android phone:
- Open Settings and select Apps.
- Tap on the app you want to delete and select Uninstall.
- You may need to confirm by tapping OK.
Letting your cache build up within apps
Caching allows apps to store temporary data so they can load faster. This may include frequently accessed images, video thumbnails, or scripts. Unfortunately, as these files accumulate over time, they may begin to corrupt, causing apps to misbehave or crash.
As luck would have it, most apps already have an automatic way of dealing with cache build-up. While constantly monitoring data internally, they clear potentially problematic files before issues arise. However, not all applications are created the same, and some may not have this feature, leading to cache accumulation. You should therefore know how to manually fix this issue.
Here's how to clear your cache on your Android phone:
- Open the Settings app and select Storage.
- Tap Apps or Other Apps (depending on your Android model).
- Select the app whose cache you want to clear.
- Now tap Clear Cache within the apps information page.
Note that clearing the cache is not a permanent way to free up storage space. After all, the app will begin to save frequently accessed files again. Clearing an app's cache manually is best used for apps that don't delete temporary data or have become corrupted over time. Furthermore, deleting an app's cache should not cause users to lose their saved progress (within apps) or login status.
Clearing an app's data, on the other hand, will delete the cache, as well as vital information such as settings, login credentials, and saved progress in a mobile game. It would be as if the app was installed for the first time.
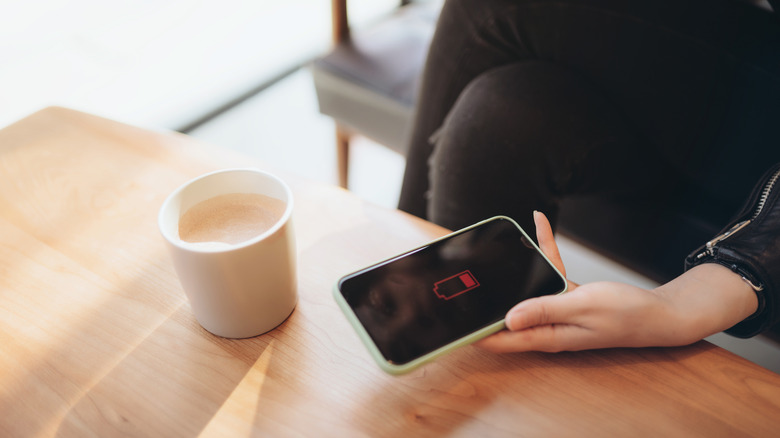
Ignoring Android's battery-optimization settings
Power Saving Mode, also known as Battery Saver, is available on most Android phones and helps conserve battery life through various power-saving measures. Many Android users are unaware of this feature or do not know when to enable it. Power Saving Mode can extend your Android phone battery by a few hours while maintaining access to essential functions such as messages and calls.
However, Power Saving Mode comes with a performance sacrifice. The internal processor of your phone is usually throttled, resulting in a slower response time. Background apps might also be restricted, leading to delays in synchronization or in-app notifications. Furthermore, the brightness of your screen is reduced significantly, making it harder to see the display during daylight times.
Further, Power Saving Mode is not permanent and is easy to toggle on and off. It does not ruin your phone's battery and can be incredibly useful in emergency situations. Based on the model of your Android phone, you may even be able to personalize the feature itself, allowing certain functionalities and settings to continue to operate.
Here's how to enable Power Saving Mode or Battery Saver on your Android phone:
- Open the Settings app.
- Scroll down and select Battery.
- Tap Power Saving Mode or Battery Saver. Further customization options may be available based on your Android phone model.
- Alternatively, you can use your drop-down menu to activate Power Saving Mode or Battery Saver. Hold down on the featured icon to customize additional options.
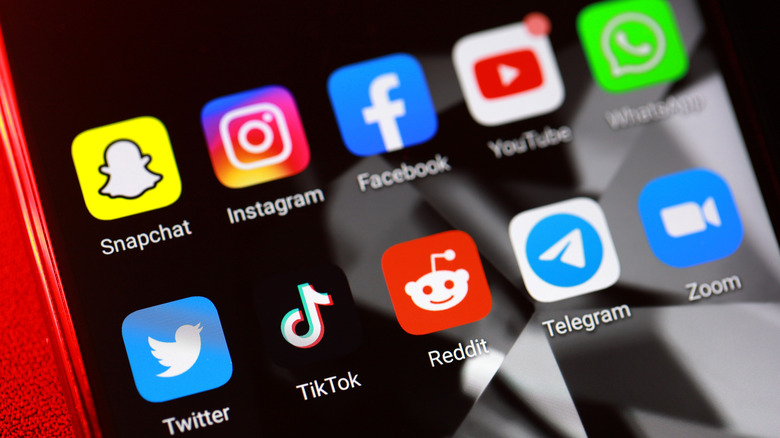
Receiving excessive notifications

By default, your Android phone will bombard you with excessive notifications. These can range from messages to social media alerts, some more urgent than others. While notifications can keep you updated, they tend to distract even the best of us. Knowing how to customize your Android phone's notification settings is consequently the best way to stay focused.
Now let's say you're in a meeting and don't want to receive any notifications. The easiest way to silence all incoming notifications would be to enable the Do Not Disturb (DND) feature which can be activated by swiping down the drop-down menu. Notifications will not make a sound or vibrate and won't appear on your lock screen or notification panel until the feature is disabled again, and there are additional ways to add customization.
Here's how to customize the Do Not Disturb feature on Android:
- Swipe down and open the drop-down menu.
- Press and hold the Do Not Disturb icon until its settings appear.
- Now customize which notifications can bypass this mode.
- You will have various options, such as People, Apps, and Alarms.
- If necessary, schedule a specific time you want the feature to activate.
- Finally, turn on Do No Disturb by tapping the icon from the drop-down menu.
Alternatively, you may want to silence a specific app while still receiving call or alarm notifications.
Here's how to turn off specific app notifications:
- Open the Settings app.
- Select Notifications and tap App Notifications.
- Toggle the specific app's notifications off.
Neglecting to restart your Android phone
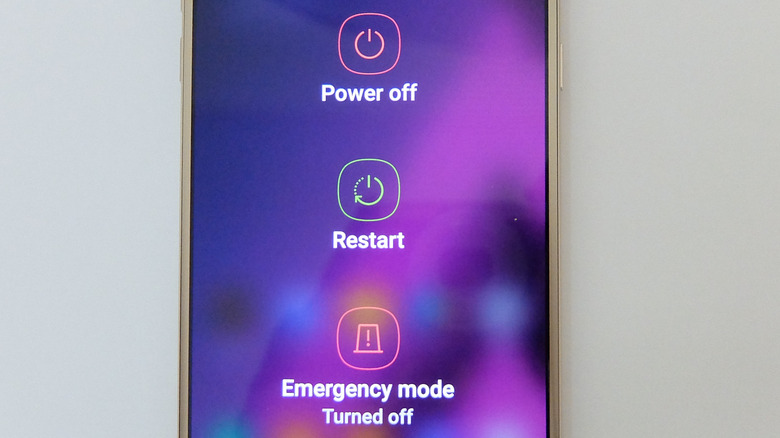
As you continue to use your phone, you might forget or intentionally neglect to perform a restart. A restart can help resolve software-related issues, improve performance, and keep your operating system from freezing. It might not be the most pleasant task, as certain phones can take a few minutes to reboot, but the benefits far outweigh any inconvenience.
While there's no fixed period, many tech experts agree you should restart your Android phone at least once a week. If you're noticing strange app behavior, such as apps continuously crashing or your system responding unusually, this might indicate that a restart is due. After all, restarting clears temporary memory, closes background apps and processes, and has the ability to fix minor software glitches.
Here's how to restart your Android phone:
- Press and hold the power button for a few seconds until a power menu appears.
- Select Restart.
- Fill in your passcode if prompted.
In the event that you do not want to manually restart your phone, some Android phone manufacturers like Samsung have added an Auto Restart or Schedule Restart feature. Users can then choose the date and time they'd like their phones to perform restart maintenance.
Here's how to schedule a regular restart on a Samsung Android phone (applicable to Android v5.0 Lollipop and above):
- Open the Settings app and tap General Management.
- Select Reset followed by Auto Restart.
- Toggle Auto Restart On and select the days and times you want Auto Restart to initiate.
Operating without security measures

The Android platform is known to be reasonably safe, but it is important to take additional security measures for several reasons. The open-source nature of the OS includes a vast ecosystem of apps available through the Google Play Store and third-party distribution services. While this promotes innovation and app development, it also makes Android users susceptible to malicious actors.
You may assume that the latest version of Android comes with the best fixes against hackers and cybercriminals. However, Android phone manufacturers run different versions of the operating system, which means your device might not be updated to the latest version. Even if it is, there's still a chance that hackers will find a loophole as they continue to search for vulnerabilities.
Add in the ability to install apps from third-party sources or click suspicious links, and you've now given hackers a way to test out their exploits. Thankfully, there are security measures you should take to further protect your phone. This can involve installing an antivirus software app, enabling two-factor authentication (2FA), or using a secure internet connection.
Here's how to check your phone's Android version:
- Open the Settings app.
- Scroll to the bottom and select About Phone.
- Locate the Android Version or Build Number.
- If it isn't the latest version, check for an update.
Here's how to get the latest Android update for your phone:
- Open the Settings app.
- Select System and tap System Update.
- Follow the steps on the screen.
Avoiding backups

Android phones contain personal information and precious memories. However, unforeseen circumstances can lead to data loss, making it crucial to have a backup in place. Unfortunately, Android users avoid this process because it can be timely, or they think the default security measures are sufficient. However, this does not always safeguard against accidental deletion or hardware failures.
The most common files users would likely want to back up are their photos, videos, and documents. If these were created on the Android phone itself, there would be no way to get them back if the internal storage device failed. Google Drive is an all-purpose solution that can copy and save files of any format, allowing users to choose individual items to upload or entire folders.
Here's how to back up files on Google Drive:
- Open the Google Drive app. If you do not have Google Drive installed, download it from the Google Play Store.
- Select the + button to open the Create New Window.
- Tap Upload and choose the files you want to back up.
Alternatively, if you would like to back up your call logs, texts, app data, and preferences, you can use Google One to store your device data.
Here's how to back up your device data on Google One:
- Download Google One on the Play Store and open it.
- To create a fresh backup, select Storage, and tap Set Up Data Backup.
- When the backup is needed, go into Storage again, and select View Details.
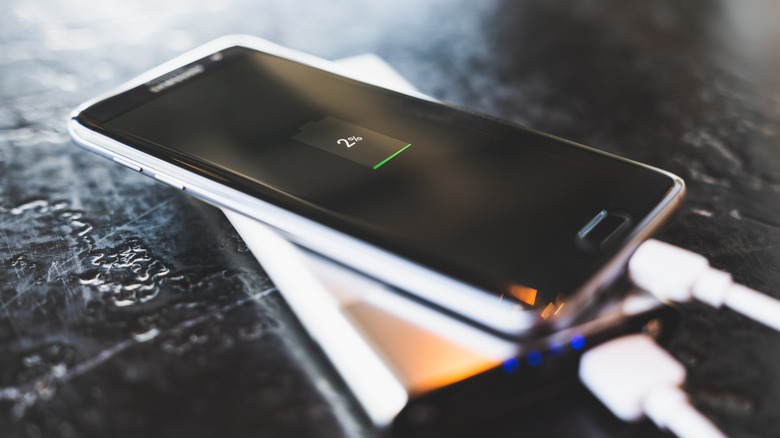
Letting the battery drain to zero
Android phones contain lithium-ion batteries, which have a limited amount of charge cycles. A charge cycle refers to charging the battery from 0% to 100% and then letting it drain to 0% again. By frequently draining the battery to zero, you use up the charge cycles more quickly, which can potentially lead to a reduced lifespan and gradual decline in performance over time.
Now you may be thinking your Android phone is relatively new and is still within its warranty. Surely you can get a replacement within this period if the battery suddenly dies? Well, battery issues are often not that immediate at first, and you may already be experiencing problems without knowing it. Every time your battery drains to zero, you risk the battery calibration becoming more inaccurate. This means the reported battery percentage does not align with the actual battery capacity, leading to incorrect battery level indicators. For example, the battery might turn off at 10% when it is actually at 0%.
There isn't a precise percentage to aim for when charging your battery, but it's recommended to plug it in before receiving the Low Power notification. 20% to 40% is usually a good range, in addition to removing it from charge before it hits the full 100%. This is because the high-voltage charger may strain your battery if left connected over time. Alternatively, if you cannot access a wall charger during the day, consider car chargers, power banks, or USB-to-computers ports.
Hidden Android 12 Features You Probably Didn't Know About

Android 12 was released on October 4, 2021, but even though it's been a part of a select few Android users' phones for a while now, there are still quite a few exciting new features that you're probably unaware of! In this newest release, there's been an increased focus on gaming, media, adaptive aesthetics, and security (as well as a few other surprises). Unfortunately, unless you're a die-hard Android fan—jumping into blogs, or trawling through every menu upon a new release—you might not have noticed these neat features as they're not intuitively accessible, or not widely supported by 3rd party apps (yet), or have become the background default.
We'll be running down what the most interesting features are, and how to access them. There's a little something for everyone to be excited about in this newest update, whether you're interested in games, security, or just making your overall smartphone experience more convenient and comfortable.
Game Mode Dashboard
One of Android 12's most impressive hidden features is the Game Mode dashboard. To turn on the game dashboard, you'll need to burrow deep into the settings, through an improbably circuitous route. First, open your Settings, then tap the Notifications option. In the new screen, scroll down a bit to the General section where you'll need to tap Do Not Disturb. This takes you to another screen where you'll tap Schedules. On the Schedules screen, you should see Gaming and a little gear icon to the right of it. Tap the gear. Finally, flip the switch to the on position.
If you're playing a game that supports this neat feature, you'll see a dark, translucent arrow on the right side of your screen. Tap that to display a small controller icon which you then tap to bring up the dashboard (at last!). Here you'll be presented with a variety of interesting options, though not all of them will be supported by every game. You can elect to stream your gameplay live via YouTube, engage optimization (aka drain your battery), turn on a frame rate counter, turn on a do-not-disturb switch, and add a recording and/or screenshot shortcut to your game screen. You'll also see an option to view your profile where you can inspect your leaderboard position and achievements.
Audio-coupled haptic effect
While haptic feedback is nothing new to smartphones, Android 12 is trying to jump on the bandwagon of making haptic feedback a little more interesting and useful for the average user. If you don't recall what "haptic feedback" is, it's just tiny vibrations that can help give digital interfaces a more tactile feel. For example, when you type on the screen keyboard, if you have haptic feedback enabled, you'll feel a little vibration when you press a letter, which is intended to give you the sensation of typing on a physical keyboard.
Android 12 is taking this a step forward by integrating the haptic functionality of our phones with sound. Built right into each device will be unique haptic patterns for each of the default installed ringtones. In this way, you could know who's calling you even if your ringer is off. Bzz-bzz-bzzzzz-bzz... oh that must be Cathy!
Even more exciting is that Google has opened this functionality up to developers through its HapticGenerator API. Devs can plug into this to auto-magically generate haptic patterns for their music and sound effects. Video games, movies, and music will become ever more immersive as they feed real-time sensations right into your hands as you engage with your media.
One-Handed Mode
If you're a current or former iPhone user (since 2014, at least), this will seem like a feature that's a bit late to the scene, especially considering how very simple it seems. And, if you're a user of an Android phone with a larger screen, you may feel very lucky to have this one-handed mode finally added to the list of available features.
One-handed mode gives you the ability to temporarily, and with just a tap or swipe, bring the top half of the screen down to the lower half, for easier navigation. That's it.
To enable this/ you'll need to go to your settings menu. Then, swipe all the way to near the bottom and tap System. Then we hit gestures, followed by One-handed mode. You'll end up on a screen with a few options presented to you. You can either opt to "Pull screen into reach" or turn on the "One-handed mode shortcut."
Personally, I struggled with the pull option. You need to get your finger in just the right position to make it work without causing the wrong thing to happen. I recommend the shortcut. This puts a nice little floating button down on the lower right hand side of the screen. Give it a tap and the top half of the screen will slide down.
Material You
Material You is the darling child of Android 12. You can tell, from the promotional material, that they are hella proud of it. And, to be fair, it's pretty nifty. With Material You, you'll be able to personalize the aesthetic of your phone's interface, just by adjusting a few settings, or switching out your wallpaper—the rest works automatically.
The central feature of Material You is the way it devises a system-wide color scheme drawn from your wallpaper, which it can sync across several devices to create a homogenized, yet unique visual experience. That means your smart watch, TV, or whatever else that's running Android 12 under the same user will conform to the same aesthetics.
What does this mean in simple terms, though? Essentially, if you use a wallpaper with primarily blue hues, your icons, and app backgrounds, will be shaded in blue hues that echo the nature of your wallpaper.
Using Material You will result in a personalized aesthetic experience on your phone. The central feature of Material You is the way it devises a system-wide color scheme drawn from your wallpaper, which it can sync across several devices to create a homogenized, yet unique visual experience.
To some extent it's automatic, but if you want to dial it in, head to your Settings and then scroll to "Wallpaper & style" to adjust as you please.
Easter Eggs Galore!
Every new Android OS release comes with its own special Easter egg(s). This one is no different, except for the fact that it comes with three Easter eggs!
The first one is somewhat familiar to anyone who's found previous Android surprises. You go to Settings, then About Phone, and then find "Android Version" and tap it repeatedly. In the past there have been ghosts and Oreos. This time there is a clock.
If you drag the hands on the clock so that they read 12, you'll get to see a big number 12 surrounded by bubbles that make it look like you're taking a color blindness test.
Once you've done this, you'll have unlocked the Easter egg widget. Go to your widgets settings, and at the top you'll find the "Android S Easter Egg." This is a genuinely beguiling widget based off of your Material You settings, that will allow you to access the entire color palette that is being run on your device, based off of your wallpaper.
Finally, if you go to this URL on your device and click the big 'ol link, you'll be able to place a giant number 12 statue in augmented reality space. And, if you look at the back side of the statue, you'll see a list of ice cream flavors, the initials of which spell Material You.
24 Hour Notification History
Personally, I'm a fan of this next tucked away feature of the Android 12 operating system. As someone who somewhat rashly clears my notification screen when it fills up too much, I've found it supremely helpful to have a catchall basket of sorts for all of my notifications from the last 24 hours. It's an exceptionally simple feature, but one that's super useful, and yet not easy enough to find.
If you want to turn this on, first swipe down on your screen to show your notifications. If you see a History button at the bottom, then congratulations, you already have this feature turned on. If not, and you see a button titled Manage instead, go ahead and tap that. Alternatively, you can go to your setting and tap Notifications. When you get there, one of the first options will be "Notification history." Enter that screen and flip the switch. Voila, your notifications will now have a tidy place to reside for 24 hours, even after you've swiped them away.
This feature is missing one thing, though, that I hope they reconcile in the future: a search bar. In 24 hours I receive a lot of notifications. Being able to narrow it down, even by the app alone, would be a huge boon. But, for now, at least you can seek out what you might have lost before.
2x2 App Button Layout
You've always been able to adjust the size of your icons, but Android has made the options even more accessibility-minded by introducing the jumbo-sized 2x2 grid arrangement for your app icons.
This feature won't be for everyone, but for those with poor vision, or people who just don't have much on their phone, this may help considerably.
To turn this on, find an empty space on your home screen and press down for about one full second. A little menu will spring up, and you'll need to select "Wallpaper & style." Swipe all the way to the bottom where you'll see the "App grid" section. Tap there and you'll be brought to a new screen where you can try out all the different grid sizes. They range from 5x5 all the way to 2x2. So, with the 5x5 option you'll have a total of 25 icons available to you, and with the 2x2 you'll have just four (plus the home row, which doesn't change across screens). Additionally, it's worth mentioning that this translates across to app folders, which will also adjust when you open them up.
If you tap any of these, you'll get a nice preview of what your screen would look like if you hit the Apply button without actually effecting any changes. If you do want to change your grid size, just hit Apply at the bottom of the screen and everything will adjust automatically.
New Media Encoding Support
Here's one for the real techies out there! Android 12 now supports AVIF images, HEVC video transcoding, and MPEG-H 3D Audio. Okay, for the non-techies out there, that's a lot of capital letters, and not a lot of context. Let me explain why all Android users will benefit from this impressive feature.
AVIF is a fairly new image file format (like jpeg, png, or gif) that provides greater quality images at even better compression rates. That means you can have a picture that has a smaller hard drive footprint than a JPEG, while also looking better.
HEVC is the same idea as AVIF, except for video. Lots of devices and apps currently use HEVC, but many don't. For those that don't, Android 12 will offer on-the-fly video transcoding to make HEVC video files usable across the whole operating system.
This will slow users down, though. The Android developer API page says that, "a one minute HEVC video file takes roughly 20 seconds to transcode into AVC on a Pixel 3 phone." That said, for universal video usability, that may be a sacrifice worth making.
What about MPEG-H 3D Audio? Essentially, that means your phone will now support not just surround sound, but what some are calling "three dimensional sound." We're talking up to 64 speakers across 128 core channels, adapted to a variety of physical arrangements. Or, heck, it can even simulate auditory 3D space in headphones, for those that support it. Massive possibilities.
Improved Privacy Settings
Unobtrusive security seems to be one of the larger goals of Android 12. That is to say, they're pushing new security features that, in effect, give you control of how exposed you want to be. We can see this clearly in three brand new features.
The first one is the option to make sure that only apps that require your exact location can access it. That means that apps which require some location information, but not precise location data, can be limited to only having your approximate location available.
Next up, Android is trying to keep you abreast of how your clipboard snippets are being used. If an app accesses your clipboard, a little notification will pop up at the bottom of the screen and fill you in.
The third, and final, new security feature I'd like to cover is the microphone and camera kill switches. You can enable these kill switches which make it so that, when enabled, no app, regardless of prior permissions granted, can access the microphone and/or camera while the switch is turned on. How truly reliable this is, I don't know, but it's a step up in personal security from the previous state of things.
Furthermore, if an app is accessing either your mic or cam, a green icon will glow in the upper right hand part of your screen. Assuming this is accurate, you'll always be able to know when you're being listened to, or watched.
Scrollable Screenshots
In the past, you'd need to download a third party app to make something like this work. Luckily, now, scrollable screenshots are built into the Android 12 OS.
If you're not familiar with what a scrollable screenshot is, imagine you want to capture an entire webpage, or a large section of a conversation, in a single image. Usually, you'd have to fill your screen with what you wanted, capture, scroll down, capture, and so on and so forth. That, or use an outside application that would help you take screenshots larger than your screen. Now, this functionality is a native feature of Android.
This one's not quite as hidden as the rest, but it still needs a little explaining. After you take a screenshot as usual, a series of icons will line up along the bottom of your screen. The rightmost icon will say "Capture more." Tap that. This will then allow you to capture roughly three times the length of your screen (or any amount in between). It doesn't seem to allow more than that, but this is still a serious improvement over the previous default.
Google Android 12 demo Quick Tap
Ah, the Quick Tap—bestowed upon the chosen few. Not only do you need Android 12 for this nifty function, but you need to have a phone that supports it. Unfortunately, my Pixel 4a does not, so I can only go off the experience of others. If you have a Pixel 5 or a Pixel 4a 5G, you're in luck for this one.
To turn this feature on, go to settings, then System, then Gestures, and then Quick Tap. Toggle the switch on. Once activated, tapping the back of the phone twice will, by default, take a screenshot. The neat thing, however, is that you can customize this to do a nearly endless variety of other things. You can pull up the digital assistant, pause (or, conversely, play) your media, pull up the recent app list, show your notifications, or—get this—open any app of your choosing. You can also force it to require you to tap more forcefully to activate—useful for the more fidgety among us.
New Widgets
Android 12 introduces a few new widgets and widget features. Some of this we've covered earlier, such as the Easter egg widget and the Material You color customization. But there's a lot more to this, and here I'd like to run through a bunch of the most interesting things you can drop on your screen.
There's a Google Maps widget that will allow you to search for whatever you want with just a tap. There's a todo list widget that integrates with Google Keep that keeps all your tasks front and center. There's the option to put photos on your screen, as if your phone were a sort of digital mantlepiece.
The Google Drive widget simplifies and speeds up the process of accessing and uploading files. The YouTube Music widget gives you home-screen control of your music. There's a simple digi-device that will display your data usage. There's an analog clock, which allows you to choose from a variety of different styles.
And, finally (at least for this list), there's the conversations widget. This allows you to make any text conversation a distinct icon. You'll get updates on the icon, including notifications of new messages, and how many unread there are. When you tap the convo, you'll be brought directly to it, no needing to go through the app interface first. I'll probably get the most use out of this one, myself.
Overhauled Ability to Share with Other nearby phones
Sharing has been updated for the Android 12. Whether that means sharing a wifi connection, or sharing some specific link or media from your phone, everything has been made (theoretically) easier.
Now, you can use Nearby Share to send someone the wifi credentials necessary to share with you. That means you'll only need to be within Bluetooth range (which is roughly 30 feet, or 10 meters), in order to utilize this functionality.
Nearby Share will also show up whenever you want to share anything on your phone that allows it. Instead of going via a messaging or social media app, you can use Nearby Share's Bluetooth functionality to zip things directly to the device of your choice.
That said, "zip" is perhaps an exaggeration. While I can imagine some utility for this feature, it involved far too many taps for my taste. Easier yet to just shoot your share over to someone's text inbox.
Face-Detection Rotation
This one is pure convenience, but what convenience it is! Few things are more annoying than trying to utilize the rotate feature of a phone when lying down. Android 12 offers the option to automatically identify the orientation of your face relative to the phone and adjust its rotation intelligently. This way it will naturally switch between landscape and portrait mode in a way that makes the most sense for what you're viewing, even when you're laying on your side.
You do have to enable this one by going to your Settings first. Scroll about halfway down to the Display option, tap that, then select the Auto-rotate screen option. You'll have to enable auto-rotate first, and then you can turn on Enable Face Detection.
This can be a little finicky depending on the quality of the lighting in the room (or bouncing off your face from the screen), but when it works, it can be quite the frustration saver.
Recommend
-
9
6 UI design mistakes you should stop doing now!I did these too when I was starting out. So thought to prevent others from making it.
-
8
9 Things CEOs Should Stop Doing If They Want To Scale Charles E. Gaudet II discussing the nine things that CEOs should immediately stop doing to better grow their business ...
-
7
Technology Myths You Need To Stop Believing Immediately
-
8
Home ...
-
6
Safety Check for iPhone: How to immediately stop sharing location and more in iOS 16 ...
-
4
Things You Should Stop Doing With Your Tesla Immediately
-
5
Things You Should Stop Doing On Your PS5 Immediately
-
4
11 Things You Should Stop Doing On Your iPhone Immediately
-
6
5 Things You Should Stop Doing On Your Xbox Immediately
-
5
If you have one of these apps on your Android phone, delete it immediately
About Joyk
Aggregate valuable and interesting links.
Joyk means Joy of geeK