

Conducting an Effective Design Retrospective in Miro
source link: https://uxplanet.org/conducting-an-effective-design-retrospective-in-miro-6d96da39bbae
Go to the source link to view the article. You can view the picture content, updated content and better typesetting reading experience. If the link is broken, please click the button below to view the snapshot at that time.

Conducting an Effective Design Retrospective in Miro
Techniques for running a design retrospective for remote teams
Design retrospectives are invaluable for teams to reflect on their work, identify areas of improvement, and foster continuous growth and innovation. These structured sessions enable teams to examine past projects, processes, and outcomes, facilitating a collective learning experience.
In today’s remote work environment, conducting design retrospectives can present unique challenges due to the lack of physical proximity. However, with the help of collaborative tools like Miro, teams can seamlessly conduct effective design retrospectives online.
Miro is a powerful and versatile collaborative online whiteboard platform that provides a virtual space for teams to collaborate, brainstorm, and visualize ideas. It offers a range of features and tools designed specifically for remote collaboration, making it an ideal choice for conducting design retrospectives.
In this article, we’ll explore why design retrospectives are an absolute must for any design team, and how you can leverage Miro’s collaborative features to conduct them regularly, and pave the way for better design outcomes.
Importance of conducting a design retrospective
So, why are design retrospectives important? Well, conducting a retrospective offers many benefits that lead to better team outcomes.
Continuous improvement
Retrospectives provide a dedicated space for teams to reflect on their work and identify areas for improvement. By learning from past projects, teams can refine their design processes and techniques, fostering a culture of continuous improvement and driving better outcomes with each subsequent project.
Team collaboration
Collaboration is key in a successful design retrospective. It allows team members to come together, share perspectives, and foster open and honest communication. Through retrospectives, team members gain a deeper understanding of each other’s roles, challenges, and achievements, promoting empathy, trust, and camaraderie. This leads to improved collaboration in future projects.
Knowledge sharing
Retrospectives serve as platforms for knowledge sharing. Each team member brings unique insights, experiences, and lessons learned to the table. By openly discussing and sharing these insights, teams tap into collective wisdom. This cross-pollination of ideas expands everyone’s knowledge, leading to innovative solutions and approaches in future projects.
Identifying patterns and best practices
Regular retrospectives help teams identify patterns and trends across projects. They uncover recurring challenges, bottlenecks, or successful strategies that contribute to project success. Recognizing these patterns allows teams to develop best practices and guidelines for consistent application in future projects, leading to more efficient and effective design processes and better outcomes.
Empowering team members
Retrospectives empower individual team members by giving them a voice and actively involving them in the decision-making process. When team members feel heard and valued, they become more invested in the team’s success. Retrospectives provide a platform for everyone to contribute ideas, insights, and suggestions. This sense of ownership and empowerment motivates team members to actively contribute to process improvements and collaborate more effectively.
Benefits of using Miro for conducting retrospectives
By leveraging the collaborative features and benefits of Miro, teams can overcome the limitations of remote work and conduct highly effective design retrospectives. This enables teams to continuously improve their processes, enhance collaboration, and drive innovation in their design endeavors.
Here are some of the benefits of using Miro for conducting effective design retrospectives:
Virtual collaboration
Miro allows team members to collaborate in real-time, regardless of their physical location. Participants can contribute simultaneously, providing a sense of presence and fostering engagement even when working remotely. This feature is especially valuable for design retrospectives as it promotes active participation and the sharing of diverse perspectives.
Visual representation
Miro’s digital whiteboard provides a dynamic visual canvas that allows teams to capture and organize ideas, artifacts, and feedback during the retrospective. This visual representation facilitates better understanding and comprehension of complex concepts and encourages creativity and ideation.
Flexible frameworks
Miro offers a wide range of templates and frameworks tailored for different retrospective techniques such as the “Start, Stop, Continue” method or the “Sailboat” retrospective. These predefined frameworks help guide the retrospective process and ensure that key aspects are addressed. Teams can customize these templates or create their own, aligning the retrospective to their specific needs.
Information centralization
Miro acts as a central repository for all retrospective materials, including notes, images, diagrams, and other artifacts. This ensures that important information is stored in one place, making it easily accessible for future reference and analysis. It also enables teams to revisit previous retrospectives and track progress over time.
Enhanced documentation and sharing
Miro enables teams to document and capture the retrospective findings in a clear and structured manner. The digital format allows for easy sharing with stakeholders, both within and outside the team, ensuring that insights and action plans are effectively communicated and understood.
Setting up a design retrospective in Miro
Start by creating a new Miro board dedicated to the design retrospective. Give it a descriptive title that reflects the purpose and scope of the retrospective.
Then, decide on the structure of the board based on the retrospective framework you plan to use. You can start with a blank canvas or select one of Miro’s retrospective templates as a starting point.
There are various frameworks you can explore to find the one that suits your team’s style and needs. Let’s dive into some popular framworks that can bring your retrospectives to life:
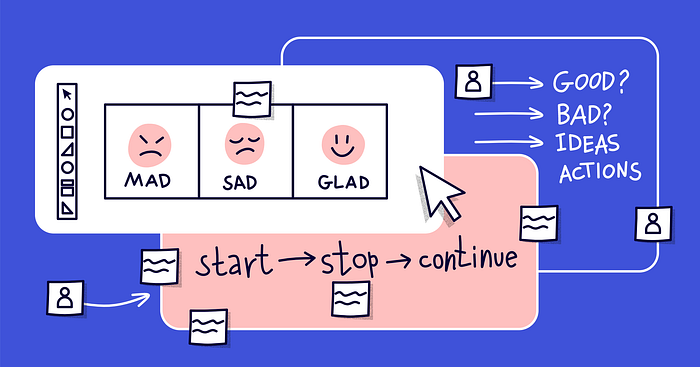
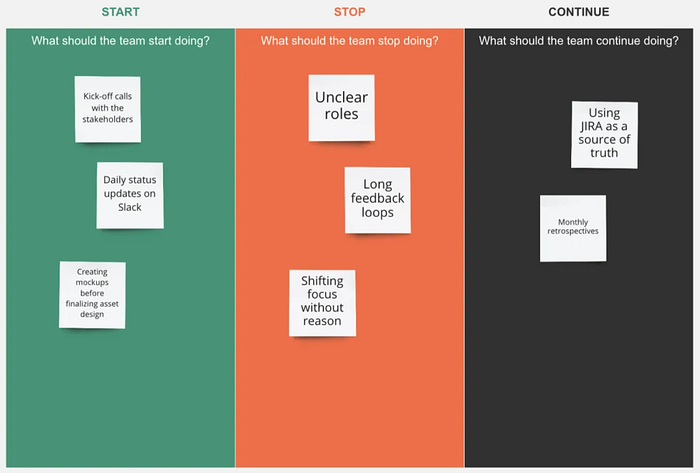
Start, Stop, Continue
Discuss what aspects of the design process or project your team should start doing, stop doing, and continue doing. This format helps identify practices to improve, eliminate, or maintain.
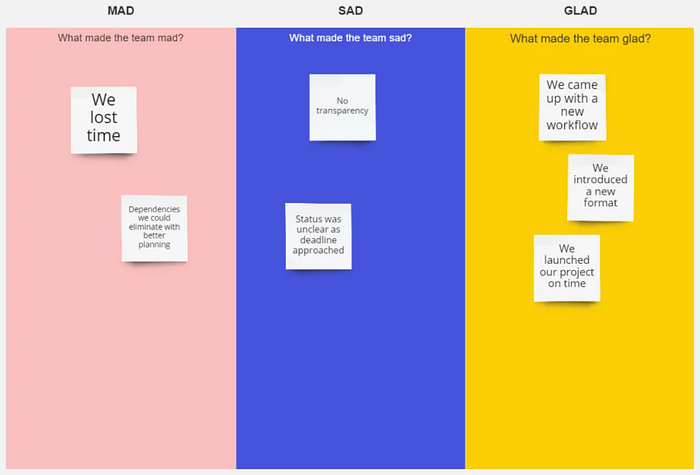
Mad, Sad, Glad
Share what aspects of the project made your team mad or upset, what made you sad or frustrated, and what made you glad. This format encourages open expression of emotions and uncovers areas for improvement.
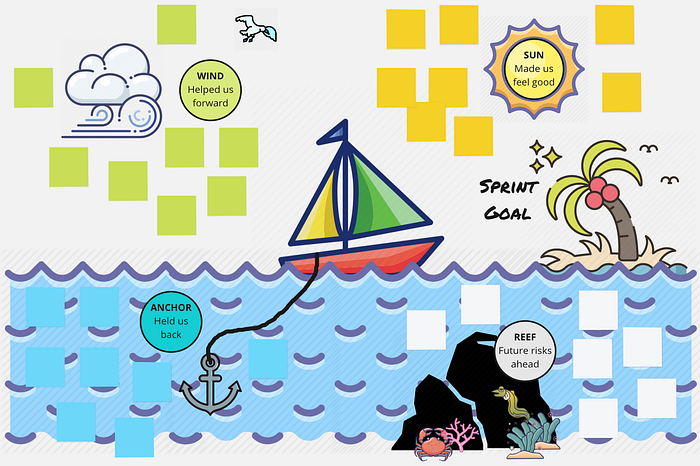
Sailboat
Visualize the retrospective as a sailboat journey. The reef represent future risks ahead, the anchors represent negative factors, such as delaying issues, the wind represents positive forces, such as things that worked well, while the anchors represent negative factors, and the land represents the goal or vision for the sprint. This format helps identify both positive and negative aspects to address.
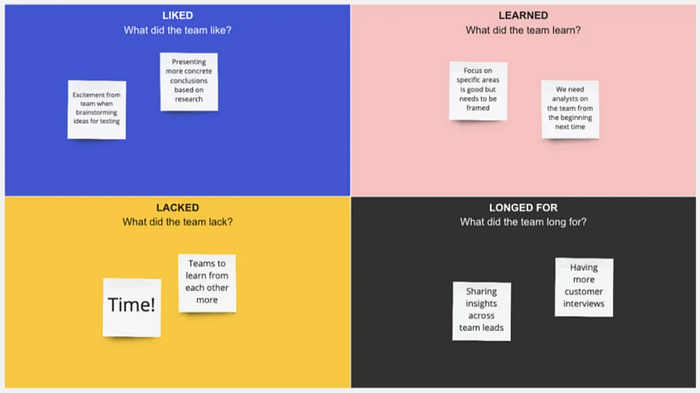
4 L’s (Liked, Learned, Lacked, Longed for)
Share what your team liked about the project, what you learned from it, what you felt was lacking, and what you longed for or desired. This format helps gather feedback and insights across different dimensions.
These different formats provide structured frameworks for conducting design retrospectives and encourage team members to actively contribute and reflect on the project. Teams can choose the format that best suits their needs and adapt it to their specific context and objectives.
Preparing for a design retrospective
By carefully preparing for the design retrospective, teams can ensure that the session is focused, well-structured, and productive. This preparation sets the stage for meaningful discussions, actionable insights, and effective collaboration towards enhancing future design endeavors.
Defining the scope and purpose
Before conducting a design retrospective, it is essential to define the scope and purpose of the session. Determine the specific project or timeframe to be covered and clarify the goals and desired outcomes. This ensures that the retrospective remains focused and productive, addressing the areas that require attention and improvement.
Setting a clear agenda and timebox
To keep the retrospective organized and efficient, create a clear agenda that outlines the activities and discussion points. Break down the session into distinct phases, such as reflection, analysis, and action planning. Assign time slots for each phase to ensure that the retrospective stays on track and all relevant topics are adequately covered. Setting a timebox helps maintain focus and prevents the session from running too long. Miro has a built in timer to help prevent your retrospective from going over time.
Communicating the objectives and expectations
Effective communication with participants is crucial for a successful design retrospective. Clearly communicate the objectives, expectations, and desired outcomes of the session. Explain the purpose of the retrospective, what participants should prepare beforehand, and the role they will play in the process. This ensures that everyone is aligned and prepared to actively contribute during the retrospective.
Gathering relevant materials and artifacts
Collecting relevant materials and artifacts for review is an important step in preparing for a design retrospective. Gather project documentation, design deliverables, user feedback, and any other relevant materials that provide insights into the project’s successes, challenges, and lessons learned. Having these materials readily available during the retrospective enables informed discussions and helps identify specific areas for improvement.
Steps to conducting a design retrospective
Alright, it’s showtime! Let’s run through the steps to make your design retrospective shine.
1. Inviting team members to the Miro board
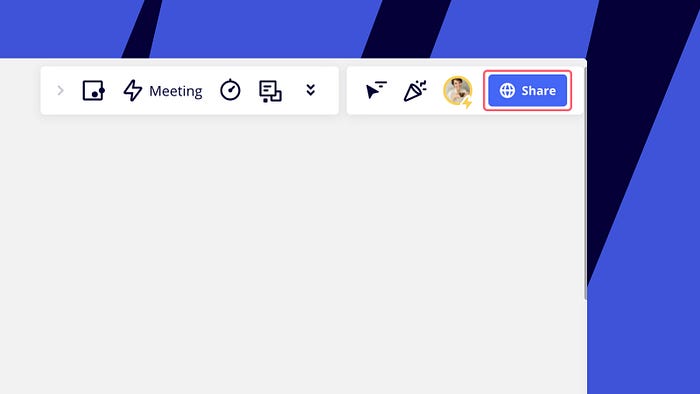
To begin the design retrospective in Miro, open the dedicated Miro board created for the session. Ensure that all participants have access to the board and can join the session smoothly. You can use Miro’s sharing feature to invite your teammates as collaborators to the board. Take a moment to familiarize everyone with the Miro interface and navigation if needed.
2. Reviewing the objectives and agenda
Before diving into the retrospective discussion, review the objectives and agenda with the participants. Remind them of the specific goals and outcomes to be achieved during the session. Clarify the agenda and the different phases or activities that will take place. This step ensures that everyone is on the same page and understands the purpose and structure of the retrospective.
3. Facilitating a discussion on the retrospective topic
As the facilitator, guide the discussion on the retrospective topic. Encourage participants to share their thoughts, observations, and experiences related to the project or timeframe under review. Use open-ended questions to prompt meaningful discussions and ensure that everyone has a chance to contribute their insights and perspectives. Foster a safe and inclusive environment that encourages active participation and constructive feedback.
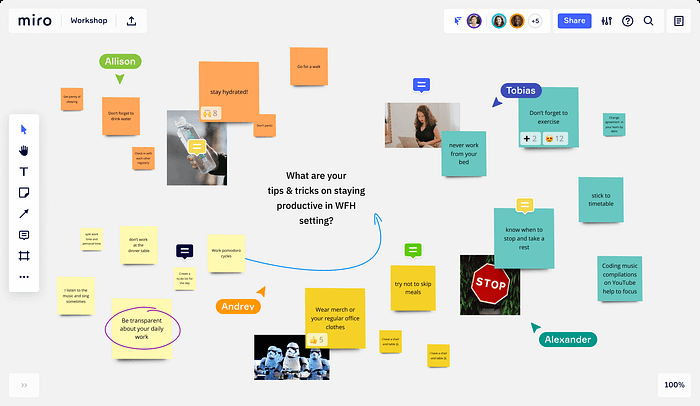
4. Using Miro’s collaboration features for brainstorming
Leverage Miro’s collaboration features to facilitate brainstorming and capture ideas during the retrospective. Encourage participants to use digital sticky notes, text boxes, or freehand drawing tools to express their ideas visually. Participants can simultaneously add their thoughts to the Miro board, fostering real-time collaboration and generating a diverse range of ideas and perspectives. This interactive and dynamic approach stimulates creativity and engagement.
5. Grouping and organizing ideas
Once a sufficient number of ideas have been generated, facilitate the grouping and organization of these ideas on the Miro board. Use Miro’s features such as frames, shapes, or color-coded labels to group related ideas or themes together. Encourage participants to collaboratively cluster and categorize the ideas based on similarities or patterns that emerge. This activity helps in structuring the data and identifying common themes for further analysis.
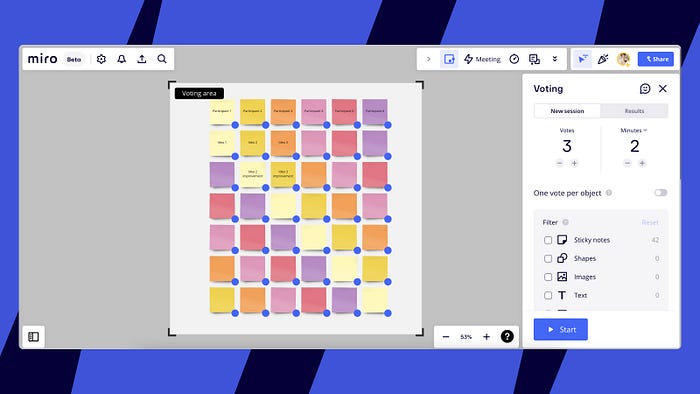
6. Prioritizing and voting
To determine the most important ideas or areas for improvement, take advantage of Miro’s voting feature. The facilitator can set the number of votes alloted for each participant, as well as define the voting area. Participants can use voting stickers or counters to indicate their preferences or level of agreement with specific ideas. This voting process helps prioritize the ideas with the highest consensus or impact. It ensures that the retrospective outcomes reflect the collective insights and priorities of the team.
Analyzing and reflecting on the findings
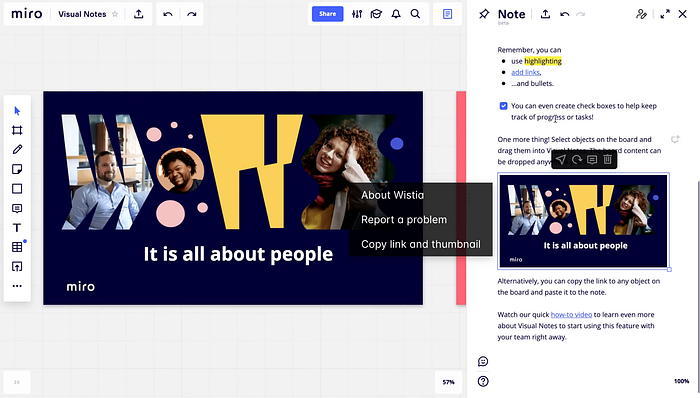
After the discussion and idea prioritization, summarize and document the key findings from the retrospective. Use Miro’s text boxes and visual notes to capture the main insights, observations, and identified areas for improvement. This documentation ensures that the retrospective outcomes are well-documented for future reference and action planning.
Analyzing patterns and themes
Review the data collected on the Miro board to identify patterns and themes that have emerged during the retrospective. Look for recurring ideas, common challenges, or shared suggestions. Analyzing these patterns provides deeper insights into the project’s strengths and weaknesses and helps identify overarching themes for further analysis and action.
Identifying actionable insights and areas for improvement
Based on the analyzed findings, identify actionable insights and specific areas for improvement. Highlight recommendations or opportunities that can enhance future design processes, team collaboration, or project outcomes. Focus on actionable items that can be implemented to address the identified issues or capitalize on the identified strengths.
Assigning responsibilities and action items
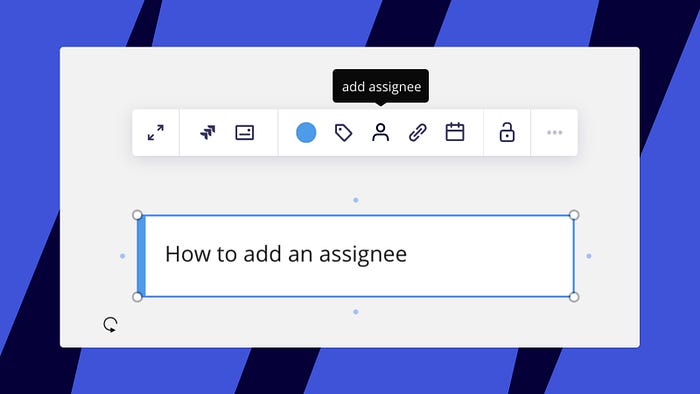
Assign responsibilities and action items based on the identified insights and areas for improvement. Clearly define the tasks, roles, and timelines for each action item. Use Miro’s collaboration features, such as adding assignees to specific task cards, to track and manage the responsibilities effectively. Ensure that each action item is assigned to a responsible individual or team, promoting accountability and follow-through.
Conclusion
Design retrospectives conducted in Miro provide a structured and collaborative approach to reflect on past projects, identify areas for improvement, and foster a culture of continuous learning and growth. By leveraging Miro’s capabilities, teams can maximize the benefits of retrospectives and drive positive changes in their design processes. Embracing the practice of regular retrospectives empowers teams to continuously evolve and deliver better design outcomes.
Recommend
About Joyk
Aggregate valuable and interesting links.
Joyk means Joy of geeK