

ast 抽象语法树 介绍与应用 - rxliuli blog
source link: https://blog.rxliuli.com/p/20e6bbeb20f64ae2aab867db3a33fa31/
Go to the source link to view the article. You can view the picture content, updated content and better typesetting reading experience. If the link is broken, please click the button below to view the snapshot at that time.
ast 抽象语法树 介绍与应用
8k 字
67 分钟
本文最后更新于:2023年4月22日 凌晨
ast 是什么?它是一种将文本转换为方便程序处理的结构化的数据。可能听到 ast,就会天然的觉得很复杂,但这其实取决于要处理的语言、工具库,如果都有像是 dom 那种封装的非常好的 api,也不会有人抱怨 ast 很复杂了。
下面引用 wiki 的描述
在计算机科学中,抽象语法树( AST ) 或语法树是用形式语言编写的文本(通常是源代码)的抽象语法结构的树表示。树的每个节点表示文本中出现的结构。
语法是 “抽象的”,因为它并不表示出现在真实语法中的每个细节,而只是结构或内容相关的细节。例如,分组括号隐含在树结构中,因此不必将它们表示为单独的节点。同样,像 if-condition-then 语句这样的句法结构可以通过具有三个分支的单个节点来表示。
一些应用的场景
- runtime: 运行时,有了 ast 之后就可以执行它,例如 quickjs 之类的嵌入式 js runtime
- compiler: 编译器,有了 ast 之后可以将之编译为机器指令,例如 golang/c 之类的语言的编译器
- editor: 代码编辑支持,编辑器的提示、报错等等,根据上下文提示可用的变量,例如 lsp 协议
- linter: 检查代码,检查代码中是否存在特定结构的代码,例如 eslint/tslint
- bundler: 需要找不到不同文件之间的引用关系,也需要处理各种模块,例如 rollup/webpack 之类的
- transpiler: 将代码翻译为另一种代码,例如 babel 将 esnext 翻译为 es2015 的代码
- generator: 代码生成器,从一些元数据生成代码,例如从 graphql 生成 ts 代码
基本上,从应用层面而言,最重要的功能是解析和序列化,即将一段代码解析为 ast 数据结构、以及将 ast 数据结构还原回代码的功能。得到 ast 数据结构之后,我们就可以操纵它了。不管是使用现有的工具函数(例如 document.querySelector 查找节点),还是自行实现一个递归算法,都能够做到查找以及修改的能力。
astexplorer 是一个好工具,它支持主流语言的 ast 可视化展示,包括与前端无关的
Go/Rust/Kotlin/Java等语言,对了解 ast 结构有很大的帮助。
例如下面这段 js 代码的 ast 的样子
const i = 1 + 2
注意,下面的 ast 结构中删除了代码位置的信息,它们通常不太重要,除非涉及到 sourcemap 之类的。
{
  "type": "Program",
  "body": [
    {
      "type": "VariableDeclaration",
      "declarations": [
        {
          "type": "VariableDeclarator",
          "id": {
            "type": "Identifier",
            "name": "i"
          },
          "init": {
            "type": "BinaryExpression",
            "left": {
              "type": "Literal",
              "value": 1,
              "raw": "1"
            },
            "operator": "+",
            "right": {
              "type": "Literal",
              "value": 2,
              "raw": "2"
            }
          }
        }
      ],
      "kind": "const"
    }
  ],
  "sourceType": "module"
}
也许你想问,ast 是否有某种形式的规范?或者不同的 ast 之间是否可以统一处理?
例如解析 js/go/rust 使用统一的方法解析,只是传入不同的解析器,并且有通用的 ast 工具
parse(`console.log('hello world')`, { lang: 'js' })
parse(
  `
package main

import "fmt"

func main() {
    fmt.Println("hello world")
}
`,
  { lang: 'go' },
)
parse(
  `
fn main() {
    println!("Hello World!");
}
`,
  { lang: 'rust' },
)
遗憾的是,ast 通常与语言强绑定,这也是为什么解析 go 通常需要使用 go,解析 rust 通常也需要 rust,除非某种语言足够流行,例如 xml/html/json/markdown/js,才会有不同语言的实现,但不同实现之间可能也有一些不同,例如 ts 和 babel 解析 js 代码得到的 ast 就存在巨大差异。
下面不会详述解析和序列化是如何完成的,而主要着重于应用场景,因为除非需要创建新的编程语言或 DSL,否则很少需要自己编写解析器,而通常使用现有的,例如 js 代码解析与序列化通常使用 babel。
对实现解析器感兴趣的话可以看 SICP 系列的课程
可能是最常用的 ast: dom
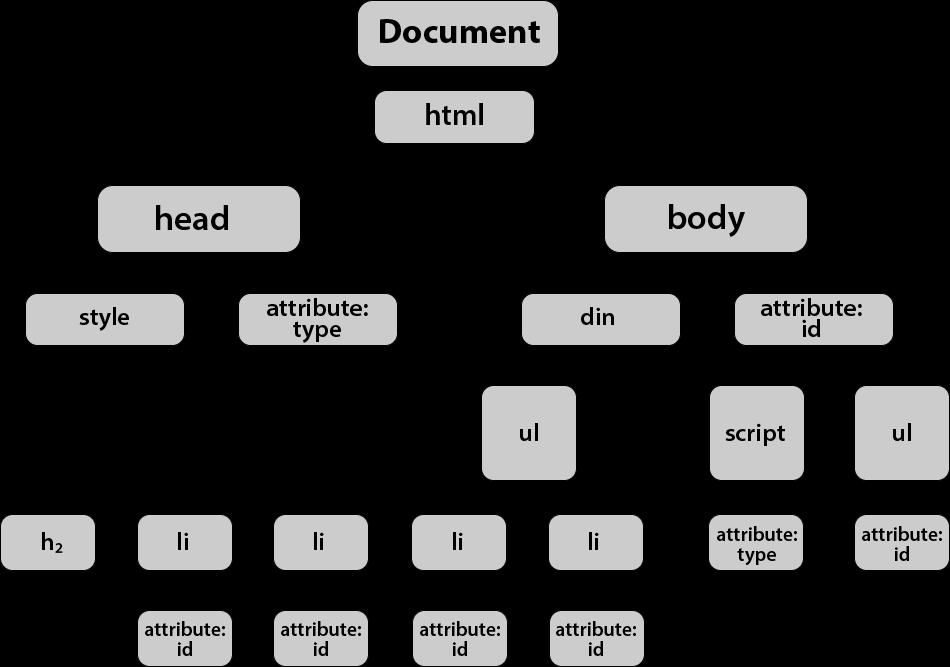
1673231996708.png
对于 web 前端而言,dom 是很熟悉的东西,在现代框架出现之前,不接触它是不可能的。现在通常使用 Document.querySelector 之类的库检索和操作 dom 树,最常见的操作是找到 dom 中的特定节点并做一些修改。
// 创建一个新的节点
const h1 = document.createElement('h1')
h1.textContent = 'hello world'

// 找到特定节点,然后将创建的节点追加进去
document.querySelector('#app')!.appendChild(h1)
例如下面这段非常简单 html 的 ast 结构如下
<a href="https://github.com/">github</a>
解析器: htmlparser2
{
  "type": "root",
  "children": [
    {
      "type": "tag",
      "children": [{ "type": "text", "data": "github" }],
      "name": "a",
      "attribs": { "href": "https://github.com/" }
    }
  ]
}
大部分时候可能并不会意识到这点,因为 dom 的 api 发展至今,已经非常好用了,如果用过其他的 xml 解析器,或许就更能感受到这点。不过 web api 也有可以解析 xml/html 文本的 DOMParser/XMLSerializer 接口,在动态渲染一些 html 时仍然有时候会使用到。
const parser = new DOMParser()
const root = parser.parseFromString(
  `<p>
  <a href="https://github.com/">github</a>
  <a href="https://google.com/">google</a>
</p>`,
  'text/html',
)
root.querySelectorAll('a').forEach((item) => {
  item.target = '_blank'
})
console.log(root.body.innerHTML)
处理 markdown 中的链接

1673232263982.png
如果你使用 markdown,或许你有时候也需要自动化处理其中的一些链接转换,例如为特定的 url 添加代理地址。
原始 markdown 内容


希望转换得到的 markdown 内容,即为 google 图片的地址添加代理服务,避免无法在 blog 显示的错误。同时也不能转换不相关的链接。


它的 ast 结构如下,可以清楚的看到完成上面的需要只要找到 image 类型的节点然后选择性替换链接即可。
解析器: mdast
[
  {
    "type": "root",
    "children": [
      {
        "type": "paragraph",
        "children": [
          {
            "type": "image",
            "title": null,
            "url": "resources/aaefd6438fcd48d68f62fc2478f1f857.png",
            "alt": "test"
          },
          { "type": "text", "value": "\n" },
          {
            "type": "image",
            "title": null,
            "url": "https://image-proxy.rxliuli.com/?url=https://lh3.googleusercontent.com/pw/AL9nZEUmvKBtRxGeG-J-0oVDVmdZccu0E0_HiDHaMPlvWBLp1v2wjaA152s9FxkIRFZROAChN-tYgimcK-ZYBFD_KGya40RzSKfDTVJqvoXjg5CsBmAaJPurSPdDmaDm6Bcunj4IxL_YPBnwtH0h7XdwaUxN=w1600-h1200-no",
            "alt": "1669384280333.png"
          }
        ]
      }
    ]
  }
]
实际上这件事情很简单,我们只需要过滤出来需要的节点并且修改就好了,下面主要使用 mdast 相关的包(它的上层封装 remark 可能更出名)来解析 markdown。
import { fromMarkdown } from 'mdast-util-from-markdown'
import { toMarkdown } from 'mdast-util-to-markdown'
import { Image } from 'mdast'
import { selectAll } from 'unist-util-select'
const s = `


`.trim()
const root = fromMarkdown(s)
;(selectAll('image', root) as Image[])
.filter((item) =>
item.url.startsWith('https://lh3.googleusercontent.com/pw/'),
)
.forEach(
(item) => (item.url = `https://image-proxy.rxliuli.com/?url=${item.url}`),
)
console.log(toMarkdown(root))
删除代码中的 console.log
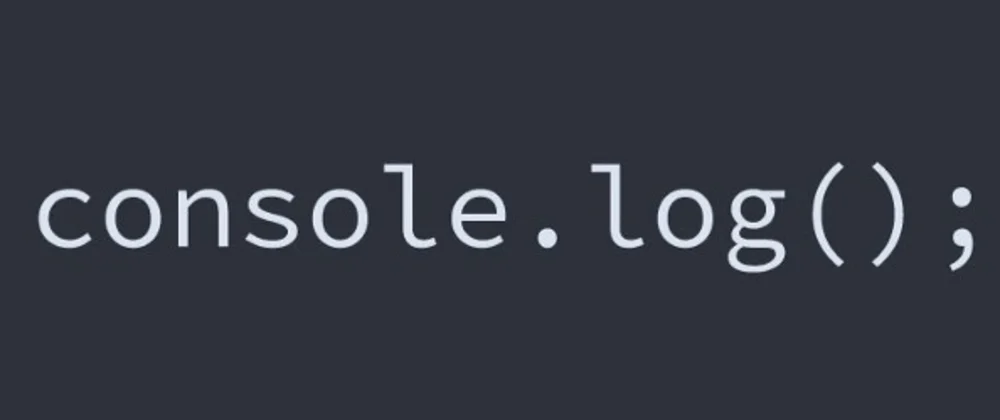
1673232301117.png
在使用构建工具编译代码时,会使用各种各样的配置和插件,像是有时候会在生产环境中删除 console.log 之类的,其实实现它也不算太难。
import { add } from './add'

console.log('hello world')
const i = add(1, 2)
console.log(`count: ${i}`)
下面使用 acorn 作为解析器、jscodeshift 作为 ast 工具库来实现。
import jscodeshift from 'jscodeshift'

const c = `import { add } from './add'

console.log('hello world')
const i = add(1, 2)
console.log(\`count: \${i}\`)`
const root = jscodeshift(c)
root
  .find(jscodeshift.CallExpression, {
    callee: {
      type: 'MemberExpression',
      object: {
        type: 'Identifier',
        name: 'console',
      },
      property: {
        type: 'Identifier',
        name: 'log',
      },
    },
  })
  .remove()
console.log(root.toSource())
bundler 支持额外类型的文件导入
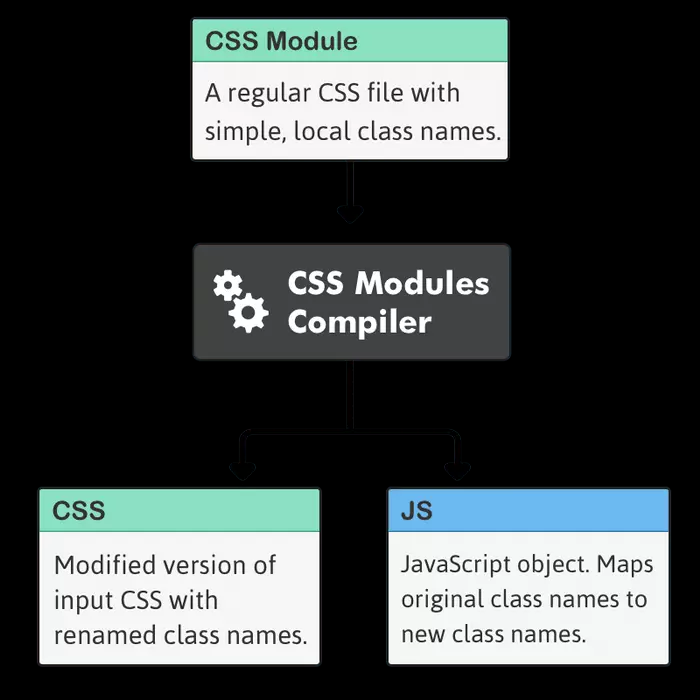
1673234439776.png
在实际的代码开发中,我们不仅仅会使用 js,也会使用 ts/image/json/graphql/css/… 等等各类文件,构建工具是如何正确的处理它们的呢?
例如以下使用 css module 的场景,在 js 中导入了一个 css 文件,然后像使用 js 变量一样使用它,就像魔法一样,这是如何做到的呢?
.app {
  display: none;
}
import css from './style.module.css'

console.log(css.app)
其实这主要归功于构建工具,它解析并找到了 .module.css 后缀名的文件,然后将所有类选择器转换为随机名称,并创建一个 js 对象替换这个导入供 js 使用。例如以上代码会被编译为
._app_1dhlq_7 {
  display: none;
}
const app = '_app_1dhlq_7'
const css = {
  app: app,
}

console.log(css)
下面简单实现 css 的转换部分,首先看一下它的 ast
{
  "type": "StyleSheet",
  "children": [
    {
      "type": "Rule",
      "prelude": {
        "type": "SelectorList",
        "children": [
          {
            "type": "Selector",
            "children": [{ "type": "ClassSelector", "name": "app" }]
          }
        ]
      },
      "block": {
        "type": "Block",
        "children": [
          {
            "type": "Declaration",
            "important": false,
            "property": "display",
            "value": {
              "type": "Value",
              "children": [{ "type": "Identifier", "name": "none" }]
            }
          }
        ]
      }
    }
  ]
}
基本思路很简单,找到所有的 ClassSelector 然后替换名字并添加映射即可。
import * as csstree from 'css-tree'
import { nanoid } from 'nanoid'

function extractClassVars(code: string): {
  code: string
  vars: Record<string, string>
} {
  const root = csstree.parse(`.app { display: none; }`)
  const vars: Record<string, string> = {}
  csstree.walk(root, (item) => {
    if (item.type !== 'ClassSelector') {
      return
    }
    if (!vars[item.name]) {
      vars[item.name] = nanoid()
    }
    item.name = vars[item.name]
  })
  return {
    code: csstree.generate(root),
    vars,
  }
}

const r = extractClassVars('.app { display: none; }')
console.log(r) // { code: '.Wkq09lhW8-LX_Tn7-johv{display:none}', vars: { app: 'Wkq09lhW8-LX_Tn7-johv' } }
然后使用 vars 替换掉 import 即可,不过这部分是构建工具相关所以暂且跳过。
下面是一些在现有项目中使用到的实际用例
- vue3 setup script 语法 – 在 vite-vue-plugin 中通过 @vue/compiler-dom 处理
- 在编写 graphql 文件时自动生成 ts 文件 – rollup-plugin-graphql-codegen
- 在构建 web 应用时自动将版本号添加到 dist/index.html 中 – vite-plugin-standard-info
- 从 som 元数据生成类型以在查询 som 数据时能够正确使用 class/components – som-codegen
- 从 openapi schema 中生成所有后端服务接口的类型定义 – faas-openapi
- 为使用的环境变量生成类型定义 ImportMeta – vite-plugin-env-dts-gen
- 加载应用的 webApp.js 时自动将 ipc-main bundle 进去 – esbuild-wasm
现有的解析器
astexplorer 中可以看常用语言的解析器,可以选择适合自己的
| 语言 | 包 | 说明 |
|---|---|---|
| javascript | acorn | js 解析器 |
| typescript | typescript/swc | ts 解析器,typescript 是官方解析器,但更复杂。swc 基于 rust |
| markdown | mdast | 最适合编程的 markdown 解析器,社区最大 |
| css | css-tree | 比较简单的 css 解析工具 |
| html | node-html-parser | 适用于 nodejs 快速的 html 解析器 |
| env | dotenv | 环境变量解析器 |
| yaml | yaml | yaml 解析器 |
一些工具包
| 名字 | 说明 |
|---|---|
| jscodeshift | 类似于 jq 的上层封装,基于 ast-types |
| ast-types | 通用的 js/ts ast 抽象,但实现在某些细微之处有问题 |
操纵 ast 可以完成很多有趣的事情,包括但不限于代码生成、修改和运行,它们虽然在一般的业务开发中少有涉猎,但更下层的许多基础设施非常依赖它,也是是前端工程化中绕不过去的部分。
Recommend
About Joyk
Aggregate valuable and interesting links.
Joyk means Joy of geeK