

Core Data with CloudKit(二) —— 同步本地数据库到 iCloud 私有数据库
source link: https://www.fatbobman.com/posts/coreDataWithCloudKit-2/
Go to the source link to view the article. You can view the picture content, updated content and better typesetting reading experience. If the link is broken, please click the button below to view the snapshot at that time.
Core Data with CloudKit(二) —— 同步本地数据库到 iCloud 私有数据库
本篇文章中,我们将探讨Core Data with CloudKit应用中最常见的场景——将本地数据库同步到iCloud私有数据库。我们将从几个层面逐步展开:
- 在新项目中直接支持
Core Data with CloudKit - 创建可同步
Model的注意事项 - 在现有项目
Core Date中添加Host in CloudKit支持 - 有选择的同步数据
本文使用的开发环境为
Xcode 12.5。关于私有数据库的概念,请参阅 Core Data with CloudKit (一) —— 基础。如想实际操作本文内容,需要拥有 Apple Developer Program 账号。
Core Data with CloudKit (一) —— 基础
Core Data with CloudKit(二) —— 同步本地数据库到 iCloud 私有数据库
Core Data with CloudKit(三)—— CloudKit 仪表台
Core Data with CloudKit(四)—— 调试、测试、迁移及其他
Core Data with CloudKit(五)—— 同步公共数据库
Core Data with CloudKit (六) —— 创建与多个 iCloud 用户共享数据的应用
健康笔记适用于任何有健康管理需求的人士。提供了强大的自定义数据类型功能,可以记录生活中绝大多数的健康项目数据。你可以为每个家庭成员创建各自的记录笔记,或者针对某个特定项目、特定时期创建对应的笔记。
在应用程序中启用Core Data with CloudKit 功能,只需要以下几步:
- 使用
NSPersistentCloudKitContainer - 在
项目 Target的Signing&Capablities中添加CloudKit支持 - 为项目创建或指定
CloudKit container - 在
项目 Target的Signing&Capablities中添加background支持 - 配置
NSPersistentStoreDescription以及viewContext - 检查
Data Model是否满足同步的要求
在新项目中直接支持 Core Data with CloudKit
在最近几年苹果不断完善Xcode的Core Data 模版,直接使用自带模版来新建一个支持Core Data with CloudKit的项目是最便捷的入手方式。
创建新的 Xcode 项目
创建新项目,在项目设置界面勾选Use Core Data及Host in CloudKit(早期版本为Use CloudKit),并设置开发团队(Team)
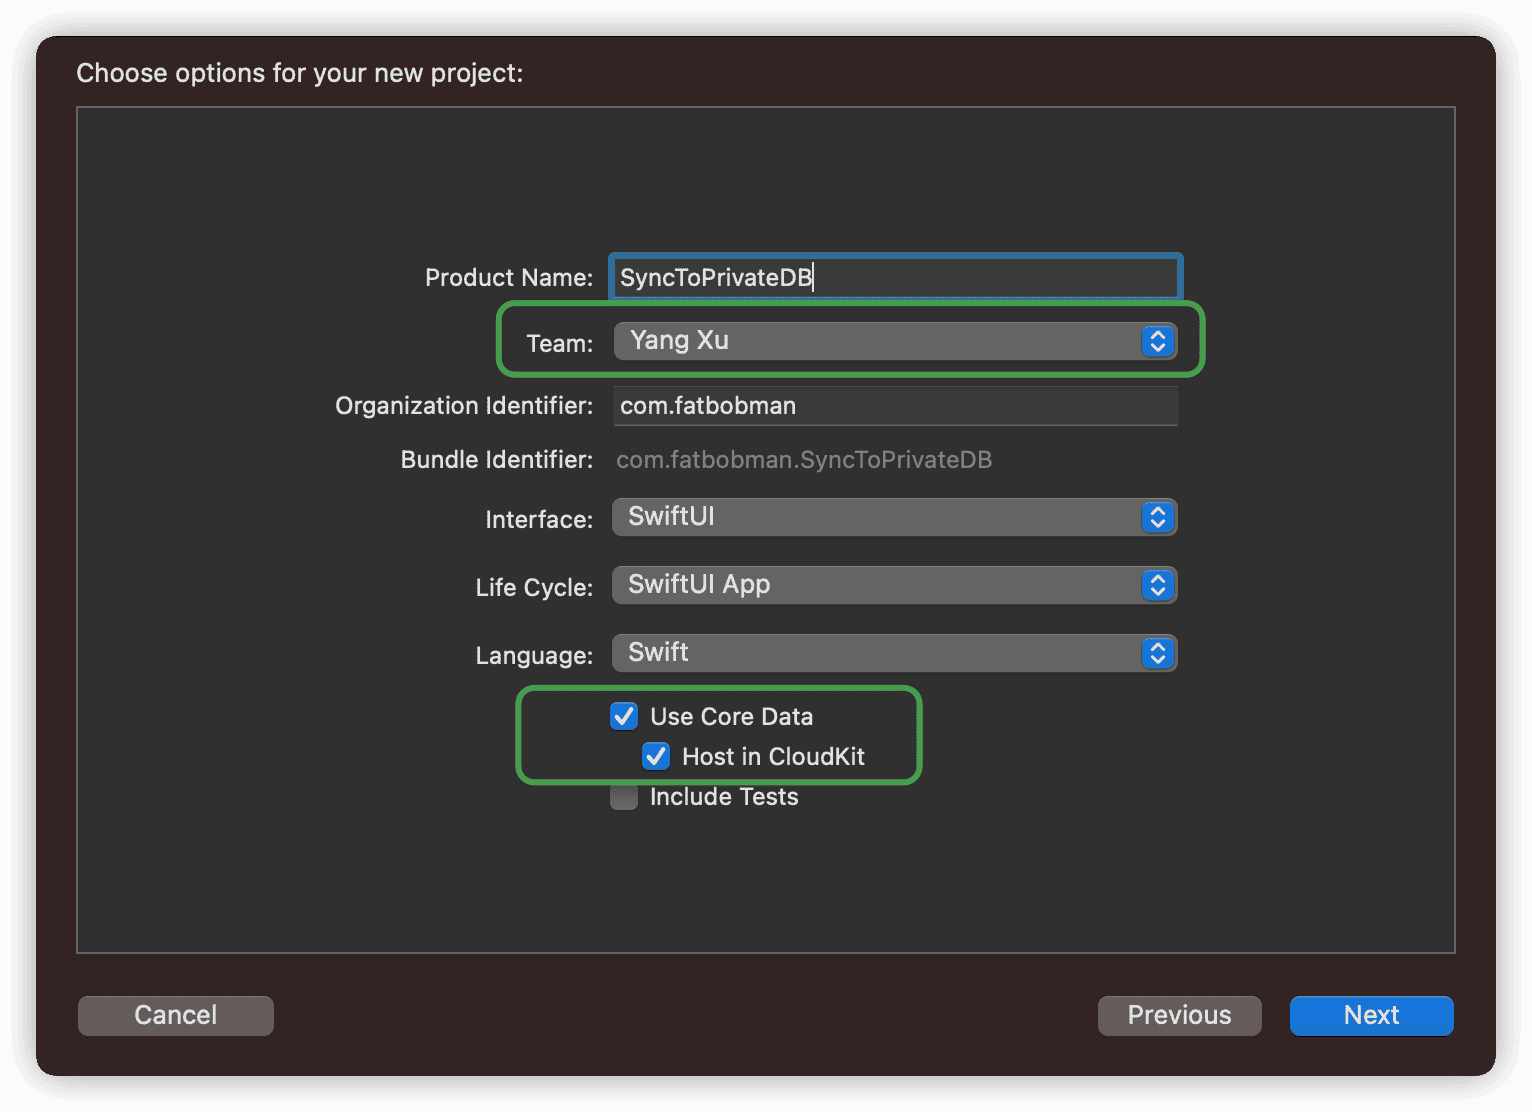
设定保存地址后,Xcode 将使用预置模版为你生成包含Core Data with CloudKit支持的项目文档。
Xcode 可能会提醒新项目代码有错误,如果觉得烦只需要 Build 一下项目即可取消错误提示(生成 NSManagoedObject Subclass)
接下来,我们根据快速指南逐步操作。
设置 PersistentCloudKitContainer
Persistence.swift是官方模版创建的Core Data Stack。由于在创建项目的时候已经选择了Host in CloudKit,因此模版代码已直接使用NSPersistentCloudKitContianer替代NSPersistentContianer,无需进行修改。
let container: NSPersistentCloudKitContainer
启用 CloudKit
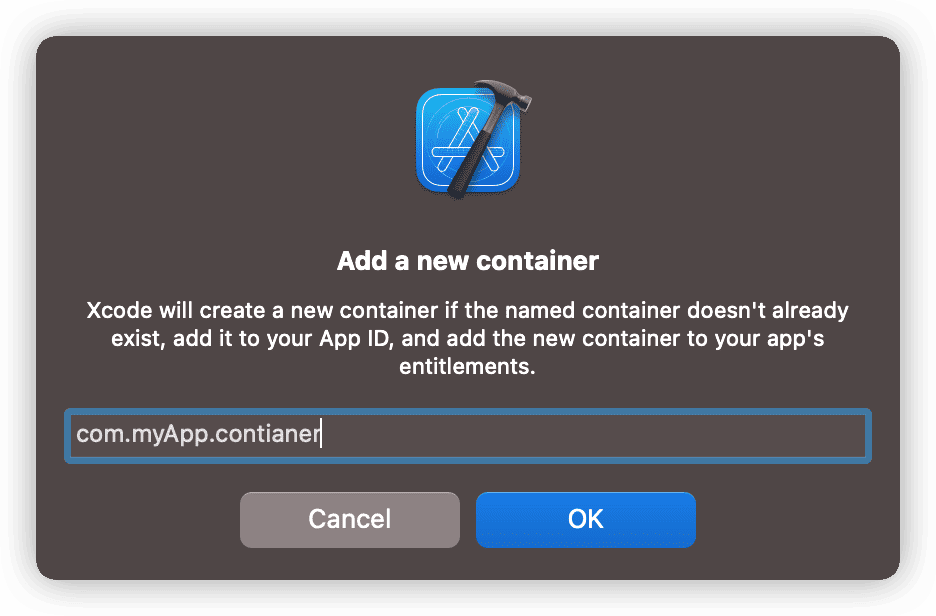
点击项目中对应的Target,选择Signing&Capabilities。点击+Capability查找icloud添加CloudKit支持。


勾选CloudKit。点击+,输入CloudKit container名称。Xcode 会在你CloutKit container名称的前面自动添加iCloud.。container的名称通常采用反向域名的方式,无需和项目或BundleID一致。如果没有配置开发者团队,将无法创建container。
在添加了CloudKit支持后,Xcode 会自动为你添加Push Notifications功能,原因我们在上一篇聊过。
启用后台通知
继续点击+Capability,搜索backgroud并添加,勾选Remote notifications
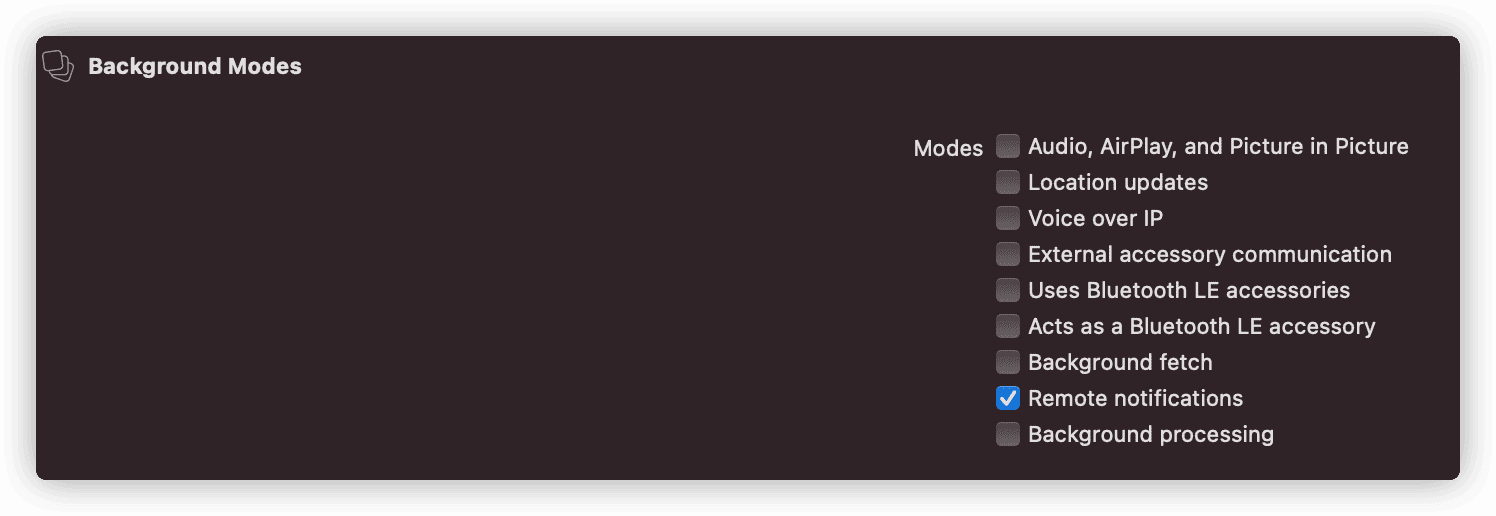
此功能让你的应用程序能够响应云端数据内容变化时推送的静默通知。
配置 NSPersistentStoreDescription 和 viewContext
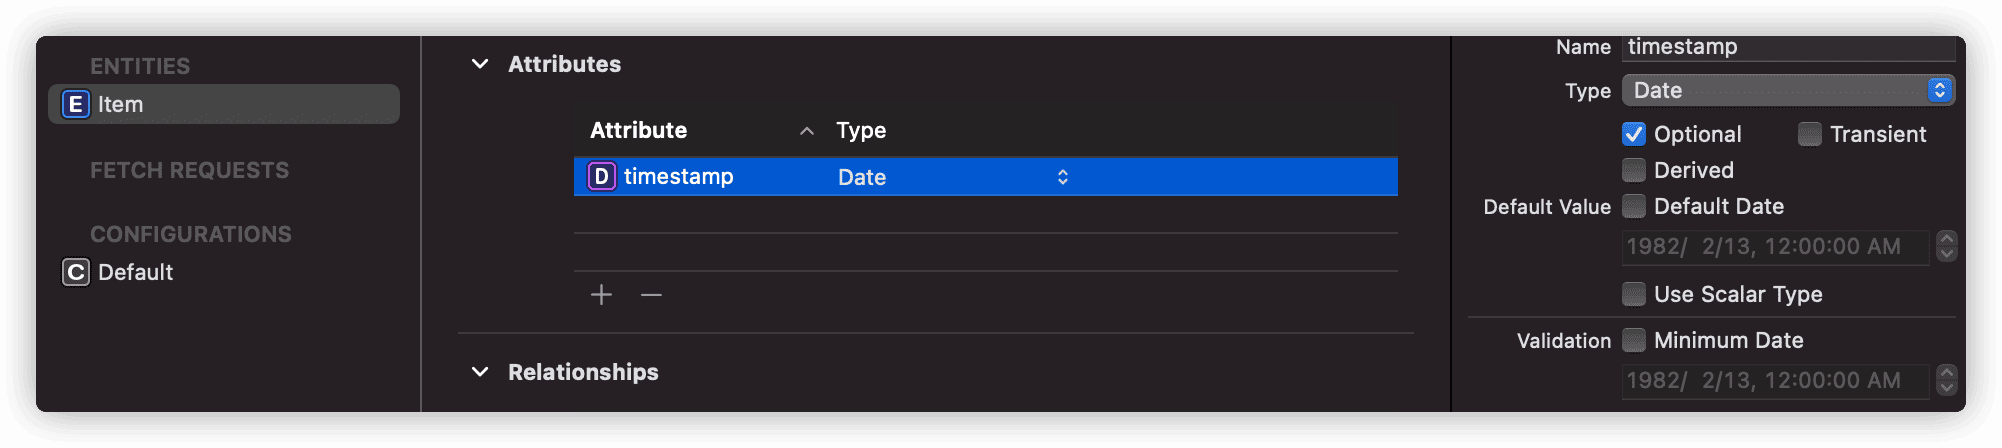
查看当前项目中的.xcdatamodeld文件,CONFIGURATIONS中只有一个默认配置Default,点击可以看到,右侧的Used with CloudKit已经被勾选上了。

如果开发者没有在Data Model Editor中自定义Configuration,如果勾选了Used with CloudKit,Core Data会使用选定的Cloudkit container设置cloudKitContainerOptions。因此在当前的Persistence.swift代码中,我们无需对NSPersistentStoreDescription做任何额外设置(我们会在后面的章节介绍如何设置NSPersistentStoreDescription`)。
在Persistence.swift对上下文做如下配置:
container.loadPersistentStores(completionHandler: { (storeDescription, error) in
       if let error = error as NSError? {
              ...
                fatalError("Unresolved error \(error), \(error.userInfo)")
        }
})
//添加如下代码
container.viewContext.automaticallyMergesChangesFromParent = true
container.viewContext.mergePolicy = NSMergeByPropertyObjectTrumpMergePolicy
do {
      try container.viewContext.setQueryGenerationFrom(.current)
} catch {
     fatalError("Failed to pin viewContext to the current generation:\(error)")
}
container.viewContext.automaticallyMergesChangesFromParent = true让视图上下文自动合并服务器端同步(import)来的数据。使用@FetchRequest或NSFetchedResultsController的视图可以将数据变化及时反应在 UI 上。
container.viewContext.mergePolicy = NSMergeByPropertyObjectTrumpMergePolicy设定合并冲突策略。如果不设置该属性,Core Data会默认使用NSErrorMergePolicy作为冲突解决策略(所有冲突都不处理,直接报错),这会导致iCloud的数据无法正确合并到本地数据库。
Core Data预设了四种合并冲突策略,分别为:
- NSMergeByPropertyStoreTrumpMergePolicy
逐属性比较,如果持久化数据和内存数据都改变且冲突,持久化数据胜出
- NSMergeByPropertyObjectTrumpMergePolicy
逐属性比较,如果持久化数据和内存数据都改变且冲突,内存数据胜出
- NSOverwriteMergePolicy
内存数据永远胜出
- NSRollbackMergePolicy
持久化数据永远胜出
对于Core Data with CloudKit这样的使用场景,通常会选择NSMergeByPropertyObjectTrumpMergePolicy。
setQueryGenerationFrom(.current)这个是在最近才出现在苹果的文档和例程中的。目的是避免在数据导入期间应用程序产生的数据变化和导入数据不一致而可能出现的不稳定情况。尽管在我两年多的使用中,基本没有遇到过这种情况,但我还是推荐大家在代码中增加上下文快照的锁定以提高稳定性。
直到
Xcode 13 beta4苹果仍然没有在预置的Core Data with CloudKit模版中添加上下文的设置,这导致使用原版模版导入数据的行为会和预期有出入,对初学者不很友好。
检查 Data Model 是否满足同步的要求
模版项目的 Data Model 非常简单,只有一个Entity且只有一个Attribute,当下无需做调整。Data Model的同步适用规则会在下个章节详细介绍。
修改 ContentView.swift
提醒:模版生成的 ContentView.swift 是不完整的,需修改后方能正确显示。
    var body: some View {
        NavigationView { // 添加 NavigationView
            List {
                ForEach(items) { item in
                    Text("Item at \(item.timestamp!, formatter: itemFormatter)")
                }
                .onDelete(perform: deleteItems)
            }
            .toolbar {
                HStack { // 添加 HStack
                    EditButton()
                    Button(action: addItem) {
                        Label("Add Item", systemImage: "plus")
                    }
                }
            }
        }
    }
修改后,可以正常显示 Toolbar 按钮了。
至此,我们已经完成了一个支持Core Data with CloudKit的项目了。
在模拟器上或实机上设置并登录相同的iCloud账户,只有同一个账户才能访问同一个iCloud私有数据库。
下面的动图,是在一台实机(Airplay投屏)和一个模拟器上的运行效果。
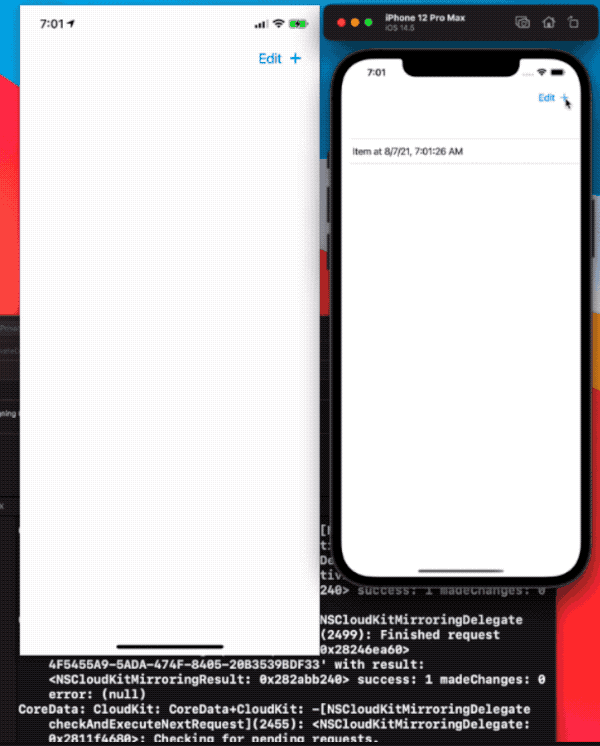
视频经过剪辑,数据的同步时间通常为 15-20 秒左右。
从模拟器上进行的操作(添加、删除)通常会在 15-20 秒中左右会反应到实机上;但从实机上进行的操作,则需要将模拟器切换到后台再返回前台才能在模拟器中体现出来(因为模拟器不支持静默通知响应)。如果是在两个模拟器间进行测试,两端都需要做类似操作。
苹果文档对同步+分发的时间描述为不超过 1 分钟,在实际使用中通常都会在 10-30 秒左右。支持批量数据更新,无需担心大量数据更新的效率问题。
当数据发生变化时,控制台会有大量的调试信息产生,之后会有专文涉及更多关于调试方面的内容。
创建可同步 Model 的注意事项
要在Core Data和CloudKit数据库之间完美地传递记录,最好对双方的数据结构类型有一定的了解,具体请参阅 Core Data with CloudKit (一) —— 基础。
CloudKit Schema并不支持Core Data Model的所有功能、配置,因此在设计可同步的Core Data项目时,请注意以下限制,并确保你创建了一个兼容的数据模型。
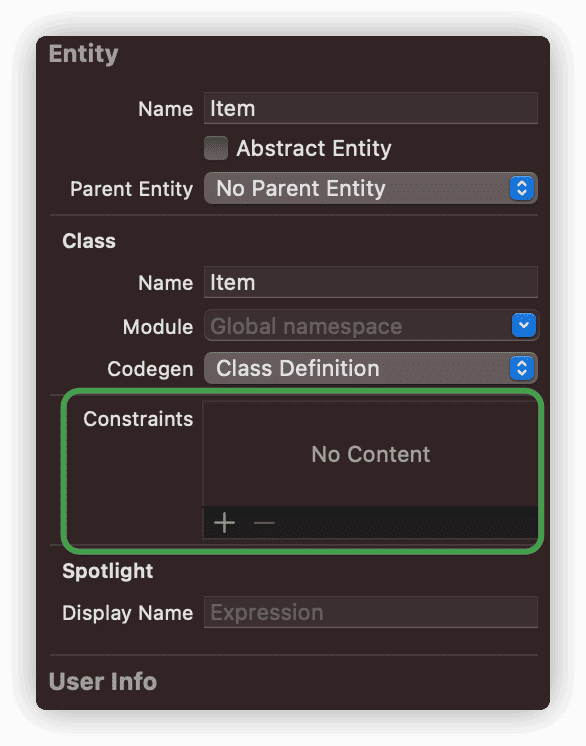
Enitites
CloudKit Sechma不支持Core Data的唯一限制(Unique constraints)
Core Data的Unique constraints需要SQLite提供支持,CloudKit本身并非关系型数据库,因此不支持并不意外。
CREATE UNIQUE INDEX Z_Movie_UNIQUE_color_colors ON ZMOVIE (ZCOLOR COLLATE BINARY ASC, ZCOLORS COLLATE BINARY ASC)
Attributes
- 不可以有即为
非可选值又没有默认值的属性。允许:可选 、有默认值、可选 + 有默认值
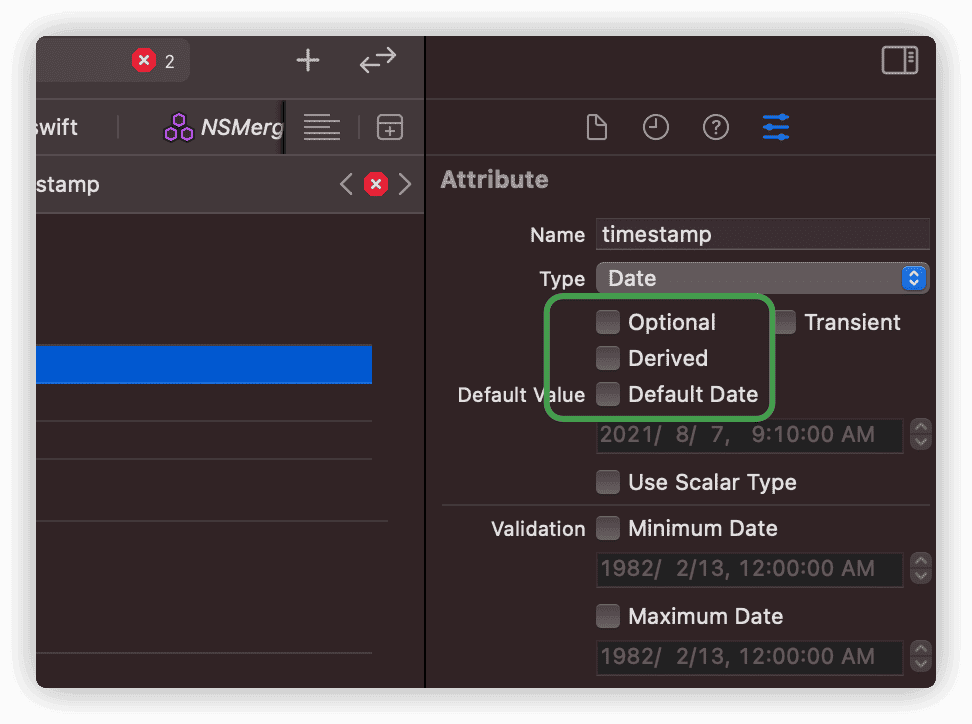
上图中的属性 非 Optional 且 没有 Default Value是不兼容的形式,Xcode会报错。
- 不支持
Undefined类型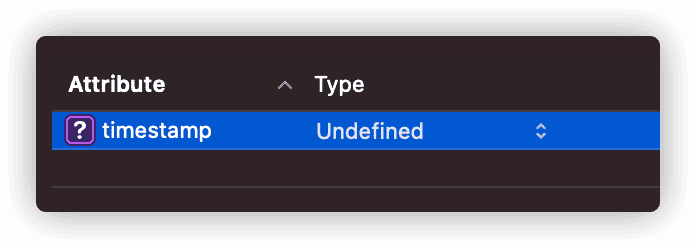
Relationships
- 所有的 relationship 必须设置为可选(
Optional) - 所有的 relationship 必须有逆向(
Invers)关系 - 不支持
Deny的删除规则
CloudKit本来也有一种类似于Core Data关系类型的对象——CKReference。不过该对象最多只能支持对应 750 条记录,无法满足大多数Core Data应用场景的需要,CloudKit采用将Core Data的关系转换成Record Name(UUID字符串形式)逐条对应,这导致CloudKit可能不会原子化(atomically)地保存关系变化,因此对关系的定义做出了较严格的限制。
在Core Data日常始终中,多数的关系定义还是能满足上述的要求。
Configurations
- 实体(
Entity)不得与其他配置(Configuration)中的实体建立relationship
官方文档中这个限制我比较困惑,因为即使不采用网络同步,开发者也通常不会为两个Configuration中的实体建立relationship。如果需要建立联系,通常会采用创建Fetched Properties。
在启用
CloudKit同步后,如果Model不满足同步兼容条件时Xcode会报错提醒开发者。在将已有项目更改为支持Core Data with CloudKit时,可能需要对代码做出一定的修改。
在现有 Core Data 项目中添加 Host in CloudKit 支持
有了模版项目的基础,将Core Data项目升级为支持Core Data with CloudKit也就非常容易了:
- 使用
NSPersistentCloudKitContainer替换NSPersistentContainer - 添加
CloudKit、background功能并添加CloudKit container - 配置上下文
以下两点仍需提醒:
CloudKit container无法认证
添加CloudKit container时,有时候会出现无法认证的情况。尤其是添加一个已经创建的container,该情况几乎必然发生。
CoreData: error: CoreData+CloudKit: -[NSCloudKitMirroringDelegate recoverFromPartialError:forStore:inMonitor:]block_invoke(1943): <NSCloudKitMirroringDelegate: 0x282430000>: Found unknown error as part of a partial failure: <CKError 0x28112d500: "Permission Failure" (10/2007); server message = "Invalid bundle ID for container"; uuid = ; container ID = "iCloud.Appname">
解决的方法为:登录开发者账户->Certificates,Identifiers&Profiles->Identifiers App IDs,选择对应的BundleID,配置iCloud,点击Edit,重新配置container。

使用自定义的NSPersistentStoreDescription
有些开发者喜欢自定义NSPersistentDescription(即使只有一个Configuration), 这种情况下,需要显式为NSPersistentDescription设置cloudKitContainerOptions,例如:
let cloudStoreDescription = NSPersistentStoreDescription(url: cloudStoreLocation)
cloudStoreDescription.configuration = "Cloud"

cloudStoreDescription.cloudKitContainerOptions = NSPersistentCloudKitContainerOptions(containerIdentifier: "your.containerID")
即使不将Model Editor中的Configuration设置为Used with CloudKit,网络同步功能同样生效。勾选Used with CloudKit的最大好处是:Xcode会帮你检查Model是否兼容CloudKit。
有选择的同步数据
在实际应用中,有某些场景我们想有选择性地对数据进行同步。通过在Data Model Editor中定义多个Configuration,可以帮助我们实现对数据同步的控制。
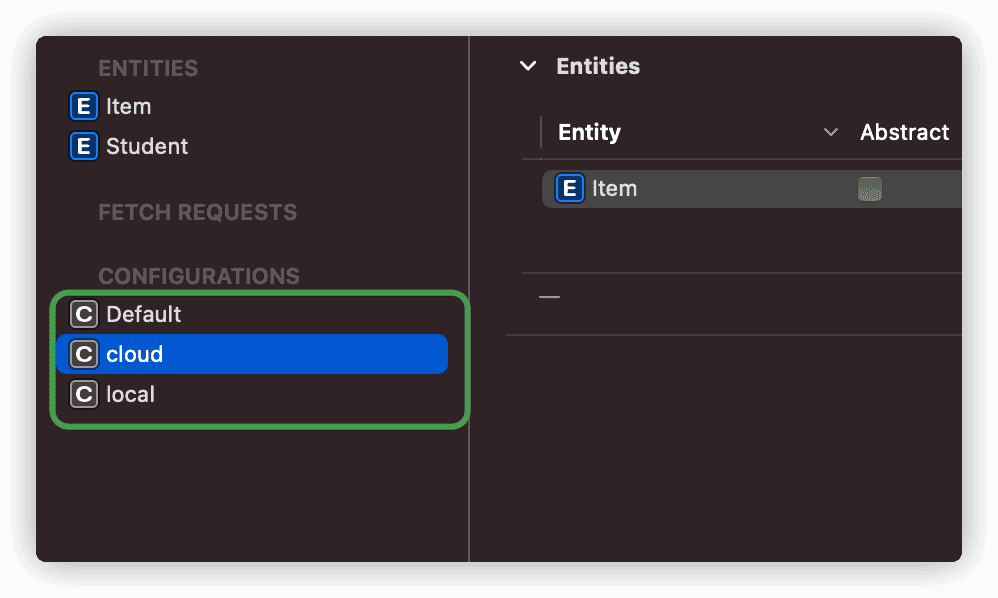
配置Configuration非常简单,只需将Entity拖入其中即可。
在不同的 Configuration 中放置不同的 Enitity
假设以下场景,我们有一个Entity——Catch,用于作为本地数据缓存,其中的数据不需要同步到 iCloud 上。
苹果的官方文档以及其他探讨 Configuration 的资料基本上都是针对类似上述这种情况
我们创建两个Configuration:
- local——
Catch - cloud——其他需要同步的
Entities
采用类似如下的代码:
let cloudURL = FileManager.default.urls(for: .documentDirectory, in: .userDomainMask).first!
              .appendingPathComponent("cloud.sqlite")
let localURL = FileManager.default.urls(for:.documentDirectory, in:.userDomainMask).first!
              .appendingPathComponent("local.sqlite")

let cloudDesc = NSPersistentStoreDescription(url: cloudURL)
cloudDesc.cloudKitContainerOptions = NSPersistentCloudKitContainerOptions(containerIdentifier: "your.cloudKit.container")
cloudDesc.configuration = "cloud"

let localDesc = NSPersistentStoreDescription(url: localURL)
localDesc.configuration = "local"

container.persistentStoreDescriptions = [cloudDesc,localDesc]
只有Configuration cloud中的Entities数据会被同步到iCloud上。
我们不可以在跨Configuration的Entity之间创建relationship,如确有需要可以使用Fetched Preoperties达到受限的近似效果
在不同的 Configuration 中放置同一个 Entity
如果想对同一个Entity的数据进行同步控制(部分同步),可以使用下面的方案。
场景如下:假设有一个Entity——Movie,无论出于什么理由,你只想对其中的部分数据进行同步。
- 为
Movie增加一个Attribute——local:Bool(本地数据为true,同步数据为false)
- 创建两个
Configuration——cloud、local,在两个Configuration中都添加上Moive
- 采用和上面一样的代码,在
NSPersistentCloudKitContainer中添加两个Description
当fetch Movie的时候,NSPersistentCoordinator会自动合并处理两个Store里面的Moive记录。不过当写入Movie实例时,协调器只会将实例写到最先包含Movie的Description,因此需要特别注意添加的顺序。
比如container.persistentStoreDescriptions = [cloudDesc,localDesc],在container.viewContext中新建的Movie会写入到cloud.sqlite中
- 创建一个
NSPersistentContainer命名为localContainer,只包含localDesc(多container方案)
- 在
localDesc上开启Persistent History Tracking
- 使用
localContainer创建上下文写入Movie实例(实例将只保存到本地,而不进行网络同步)
- 处理
NSPersistentStoreRemoteChange通知,将从localContainer中写入的数据合并到container的viewContext中
以上方案需要使用Persistent History Tracking,更多资料可以查看我的另一篇文章 【在 CoreData 中使用持久化历史跟踪】。
在本文中,我们探讨了如何实现将本地数据库同步到iCloud私有数据库。
下一篇文章让我们一起探讨如何使用CloudKit仪表台。从另一个角度认识Core Data with CloudKit。
希望本文能够对你有所帮助。同时也欢迎你通过 Twitter、 Discord 频道或下方的留言板与我进行交流。
Recommend
About Joyk
Aggregate valuable and interesting links.
Joyk means Joy of geeK