

实时分布式低延迟OLAP数据库Apache Pinot探索实操 - itxiaoshen
source link: https://www.cnblogs.com/itxiaoshen/p/17320375.html
Go to the source link to view the article. You can view the picture content, updated content and better typesetting reading experience. If the link is broken, please click the button below to view the snapshot at that time.
实时分布式低延迟OLAP数据库Apache Pinot探索实操
Apache Pinot 官网地址 https://pinot.apache.org/ 最新版本0.12.1
Apache Pinot 官网文档地址 https://docs.pinot.apache.org/
Apache Pinot 源码地址 https://github.com/apache/pinot
Apache Pinot是一个实时分布式OLAP数据存储,专为低延迟高吞吐量分析而构建,非常适合面向用户的分析的工作。Pinot 携手 Kafka 和 Presto 提供面向用户的分析。
Pinot可直接从流数据源(如Apache Kafka和Amazon Kinesis)中摄取数据,基于实时事件实现即时的查询。还可以从批处理数据源中摄取数据,如Hadoop HDFS、Amazon S3、Azure ADLS和谷歌云存储。核心采用列式存储,基于智能索引和预聚合技术实现低延迟;还提供内部仪表板、异常检测和临时数据探索。
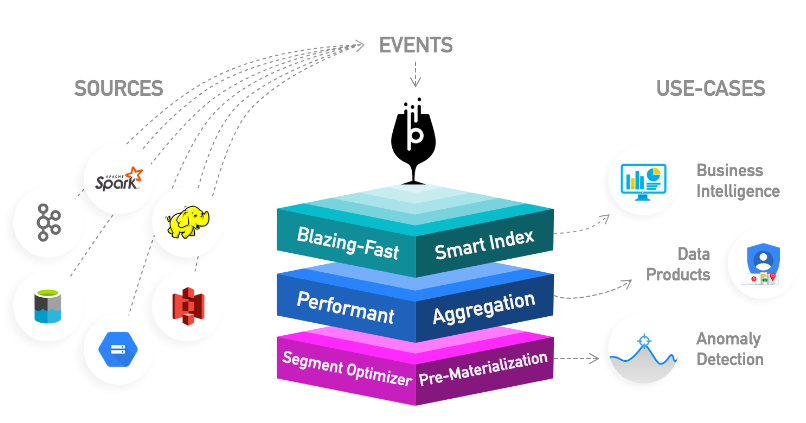
Pinot最初是在LinkedIn上构建的,用于支持丰富的交互式实时分析应用程序,如Who Viewed Profile, Company Analytics, Talent Insights等等。
- 面向列:面向列的存储技术,并提供各种压缩方案。
- 可插索引:可插拔的索引技术,支持排序索引、位图索引、倒排索引。
- 查询优化:能够基于查询和段元数据优化查询/执行计划。
- 来自Kafka、Kinesis等流的近实时摄取,以及来自Hadoop、S3、Azure、GCS等源的批量摄取
- 类似sql的语言,支持对数据的选择、聚合、过滤、分组、排序和不同的查询。
- 支持多值字段
- 水平可扩展和容错
Pinot旨在为大型数据集提供低延迟查询;为了实现这一性能,Pinot以列式格式存储数据,并添加额外的索引来执行快速过滤、聚合和分组。原始数据被分解成小的数据碎片,每个碎片被转换成一个称为段的单位。一个或多个段一起形成一个表,这是使用SQL/PQL查询Pinot的逻辑容器。Pinot非常适合查询具有许多维度和指标的时间序列数据。Pinot不是数据库的替代品,也即是它不能用作真值存储的来源,不能改变数据。虽然Pinot支持文本搜索,但它并不能取代搜索引擎。此外,默认情况下,Pinot查询不能跨多个表,但可以使用Trino-Pinot连接器或preto-pinot连接器来实现表连接和其他功能。主要使用场景如下:
- 面向用户分析的产品
- 用于业务指标的实时仪表板
Local安装
# 下载Pinot发行版最新版本0.12.1,需要JDK11或以上版本,JDK16除外
PINOT_VERSION=0.12.1
wget https://downloads.apache.org/pinot/apache-pinot-$PINOT_VERSION/apache-pinot-$PINOT_VERSION-bin.tar.gz
# 解压文件
tar -zxvf apache-pinot-$PINOT_VERSION-bin.tar.gz
# 导航到包含启动程序脚本的目录:
cd apache-pinot-$PINOT_VERSION-bin
# 有两种方法启动:快速启动或手动设置集群。
# Pinot附带快速启动命令,可以在同一进程中启动Pinot组件实例,并导入预构建的数据集。下面的快速启动命令启动预装棒球数据集的Pinot,所有可用的快速入门命令列表请参见快速入门示例。
./bin/pinot-admin.sh QuickStart -type batch
手动设置集群
# 如果想处理更大的数据集(超过几兆字节),可以单独启动Pinot各个组件,并将它们扩展到多个实例
# 启动Zookeeper
./bin/pinot-admin.sh StartZookeeper \
  -zkPort 2191
# 启动Pinot Controller
export JAVA_OPTS="-Xms4G -Xmx8G -XX:+UseG1GC -XX:MaxGCPauseMillis=200 -Xloggc:gc-pinot-controller.log"
./bin/pinot-admin.sh StartController \
    -zkAddress localhost:2191 \
    -controllerPort 9000
# 启动Pinot Broker
export JAVA_OPTS="-Xms4G -Xmx4G -XX:+UseG1GC -XX:MaxGCPauseMillis=200 -Xloggc:gc-pinot-broker.log"
./bin/pinot-admin.sh StartBroker \
    -zkAddress localhost:2191
# 启动Pinot Server
export JAVA_OPTS="-Xms4G -Xmx16G -XX:+UseG1GC -XX:MaxGCPauseMillis=200 -Xloggc:gc-pinot-server.log"
./bin/pinot-admin.sh StartServer \
    -zkAddress localhost:2191
# 启动Kafka
./bin/pinot-admin.sh  StartKafka \
  -zkAddress=localhost:2191/kafka \
  -port 19092
Docker安装
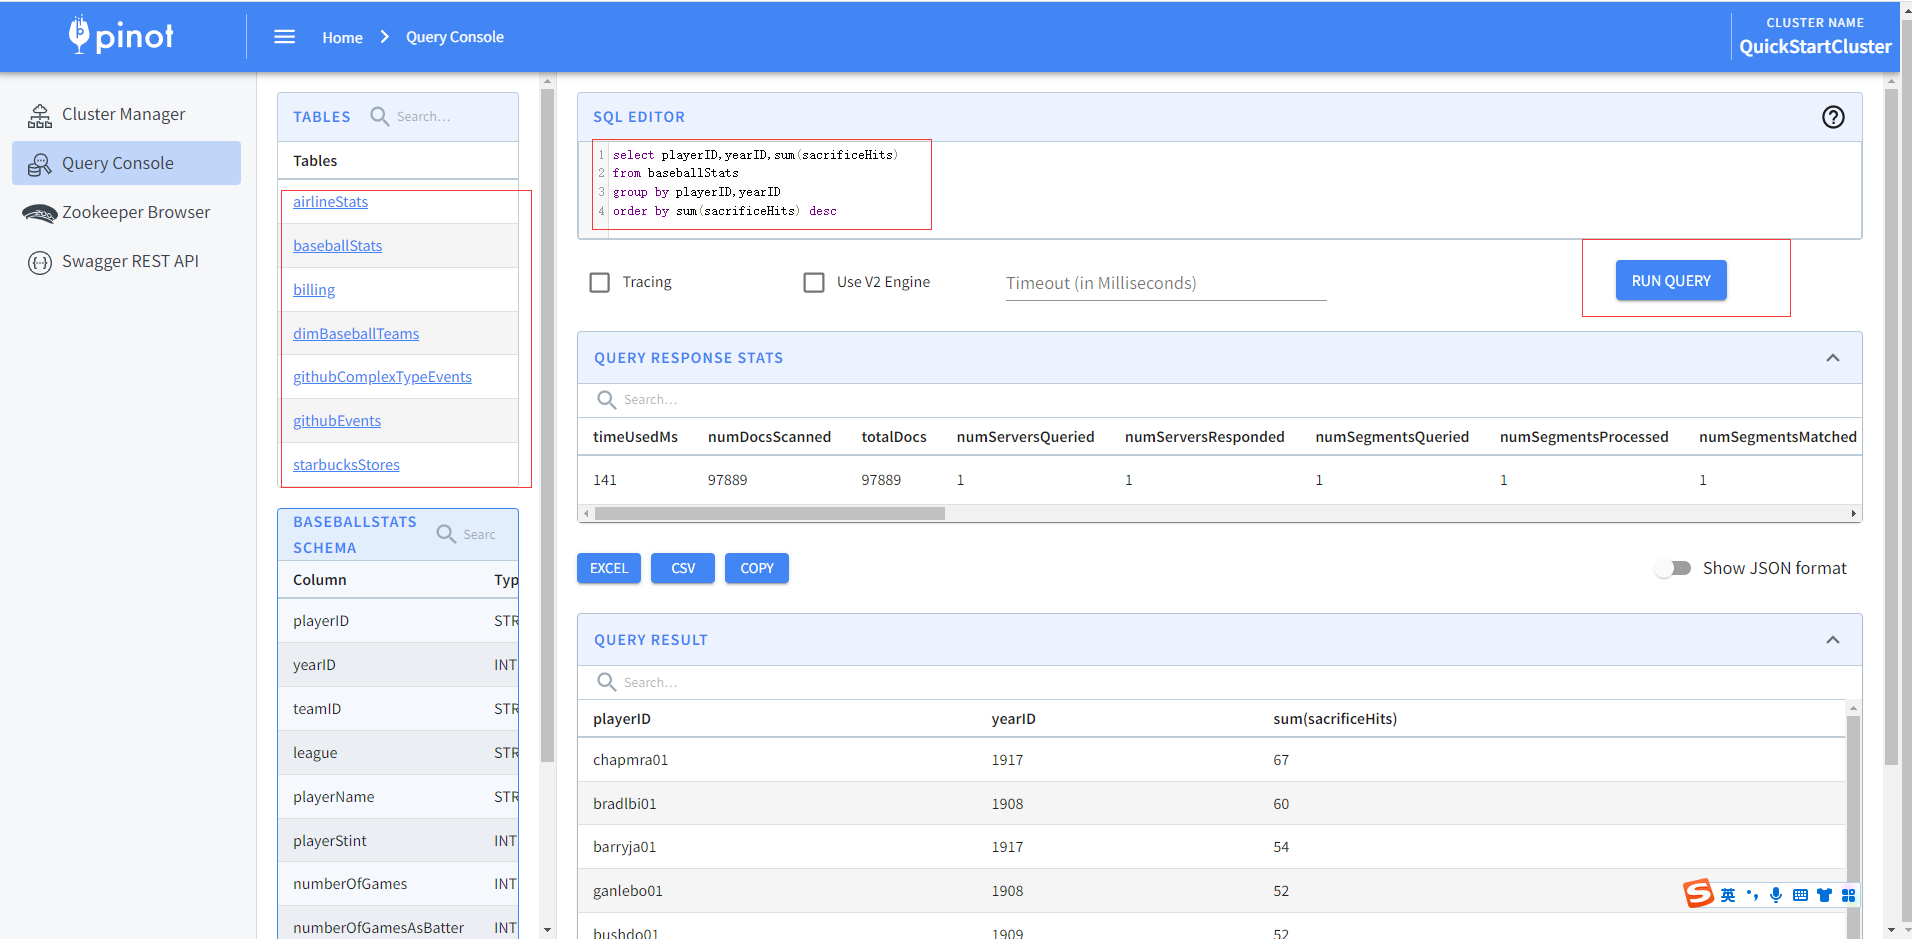
# 启动Apache Zookeeper、Pinot Controller、Pinot Broker和Pinot Server。创建baseballStats表启动一个独立的数据摄取作业,为baseballStats表的给定CSV数据文件构建一个段,并将该段推到Pinot Controller。向Pinot发出示例查询
docker run \
    -p 9000:9000 \
    apachepinot/pinot:0.12.1 QuickStart \
    -type batch
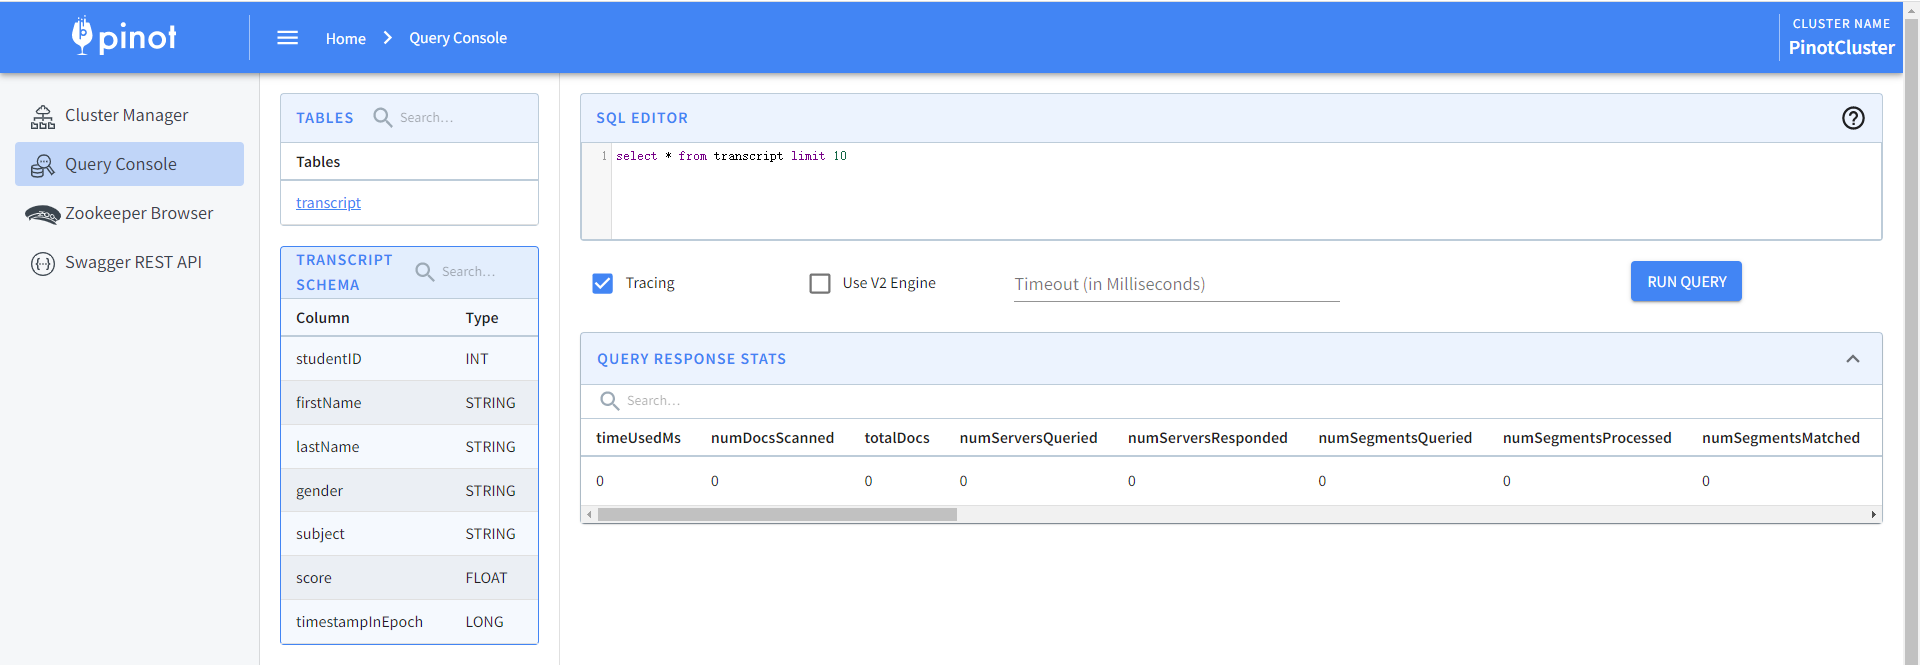
启动完后生成示例数据,可以通过查询控制台进行SQL编辑查询,显示查询结果并可以导出EXCEL和CSV格式文件。
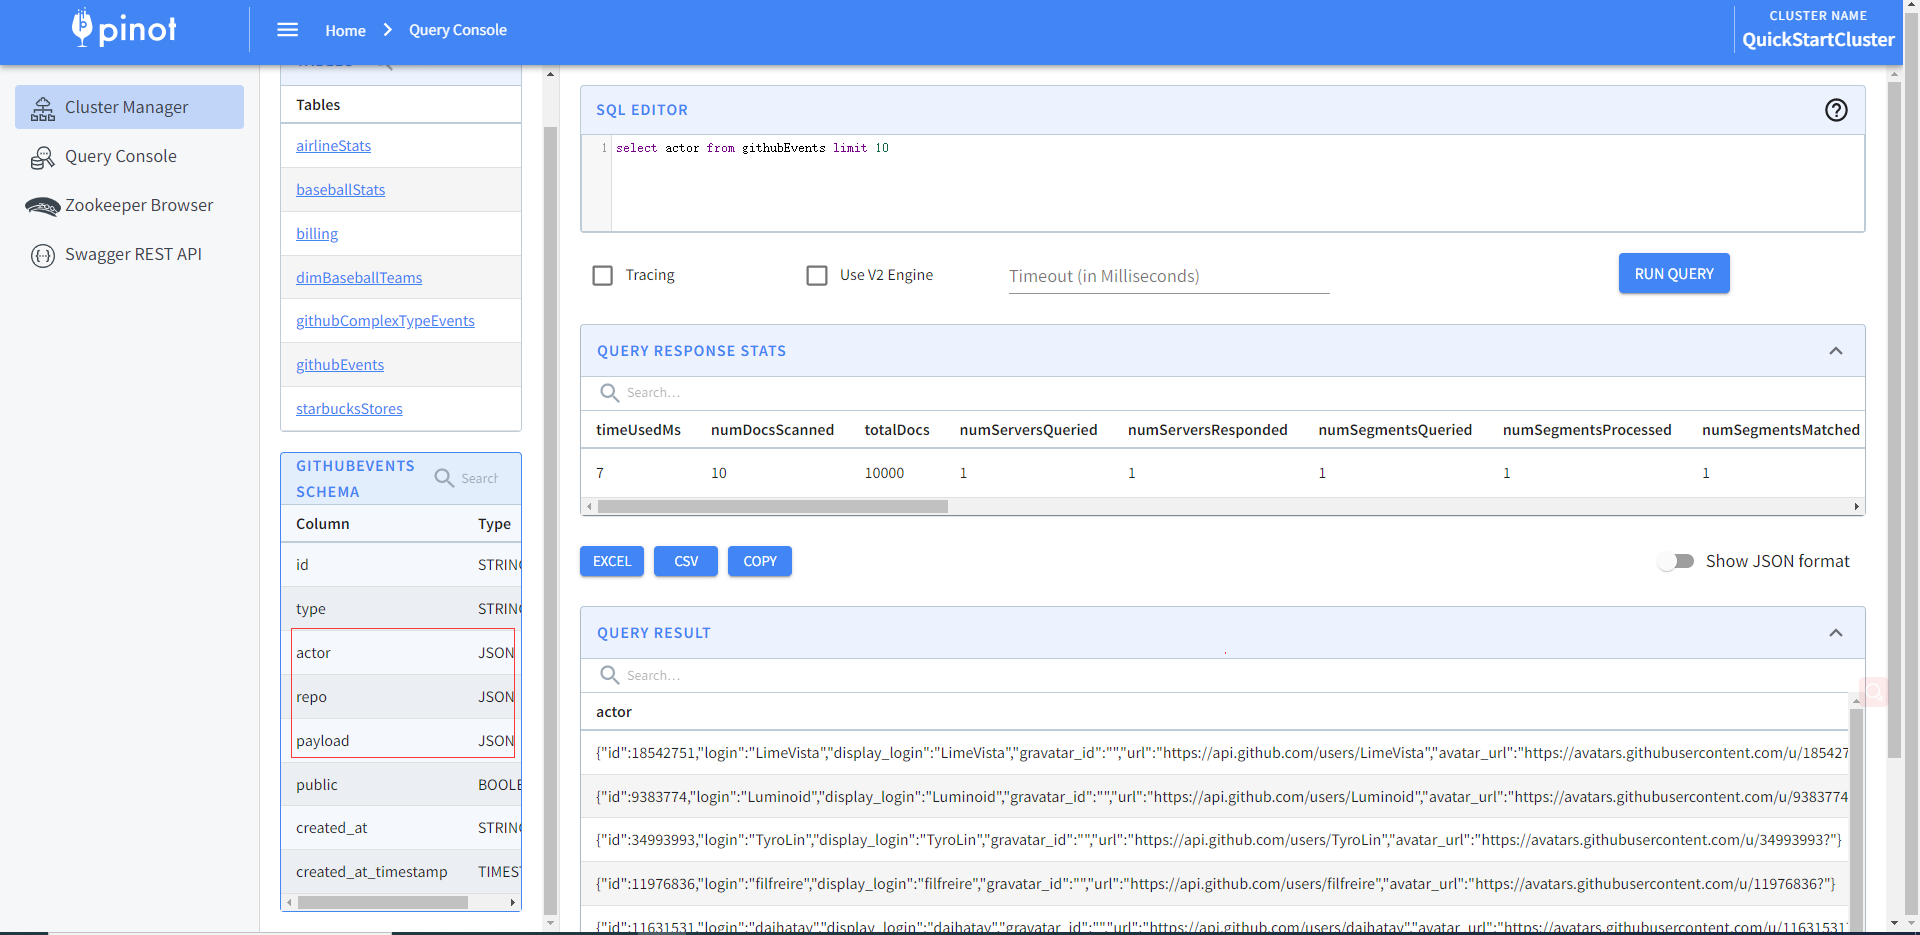
官方还提供多种多种数据类型格式样例数据,比如JSON
# 启动Apache Zookeeper、Pinot Controller、Pinot Broker和Pinot Server。创建githubEvents表启动一个独立的数据摄取作业,为githubEvents表的给定JSON数据文件构建一个段,并将该段推到Pinot Controller。向Pinot发出示例查询
docker run \
    -p 9000:9000 \
    apachepinot/pinot:0.12.1 QuickStart \
    -type batch_json_index
还提供其他流式、Upsert、混合的类型,各位有兴趣可以详细查看
docker run \
    -p 9000:9000 \
    apachepinot/pinot:0.12.1 QuickStart \
    -type batch_complex_type
docker run \
    -p 9000:9000 \
    apachepinot/pinot:0.12.1 QuickStart \
    -type stream
docker run \
    -p 9000:9000 \
    apachepinot/pinot:0.12.1 QuickStart \
    -type realtime_minion
docker run \
    -p 9000:9000 \
    apachepinot/pinot:latest QuickStart \
    -type stream_complex_type
docker run \
    -p 9000:9000 \
    apachepinot/pinot:latest QuickStart \
    -type upsert
docker run \
    -p 9000:9000 \
    apachepinot/pinot:latest QuickStart \
    -type upsert_json_index
docker run \
    -p 9000:9000 \
    apachepinot/pinot:latest QuickStart \
    -type hybrid
docker run \
    -p 9000:9000 \
    apachepinot/pinot:latest QuickStart \
    -type join
手动启动集群
# 创建网络,在docker中创建一个隔离的桥接网络
docker network create -d bridge pinot-demo
# 启动 Zookeeper,以daemon模式启动Zookeeper。这是一个单节点zookeeper设置。Zookeeper是Pinot的中央元数据存储,应该设置为用于生产的复制。更多信息请参见运行复制的Zookeeper。
docker run \
    --network=pinot-demo \
    --name pinot-zookeeper \
    --restart always \
    -p 2181:2181 \
    -d zookeeper:3.5.6
# 启动 Pinot Controller,在守护进程中启动Pinot Controller并连接到Zookeeper。下面的命令需要一个4GB的内存容器。如果您的机器没有足够的资源,那么就调整- xms和xmx。
docker run --rm -ti \
    --network=pinot-demo \
    --name pinot-controller \
    -p 9000:9000 \
    -e JAVA_OPTS="-Dplugins.dir=/opt/pinot/plugins -Xms1G -Xmx4G -XX:+UseG1GC -XX:MaxGCPauseMillis=200 -Xloggc:gc-pinot-controller.log" \
    -d ${PINOT_IMAGE} StartController \
    -zkAddress pinot-zookeeper:2181
# 启动 Pinot Broker,在守护进程中启动Pinot Broker并连接到Zookeeper。下面的命令需要一个4GB的内存容器。如果您的机器没有足够的资源,那么就调整- xms和xmx。
docker run --rm -ti \
    --network=pinot-demo \
    --name pinot-broker \
    -p 8099:8099 \
    -e JAVA_OPTS="-Dplugins.dir=/opt/pinot/plugins -Xms4G -Xmx4G -XX:+UseG1GC -XX:MaxGCPauseMillis=200 -Xloggc:gc-pinot-broker.log" \
    -d ${PINOT_IMAGE} StartBroker \
    -zkAddress pinot-zookeeper:2181
# 启动 Pinot Server,在守护进程中启动Pinot服务器并连接到Zookeeper。下面的命令需要一个16GB的内存容器。如果您的机器没有足够的资源,那么就调整- xms和xmx。
docker run --rm -ti \
    --network=pinot-demo \
    --name pinot-server \
    -p 8098:8098 \
    -e JAVA_OPTS="-Dplugins.dir=/opt/pinot/plugins -Xms4G -Xmx16G -XX:+UseG1GC -XX:MaxGCPauseMillis=200 -Xloggc:gc-pinot-server.log" \
    -d ${PINOT_IMAGE} StartServer \
    -zkAddress pinot-zookeeper:2181
# 启动 Kafka,你也可以选择启动Kafka来设置实时流。这会在端口9092上打开Kafka代理。
docker run --rm -ti \
    --network pinot-demo --name=kafka \
    -e KAFKA_ZOOKEEPER_CONNECT=pinot-zookeeper:2181/kafka \
    -e KAFKA_BROKER_ID=0 \
    -e KAFKA_ADVERTISED_HOST_NAME=kafka \
    -p 9092:9092 \
    -d bitnami/kafka:latest
# 查看运行容器
docker container ls -a
Docker Compose
创建docker-compose.yml文件内容如下
version: '3.7'
services:
  pinot-zookeeper:
    image: zookeeper:3.5.6
    container_name: pinot-zookeeper
    ports:
      - "2181:2181"
    environment:
      ZOOKEEPER_CLIENT_PORT: 2181
      ZOOKEEPER_TICK_TIME: 2000
  pinot-controller:
    image: apachepinot/pinot:0.12.1
    command: "StartController -zkAddress pinot-zookeeper:2181"
    container_name: pinot-controller
    restart: unless-stopped
    ports:
      - "9000:9000"
    environment:
      JAVA_OPTS: "-Dplugins.dir=/opt/pinot/plugins -Xms1G -Xmx4G -XX:+UseG1GC -XX:MaxGCPauseMillis=200 -Xloggc:gc-pinot-controller.log"
    depends_on:
      - pinot-zookeeper
  pinot-broker:
    image: apachepinot/pinot:0.12.1
    command: "StartBroker -zkAddress pinot-zookeeper:2181"
    restart: unless-stopped
    container_name: "pinot-broker"
    ports:
      - "8099:8099"
    environment:
      JAVA_OPTS: "-Dplugins.dir=/opt/pinot/plugins -Xms4G -Xmx4G -XX:+UseG1GC -XX:MaxGCPauseMillis=200 -Xloggc:gc-pinot-broker.log"
    depends_on:
      - pinot-controller
  pinot-server:
    image: apachepinot/pinot:0.12.1
    command: "StartServer -zkAddress pinot-zookeeper:2181"
    restart: unless-stopped
    container_name: "pinot-server"
    ports:
      - "8098:8098"
    environment:
      JAVA_OPTS: "-Dplugins.dir=/opt/pinot/plugins -Xms4G -Xmx16G -XX:+UseG1GC -XX:MaxGCPauseMillis=200 -Xloggc:gc-pinot-server.log"
    depends_on:
      - pinot-broker
运行docker-compose命令启动所有组件
docker-compose --project-name pinot-demo up
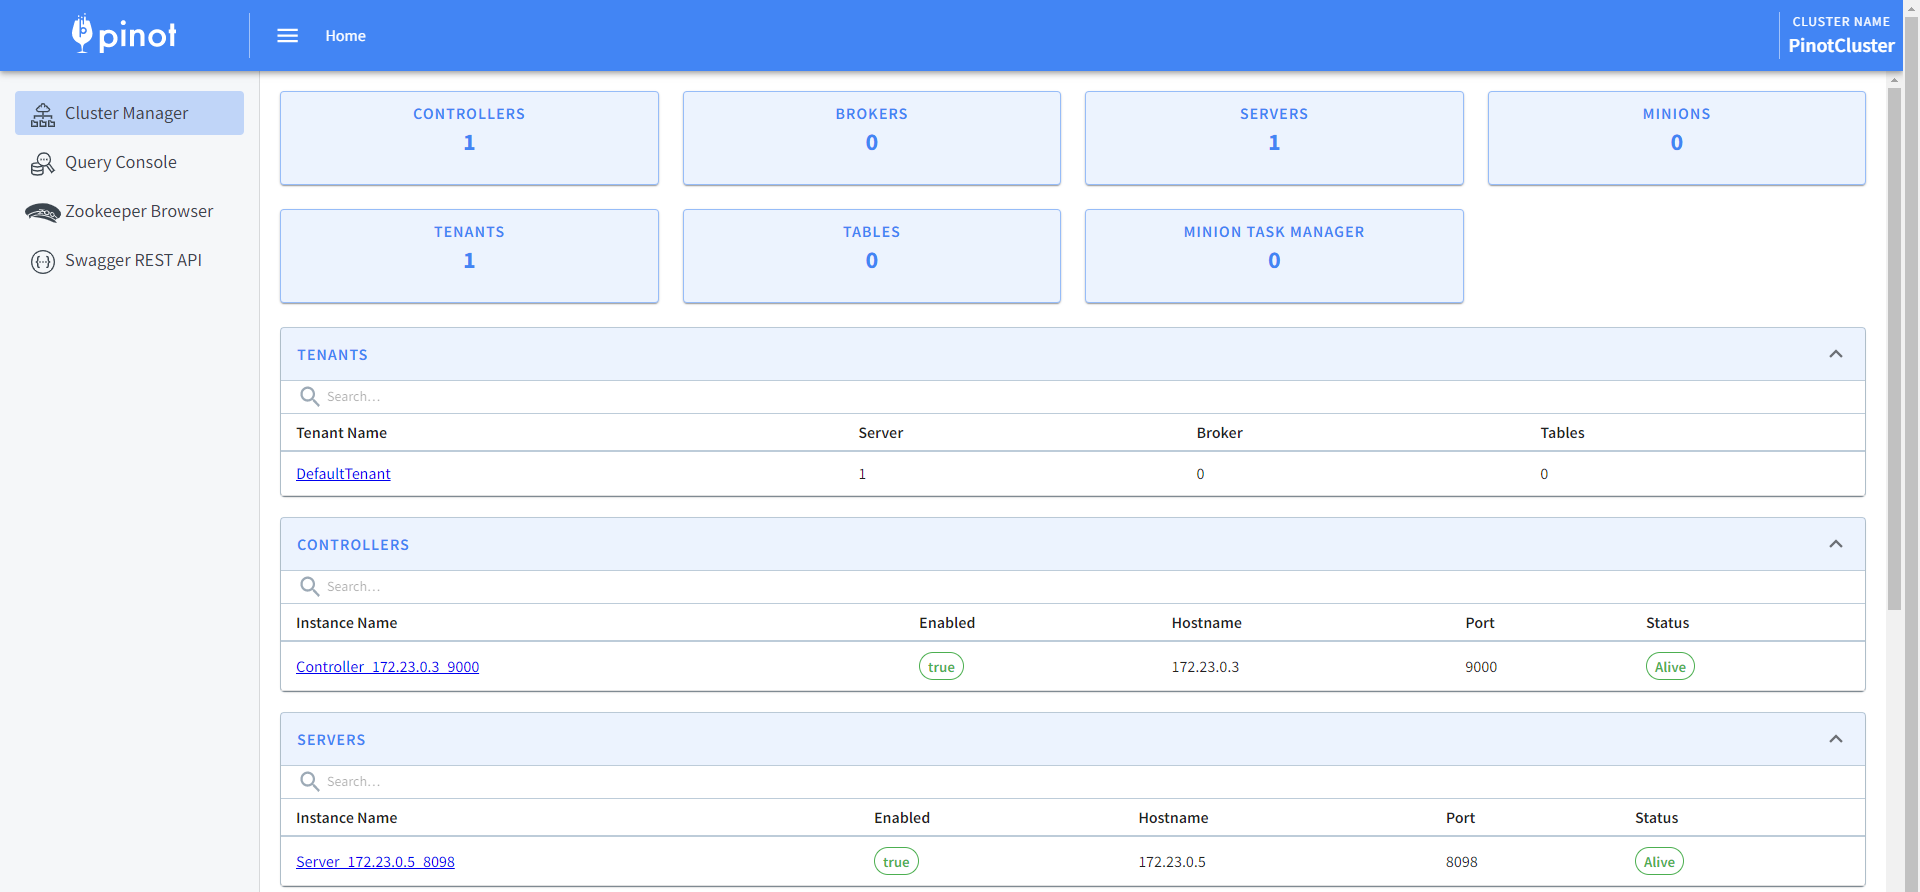
访问9000端口管理端点,http://mypinot:9000/
批导入数据
# 创建数据目录mkdir -p /tmp/pinot-quick-start/rawdata# 支持的文件格式有CSV、JSON、AVRO、PARQUET、THRIFT、ORC。创建一个/tmp/pinot-quick-start/rawdata/transcript.csv文件,内容如下studentID,firstName,lastName,gender,subject,score,timestampInEpoch200,Lucy,Smith,Female,Maths,3.8,1570863600000200,Lucy,Smith,Female,English,3.5,1571036400000201,Bob,King,Male,Maths,3.2,1571900400000202,Nick,Young,Male,Physics,3.6,1572418800000
- 创建Schema:模式用于定义Pinot表的列和数据类型。模式的详细概述可以在schema中找到。简单地说,将列分为3种类型
| 列类型 | 描述 |
|---|---|
| 维度列 | 通常用于过滤器和分组by,用于对数据进行切片和切块 |
| 度量列 | 通常用于聚合,表示定量数据 |
| 时间 | 可选列,表示与每行关联的时间戳 |
例如,在上面数据中,studententid、firstName、lastName、gender、subject列是维度列,score列是度量列,timestampInEpoch是时间列。确定了维度、指标和时间列,使用下面的参考为数据创建一个schema,创建/tmp/pinot-quick-start/transcript-schema.json
{ "schemaName": "transcript", "dimensionFieldSpecs": [ { "name": "studentID", "dataType": "INT" }, { "name": "firstName", "dataType": "STRING" }, { "name": "lastName", "dataType": "STRING" }, { "name": "gender", "dataType": "STRING" }, { "name": "subject", "dataType": "STRING" } ], "metricFieldSpecs": [ { "name": "score", "dataType": "FLOAT" } ], "dateTimeFieldSpecs": [{ "name": "timestampInEpoch", "dataType": "LONG", "format" : "1:MILLISECONDS:EPOCH", "granularity": "1:MILLISECONDS" }]}
- 创建表配置:表配置用于定义与Pinot表相关的配置。该表的详细概述可以在表中找到。下面是上面CSV数据文件的表配置,创建表配置文件/tmp/pinot-quick-start/transcript-table-offline.json
{ "tableName": "transcript", "segmentsConfig" : { "timeColumnName": "timestampInEpoch", "timeType": "MILLISECONDS", "replication" : "1", "schemaName" : "transcript" }, "tableIndexConfig" : { "invertedIndexColumns" : [], "loadMode" : "MMAP" }, "tenants" : { "broker":"DefaultTenant", "server":"DefaultTenant" }, "tableType":"OFFLINE", "metadata": {}}
- 上传表配置和Schema
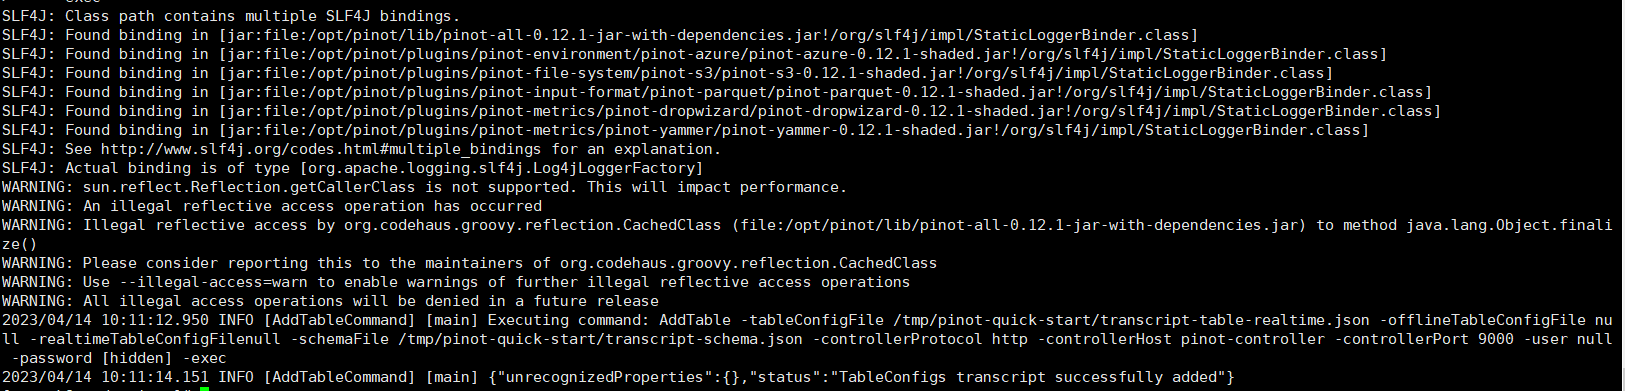
# 前面是通过docker网络创建,确保可以访问controllerHost(manual-pinot-controller为可以访问主机名、容器、IP)和controllerPort端口即可docker run --rm -ti \ --network=pinot-demo \ -v /tmp/pinot-quick-start:/tmp/pinot-quick-start \ --name pinot-batch-table-creation \ apachepinot/pinot:0.12.1 AddTable \ -schemaFile /tmp/pinot-quick-start/transcript-schema.json \ -tableConfigFile /tmp/pinot-quick-start/transcript-table-offline.json \ -controllerHost manual-pinot-controller \ -controllerPort 9000 -exec
可以通过检查Rest API中的表配置和模式,以确保它已成功上传。
- 创建段:Pinot表的数据存储为Pinot段。段的详细概述可以在段中找到。为了生成一个段,首先需要创建一个作业规范yaml文件。JobSpec yaml文件包含有关数据格式、输入数据位置和pinot集群坐标的所有信息。创建/tmp/pinot-quick-start/docker-job-spec.yml文件,内容如下
executionFrameworkSpec: name: 'standalone' segmentGenerationJobRunnerClassName: 'org.apache.pinot.plugin.ingestion.batch.standalone.SegmentGenerationJobRunner' segmentTarPushJobRunnerClassName: 'org.apache.pinot.plugin.ingestion.batch.standalone.SegmentTarPushJobRunner' segmentUriPushJobRunnerClassName: 'org.apache.pinot.plugin.ingestion.batch.standalone.SegmentUriPushJobRunner'jobType: SegmentCreationAndTarPushinputDirURI: '/tmp/pinot-quick-start/rawdata/'includeFileNamePattern: 'glob:**/*.csv'outputDirURI: '/tmp/pinot-quick-start/segments/'overwriteOutput: truepinotFSSpecs: - scheme: file className: org.apache.pinot.spi.filesystem.LocalPinotFSrecordReaderSpec: dataFormat: 'csv' className: 'org.apache.pinot.plugin.inputformat.csv.CSVRecordReader' configClassName: 'org.apache.pinot.plugin.inputformat.csv.CSVRecordReaderConfig'tableSpec: tableName: 'transcript' schemaURI: 'http://manual-pinot-controller:9000/tables/transcript/schema' tableConfigURI: 'http://manual-pinot-controller:9000/tables/transcript'pinotClusterSpecs: - controllerURI: 'http://manual-pinot-controller:9000'
使用以下命令生成一个段并上传
docker run --rm -ti \ --network=pinot-demo \ -v /tmp/pinot-quick-start:/tmp/pinot-quick-start \ --name pinot-data-ingestion-job \ apachepinot/pinot:0.12.1 LaunchDataIngestionJob \ -jobSpecFile /tmp/pinot-quick-start/docker-job-spec.yml
流式导入数据
- 创建Kafka和主题
# 首先,需要设置一个流。Pinot为Kafka提供了开箱即用的实时摄取支持。在本地设置一个演示Kafka集群,并创建一个示例主题转录主题docker run --rm -ti \ --network pinot-demo --name=kafka \ -e KAFKA_ZOOKEEPER_CONNECT=pinot-zookeeper:2181/kafka \ -e ALLOW_PLAINTEXT_LISTENER=yes \ -e KAFKA_BROKER_ID=0 \ -e KAFKA_ADVERTISED_HOST_NAME=kafka \ -p 9092:9092 \ -d bitnami/kafka:latest # 创建一个Kafka主题docker exec \ -t kafka \ /opt/bitnami/kafka/bin/kafka-topics.sh \ --bootstrap-server kafka:9092 \ --partitions=1 --replication-factor=1 \ --create --topic transcript-topic

- 创建表配置,创建/tmp/pinot-quick-start/transcript-table-realtime.json文件,内容如下
{ "tableName": "transcript", "tableType": "REALTIME", "segmentsConfig": { "timeColumnName": "timestampInEpoch", "timeType": "MILLISECONDS", "schemaName": "transcript", "replicasPerPartition": "1" }, "tenants": {}, "tableIndexConfig": { "loadMode": "MMAP", "streamConfigs": { "streamType": "kafka", "stream.kafka.consumer.type": "lowlevel", "stream.kafka.topic.name": "transcript-topic", "stream.kafka.decoder.class.name": "org.apache.pinot.plugin.stream.kafka.KafkaJSONMessageDecoder", "stream.kafka.consumer.factory.class.name": "org.apache.pinot.plugin.stream.kafka20.KafkaConsumerFactory", "stream.kafka.broker.list": "kafka:9092", "realtime.segment.flush.threshold.rows": "0", "realtime.segment.flush.threshold.time": "24h", "realtime.segment.flush.threshold.segment.size": "50M", "stream.kafka.consumer.prop.auto.offset.reset": "smallest" } }, "metadata": { "customConfigs": {} }}
- 上传Schema和表配置
docker run \ --network=pinot-demo \ -v /tmp/pinot-quick-start:/tmp/pinot-quick-start \ --name pinot-streaming-table-creation \ apachepinot/pinot:0.12.1 AddTable \ -schemaFile /tmp/pinot-quick-start/transcript-schema.json \ -tableConfigFile /tmp/pinot-quick-start/transcript-table-realtime.json \ -controllerHost pinot-controller \ -controllerPort 9000 \ -exec
- 创建数据文件用于kafka生产者发送,/tmp/pinot-quick-start/rawdata/transcript.json,内容如下
{"studentID":205,"firstName":"Natalie","lastName":"Jones","gender":"Female","subject":"Maths","score":3.8,"timestampInEpoch":1571900400000}{"studentID":205,"firstName":"Natalie","lastName":"Jones","gender":"Female","subject":"History","score":3.5,"timestampInEpoch":1571900400000}{"studentID":207,"firstName":"Bob","lastName":"Lewis","gender":"Male","subject":"Maths","score":3.2,"timestampInEpoch":1571900400000}{"studentID":207,"firstName":"Bob","lastName":"Lewis","gender":"Male","subject":"Chemistry","score":3.6,"timestampInEpoch":1572418800000}{"studentID":209,"firstName":"Jane","lastName":"Doe","gender":"Female","subject":"Geography","score":3.8,"timestampInEpoch":1572505200000}{"studentID":209,"firstName":"Jane","lastName":"Doe","gender":"Female","subject":"English","score":3.5,"timestampInEpoch":1572505200000}{"studentID":209,"firstName":"Jane","lastName":"Doe","gender":"Female","subject":"Maths","score":3.2,"timestampInEpoch":1572678000000}{"studentID":209,"firstName":"Jane","lastName":"Doe","gender":"Female","subject":"Physics","score":3.6,"timestampInEpoch":1572678000000}{"studentID":211,"firstName":"John","lastName":"Doe","gender":"Male","subject":"Maths","score":3.8,"timestampInEpoch":1572678000000}{"studentID":211,"firstName":"John","lastName":"Doe","gender":"Male","subject":"English","score":3.5,"timestampInEpoch":1572678000000}{"studentID":211,"firstName":"John","lastName":"Doe","gender":"Male","subject":"History","score":3.2,"timestampInEpoch":1572854400000}{"studentID":212,"firstName":"Nick","lastName":"Young","gender":"Male","subject":"History","score":3.6,"timestampInEpoch":1572854400000}
将示例JSON推入Kafka主题,使用从Kafka下载的Kafka脚本
bin/kafka-console-producer.sh \ --bootstrap-server kafka:9092 \ --topic transcript-topic < /tmp/pinot-quick-start/rawdata/transcript.json

- 本人博客网站IT小神 www.itxiaoshen.com
Recommend
About Joyk
Aggregate valuable and interesting links.
Joyk means Joy of geeK