
Bringing seamless authentication to your apps with passkeys using Credential Man...
source link: https://medium.com/androiddevelopers/bringing-seamless-authentication-to-your-apps-using-credential-manager-api-b3f0d09e0093
Go to the source link to view the article. You can view the picture content, updated content and better typesetting reading experience. If the link is broken, please click the button below to view the snapshot at that time.

Bringing seamless authentication to your apps with passkeys using Credential Manager API
Traditional authentication solutions pose a number of security and usability challenges. The Credential Manager API helps you and your users overcome these challenges.
Passwords are widely used but…
- Are easily forgotten.
- Require the user’s knowledge to create strong passwords.
- Are easy to phish, harvest and replay by attackers.
Android has created the Credential Manager API to simplify the sign-in experience and address security risks by supporting passkeys, the next generation industry standard for passwordless authentication.
Credential Manager brings together support for passkeys and combines it with traditional authentication methods such as passwords, Sign in with Google etc.
When interacting with apps that support passkeys, using the Credential Manager API, users can create passkeys and store them in the Google Password Manager. The Google Password Manager then syncs those passkeys across all the Android devices where that user has signed in. Users can also use passkeys to authenticate in a seamless and secure way. In addition to supporting passkeys, Credential Manager also supports existing sign in methods, such as user-id/password (from Google Password Manager) and Google Sign In.
This blog explains how to create a passkey using the Credential Manager API, and how to authenticate the user via the API .
Leveraging existing biometrics to enhance security for a simple and seamless sign-in flow.
Users can secure access to their device via biometrics or a standard screen lock credential (PIN, pattern or password).
In the context of passkeys, biometric authentication can be used in conjunction with — or instead of — traditional authentication methods such as passwords or PINs. When using biometric authentication, the user provides their biometric data, which is then compared to the stored biometric data on device to confirm the user’s identity.
Using biometric authentication can provide a higher level of security than traditional authentication methods, as it is much more difficult for an unauthorized user to imitate someone’s unique biometric characteristics. Biometric information and processing continues to stay on the device and is never sent to any remote server — the server only sees an assurance that the biometric check was successful.
Enable sign-in across apps and websites
The first step to enable support for passkeys for your Android app is to associate your app and the website.
To achieve this, declare associations by hosting a Digital Asset Links JSON file on your website, and add a link to the Digital Asset Link file to your app’s manifest.
The Digital Asset Links protocol and API enable an app or website to make public, verifiable statements about other apps or websites. For example, a website can declare that it is associated with a specific Android app, or it can declare that it wants to share user credentials with another website.
To know more on how to associate your app with a website, please check our official documentation.
How do passkeys work?
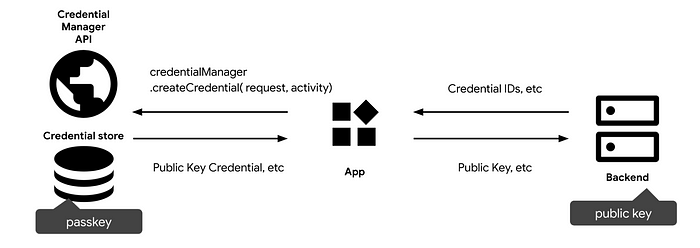
The four components of the passkey registration flow are:
- Backend: Your backend server that contains the accounts database, which stores the public key and other metadata about each passkey that the server interacts with.
- Credential Manager API: API used for retrieving and storing users’ passkeys with credential providers on the device..
- App: Your frontend which communicates with the Credential Manager API and sends fetch requests to the backend.
- Credential Provider: The credential provider on the user’s device. This provider creates and stores users’ passkeys. This may be on the same device as the app (i.e. Google Password Manager) or on another device, like a phone.
How to create passkeys?
You need to create a passkey, associate it with a user’s account, and store the passkey’s public key on your server before the user can sign in with it.

Create a passkey
To create a passkey:
- A user launches your app and signs in to establish a session.
- Next, your app prompts the user to create a passkey.
Note : The ideal UX would be that the passkey creation is suggested after the user signs in, without the need to go to settings and have the user manually look for the ‘create a passkey’ button.
Associate a passkey with a user’s account
- Once the user consents to create a passkey, your app requests information from the backend, such as user info, a challenge, and the credential IDs. Your app passes this information into the createCredential(…) method.
This is the information returned from the backend:
- challenge: A server-generated random string that contains enough entropy to make guessing it infeasible. It should be at least 16 bytes long. This is required but unused during registration unless doing attestation.
- rp : The Relying Party Entity corresponds to your application details. It needs :
– a name : your application name
– an ID : corresponds to the domain or subdomain.
– an icon (optional). - user.id: A user’s unique ID. This value must not include personally identifying information, for example, e-mail addresses or usernames. A random, 16-byte value generated per account will work well.
- user.name: This field should hold a unique identifier for the account that the user will recognise, like their email address or username. This will be displayed in the account selector. (If using a username, use the same value as in password authentication.)
- user.displayName: This field is an optional, more user-friendly name for the account. It’s a human-palatable name for the user account, intended only for display and will be used in the account selector
- pubKeyCredParams: The Public Key Credential Parameters is a list of allowed algorithms and key types. This list must contain at least one element.
- timeout: You can specify a time, in milliseconds, that the caller is willing to wait for the call to complete. This is treated as a hint, and may be overridden by the client.
- authenticatorSelection: This object is intended to select the appropriate authenticators to participate in the creation operation:
– authenticatorAttachment: indicates if the device should be attached on the platform or not or if there is no requirement about it. Set it to “platform”. This indicates that we want an authenticator that is embedded into the platform device, and the user will not be prompted to insert e.g. a USB security key.
– userVerification: requirements regarding the user verification. Eligible authenticators are filtered and only capable of satisfying this requirement will interact with the user.
– residentKey: indicate a value “required” to create a passkey. - [Optional] excludeCredentials: The user trying to register a device may have registered other devices. To limit the creation of multiple credentials for the same account on a single authenticator, you can then ignore these devices. The transports member, if provided, should contain the result of calling getTransports() during the registration of each credential.
2. Now call createCredential(<info returned from the backend>) request, which is a suspendable function and waits for the user to consent to your app’s use of a passkey, as well as which credential provider, and account it should be stored with.
Note : You need to initialize a CredentialManager object before calling createCredential() method:
Next, create a passkey :
Note: Even with the same parameter object, the above call creates a new credential every time it is called. Use the exclude list to prevent registering the same authenticator twice. See excludeCredentials above

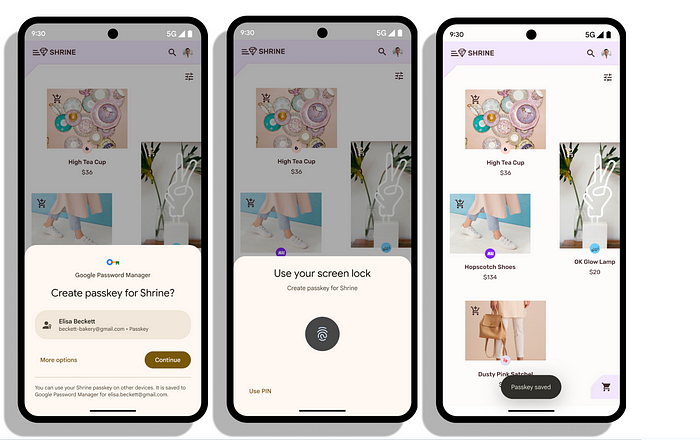
The system displays this UI near the bottom of the screen.
3. A passkey is created after receiving the user’s consent using the device’s screen lock/biometrics. The credential provider creates a new asymmetric key pair and securely stores the private key on the device.
4. After the suspendable call is resolved, a public key credential containing a new public key, a credential ID, and other attestation data is returned to your app.
Store the passkey’s public key on your server
Your app should now send the public key credential to the backend. The backend stores the credential ID and the public key associated with the user account for future authentications.
The public key credential object contains the following properties:
- id: A Base64URL encoded ID of the created passkey. This ID helps the apis to determine whether a matching passkey is in the device upon authentication. This value needs to be stored in the database on the backend.
- rawId: An ArrayBuffer version of the credential ID.
- response.clientDataJSON: An ArrayBuffer encoded client data. The clientDataJSON object, always populated by the client (browser or app), is sent in response to the RP server during registration and authentication, determining the current flow whether its a registration or authentication response to a server challenge. It has 3 properties :
– The type can be either a registration response(create) or an authentication response(get).
– The challenge value is the actual challenge that was sent by the RP during the create or get ceremony.
– The origin contains the effective domain name of the endpoint to which the client is connecting during the registration or authentication. - response.attestationObject: An ArrayBuffer encoded attestation object. This contains important information such as an RP ID, flags and a public key.
- authenticatorAttachment: Returns “platform” when this credential is created on a passkey capable device.
- type: This field is always set to “public-key”.
After the credentials get registered on the server successfully, the user can use the passkey the next time they sign in to your app.
Save the credential info in your app for future use
You can then store the information retrieved from the credential to the on-device database for future use. The following list includes some typical properties to save:
- Credential ID (Primary key)
- User ID
How to authenticate?
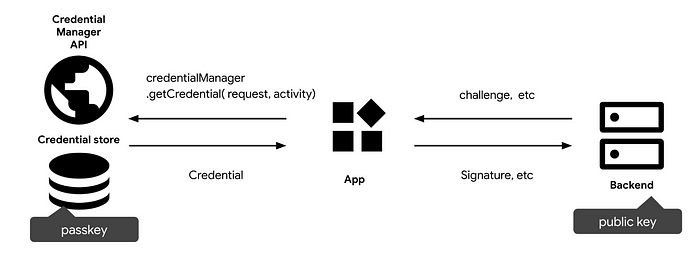
To authenticate a user with a previously-created passkey, follow the steps in this section. The API and components to be used are the same as used when you create a passkey (described above). Only the workflow differs:

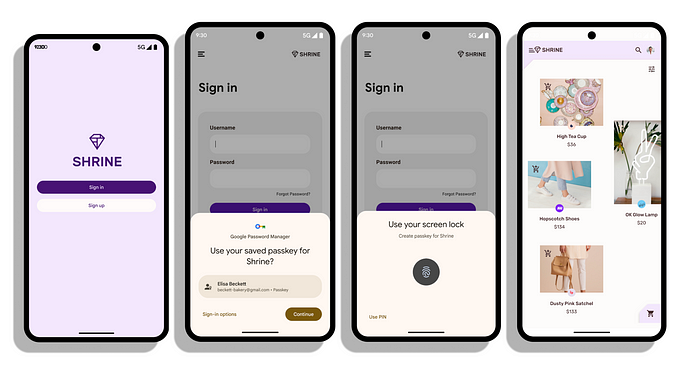
- Your app initiates a request to authenticate on behalf of the user.
- Your app fetches a challenge from the relying party (RP) server that is required to call CredentialManager.create(context).getCredential(<info returned from the backend>).
– challenge: A server-generated challenge in an ArrayBuffer. This is required to prevent replay attacks. Make sure to generate a new challenge on every sign-in attempt and disregard it after a certain duration or after a sign-in attempt fails to validate. - The RP parses the info returned from the backend and returns it to the client.
– It contains the challenge and the allowCredentials field, which contains a list of previously registered credentials that may be used to perform the authentication process.
– rpId : relying party identifier claimed by the caller. This must exactly match the rp.id specified during registration. - Next, To retrieve all the passkeys and password options that are associated with the user’s account, initialize the password and passkey authentication options:
5. Build the sign-in request, using the options retrieved from the previous step:
6. Now, call credentialManager.getCredential(…) . The api validates the rp.id against the origin, and hashes the clientData.
7. The credential provider finds a credential that matches the Relying Party ID and prompts the user to consent to the authentication. Once the user selects a passkey to authenticate and the steps are successful, the credential provider creates a new assertion by signing over the clientDataHash and authenticatorData with the private key generated for this account during registration.

8. The authenticator returns the authenticatorData and assertion signature back to the client.
9. The credential manager APIs return a PublicKeyCredential object that contains the AuthenticatorAssertionResponse, which is returned to the RP to finalize the authentication.
Send the returned public key credential to your app server #
- The public key credential object contains the following properties:
– id: The base64url encoded ID of the authenticated passkey credential.
– rawId: An ArrayBuffer version of the credential ID.
– response.clientDataJSON: The clientDataJSON contains the JSON-serialized data passed to the authenticator by the client in order to generate the credential. The clientDataJSON object, always populated by the client (browser or app), is sent in response to the RP server during registration and authentication, determining the current flow whether it’s a registration or authentication response to a server challenge. It has 3 properties :
– The type can be either for a registration response(create) or for an authentication response(get).
– The challenge value is the actual challenge that was sent by the RP during the create or get ceremony.
– The origin contains the effective domain name of the endpoint to which the client is connecting during the registration or authentication.
– response.authenticatorData: An ArrayBuffer of authenticator data. This field contains information such as the RP ID. The authenticator data structure is a byte array of 37 bytes or more.
– response.signature: An ArrayBuffer of the signature. This value is the core of the credential and needs to be verified on the server. This is the signature generated by the private key associated with this credential. On the server, the public key will be used to verify that this signature is valid.
– response.userHandle: An ArrayBuffer that contained the user ID that was set at creation time. This value can be used, instead of the credential ID, if the server needs to pick the ID values that it uses, or if the backend wishes to avoid creating an index on credential IDs. This field represents the user.id that was supplied during registration. It can be used to relate this assertion to the user on the server.
– authenticatorAttachment: Returns platform when this credential came from the local device. Otherwise cross-platform, notably when the user used a phone to sign in. If the user needs to use a phone to sign-in, consider prompting them to create a passkey on the local device.
– type: This field is always set to “public-key”.
Validate the Authentication data
- After the authentication data is fully validated, the signature is verified using the public key stored in the database during registration.
- Once the credential is verified with a matching public key on the server, sign the user in.
Support for 3P Password Managers
Support for 3rd-party password managers is available on devices that run Android 14 or higher.
Conclusion
Now let’s take a moment to summarize what we discussed in this blog today!
Here are the key takeaways for developers:
- The Credential Manager API is great for both users and developers.
- They are ready to try-out.
- We are working on bringing more features and enhancements to the API in the upcoming months, so stay tuned for more updates!
To know more about how the API and methods work, you can read through our documentation here: https://developer.android.com/training/sign-in/passkeys
Recommend
-
 37
37
无法访问此网站 github.blog 意外终止了连接。 ...
-
 2
2
Git Credential Manager Core Git Credential Manager Core (GCM Core) is a secure Git credential helper built on .NET
-
 1
1
Universal Git Authentication “Authentication is hard. Hard to debug, hard to test, hard to get right.” – Me These words were true when I wrote them back in
-
 2
2
README NAME...
-
 2
2
-
 3
3
Feature How passkeys are changing authentication Well-implemented passkeys can...
-
 6
6
-
 0
0
How To Switch to Using Passkeys With Your Google Accounts
-
 5
5
From Passwords to Passkeys: Revolutionizing User AuthenticationPasswords are getting outdated. Passkeys are proving to be a much better alternative. This blog explores the concept of passkey and its applicat...
-
 5
5
About Joyk
Aggregate valuable and interesting links.
Joyk means Joy of geeK