

Serverless System to Receive and Process Status Callbacks from Twilio
source link: https://www.twilio.com/blog/serverless-twilio-status-callback-aws
Go to the source link to view the article. You can view the picture content, updated content and better typesetting reading experience. If the link is broken, please click the button below to view the snapshot at that time.
Serverless System to Receive and Process Status Callbacks from Twilio
Status callbacks are key to Twilio’s Communications APIs. For every status change, Twilio will make an asynchronous webhook to the URL provided in your API requests' StatusCallback parameter with the new status, as well as several other helpful parameters.
In short, status callbacks give you real time data on your customer engagements – it is worth paying attention! This blog post will show you how to build a status callback handler using Amazon Web Service and serverless technologies (Lambda) and managed products (API Gateway, SQS, SNS, S3, DynamoDB).
Using managed products like API Gateway and SQS allows you to enable queue based leveling to handle spiky demand. Using Serverless Lambdas means you will only pay for compute resources consumed and will not have idle capacity waiting for status callbacks.
Twilio’s status callback recommendations and possible solutions
Twilio recommends configuring status callbacks and processing them in your data analytics pipelines and also watching out for errors in real time.
Would you also like the ability to pass custom parameters in your API calls and receive them back in your status callbacks? You aren’t alone – many people do.
Let’s get started.
Serverless Status Callback Handler solution architecture
First, let me show you what we’ll be building together. Here’s an overview of the architecture:
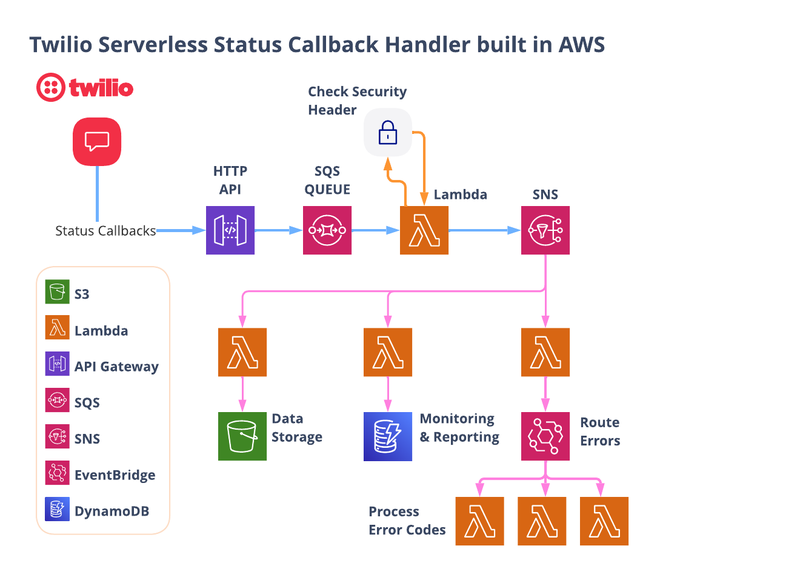
Let’s walk through the flow starting from the top left...
1. Publicly accessible URLs
Many Twilio channels such as Messaging, Voice, and Video use status callbacks. Once you spin up this project, you can configure these channels to use the URLs created by AWS’s API Gateway.
These URLs need to be publicly accessible so Twilio can reach them, which makes them a potential target for fraud. Included in this post is the ability to check the security headers in each request, so you can be sure that each request is legitimate and coming from Twilio.
2. Queue in SQS
Twilio will post all status callbacks to this new public URL, and API Gateway will dump all requests into an SQS queue. This combination (API Gateway to SQS) sets up queue based leveling to be able to handle spiky demand. The process lambda in the next step will pull messages from the SQS queue in batches.
3. A lambda for validating and then processing each request
For each message, the lambda will check the x-twilio-signature header to validate that the request was sent from your Twilio account. If it passes the test, the message is published to an SNS topic for additional processing. Incoming messages that do not pass this test are assumed to be fraudulent and are discarded.
4. SNS enables downstream processing
Since the response from Twilio is published to an SNS topic, you can easily include downstream processors to intelligently process feedback from your API calls to Twilio. This project includes three examples:
- Save Responses to S3 ⇒ Save all status callbacks to an S3 bucket that can be sent to other analytics tools, data lakes, or warehouses. These customer engagements are important data points that should be a part of your data pipeline! In fact, status callbacks from these customer engagements should be a part of your CDP strategy – find out more about Twilio Segment!
- Save Responses to DynamoDB => Similar to above, putting all status callbacks into a DB (NoSQL or relational database), allows you to have real time visibility into your Twilio API calls.
- Check For Errors ⇒ Using EventBridge, you can check every status callback for errors and handle them as needed. someone right away to take action!
Sound good? Let’s get started...
AWS Resources
All of the AWS components of the serverless application are provided as "Infrastructure as Code" (oft-shortened to IaC) and deployed via CloudFormation into AWS. Here is an overview of the components:
- AWS SAM => an open-source framework that enables you to build serverless applications on AWS
- AWS CLI => Not required, but recommended because it simplifies credential management when deploying
- AWS Lambda => serverless compute service
- AWS Step Functions => step functions
- S3 => Object Storage
- SQS => simple queue service
- SNS => simple notification service
- EventBridge => serverless event bus
Prerequisites
This is not a beginner level build! You need to have some knowledge of AWS, serverless computing, and programming.
- Twilio Account. If you don’t yet have one, you can sign up for a free account here.
- AWS Account with permissions to provision Lambdas, step functions, S3 buckets, IAM Roles & Policies, an SQS queue, SNS topics, and a custom EventBus. You can sign up for an account here.
- AWS SAM CLI installed
Let’s Build it!
Here are the basic steps of our serverless multichannel build today.
- Add your Twilio Credentials to AWS Secrets Manager
- Download the code
- Deploy the stacks in sequence
- Try it out!
1. Add Twilio Credentials to AWS Secrets Manager
Making sure that you never include credentials in your code is a core security tenet. We are going to use AWS Secrets Manager to save our Twilio credentials. The compute components will be able to access these credentials at runtime to call the Twilio APIs.
From your AWS Console, be sure that you are in the AWS Region where you wish to deploy this project! Next, go to Secrets Manager.
In order to validate requests coming from Twilio, we need to use the AUTH TOKEN from your account. We will save that value to Secrets Manager.
The Auth Token is found on the home page for the Twilio Account in a panel that looks like this:
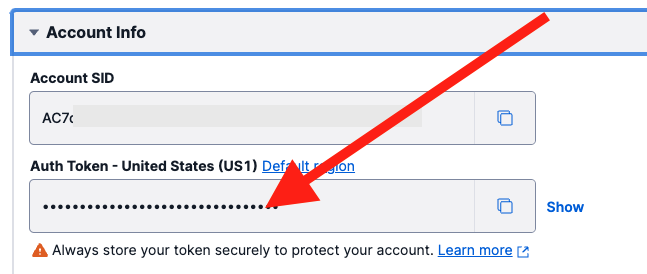
Copy the Auth Token value, as you will paste it into Secrets Manager shortly...
Back at the AWS Console and in Secrets Manager, select Store a new secret.
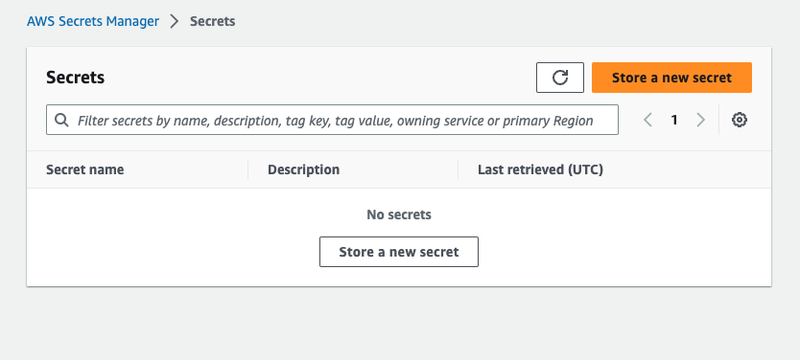
You will enter only key/value pair:

- AUTH_TOKEN ⇒ paste the Auth Token you just copied into the value.
On the next screen, enter “TwilioStatusCallbackHandler” as your secret name like below...

After this step you can configure rotation options for this secret. You can accept default values for now, or configure to your requirements. The CloudFormation stack will pull this value when deploying so you do not save these credentials in your code base.
2. Download the Code for this Application
Download the code from this repo.
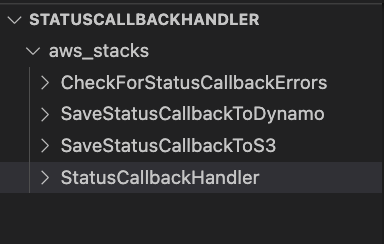
The repo contains a directory called aws_stacks that contains 4 stacks that are deployable to your AWS account. The StatusCallbackHandler stack is the “primary stack” and must be deployed first.
3. Deploy Code
Here is a video that covers installation:
Recommend
About Joyk
Aggregate valuable and interesting links.
Joyk means Joy of geeK