

K3S系列文章-使用AutoK3s在腾讯云上安装高可用K3S集群 - 东风微鸣
source link: https://www.cnblogs.com/east4ming/p/17154914.html
Go to the source link to view the article. You can view the picture content, updated content and better typesetting reading experience. If the link is broken, please click the button below to view the snapshot at that time.

K3S系列文章-使用AutoK3s在腾讯云上安装高可用K3S集群
在腾讯云上安装 K3S
后续会在这套 K3S 集群上安装 Rancher
- 高可用
- 3 台master 的 k3s 集群
- 数据备份
- k3s 数据备份到 腾讯云对象存储 cos
- 尽量复用公有云的能力
- Tencent Cloud Controller Manager (❌ 因为腾讯云已经放弃维护相关源码, 所以无法复用)
- SVC LoadBalancer 调用 CLB (❌ 因为腾讯云已经放弃维护相关源码, 所以无法复用)
- 备份 - 使用腾讯云 COS
-
有腾讯云账户,账户至少拥有如下权限:auto k3s 安装 - 设置 CAM 以及这些权限:
QcloudTAGFullAccess
-
该腾讯云账号有对应的 API 密钥,地址:访问密钥 - 控制台 (tencent.com) ,或者拥有相关权限:
cam:QueryCollApiKey和cam:CreateCollApiKey -
一台 linux 操作机,用于部署 autok3s
-
一个对象存储通 cos,用于备份
-
已有的镜像仓库的一些账号密码或认证信息,包括:quay,docker,腾讯云 (用于加速 pull push镜像)
ℹ️ Info:
腾讯云 tcr 广州 提供免费个人版实例,可以使用并添加:
K3S 安装注意事项
- 通过autok3s部署
- 通过 autok3s 安装后, 默认 k8s api 通过 公网 IP 进行通信, 需要调整 systemd 配置使其通过内网进行通信.
- ⚠️付费模式,安装后可根据具体情况在将付费模式控制台改为:包年包月
K3S 安装参数
本次 K3s 安装参数如下:
- Master
3台 - Worker:
0 - Region:shanghai (
ap-shanghai) - zone:二区(
ap-shanghai-2) - Instance Type:
S5.MEDIUM8 - Image:
img-22trbn9x(ubuntu 20.04) - instanceChargeType:默认后付费,且无法调整。⚠️安装后控制台改为:PREPAID
- Disk:
CLOUD_SSD(ℹ️CLOUD_PREMIUM(高性能云盘),CLOUD_SSD(SSD云硬盘)) - Disk Size:
50G - VPC ID: 空(autok3s 会自动创建)
- Subnet ID: 空(autok3s 会自动创建)
- Internet Max Bandwidth Out:
5(可以按需调小) - Security Group Ids:空, 让 autok3s 自动创建, 集群创建好之后再调整安全组, 缩小入口范围
- EIP:是否使用弹性公网IP
false - Tags (见下文)
- K3s Version:
v1.21.7+k3s1 - Cluster:
true - Master Extra Args: 见下文
- Cluster模式:
true - Registry(见下文)
- UI:
true
⚠️ Warning:
执行
autok3s创建前, 如果选择已有的安全组, 那么 CVM 实例至少需要应用以下安全组规则:Rule Protocol Port Source Description InBound TCP 22 ALL SSH Connect Port InBound TCP 6443 K3s agent nodes Kubernetes API InBound TCP 10250 K3s server & agent Kubelet InBound UDP 8472 K3s server & agent (Optional) Required only for Flannel VXLAN InBound TCP 2379,2380 K3s server nodes (Optional) Required only for embedded ETCD OutBound ALL ALL ALL Allow All特别是: 22 端口必须要对操作机的公网IP 开放
原因: autok3s 自动部署公有云时, 通过公网IP 上传 KeyPair, 如果没有以上安全组,
autok3s会执行失败. 报错如下: (101.34.46.218就是公网 IP)level=error msg="[ssh-dialer] init dialer [101.34.46.218:22] error: [tencent] calling getInstanceStatus error. region: ap-shanghai, zone: ap-shanghai-2, instanceName: [ins-ggxozpyl ins-cfi2vio1 ins-78rkem0b], message: not `RUNNING` status"
AutoK3s
在操作机上安装,命令如下:
curl -sS http://rancher-mirror.cnrancher.com/autok3s/install.sh | INSTALL_AUTOK3S_MIRROR=cn sh
过程如下:
Downloading package http://rancher-mirror.rancher.cn/autok3s/v0.4.6/autok3s_linux_amd64 as /tmp/autok3s_linux_amd64
Download complete.

Running with sufficient permissions to attempt to move autok3s to /usr/local/bin
New version of autok3s installed to /usr/local/bin
Version: {"gitVersion":"v0.4.6","gitCommit":"4537e6ee2aea8b204a72f7b6c377edb154f7c058","gitTreeState":"","buildDate":"2021-12-28T04:15:30Z","goVersion":"go1.16.2","compiler":"gc","platform":"linux/amd64"}
Downloading package http://rancher-mirror.rancher.cn/kube-explorer/v0.2.7/kube-explorer-linux-amd64 as /tmp/kube-explorer-linux-amd64
Download complete.

Running with sufficient permissions to attempt to move kube-explorer to /usr/local/bin
New version of kube-explorer installed to /usr/local/bin
Skipping /usr/local/bin/kubectl symlink to autok3s, already exists
您可以通过以下 CLI 命令启动本地 UI。
autok3s serve --bind-address 0.0.0.0 --bind-port 8087
⚠️ Warning:
页面无登录认证,确保最小权限开放以及用完后及时关闭。
输出如下:
INFO[0000] run as daemon, listening on 127.0.0.1:8087
访问 UI:http://<操作机IP>:8087
AutoK3s UI 模板
如果今后要多次安装,可以在 UI 上创建可复用的模板,模板包括如下固定参数:
-
Credential Options:
- 腾讯云 Secret Id
- 腾讯云 Secret Key
-
Instance Options
- Basic
- Region:
ap-shanghai - Zone:
ap-shanghai-2 - Instance Type:
S5.MEDIUM8 - Image:
img-22trbn9x(ubuntu 20.04) - Disk Category:
CLOUD_SSD - Disk Size:
50G
- Region:
- Network
- Internet Max Bandwidth Out:
5 - EIP:
Disable - ⚠️ 注意:另外 3 个参数:VPC ID、SubnetID、Security Group Ids 每次创建时需要按需填写或留空
- Internet Max Bandwidth Out:
- SSH Public
- SSH User:
ubuntu - SSH Port:
22 - Keypair Id : 留空(⚠️ 注意:如果 Keypair Id 留空,会自动生成 Keypair)
- SSH User:
- SSH Private
- SSH Agent Auth:
Disable - SSH Key Path: 留空(⚠️ 注意:如果上面选择了 Keypair Id, 那么对应的SSH Key Path 也要填写)
- SSH Agent Auth:
- Advance
- 打了 3 个 tags,方便后续管理:
app=rancherenv=prodprovider=k3s
- 打了 3 个 tags,方便后续管理:
- Basic
-
K3s Options
-
Basic
- K3s Channel:
stable - K3s Version:
v1.21.7+k3s1(ℹ️ Info: 202201 根据 suse 官网选型的最新稳定版,k3s v1.21.7+k3s1,后面会按需调整版本) - Cluster:
Enable(启用集群模式,使用 etcd 组成高可用集群) - K3s Install Script:
http://rancher-mirror.cnrancher.com/k3s/k3s-install.sh
- K3s Channel:
-
Master
-
Master:
3 -
Master Extra Args:
--write-kubeconfig-mode "644" --pause-image registry.cn-hangzhou.aliyuncs.com/rancher/pause:3.6 --etcd-s3 --etcd-snapshot-schedule-cron 0 0 * * * --etcd-s3-endpoint cos.ap-shanghai.myqcloud.com --etcd-s3-access-key <your-cos-access-key> --etcd-s3-secret-key <your-cos-secret-key> --etcd-s3-bucket <your-cos-bucket> --etcd-s3-folder /rancher/k3s
-
-
Worker
- Worker:
0
- Worker:
-
Advance: 留空
-
TLS Sans: 留空 (⚠️ 如果前面会使用 CLB 作为负载均衡,那么建议填上 CLB VIP)
-
Registry, 见下面
registries.yaml
-
-
Additional Options
- UI:
explorer
- UI:
registries.yaml:
mirrors:
  docker.io:
    endpoint:
      - "https://mirror.ccs.tencentyun.com"
      - "https://registry.cn-hangzhou.aliyuncs.com"
      - "https://docker.mirrors.ustc.edu.cn"
  quay.io:
    endpoint:
      - "https://mirror.ccs.tencentyun.com"
configs:
  'ccr.ccs.tencentyun.com':
    auth:
      username: <your-account-id>
      password: <your-registry-password>
AutoK3s 通过 UI 创建 K3S 集群
访问 UI 界面, 点击 Quick Start, Provider 选择 tencent;
然后在下方填入自定义的信息, 主要是填写 Network 的信息, 如下图:
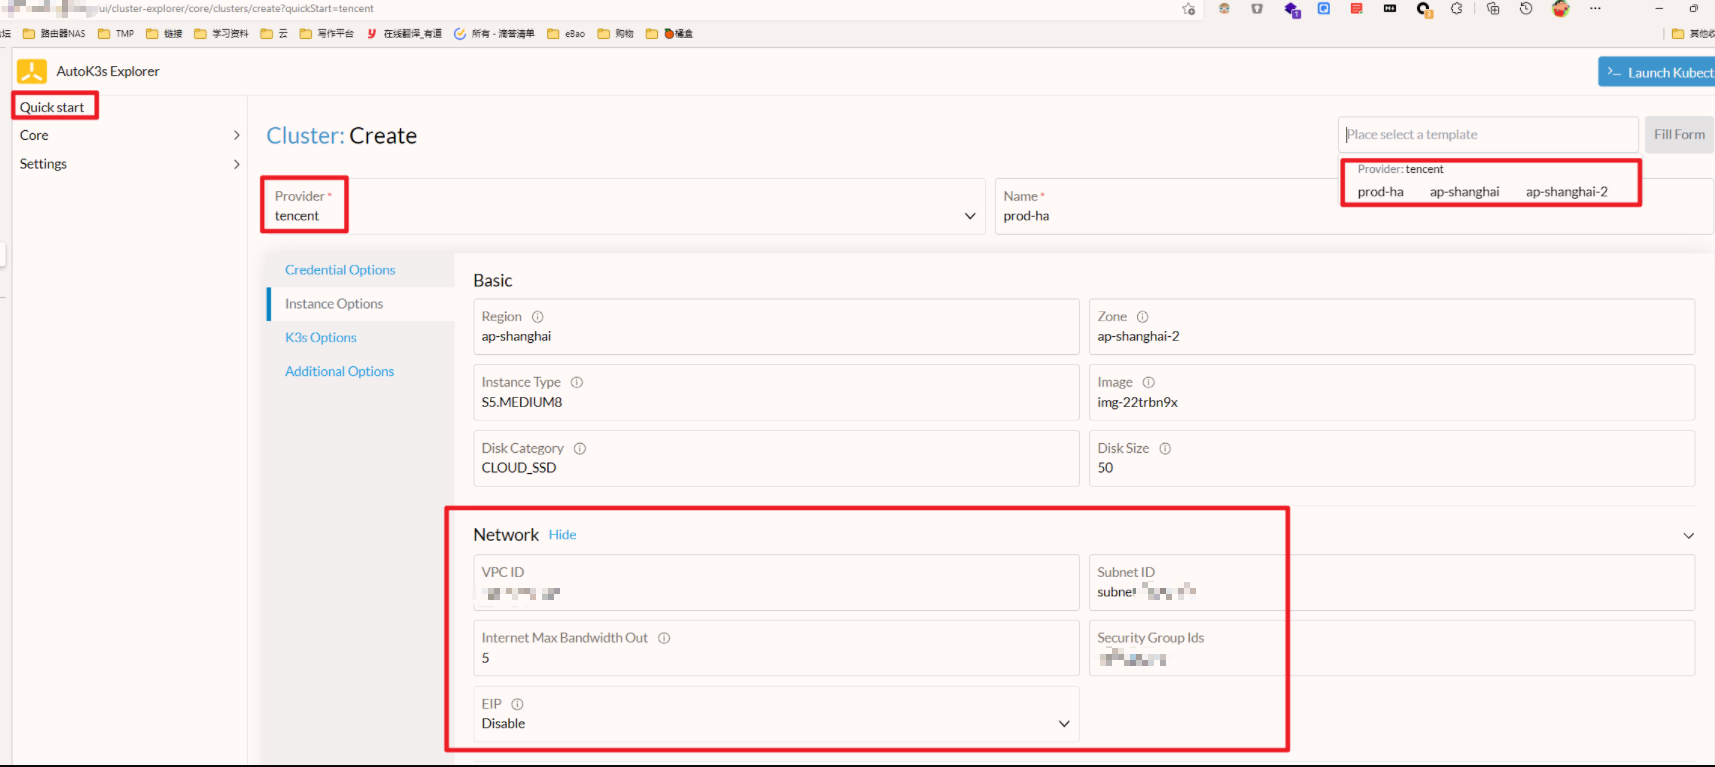
点击 Create, 等待返回结果即可.
AutoK3s CLI 命令
您也可以通过以下 CLI 在 腾讯云上快速创建一个 3 master, 0 worker 节点的 K3s 高可用集群。
autok3s create --provider tencent --cluster --enable [ "explorer" ] --k3s-channel stable --k3s-install-mirror INSTALL_K3S_MIRROR=cn --k3s-install-script http://rancher-mirror.cnrancher.com/k3s/k3s-install.sh --k3s-version v1.21.7+k3s1 --master 3 --master-extra-args '--write-kubeconfig-mode "644" --pause-image registry.cn-hangzhou.aliyuncs.com/rancher/pause:3.6 --etcd-s3 --etcd-snapshot-schedule-cron 0 0 * * * --etcd-s3-endpoint cos.ap-shanghai.myqcloud.com --etcd-s3-access-key <your-cos-access-key> --etcd-s3-secret-key <your-cos-secret-key> --etcd-s3-bucket <your-cos-bucket> --etcd-s3-folder /rancher/k3s' --name rancher-1 --ssh-port 22 --ssh-user ubuntu --tls-sans <your-clb-ip> --worker 0 --disk-category CLOUD_SSD --disk-size 50 --image img-22trbn9x --instance-type S5.MEDIUM8 --internet-max-bandwidth-out 5 --keypair-id <your-keypair-id> --region ap-shanghai --secret-id <your-tencent-secret-id> --secret-key <your-tencent-secret-key> --tags 'app=rancher' --tags 'env=prod' --tags 'provider=k3s' --zone ap-shanghai-2 --vpc <your-vpc-id> --subnet <your-subnet-id> --registry /etc/autok3s/registries.yaml
安装成功日志显示如下:
time="2022-02-12T14:52:16+08:00" level=info msg="[tencent] executing create logic..."
INFO[0000] [tencent] use existing key pair
time="2022-02-12T14:52:16+08:00" level=info msg="[tencent] 3 masters and 0 workers will be added"
time="2022-02-12T14:52:16+08:00" level=info msg="[tencent] check default security group autok3s in region ap-shanghai"
time="2022-02-12T14:52:16+08:00" level=info msg="[tencent] create default security group autok3s in region ap-shanghai"
time="2022-02-12T14:52:16+08:00" level=info msg="[tencent] check rules of security group autok3s"
time="2022-02-12T14:52:18+08:00" level=info msg="[tencent] 3 number of master instances will be created"
time="2022-02-12T14:52:23+08:00" level=info msg="[tencent] 3 number of master instances successfully created"
time="2022-02-12T14:52:23+08:00" level=info msg="[tencent] waiting for the instances [ins-xxxxx] to be in `RUNNING` status..."
time="2022-02-12T14:52:54+08:00" level=info msg="[tencent] instances [ins-xxxxx] are in `RUNNING` status"
time="2022-02-12T14:52:54+08:00" level=info msg="[tencent] executing init k3s cluster logic..."
time="2022-02-12T14:52:54+08:00" level=info msg="[tencent] creating k3s master-1..."
mirrors:
    docker.io:
        endpoint:
            - https://mirror.ccs.tencentyun.com
            - https://registry.cn-hangzhou.aliyuncs.com
            - https://docker.mirrors.ustc.edu.cn
    quay.io:
        endpoint:
            - https://mirror.ccs.tencentyun.com
configs:
    ccr.ccs.tencentyun.com:
        auth:
            username:
            password:
            auth: ""
            identity_token: ""
        tls: null
auths: {}
time="2022-02-12T14:53:26+08:00" level=info msg="[cluster] k3s master command: curl -sLS http://rancher-mirror.cnrancher.com/k3s/k3s-install.sh | INSTALL_K3S_MIRROR=cn K3S_TOKEN='xxxxxxx' INSTALL_K3S_EXEC='server  --tls-san xxxxx --tls-san xxxxxxxx --tls-san xxxxxxx --node-external-ip xxxxxx --write-kubeconfig-mode \"644\" --pause-image registry.cn-hangzhou.aliyuncs.com/rancher/pause:3.6 --disable-cloud-controller --cluster-cidr 10.42.0.0/16 --cluster-init' INSTALL_K3S_VERSION='v1.21.7+k3s1' sh -"
[INFO]  Using v1.21.7+k3s1 as release
[INFO]  Downloading hash http://rancher-mirror.cnrancher.com/k3s/v1.21.7-k3s1/sha256sum-amd64.txt
[INFO]  Downloading binary http://rancher-mirror.cnrancher.com/k3s/v1.21.7-k3s1/k3s
[INFO]  Verifying binary download
[INFO]  Installing k3s to /usr/local/bin/k3s
[INFO]  Creating /usr/local/bin/kubectl symlink to k3s
[INFO]  Creating /usr/local/bin/crictl symlink to k3s
[INFO]  Creating /usr/local/bin/ctr symlink to k3s
[INFO]  Creating killall script /usr/local/bin/k3s-killall.sh
[INFO]  Creating uninstall script /usr/local/bin/k3s-uninstall.sh
[INFO]  env: Creating environment file /etc/systemd/system/k3s.service.env
[INFO]  systemd: Creating service file /etc/systemd/system/k3s.service
[INFO]  systemd: Enabling k3s unit
[INFO]  systemd: Starting k3s
time="2022-02-12T14:53:59+08:00" level=info msg="[tencent] successfully created k3s master-1"
time="2022-02-12T14:53:59+08:00" level=info msg="[tencent] creating k3s master-2..."
...
time="2022-02-12T14:54:35+08:00" level=info msg="[tencent] successfully created k3s master-2"
time="2022-02-12T14:54:35+08:00" level=info msg="[tencent] creating k3s master-3..."
...
time="2022-02-12T14:55:06+08:00" level=info msg="[tencent] successfully created k3s master-3"
apiVersion: v1
clusters:
- cluster:
    certificate-authority-data: ......
    server: https://127.0.0.1:6443
  name: default
contexts:
- context:
    cluster: default
    user: default
  name: default
current-context: default
kind: Config
preferences: {}
users:
- name: default
  user:
    client-certificate-data: ......
    client-key-data: ......
time="2022-02-12T14:55:06+08:00" level=info msg="[tencent] deploying additional manifests"
time="2022-02-12T14:55:06+08:00" level=info msg="[tencent] successfully deployed additional manifests"
time="2022-02-12T14:55:06+08:00" level=info msg="[tencent] successfully executed init k3s cluster logic"
---
time="2022-02-12T14:55:07+08:00" level=info msg="[tencent] successfully deployed manifests"
time="2022-02-12T14:55:07+08:00" level=info msg="=========================== Prompt Info ==========================="
time="2022-02-12T14:55:07+08:00" level=info msg="Use 'autok3s kubectl config use-context prod-ha.ap-shanghai.tencent'"
time="2022-02-12T14:55:07+08:00" level=info msg="Use 'autok3s kubectl get pods -A' get POD status`"
? 到这里, K3S 集群创建完毕.
K3s 配置调整
? Important:
安装后, 默认 k8s api 通过 公网 IP 进行通信, 出于安全考虑,建议调整 systemd 配置使其通过内网进行通信.
步骤如下:
修改后两台 master 的 /etc/systemd/system/k3s.service.env 的 K3S_URL 为第一台 master 的内网地址
K3S_URL=https://<master1-internal-ip>:6443
第一台 master, 修改 /etc/systemd/system/k3s.service , 增加:
        '--node-ip' \
        '<master1-internal-ip>' \
        '--advertise-address' \
        '<master1-internal-ip>' \
另外2台, 增加及修改如下:
        '--server' \
        'https://<master1-internal-ip>:6443' \
        ...
        '--node-ip' \
        '<other-master-internal-ip>' \
        '--advertise-address' \
        '<other-master-internal-ip>' \
重启生效:
systemctl daemon-reload
systemctl restart k3s.service
验证:
查看 kubernetes 的 endpoint, 从公网地址变为内网地址, 如下:
apiVersion: v1
kind: Endpoints
metadata:
  name: kubernetes
  namespace: default
  ...
  labels:
    endpointslice.kubernetes.io/skip-mirror: 'true'
  managedFields:
    - manager: k3s
      operation: Update
      ...
  selfLink: /api/v1/namespaces/default/endpoints/kubernetes
subsets:
  - addresses:
      - ip: <master2-internal-ip>
      - ip: <master1-internal-ip>
      - ip: <master3-internal-ip>
    ports:
      - name: https
        port: 6443
        protocol: TCP
调整安全组
入站规则:
- TCP:22(SSH) 端口权限收紧
- TCP:6443(K8S API) 端口权限收紧
- UDP:8472(K3s vxlan) 只开放给内网
- TCP:10250(kube api-server) 只开放给内网
最终效果如下: (应该可以进一步收紧)

??? 至此, 完成腾讯云上 K3S 高可用集群的搭建, 并配置备份.
为后面的 Rancher 搭建做好了基础。
以下是安装后的相关输出信息:
-
3 个 Master 和 Server hostname、内外网IP
-
K3S API Server 地址:
https://<以上6个IP地址任一个或CLB的IP>:6443 -
K3S kubeconfig 配置:位于 k3s 的
/etc/rancher/k3s/k3s.yaml以及操作机的/root/.autok3s/.kube/config
三人行, 必有我师; 知识共享, 天下为公. 本文由东风微鸣技术博客 EWhisper.cn 编写.
Recommend
About Joyk
Aggregate valuable and interesting links.
Joyk means Joy of geeK