

redis georadius源码分析与性能优化 - orlion
source link: https://www.cnblogs.com/orlion/p/17121054.html
Go to the source link to view the article. You can view the picture content, updated content and better typesetting reading experience. If the link is broken, please click the button below to view the snapshot at that time.

原文地址: https://blog.fanscore.cn/a/51/
最近接到一个需求,开发中使用了redis georadius命令取附近给定距离内的点。完工后对服务进行压测后发现georadius的性能比预期要差,因此我分析了georadius的源码,并对原始的实现方案进行了优化,总结成了本文。
我们生产环境使用的redis版本为4.0.13,因此本文redis源码皆为4.0.13版本的源码
redis geo原理
往redis中添加坐标的命令是GEOADD key longitude latitude member [longitude latitude member ...],实际上redis会将经纬度转成一个52bit的整数作为zset的score,然后添加到zset中,所以实际上redis geo底层就是个zset,你甚至可以直接使用zset的命令来操作一个geo类型的key。
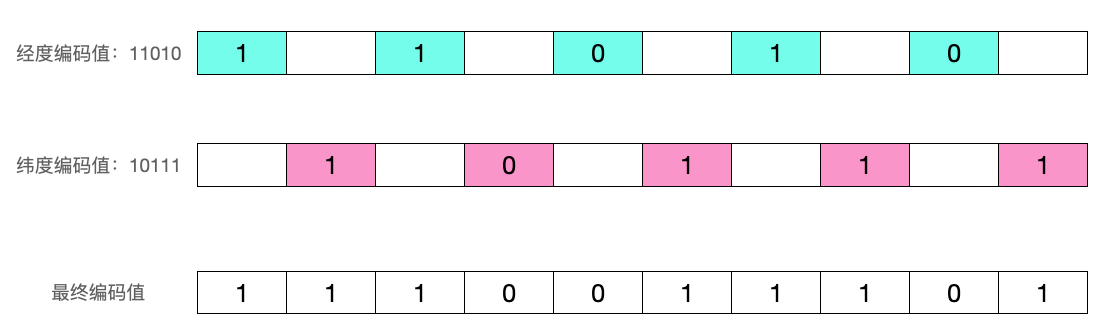
那么经纬度是如何转成52bit整数的呢?业内广泛使用的方法是首先对经纬度分别按照二分法编码,然后将各自的编码交叉组合成最后的编码。我们以116.505021, 39.950898这个坐标为例看下如何编码:
- 第一次二分操作,把经度分为两个区间:
[-180,0)和[0,180],116.505021落在右区间,因此用1表示第一次编码后的值 - 第二次二分操作,把
[0,180]分为两个区间[0,90)和[90,180],116.505021落在右区间,因此用1表示第二次编码后的值 - 第三次二分操作,把
[90,180]分为两个区间[90,135)和[135,180],116.505021落在左区间,因此用0表示第二次编码后的值 - 按照这种方法依次处理,做完5次后,得到经度值的5位编码值:
11010
| 分区次数 | 左区间 | 右区间 | 经度116.505021在区间 | 编码值 |
|---|---|---|---|---|
| 1 | [-180, 0) | [0, 180] | [0, 180] | 1 |
| 2 | [0, 90) | [90, 180] | [90, 180] | 1 |
| 3 | [90, 135) | [135, 180] | [90, 135]) | 0 |
| 4 | [90, 112.5) | [112.5, 135] | [112.5, 135] | 1 |
| 5 | [112.5, 123.75) | [123.75, 180] | [112.5, 123.75] | 0 |
- 按照同样的方法对纬度值进行编码,得到纬度值的5位编码值:
10111
| 分区次数 | 左区间 | 右区间 | 纬度39.950898在区间 | 编码值 |
|---|---|---|---|---|
| 1 | [-90, 0) | [0, 90] | [0, 90] | 1 |
| 2 | [0, 45) | [45, 90] | [0, 45] | 0 |
| 3 | [0, 22.5) | [22.5, 45] | [22.5, 45]) | 1 |
| 4 | [22.5, 33.75) | [33.75, 45] | [33.75, 45] | 1 |
| 5 | [33.75, 39.375) | [39.375, 45] | [39.375, 45] | 1 |
然后将经度编码11010和纬度编码值10111交叉得到最终geohash值1110011101
通常会使用base32将编码值转成字符串表示的hash值,与本文无关这里不多做介绍
根据如上的算法通常可以直观的写出如下的代码:
// 该代码来源于https://github.com/HDT3213/godis/blob/master/lib/geohash/geohash.go
func encode0(latitude, longitude float64, bitSize uint) ([]byte, [2][2]float64) {
	box := [2][2]float64{
		{-180, 180}, // lng
		{-90, 90},   // lat
	}
	pos := [2]float64{longitude, latitude}
	hash := &bytes.Buffer{}
	bit := 0
	var precision uint = 0
	code := uint8(0)
	for precision < bitSize {
		for direction, val := range pos {
			mid := (box[direction][0] + box[direction][1]) / 2
			if val < mid {
				box[direction][1] = mid
			} else {
				box[direction][0] = mid
				code |= bits[bit]
			}
			bit++
			if bit == 8 {
				hash.WriteByte(code)
				bit = 0
				code = 0
			}
			precision++
			if precision == bitSize {
				break
			}
		}
	}
	if code > 0 {
		hash.WriteByte(code)
	}
	return hash.Bytes(), box
}
可以看到基本就是上述算法的实际描述,但是redis源码中却是另外一种算法:
int geohashEncode(const GeoHashRange *long_range, const GeoHashRange *lat_range,
                  double longitude, double latitude, uint8_t step,
                  GeoHashBits *hash) {
    // 参数检查此处代码省略
    ...

    double lat_offset =
        (latitude - lat_range->min) / (lat_range->max - lat_range->min);
    double long_offset =
        (longitude - long_range->min) / (long_range->max - long_range->min);

    lat_offset *= (1 << step);
    long_offset *= (1 << step);
    // lat_offset与long_offset交叉
    hash->bits = interleave64(lat_offset, long_offset);
    return 1;
}
那么该如何理解redis的这种算法呢?我们假设经度用3位来编码

可以看到编码值从左到右实际就是从000到111依次加1递进的,给定的经度值在这条线的位置(偏移量)就是其编码值。假设给定经度值为50,那么它在这条线的偏移量就是(50 - -180) / (180 - -180) * 8 = 5即101
georadius原理
georadius命令格式为GEORADIUS key longitude latitude radius m|km|ft|mi [WITHCOORD] [WITHDIST] [WITHHASH] [COUNT count] [ASC|DESC] [STORE key] [STOREDIST key],以给定的经纬度为中心, 返回键包含的位置元素当中, 与中心的距离不超过给定最大距离的所有位置元素。
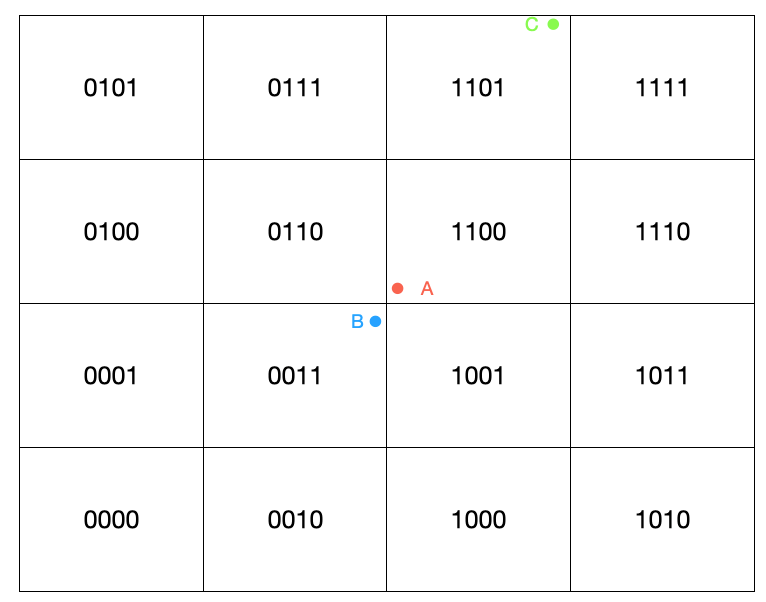
首先需要明确一点的是并非两个坐标点编码相近其距离越近,以上图为例,虽然A所在区块的编码与C所在区块编码较之B更相近,但实际B点距离A点更近。为了避免这种问题redis中会先计算出给定点东南西北以及东北、东南、西北、西南八个区块以及自己身所在的区块即九宫格区域内所有坐标点,然后计算与当前点的距离,再进一步筛选出符合距离条件的点。
假设要查附近100km的点,那么要保证矩形的边长要大于100km,才能保证能获取到所有符合条件的点,地球半径约6372.797km,第一次分割后可以得到四个东西长6372.797*π,南北长3186.319*π,继续切割:
| 分割次数 | 东西长(km) | 南北长(km) |
|---|---|---|
| 1 | 6372.797*π | 3186.319*π |
| 2 | 3186.319*π | 1593.160*π |
| 3 | 1593.160*π | 796.58*π |
| 4 | 796.58*π | 398.29*π |
| 5 | 398.29*π | 199.145*π |
| 6 | 199.145*π | 99.573*π |
| 7 | 99.573*π | 49.787*π |
分割到第七次时南北长49.787*π,如果再切分长度为24.894*π,长度小于100km,因此停止分割,所以如果要查附近100km的点,我们需要的精度为7
redis中根据给定的距离估算出需要的精度的代码如下
const double MERCATOR_MAX = 20037726.37;

uint8_t geohashEstimateStepsByRadius(double range_meters, double lat) {
    if (range_meters == 0) return 26;
    int step = 1;
    while (range_meters < MERCATOR_MAX) {
        range_meters *= 2;
        step++;
    }
    step -= 2;
    // 高纬度地区地球半径小因此适当降低精度
    if (lat > 66 || lat < -66) {
        step--;
        if (lat > 80 || lat < -80) step--;
    }

    if (step < 1) step = 1;
    if (step > 26) step = 26;
    return step;
}
调用encode0函数就能计算出给定点在step = geohashEstimateStepsByRadius()精度级别所在矩形区域的geohash值。接下来计算该矩形区域附近的八个区域。
...
// 调用encode0函数计算geohash
geohashEncode(&long_range,&lat_range,longitude,latitude,steps,&hash);
// 计算出附近八个区域
geohashNeighbors(&hash,&neighbors);
...
一个区域的东侧区域只要将经度的编码值+1即可,反之西侧区域只要将经度编码值-1即可,北侧区域只要将纬度的编码值+1即可,南侧区域只要将纬度的编码值-1即可。对应redis源码如下:
void geohashNeighbors(const GeoHashBits *hash, GeoHashNeighbors *neighbors) {
    neighbors->east = *hash;
    neighbors->west = *hash;
    neighbors->north = *hash;
    neighbors->south = *hash;
    neighbors->south_east = *hash;
    neighbors->south_west = *hash;
    neighbors->north_east = *hash;
    neighbors->north_west = *hash;
    // 纬度加1就是东侧区域
    geohash_move_x(&neighbors->east, 1);
    geohash_move_y(&neighbors->east, 0);
    // 纬度减1就是西侧区域
    geohash_move_x(&neighbors->west, -1);
    geohash_move_y(&neighbors->west, 0);
    // 精度减1就是南侧区域
    geohash_move_x(&neighbors->south, 0);
    geohash_move_y(&neighbors->south, -1);

    geohash_move_x(&neighbors->north, 0);
    geohash_move_y(&neighbors->north, 1);

    geohash_move_x(&neighbors->north_west, -1);
    geohash_move_y(&neighbors->north_west, 1);

    geohash_move_x(&neighbors->north_east, 1);
    geohash_move_y(&neighbors->north_east, 1);

    geohash_move_x(&neighbors->south_east, 1);
    geohash_move_y(&neighbors->south_east, -1);

    geohash_move_x(&neighbors->south_west, -1);
    geohash_move_y(&neighbors->south_west, -1);
}
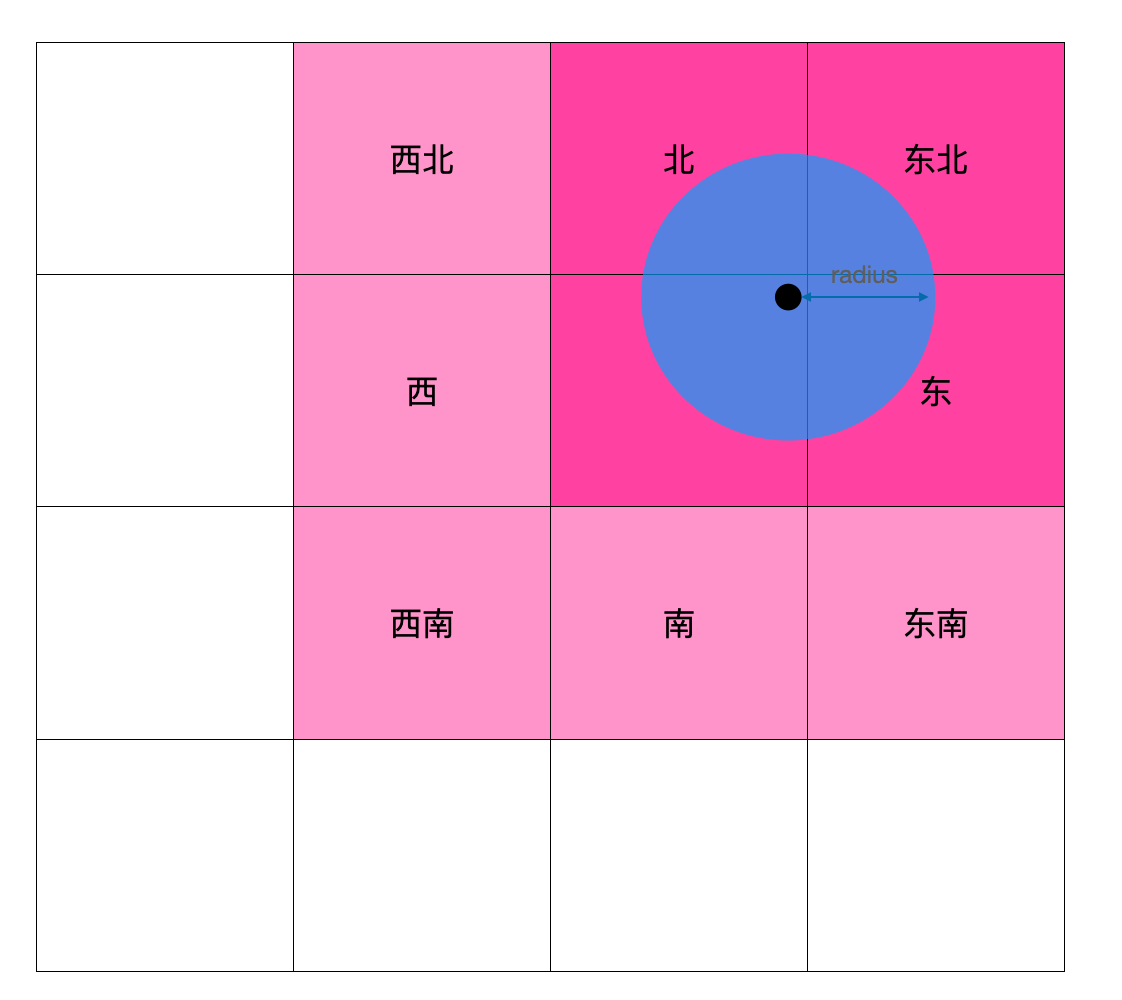
如上图所示,当给定点在中心区域的东北侧时,西北、西、西南、南、东南五个方向的区域中的所有点距离给定点肯定超过了给定距离,所以可以过滤掉,redis代码如下所示:
if (steps >= 2) {
    if (area.latitude.min < min_lat) {
        GZERO(neighbors.south); // 南侧区域置零,过滤南侧区域
        GZERO(neighbors.south_west);
        GZERO(neighbors.south_east);
    }
    if (area.latitude.max > max_lat) {
        GZERO(neighbors.north);
        GZERO(neighbors.north_east);
        GZERO(neighbors.north_west);
    }
    if (area.longitude.min < min_lon) {
        GZERO(neighbors.west);
        GZERO(neighbors.south_west);
        GZERO(neighbors.north_west);
    }
    if (area.longitude.max > max_lon) {
        GZERO(neighbors.east);
        GZERO(neighbors.south_east);
        GZERO(neighbors.north_east);
    }
}
计算出区块后下一步就需要将九宫格区域中的所有坐标点拿出来,依次计算与给定点的距离,然后过滤出符合给定距离的点
// 遍历九宫格内所有点,依次计算与给定点的距离,然后过滤出符合给定距离的点添加到ga中
int membersOfAllNeighbors(robj *zobj, GeoHashRadius n, double lon, double lat, double radius, geoArray *ga) {
    GeoHashBits neighbors[9];
    unsigned int i, count = 0, last_processed = 0;
    int debugmsg = 1;

    neighbors[0] = n.hash;
    neighbors[1] = n.neighbors.north;
    neighbors[2] = n.neighbors.south;
    neighbors[3] = n.neighbors.east;
    neighbors[4] = n.neighbors.west;
    neighbors[5] = n.neighbors.north_east;
    neighbors[6] = n.neighbors.north_west;
    neighbors[7] = n.neighbors.south_east;
    neighbors[8] = n.neighbors.south_west;

    // 遍历九宫格
    for (i = 0; i < sizeof(neighbors) / sizeof(*neighbors); i++) {
        ...
        // 当给定距离过大时,区块可能会重复
        if (last_processed &&
            neighbors[i].bits == neighbors[last_processed].bits &&
            neighbors[i].step == neighbors[last_processed].step)
        {
            continue;
        }
        // 取出宫格内所有点,依次计算距离,符合条件后添加到ga中
        count += membersOfGeoHashBox(zobj, neighbors[i], ga, lon, lat, radius);
        last_processed = i;
    }
    return count;
}

int membersOfGeoHashBox(robj *zobj, GeoHashBits hash, geoArray *ga, double lon, double lat, double radius) {
    GeoHashFix52Bits min, max;
    // 根据区块的geohash值计算出对应的zset的score的上下限[min,max]
    scoresOfGeoHashBox(hash,&min,&max);
    // 取出底层的zset中的[min,max]范围内的元素,依次计算距离,符合条件后添加到ga中
    return geoGetPointsInRange(zobj, min, max, lon, lat, radius, ga);
}
georadius优化
从上一节中可以看到,给定距离范围越大,则九宫格区域越大,九宫格区域内的点就越多,而每个点都需要计算与中间点的距离,距离计算又涉及到大量的三角函数计算,所以这部分计算是十分消耗CPU的。又因为redis工作线程是单线程的,因此无法充分利用多核,无法通过增加redis server的CPU核数来提升性能,只能添加从库。
距离计算算法及优化可以看下美团的这篇文章: https://tech.meituan.com/2014/09/05/lucene-distance.html
对于这个问题,我们可以将九宫格以及距离计算部分提升到我们的应用程序即redis客户端来进行,步骤如下:
- 在客户端计算出九宫格区域,然后转为zset score的范围
- 使用zrangebyscore命令从redis取出score范围内的所有点
- 遍历所有点依次计算与给定点的距离,筛选出符合距离条件的点
陌陌好像也是使用了这种方案:https://mp.weixin.qq.com/s/DL2P49y4R1AE2MIdkxkZtQ
由于我们使用golang进行开发,因此我将redis中的georadius部分代码转为了golang代码,并整理成一个库开源在了github:https://github.com/Orlion/go-georadius
原本的写法是:
client.GeoRadius(key, longitude, latitude, &redis.GeoRadiusQuery{
	Radius:    1000,
	Unit:      "m", // 距离单位
	Count:     1,          // 返回1条
	WithCoord: true,       // 将位置元素的经纬度一并返回
	WithDist:  true,       // 一并返回距离
})
ga := make([]redis.Z, 0)
ranges := geo.NeighborRanges(longitude, latitude, 1000)
for _, v := range ranges {
    zs, _ := client.ZRangeByScoreWithScores(key, redis.ZRangeBy{
		Min: strconv.Itoa(int(v[0])),
		Max: strconv.Itoa(int(v[1])),
	}).Result()
	for _, z := range zs {
	    dist := geox.GetDistanceByScore(longitude, latitude, uint64(z.Score))
		if dist < 1000 {
		    ga = append(ga, z)
		}
	}
}
压测结果对比
43w坐标点,取附近50km(九宫格内有14774点,符合条件的点约6000个)
50km优化前
Concurrency Level:      5
Time taken for tests:   89.770 seconds
Complete requests:      5000
Failed requests:        0
Write errors:           0
Total transferred:      720000 bytes
HTML transferred:       0 bytes
Requests per second:    55.70 [#/sec] (mean)
Time per request:       89.770 [ms] (mean)
Time per request:       17.954 [ms] (mean, across all concurrent requests)
Transfer rate:          7.83 [Kbytes/sec] received

Connection Times (ms)
              min  mean[+/-sd] median   max
Connect:        0    0   0.0      0       0
Processing:    23   90  10.7     90     159
Waiting:       23   89  10.7     89     159
Total:         23   90  10.7     90     159

Percentage of the requests served within a certain time (ms)
  50%     90
  66%     93
  75%     96
  80%     97
  90%    102
  95%    107
  98%    111
  99%    116
 100%    159 (longest request)
50km优化后
Concurrency Level:      5
Time taken for tests:   75.447 seconds
Complete requests:      5000
Failed requests:        0
Write errors:           0
Total transferred:      720000 bytes
HTML transferred:       0 bytes
Requests per second:    66.27 [#/sec] (mean)
Time per request:       75.447 [ms] (mean)
Time per request:       15.089 [ms] (mean, across all concurrent requests)
Transfer rate:          9.32 [Kbytes/sec] received

Connection Times (ms)
              min  mean[+/-sd] median   max
Connect:        0    0   0.0      0       0
Processing:    21   75  14.2     75     159
Waiting:       21   75  14.1     75     159
Total:         21   75  14.2     75     159

Percentage of the requests served within a certain time (ms)
  50%     75
  66%     80
  75%     84
  80%     86
  90%     92
  95%     98
  98%    104
  99%    111
 100%    159 (longest request)
可以看到性能并没有巨大的提升,我们减小距离范围到5km(符合条件的点有130个)再看下压测结果
5km优化前
Concurrency Level:      5
Time taken for tests:   14.006 seconds
Complete requests:      5000
Failed requests:        0
Write errors:           0
Total transferred:      720000 bytes
HTML transferred:       0 bytes
Requests per second:    356.99 [#/sec] (mean)
Time per request:       14.006 [ms] (mean)
Time per request:       2.801 [ms] (mean, across all concurrent requests)
Transfer rate:          50.20 [Kbytes/sec] received

Connection Times (ms)
              min  mean[+/-sd] median   max
Connect:        0    0   0.0      0       0
Processing:     2   14   5.5     12      33
Waiting:        2   14   5.5     12      33
Total:          2   14   5.5     12      34

Percentage of the requests served within a certain time (ms)
  50%     12
  66%     16
  75%     19
  80%     20
  90%     22
  95%     23
  98%     27
  99%     28
 100%     34 (longest request)
5km优化后
Concurrency Level:      5
Time taken for tests:   16.661 seconds
Complete requests:      5000
Failed requests:        0
Write errors:           0
Total transferred:      720000 bytes
HTML transferred:       0 bytes
Requests per second:    300.11 [#/sec] (mean)
Time per request:       16.661 [ms] (mean)
Time per request:       3.332 [ms] (mean, across all concurrent requests)
Transfer rate:          42.20 [Kbytes/sec] received

Connection Times (ms)
              min  mean[+/-sd] median   max
Connect:        0    0   0.0      0       0
Processing:     3   17   5.8     16      66
Waiting:        3   16   5.8     16      66
Total:          3   17   5.8     16      66

Percentage of the requests served within a certain time (ms)
  50%     16
  66%     20
  75%     21
  80%     22
  90%     24
  95%     26
  98%     28
  99%     30
 100%     66 (longest request)
可以看到当优化后性能更差了

猜测造成这个结果的原因应该是附近5km九宫格内的点比较少,所以优化后实际没减少多少距离计算,但多了n(n<=9)倍的请求数,多了额外的命令解析与响应内容的消耗,因此这种优化方案仅仅适用于附近点特别多的情况。
Recommend
About Joyk
Aggregate valuable and interesting links.
Joyk means Joy of geeK