

API with NestJS #95. CI/CD with Amazon ECS and GitHub Actions
source link: https://wanago.io/2023/02/13/nestjs-api-ci-cd-aws-ecs-github-actions/
Go to the source link to view the article. You can view the picture content, updated content and better typesetting reading experience. If the link is broken, please click the button below to view the snapshot at that time.

API with NestJS #95. CI/CD with Amazon ECS and GitHub Actions

In the last two parts of this series, we’ve explained the details of manually deploying our NestJS application with Amazon Elastic Compute Cloud. It’s a great idea to go through the above process by hand to understand it fully. The next step is automating it by implementing Continuous Integration and Continuous Delivery. In this article, we explain each part of the above process and automate our deployments.
To follow this article, check out those parts first:
Integrating AWS with GitHub Actions
GitHub Actions is a CI/CD platform built into GitHub and allows us to automate our deployment. For example, it allows us to run a set of scripts every time someone creates a pull request or merges changes to a particular branch.
We need a way for the GitHub Actions platform to perform actions on AWS on our behalf. One way to do that is to allow GitHub to authenticate to our AWS user.
We probably defined some users in the Identity and Access Management (IAM) interface in AWS, and we could allow GitHub to log in to their accounts. Unfortunately, we need to make sure to give GitHub as few permissions as possible to increase security.
To do that, let’s go to the IAM dashboard and click on the “Add users” button.

Let’s use the “Attach policies directly” option and create a policy from scratch to maximize our control over the permissions. We want GitHub to be able to perform a few actions on our behalf:
- log in to ECR,
- build the Docker image and push it to the registry,
- update an existing ECS service.
To allow the above, when creating a policy, click on the “JSON” button and use the following JSON:
"Version": "2012-10-17", "Statement": [ "Action": [ "ecr-public:*", "ecs:UpdateService", "sts:GetServiceBearerToken" "Resource": "*", "Effect": "Allow" "Action": [ "iam:PassRole" "Effect": "Allow", "Resource": "*", "Condition": { "StringLike": { "iam:PassedToService": [ "ecs-tasks.amazonaws.com" |
In the previous parts of this series we’ve worked with a public ECR repository, therefore we need to use the appropriate action with the public suffix. We could take it a step further and replace ecr-public:* with the exact actions GitHub needs to push the Docker image to ECR.
Now, we need to name our new policy and finalize it.

The last step is to use the above policy when creating our new IAM user.

Creating access keys for a user
Once we have our new user, we need to provide a way for GitHub actions to use it. We could achieve that by going to our new user in the IAM dashboard and creating access keys.

An access key consists of two parts: the access key and the secret access key. Make sure not to share them with anyone, though. Having both of them allows you to authenticate as a given user.

We need to open our GitHub repository and go to Settings -> Secrets and variables -> Actions. On this page, we need to add two repository secrets:
- AWS_ACCESS_KEY_ID
- AWS_SECRET_ACCESS_KEY

Configuring GitHub Actions
A GitHub Actions workflow is an automated process that an event in our repository can trigger. A typical example of an event is pushing new changes to the master branch. Every time that happens, we want a few things to take place:
- create a Docker image and push it to ECR,
- update an existing ECS service.
To configure GitHub actions, we need to create a YAML file in the .github/workflows directory.
.github/workflows/deploy.yml
name: Deploy to production push: branches: - master jobs: create-docker-image: name: Build and push the Docker image to ECR runs-on: ubuntu-latest steps: deploy: name: Build and deploy the new Docker image to ECS runs-on: ubuntu-latest needs: create-docker-image steps: |
Our workflow consists of two jobs: creating the Docker image and deploying it. It’s triggered every time we push new code to the master branch.
Let’s take a closer look at the create-docker-image job.
create-docker-image: name: Build and push the Docker image to ECR runs-on: ubuntu-latest steps: - name: Check out the repository uses: actions/checkout@v3 - name: Configure AWS credentials uses: aws-actions/configure-aws-credentials@v1-node16 with: aws-access-key-id: ${{ secrets.AWS_ACCESS_KEY_ID }} aws-secret-access-key: ${{ secrets.AWS_SECRET_ACCESS_KEY }} aws-region: us-east-1 - name: Login to Amazon ECR Public id: login-ecr-public uses: aws-actions/amazon-ecr-login@v1 with: registry-type: public - name: Build, tag, and push docker image to Amazon ECR Public REGISTRY: ${{ steps.login-ecr-public.outputs.registry }} REGISTRY_ALIAS: e2b3j8w6 REPOSITORY: nestjs-api IMAGE_TAG: nestjs-api run: | docker build -t $IMAGE_TAG . docker tag $IMAGE_TAG:latest $REGISTRY/$REGISTRY_ALIAS/$IMAGE_TAG:latest docker push $REGISTRY/$REGISTRY_ALIAS/$REPOSITORY:latest |
Our job consists of four steps. Understanding what happens requires us to go through each step one by one.
Checking out the repository
For GitHub action to be able to access our code, we need to check out our repository. Fortunately, GitHub has an action we can use to check out the code for us.
- name: Check out the repository uses: actions/checkout@v3 |
Configuring the AWS credentials
The next step is to configure AWS credentials. This is why we had to put the AWS_ACCESS_KEY_ID and AWS_SECRET_ACCESS_KEY as secrets into our GitHub repository.
- name: Configure AWS credentials uses: aws-actions/configure-aws-credentials@v1-node16 with: aws-access-key-id: ${{ secrets.AWS_ACCESS_KEY_ID }} aws-secret-access-key: ${{ secrets.AWS_SECRET_ACCESS_KEY }} aws-region: us-east-1 |
Please notice that I’m using aws-region: us-east-1 above. Most AWS services are region-specific, but ECR public registry requires authentication in the us-east-1 region.
Logging into ECR
As soon as we have the credentials, we can log into ECR.
- name: Log into the Amazon ECR Public id: login-ecr-public uses: aws-actions/amazon-ecr-login@v1 with: registry-type: public |
Building the Docker image and pushing it
The last step of this job is to build the docker image and push it to our ECR repository.
- name: Build, tag, and push docker image to Amazon ECR Public REGISTRY: ${{ steps.login-ecr-public.outputs.registry }} REGISTRY_ALIAS: e2b3j8w6 REPOSITORY: nestjs-api IMAGE_TAG: nestjs-api run: | docker build -t $IMAGE_TAG . docker tag $IMAGE_TAG:latest $REGISTRY/$REGISTRY_ALIAS/$IMAGE_TAG:latest docker push $REGISTRY/$REGISTRY_ALIAS/$REPOSITORY:latest |
Above, we use the REGISTRY: ${{ steps.login-ecr-public.outputs.registry }} variable that comes from the previous step of this job. We also need to set up the correct registry alias that we can find on the page of our ECR registry in the AWS dashboard.
Deploying the new Docker image
The other job deploys the image created in the previous job.
deploy: name: Deploy the new Docker image to ECS runs-on: ubuntu-latest needs: create-docker-image steps: - name: Configure AWS credentials uses: aws-actions/configure-aws-credentials@v1-node16 with: aws-access-key-id: ${{ secrets.AWS_ACCESS_KEY_ID }} aws-secret-access-key: ${{ secrets.AWS_SECRET_ACCESS_KEY }} aws-region: eu-central-1 - name: Update ECS service run: | aws ecs update-service --cluster nest_cluster --service nestjs_service --task-definition nest_task --force-new-deployment |
Please notice that above we use aws-region: eu-central-1, which is the location of my cluster. It depends on which AWS region we are using. We also add needs: create-docker-image to make sure GitHub Actions wait for the previous job to be finished.
The most crucial part of the above code is using the aws ecs update-service to update the existing ECS service we’ve defined in one of the previous parts of this series. Please make sure to provide the correct details:
- the name of your cluster with the --cluster argument,
- name of your service using --service,
- the proper task definition with the --task-definition argument.
We also use the --force-new-deployment flag to force a new deployment even when the service definition didn’t change. Thanks to the above, we deploy a new version of our service that uses the latest Docker image from our ECR repository.
This is the full content of our .github/workflows/deploy.yml file:
.github/workflows/deploy.yml
name: Deploy to production push: branches: - master jobs: create-docker-image: name: Build and push the Docker image to ECR runs-on: ubuntu-latest steps: - name: Check out the repository uses: actions/checkout@v3 - name: Configure AWS credentials uses: aws-actions/configure-aws-credentials@v1-node16 with: aws-access-key-id: ${{ secrets.AWS_ACCESS_KEY_ID }} aws-secret-access-key: ${{ secrets.AWS_SECRET_ACCESS_KEY }} aws-region: us-east-1 - name: Log into the Amazon ECR Public id: login-ecr-public uses: aws-actions/amazon-ecr-login@v1 with: registry-type: public - name: Build, tag, and push docker image to Amazon ECR Public REGISTRY: ${{ steps.login-ecr-public.outputs.registry }} REGISTRY_ALIAS: e2b3j8w6 REPOSITORY: nestjs-api IMAGE_TAG: nestjs-api run: | docker build -t $IMAGE_TAG . docker tag $IMAGE_TAG:latest $REGISTRY/$REGISTRY_ALIAS/$IMAGE_TAG:latest docker push $REGISTRY/$REGISTRY_ALIAS/$REPOSITORY:latest deploy: name: Deploy the new Docker image to ECS runs-on: ubuntu-latest needs: create-docker-image steps: - name: Configure AWS credentials uses: aws-actions/configure-aws-credentials@v1-node16 with: aws-access-key-id: ${{ secrets.AWS_ACCESS_KEY_ID }} aws-secret-access-key: ${{ secrets.AWS_SECRET_ACCESS_KEY }} aws-region: eu-central-1 - name: Update ECS service run: | aws ecs update-service --cluster nest_cluster --service nestjs_service --task-definition nest_task --force-new-deployment |
As soon as we push the above file to the master branch, we can go to the Actions page in our repository to inspect the logs of our workflow.

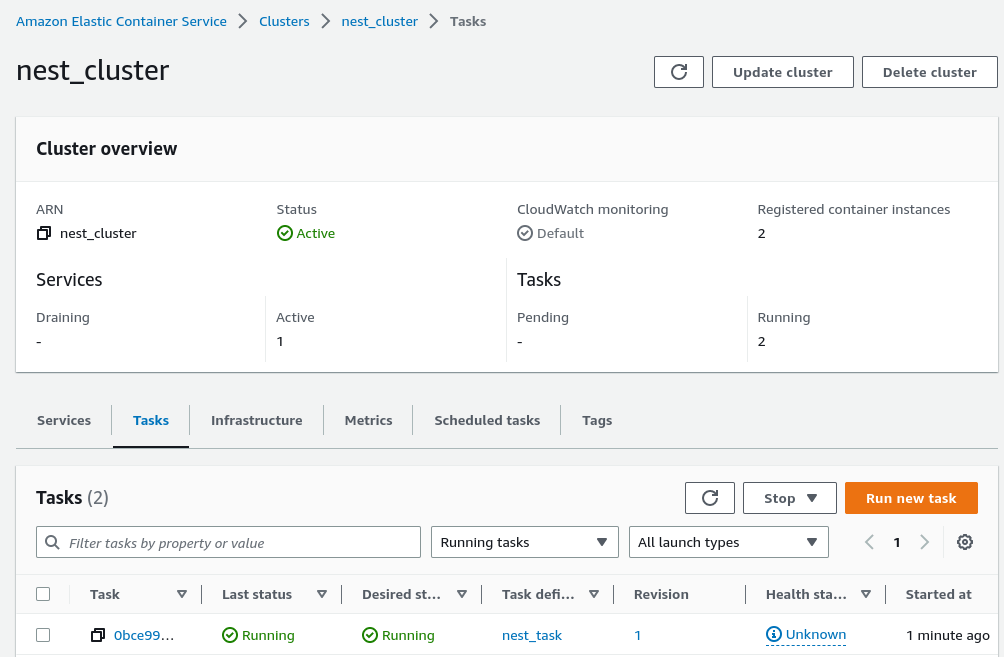
Doing that spawns a new task in our cluster that deploys our NestJS application. As soon as the task finishes, the latest version of our code is up.
Summary
In this article, we’ve learned how to use GitHub Actions with AWS ECS to set up a CI/CD pipeline. Whenever we push new changes to the master branch, GitHub Actions creates a new Docker image and redeploys our ECS service. There is still more to learn when it comes to setting up CI/CD with GitHub Actions, so stay tuned!
Series Navigation<< API with NestJS #94. Deploying multiple instances on AWS with a load balancer
</body
Recommend
About Joyk
Aggregate valuable and interesting links.
Joyk means Joy of geeK