

基于 Ubuntu 服务器配置原生的 Socks5 网关代理服务器 - 张晓栋
source link: https://www.cnblogs.com/berkerdong/p/17110158.html
Go to the source link to view the article. You can view the picture content, updated content and better typesetting reading experience. If the link is broken, please click the button below to view the snapshot at that time.

基于 Ubuntu 服务器配置原生的 Socks5 网关代理服务器
常见的代理协议有 http、https、socks4/5 这三种,http协议的代理搭建方案最简单,但是http代理无法访问https网站,https代理无法实现调用远端dns,所以我个人推荐使用Scoks5协议做代理,本文用于记录在Ubuntu系统中搭建Socks5代理的详细步骤,采用dante-server作为服务端。
首先更新服务器安装源sudo apt-get update
执行安装命令sudo apt-get install dante-server
添加一个用户用于进行连接代理时的身份验证
sudo useradd zhangxiaodong
sudo passwd zhangxiaodong
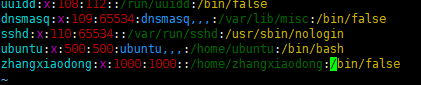
由于我们只想使用这个用户用作Socks的代理登陆验证,所以禁止这个用户的系统登陆权限
sudo vim /etc/passwd
将zhangxiaodong的shell改成 /bin/false,如下图
sudo vim /etc/danted.conf
清空原来的内容输入以下内容
我这边的服务器网卡IP为 172.16.50.1,并采用 1080 作为代理端口则配置如下
logoutput: stderr

internal: 172.16.50.1  port = 1080

external: 172.16.50.1

#验证账户:username  不验证账户:none
method: username

user.privileged: root
user.notprivileged: nobody
user.libwrap: nobody
compatibility: sameport
compatibility: reuseaddr
extension: bind

client pass {
  from: 0.0.0.0/0 to: 0.0.0.0/0
  log: connect disconnect error
}

pass {
  from: 0.0.0.0/0 to: 0.0.0.0/0
  command: bind
  log: connect disconnect error
}

pass {
  from: 0.0.0.0/0 to: 0.0.0.0/0
  command: bindreply udpreply
  log: connect error
}

pass {
  from: 0.0.0.0/0 to: 0.0.0.0/0 port 1-65535
  protocol: tcp udp
}

pass {
  from: 0.0.0.0/0 to: 0.0.0.0/0 port 1-65535
  command: udpassociate
}
保存退出即可,然后执行启动sudo /etc/init.d/danted start
查看服务运行状态sudo netstat -anp | grep 1080
至此关于 基于 Ubuntu 服务器配置原生的 Socks5 网关代理服务器 就讲解完了,有任何不明白的,可以在文章下面评论或者私信我,欢迎大家积极的讨论交流,有兴趣的朋友可以关注我目前在维护的一个 .NET 基础框架项目,项目地址如下
https://github.com/berkerdong/NetEngine.git
https://gitee.com/berkerdong/NetEngine.git
Recommend
About Joyk
Aggregate valuable and interesting links.
Joyk means Joy of geeK