

引子 - 实现轻量的 ioc 容器 - 布落
source link: https://www.cnblogs.com/blogure/p/intro-insni.html
Go to the source link to view the article. You can view the picture content, updated content and better typesetting reading experience. If the link is broken, please click the button below to view the snapshot at that time.

IoC 反转控制原则也被叫做依赖注入 DI, 容器按照配置注入实例化的对象.
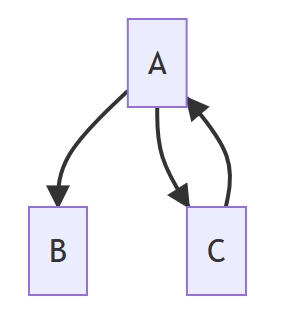
假设 A 的相互依赖关系如下图, 如何将 A 对象实例化并注入属性.
本文将实现一个轻量化的 IoC 容器, 完成对象的实例化和注入, 基于注解不依赖于任何库. (注解参考 JSR-330)
前提 JSR-330
| 注解 | 说明 |
|---|---|
| @Inject | 标识可注入的字段 |
| @Named | 基于字符串的限定符, 表示需要 IoC 接管的类 |
JSR-330 远比前提中提到的更多, 可以看下官方的解释说明, 这里只截取了本文目的需要开发的部分.
按照背景中的依赖关系图, 先定义出来对象.
@Named("a")
public class A {
	@Inject
	public B b;
	@Inject
	public C c;
	// getter and setter
	// constructor
}

@Named("b")
public class B {
	@Value("hello world!")
	public String name;
	// getter and setter
	// constructor
}

@Named("c")
public class C {
	@Inject
	public A a;
	// getter and setter
	// constructor
}
为了清晰, 这里省略了构造器和 setter 函数, 这些对于实现是必要的, 如果需要完整代码可以参照项目 xnuc-insni.
先考虑简单情况, A 与 B 的相互依赖如何实现.
注解定义参照 inject, 这里只截取了需要的部分.
@Target(FIELD)
@Retention(RUNTIME)
public @interface Inject {}

@Target(TYPE)
@Retention(RUNTIME)
public @interface Named {
	String value() default "";
}
对于简单类型, 可以提供一个设定的数值, 使用 Val 注解完成.
@Target(FIELD)
@Retention(RUNTIME)
public @interface Value {
	String value() default "";
}
容器定义很简单, 有一个实例的表和类定义的表.
public class Context {
	public HashMap<String, Object> instances; // 实例
	public HashMap<String, Class<?>> defineds; // 类定义
}
获取类定义
获取类定义用到反射和注解, 不了解相关知识的同学可以先补一下这部分. 如果要获取类定义, 最简单的方法就是找到全部类进行类加载. 首先获取主类加载器, 找到全部 .class 路径.
Enumeration<URL> resources = Main.class.getClassLoader().getResources(pkg.replace(".", "/"));
File file = new File(resources.nextElement().getFile());
获取全部包下的全部类, 存在子包的情况, 可以用递归或者队列, 最开始用的队列, 但是发现队列对于子包处理时非常复杂的, 需要根据队列信息维护当前包名. 递归的系统栈会帮我们记录下来自然就不需要我们自己维护了, 选择递归的方式处理子包.
private void subdir(String pkg, File file, List<Class<?>> clzes) throws Exception {
	for (File f : file.listFiles()) { // 退出条件
		if (f.isFile()) {
			String clsName = String.format("%s.%s", pkg, f.getName().substring(0, f.getName().lastIndexOf(".")));
			clzes.add(Class.forName(clsName));
		}
		if (f.isDirectory())
			subdir(String.format("%s.%s", pkg, f.getName()), f, clzes);
	}
}
这里选择了参数传返回值, 更好的方式还是直接内部将 list 构造出来, 返回出去.
拿到全部类后, 将有存在注解的类筛选出来. 放入 Context 的 defineds.
for (Class<?> c : clzList) {
	if (c.getAnnotation(Named.class) != null) {
		defineds.put(c.getAnnotation(Named.class).value(), c);
	}
}
此时初始化完毕, 类定义获取到. 另外, 其实这里已经可以开始注入了, 但是真实情况下, 如果类定义比较多, 那么初始化将非常耗时, 如果选择用到再说的原则, 初始化就会快很.
Context#get 用来获取容器对象, 如果对象还没有实例化, 就实例化. 实例化 instance 实现比较简单, 找到定义的 filed 进行 set. 这也解释了, 为什么需要无参构造器和 setter. 对于基础值也可以通过 @Value 主动赋予自定义的数值. 对于 @Inject 直接去 Context#get即可.
private Object instance(Object rto, Class<?> clz) throws Exception {
	for (Field field : clz.getFields()) {
		if (field.getAnnotation(Value.class) != null) {
			PropertyDescriptor descriptor = new PropertyDescriptor(field.getName(), clz);
			descriptor.getWriteMethod().invoke(rto, field.getAnnotation(Value.class).value());
		}
		if (field.getAnnotation(Inject.class) != null) {
			PropertyDescriptor descriptor = new PropertyDescriptor(field.getName(), clz);
			descriptor.getWriteMethod().invoke(rto, get(field.getName()));
		}
	}
	return rto;
}
写完 instance 的逻辑, get 的逻辑就比较简单了. 有返回, 没有实例化.
public Object get(String objName) throws Exception {
	if (instances.get(objName) != null)
		return instances.get(objName);

	if (defineds.get(objName) == null)
		throw new Exception(String.format("objName %s undefined", objName));
	Class<?> clz = defineds.get(objName);
	instances.put(objName, instance(unreadyInstances.get(objName), clz));
	return instances.get(objName);
}
这样只能解决 A 和 B 的问题, 对于 A 和 C 的问题这样就会导致注入 A 时发现需要注入 C, 而注入 C 时又要去注入 A, 最终导致循环.
循环依赖解决方法很简单, 只需要一个表记录下我现在正在注入 A, 所以 C 注入 A 的时候直接把正在注入的 A 丢给 C 即可.
所以新增 Context 成员 public HashMap<String, Object> unreadyInstances
public class Context {

	public HashMap<String, Object> instances;
	++ public HashMap<String, Object> unreadyInstances;
	public HashMap<String, Class<?>> defineds;
}
注入前先把这个对象扔进去, 注入时如果其他对象有循环依赖, Context#get 可以直接返回这个对象.
public Object get(String objName) throws Exception {
	if (instances.get(objName) != null)
		return instances.get(objName);
	++ if (unreadyInstances.get(objName) != null)
	++	return unreadyInstances.get(objName);

	if (defineds.get(objName) == null)
		throw new Exception(String.format("objName %s undefined", objName));
	Class<?> clz = defineds.get(objName);

	++ unreadyInstances.put(objName, clz.getDeclaredConstructor().newInstance());
	instances.put(objName, instance(unreadyInstances.get(objName), clz));
	++ unreadyInstances.remove(objName);

	return instances.get(objName);
}
最终的代码就是这样了, 写个 Main 类, 运行下.
public class Main {
	public static void main(String[] args) throws Exception {
		Context ioc = Context.run(Main.class);
		A a = (A) ioc.get("a");
		System.out.println(a.getC().getA().getB().getName()); // >hello world!
	}
}
全部代码可以参考 xnuc - insni 喜欢可以帮忙点个 ⭐Star.
Recommend
About Joyk
Aggregate valuable and interesting links.
Joyk means Joy of geeK