

WPF-3D图形 - 步、步、为营
source link: https://www.cnblogs.com/qsnn/p/17067738.html
Go to the source link to view the article. You can view the picture content, updated content and better typesetting reading experience. If the link is broken, please click the button below to view the snapshot at that time.
WPF-3D图形
WPF的3D功能可以在不编写任何c#代码的情况下进行绘制,只需要使用xaml即可完成3D图形的渲染。本文主要讲述了WPF-3D中的关键概念, 以及常用到的命中测试、2d控件如何在3D对象中进行渲染,除此之外,还演示了如何导入外部3D模型。
视口指的是图像要展示在哪里,可以理解为展示图形的舞台。在WPF中视口使用Viewport3D标签表示。
如果把视口比作舞台,那相机就可以理解为观众的眼睛,不同的眼睛位置会看到不同的角度。
<Viewport3D>
    <!--相机-->
    <Viewport3D.Camera>
        <!--透视相机-->
        <PerspectiveCamera Position="8,5,10"
                           LookDirection="-7,-2,-10"
                           FarPlaneDistance="40"
                           NearPlaneDistance="10"
                           FieldOfView="60">
            <PerspectiveCamera.Transform>
                <RotateTransform3D CenterX="1.5" CenterY="1" CenterZ="0.5">
                    <RotateTransform3D.Rotation>
                        <AxisAngleRotation3D Angle="45" Axis="0,1,0"/>
                    </RotateTransform3D.Rotation>
                </RotateTransform3D>
            </PerspectiveCamera.Transform>
        </PerspectiveCamera>
        <!--正交相机,用法类似-->
        <!--<OrthographicCamera/>-->
</Viewport3D.Camera>
没有光源也就看不到3D对象
<!--光线-->
<ModelVisual3D>
    <ModelVisual3D.Content>
        <Model3DGroup>
            <!--散射光线-->
            <AmbientLight Color="#FFF"/>
            <!--平行光-->
            <!--<DirectionalLight Color="#FFF" Direction="0,-1,0"/>-->
            <!--点光源-->
            <!--<PointLight Position="0,0,0"/>-->
            <!--锥形辐射光:手电筒-->
            <!--<SpotLight Position="0,0,0" Direction="0,0,-3"/>-->
        </Model3DGroup>
    </ModelVisual3D.Content>
</ModelVisual3D>
3D几何对象只是将轮廓定义出来,表面是没有定义的,所以需要使用材质来展现出不同的物体表面。也可以理解为3D几何对象只是勾勒出物体的轮廓,而材质则是上颜色。
<ModelUIElement3D >
    <ModelUIElement3D.Model>
        <GeometryModel3D>
            <!--材质-->
            <GeometryModel3D.Material>
                <!--散射材质-->
                <DiffuseMaterial Brush="Blue"/>
                <!--镜面材质-->
                <!--<SpecularMaterial SpecularPower="1" Brush="Blue"/>-->
                <!--自发光材质-->
                <!--<EmissiveMaterial Color="Green" />-->
            </GeometryModel3D.Material>
            <GeometryModel3D.Geometry>
                <MeshGeometry3D Positions="0,0,1 0,2,1 3,2,1 3,0,1
                                           0,0,0 0,2,0 3,2,0 3,0,0"
                                TriangleIndices="2,3,7 7,6,2 1,5,4 0,1,4"/>
            </GeometryModel3D.Geometry>
        </GeometryModel3D>
    </ModelUIElement3D.Model>
</ModelUIElement3D>
3D对象则是具体的对象,在WPF中视口使用<ModelUIElement3D>标签表示。在WPF中,图形是以三角面片作为最基本的展示单元,因为三角形是最稳定的即三个点可以确定出唯一的一个平面,任何复杂的图形都是由多个三角面片组成的。在给TriangleIndices属性赋值时,一定注意三个点的顺序。
命中测试(鼠标交互)
想要使用鼠标点击得到某个图形,可以在具体的某个3D对象中,增加MouseLeftButtonDown事件
<ModelUIElement3D MouseLeftButtonDown="ModelUIElement3D_MouseLeftButtonDown">事件中可以进行改变颜色等操作
private void ModelUIElement3D_MouseLeftButtonDown(object sender, MouseButtonEventArgs e)
{
    ModelUIElement3D mui3d = sender as ModelUIElement3D;
    var model = mui3d.Model as GeometryModel3D;
    (model.Material as DiffuseMaterial).Brush = Brushes.Orange;
}
如果有很多3D对象,在每个具体的对象上面增加事件会很麻烦,也可以直接在Viewport3D中增加事件
<Viewport3D MouseLeftButtonDown="Viewport3D_MouseLeftButtonDown">在时间中急性转换处理
private void Viewport3D_MouseLeftButtonDown(object sender, MouseButtonEventArgs e)
{
    Viewport3D viewport3D=sender as Viewport3D;
    Point location=e.GetPosition(viewport3D);
    HitTestResult hitTestResult=VisualTreeHelper.HitTest(viewport3D, location);
    if (hitTestResult != null)
    {
        ...//具体操作
    }
}
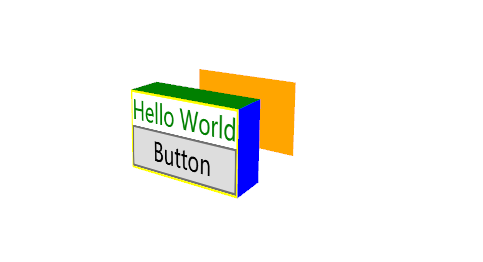
3D对象中2D控件渲染
如果要在3D对象中增加控件,可以使用Viewport2DVisual3D标签,实现如下图所示的效果。
<Viewport3D>
 <Viewport2DVisual3D>
    <Viewport2DVisual3D.Geometry>
        <MeshGeometry3D Positions="0,0,1 0,2,1 3,2,1 3,0,1
                       0,0,0 0,2,0 3,2,0 3,0,0"
            TriangleIndices="0,2,1 0,3,2 6,4,5 6,7,4"
            TextureCoordinates="0,1 0,0 1,0 1,1"/>
        <!--TextureCoordinates:表示的二维平面坐标,原点:左上角-->
    </Viewport2DVisual3D.Geometry>

    <Viewport2DVisual3D.Material>
        <DiffuseMaterial Viewport2DVisual3D.IsVisualHostMaterial="True" Brush="White"/>
    </Viewport2DVisual3D.Material>
    <Viewport2DVisual3D.Visual>
    <Border BorderThickness="1" BorderBrush="Yellow">
        <StackPanel>
            <TextBlock Text="Hello World" Foreground="Green" />
            <Button Content="Button" Click="Button_Click"/>
        </StackPanel>
    </Border>
    </Viewport2DVisual3D.Visual>
 </Viewport2DVisual3D>
<Viewport3D>
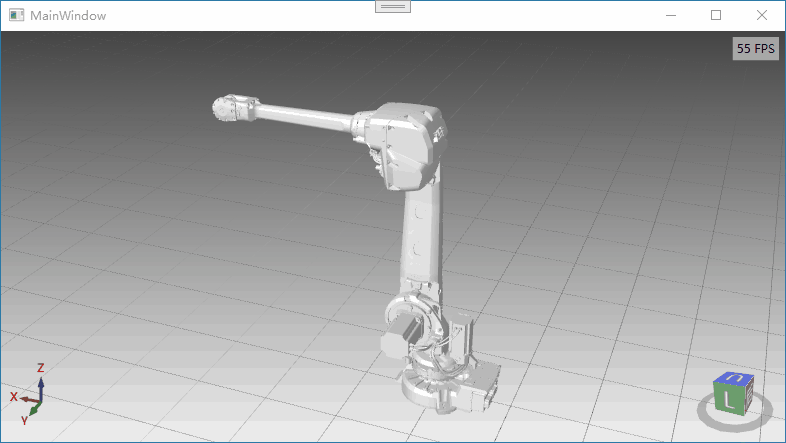
外部导入3D模型
在wpf中绘制3D模型还是非常麻烦的,在实际工作中用的比较多的是从外部导入已有的3d模型。推荐一个比较好的第三方库HelixToolKit
<Window x:Class="WpfApp2.MainWindow"
        xmlns="http://schemas.microsoft.com/winfx/2006/xaml/presentation"
        xmlns:x="http://schemas.microsoft.com/winfx/2006/xaml"
        xmlns:d="http://schemas.microsoft.com/expression/blend/2008"
        xmlns:mc="http://schemas.openxmlformats.org/markup-compatibility/2006"
        xmlns:local="clr-namespace:WpfApp2"
        xmlns:helix="http://helix-toolkit.org/wpf"
        mc:Ignorable="d"
        Title="MainWindow" Height="450" Width="800">
    <Grid>
        <helix:HelixViewport3D  Name="viewPort3d"
                                ShowViewCube="True"
            ViewCubeBackText="后" ViewCubeFrontText="前" ViewCubeHeight="100" ViewCubeWidth="100"
            ViewCubeVerticalPosition="Bottom"
            ViewCubeHorizontalPosition="Right"

            ShowCoordinateSystem="True"
            CoordinateSystemLabelForeground="Red"
            CoordinateSystemHorizontalPosition="Left"
            CoordinateSystemVerticalPosition="Bottom"

            ShowFrameRate="True"

            IsViewCubeEdgeClicksEnabled="False">


            <helix:HelixViewport3D.Camera>
                <PerspectiveCamera FieldOfView="45"
                                   LookDirection="0,0,-414.387754871885"
                                   FarPlaneDistance="30000"
                                   NearPlaneDistance="0.1"
                                   Position="9.9475983006414E-14,91.037123633789,414.387754871885"
                                   UpDirection="0,1,0"/>
            </helix:HelixViewport3D.Camera>

            <helix:HelixViewport3D.Background>
                <LinearGradientBrush EndPoint="0.5,1" StartPoint="0.5,0">
                    <GradientStop Color="#444" Offset="0"/>
                    <GradientStop Color="#EEE" Offset="1"/>
                </LinearGradientBrush>
            </helix:HelixViewport3D.Background>
            <helix:GridLinesVisual3D Width="16000" Length="16000" Thickness="2" MinorDistance="500" MajorDistance="500" Fill="Gray" />

            <!--很重要,没有灯光场景是黑的-->
            <helix:DefaultLights/>

            <ModelVisual3D x:Name="model"></ModelVisual3D>

        </helix:HelixViewport3D>
    </Grid>
</Window>
namespace WpfApp2
{
    public partial class MainWindow : Window
    {
        List<string> modelPaths = new List<string>();
        string basePath = AppDomain.CurrentDomain.BaseDirectory + "\\ModelFiles\\";
        public MainWindow()
        {
            InitializeComponent();
            modelPaths.Add("IRB4600_20kg-250_LINK1_CAD_rev04.stl");
            modelPaths.Add("IRB4600_20kg-250_LINK2_CAD_rev04.stl");
            modelPaths.Add("IRB4600_20kg-250_LINK3_CAD_rev005.stl");
            modelPaths.Add("IRB4600_20kg-250_LINK4_CAD_rev04.stl");
            modelPaths.Add("IRB4600_20kg-250_LINK5_CAD_rev04.stl");
            modelPaths.Add("IRB4600_20kg-250_LINK6_CAD_rev04.stl");
            modelPaths.Add("IRB4600_20kg-250_LINK3_CAD_rev04.stl");
            modelPaths.Add("IRB4600_20kg-250_CABLES_LINK1_rev03.stl");
            modelPaths.Add("IRB4600_20kg-250_CABLES_LINK2_rev03.stl");
            modelPaths.Add("IRB4600_20kg-250_CABLES_LINK3_rev03.stl");
            modelPaths.Add("IRB4600_20kg-250_BASE_CAD_rev04.stl");

            this.Loaded += MainWindow_Loaded;

            viewPort3d.RotateGesture = new MouseGesture(MouseAction.RightClick);
            viewPort3d.PanGesture = new MouseGesture(MouseAction.LeftClick);
        }
        private void MainWindow_Loaded(object sender, RoutedEventArgs e)
        {
            viewPort3d.Camera.LookDirection = new Vector3D(2038, -5200, -2930);
            viewPort3d.Camera.UpDirection = new Vector3D(-0.145, 0.372, 0.917);
            viewPort3d.Camera.Position = new Point3D(-1571, 4801, 3774);

            this.model.Content = InitializeModels(this.modelPaths);
        }

        private Model3DGroup InitializeModels(List<string> modelsNames)
        {
            Model3DGroup group = new Model3DGroup();
            try
            {
                ModelImporter import = new ModelImporter();

                foreach (string modelName in modelsNames)
                {
                    var materialGroup = new MaterialGroup();
                    Color mainColor = Colors.White;
                    //EmissiveMaterial emissMat = new EmissiveMaterial(new SolidColorBrush(mainColor));
                    DiffuseMaterial diffMat = new DiffuseMaterial(new SolidColorBrush(mainColor));
                    //SpecularMaterial specMat = new SpecularMaterial(new SolidColorBrush(mainColor), 2000);
                    //materialGroup.Children.Add(emissMat);
                    materialGroup.Children.Add(diffMat);
                    //materialGroup.Children.Add(specMat);

                    var link = import.Load(basePath + modelName);
                    GeometryModel3D model = link.Children[0] as GeometryModel3D;
                    model.Material = materialGroup;
                    model.BackMaterial = materialGroup;

                    group.Children.Add(link);
                }
            }
            catch (Exception e)
            {
                MessageBox.Show("未知异常:" + e.StackTrace);
            }
            return group;
        }
    }
}
Recommend
About Joyk
Aggregate valuable and interesting links.
Joyk means Joy of geeK