

Create Project Planning and Resource Management Calendar in .NET MAUI
source link: https://www.syncfusion.com/blogs/post/create-project-planning-and-resource-management-calendar-in-net-maui.aspx?utm_campaign=alvinashcraft_blog_edmjan23
Go to the source link to view the article. You can view the picture content, updated content and better typesetting reading experience. If the link is broken, please click the button below to view the snapshot at that time.

Create Project Planning and Resource Management Calendar in .NET MAUI
A project planning calendar for resource scheduling is an effective project management tool. It makes it easier to plan, track, update, and collaborate on project tasks with your team. The Syncfusion .NET MAUI Scheduler control allows you to create a real-time project planning and resource management calendar by using the resource view feature in timeline views.
In this blog, I’ll explain how to create a calendar for planning employees’ tasks using the Scheduler’s timeline month view.

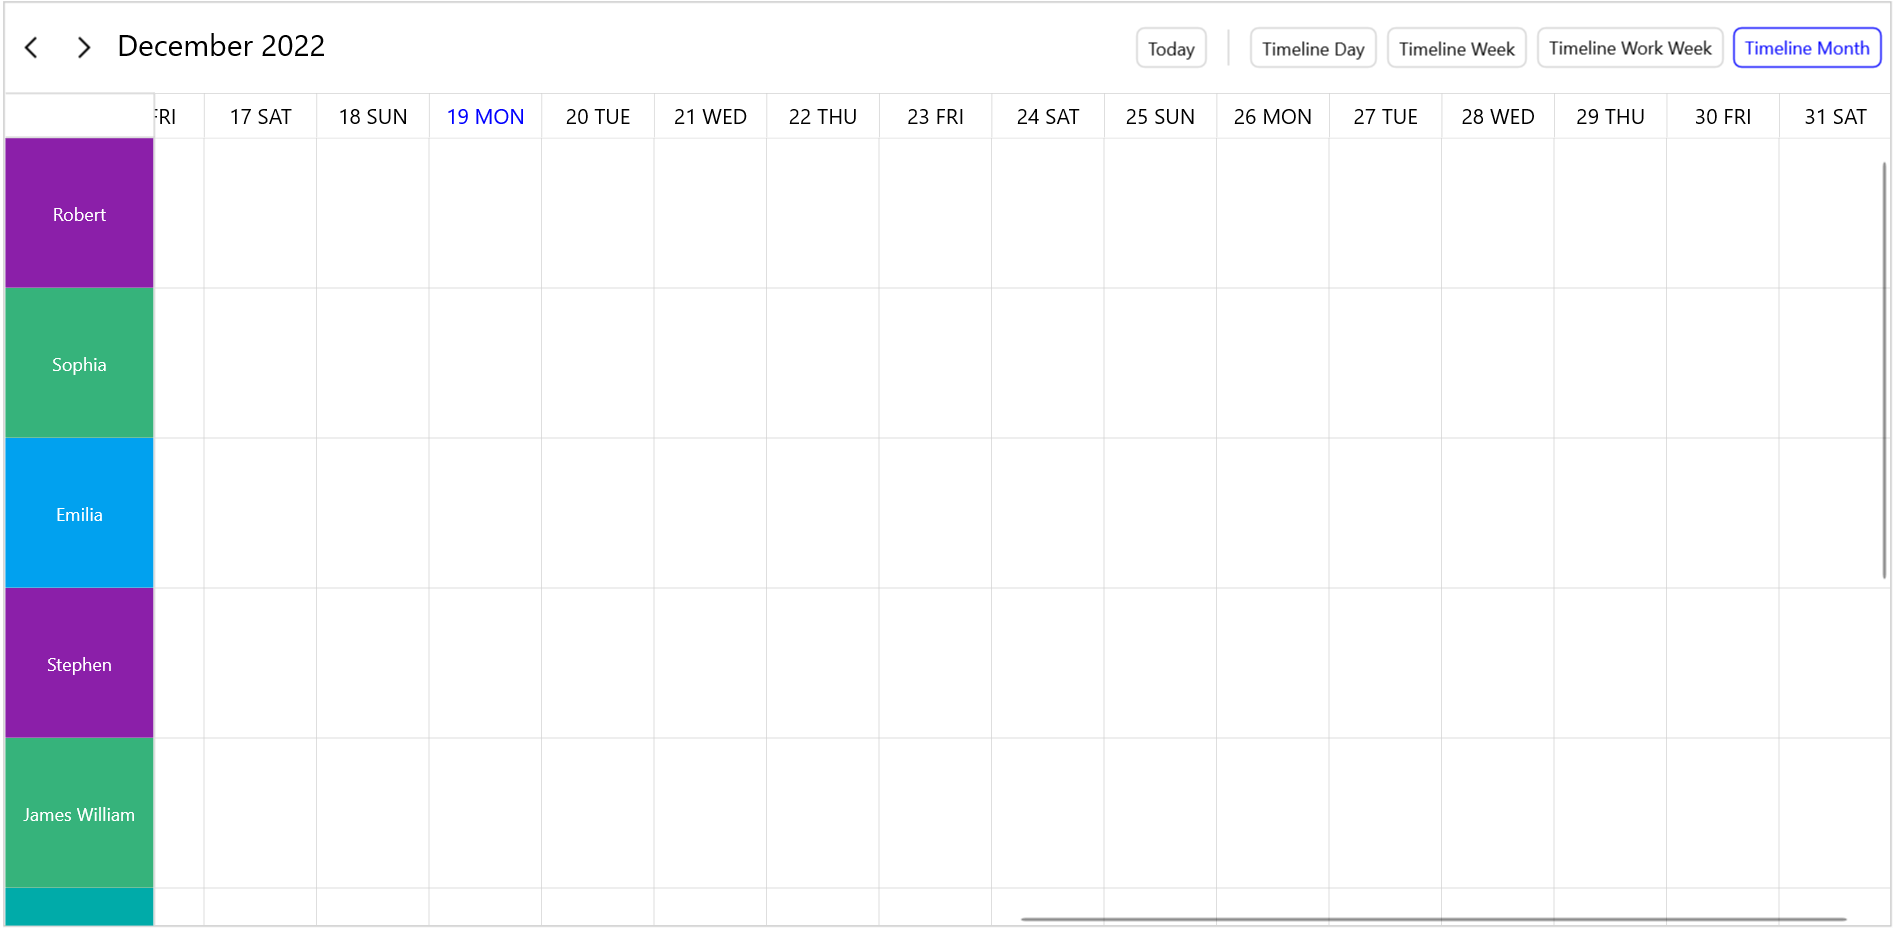
Project planning calendar in .NET MAUI
Note: If you are new to using our .NET MAUI Scheduler control, please read the Getting Started with .NET MAUI Scheduler documentation before proceeding further.
Designing the calendar for each resource
Create a calendar for each employee to schedule and manage their tasks in one place. The Scheduler resources feature can be used to manage tasks that the project team is planning to work on in the timeline day, timeline week, timeline workweek, and timeline month views.
Refer to the following code to initialize the scheduler timeline month view.
xmlns:schedule="clr-namespace:Syncfusion.Maui.Scheduler;assembly=Syncfusion.Maui.Scheduler"

 <schedule:SfScheduler x:Name="Scheduler" View="TimelineMonth"/>
Create an employee model
It’s very simple to add a resource view to the Scheduler control. You can create any kind of object and bind it in the Resources property of SchedulerResourceView class.
Here, we have created a custom Employee resource model with the required fields Id, Name, and other optional fields like Background, Role, and ImageName.
public class Employee
{
    /// <summary>
    /// Gets or sets employee name.
    /// </summary>
    public string Name { get; set; }

    /// <summary>
    /// Gets or sets resource object id.
    /// </summary>
    public object Id { get; set; }

    /// <summary>
    /// Gets or sets employee background.
    /// </summary>
    public Brush Background { get; set; }

    /// <summary>
    /// Gets or sets an image for an employee.
    /// </summary>
    public string ImageName { get; set; }

    /// <summary>
    /// Gets or sets employee role.
    /// </summary>
    public string Role { get; set; }
}
Then, map the custom Employee properties to the Mapping properties of the SchedulerResourceView class.
Refer to the following code.
<schedule:SfScheduler x:Name="Scheduler" View="TimelineMonth">
  <schedule:SfScheduler.ResourceView>
    <schedule:SchedulerResourceView>
       <schedule:SchedulerResourceView.Mapping>
          <schedule:SchedulerResourceMapping Name="Name"
                                             Id="Id"
                                             Background="Background"
                                             />
       </schedule:SchedulerResourceView.Mapping>
    </schedule:SchedulerResourceView>
  </schedule:SfScheduler.ResourceView>
 </schedule:SfScheduler>
Adding resources to the Scheduler
To add the resources to the Scheduler, create custom resources or employees and bind them to the Resources property of the SchedulerResourceView class.
Refer to the following code.
this.Resources = this.GetSchedulerResources();
/// <summary>
/// Method to get resources or employees to the scheduler.
/// </summary>
/// <returns>Scheduler resources</returns>
private List<object> GetSchedulerResources()
{
     Random random = new();
     List<object> resources = new();
     List<string> employeeNames = new List<string>
     {
        "Robert", "Sophia", "Emilia" , "Stephen",  "James William", "Johnny", "Daniel", "Adeline Ruby","Kinsley Elena",
     };

     for (int i = 0; i < 9; i++)
     {
         Employee employees = new();
         employees.Name = employeeNames[i];
         employees.Background = this.resourceColors[random.Next(this.resourceColors.Count)];
         employees.Id = i + 1;

         if (employees.Name == "Robert")
         {
            employees.ImageName = "people9.png";
            employees.Role = "Project manager";
         }
         else if (employees.Name == "Sophia")
         {
            employees.ImageName = "people2.png";
            employees.Role = "Team lead";
         }
         else if (employees.Name == "Emilia")
         {
            employees.ImageName = "people7.png";
            employees.Role = "Developer";
         }
         else if (employees.Name == "Stephen")
         {
             employees.ImageName = "people1.png";
             employees.Role = "Developer";
         }
         else if (employees.Name == "James William")
         {
             employees.ImageName = "people6.png";
             employees.Role = "Developer";
         }
         else if (employees.Name == "Daniel")
         {
             employees.ImageName = "people3.png";
             employees.Role = "Tester";
         }
         else if (employees.Name == "Johnny")
         {
             employees.ImageName = "people8.png";
             employees.Role = "Tester";
         }
         else if (employees.Name == "Adeline Ruby")
         {
              employees.ImageName = "people4.png";
              employees.Role = "Support Engineer";
         }
         else if (employees.Name == "Kinsley Elena")
         {
               employees.ImageName = "people5.png";
               employees.Role = "Content writer";
         }
         resources.Add(employees);
     }

     return resources;
}
<schedule:SfScheduler x:Name="Scheduler" View="TimelineMonth">
   <schedule:SfScheduler.ResourceView>
      <!--Bind custom Resources from view model-->
      <schedule:SchedulerResourceView Resources="{Binding Resources}">
         <schedule:SchedulerResourceView.Mapping>
           <schedule:SchedulerResourceMapping Name="Name"
                                              Id="Id"
                                              Background="Background"
                                              Foreground="Foreground"/>
         </schedule:SchedulerResourceView.Mapping>
      </schedule:SchedulerResourceView>
   </schedule:SfScheduler.ResourceView>
   <schedule:SfScheduler.BindingContext>
      <local:ResourceViewModel/>
   </schedule:SfScheduler.BindingContext>

</schedule:SfScheduler>
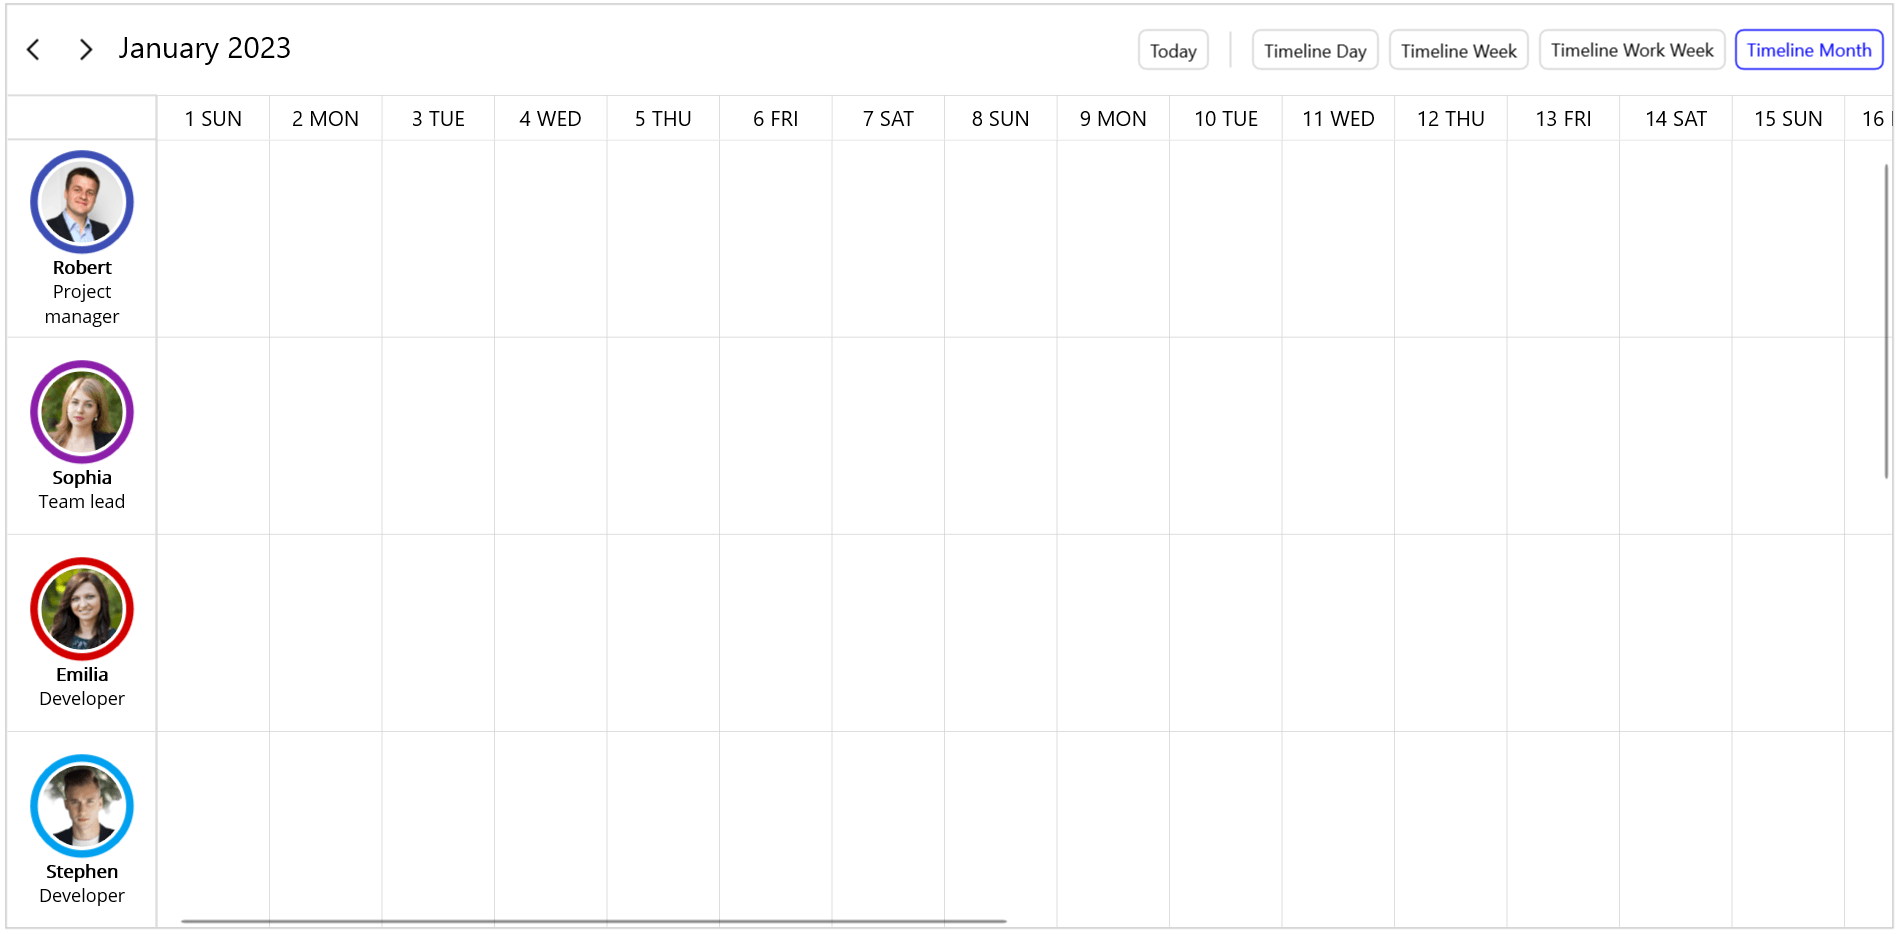
Add resources to the .NET MAUI Scheduler
Customizing the resource view appearance
You can also customize the resource view’s appearance using the HeaderTemplate property in the SchedulerResourceView class.
Refer to the following code example to customize the resource view appearance.
<ContentPage.Resources>
     <local:ImageSourceConverter x:Key="imageConverter"/>
  </ContentPage.Resources>
  <schedule:SfScheduler x:Name="Scheduler" View="TimelineMonth">
     <schedule:SfScheduler.ResourceView>
       <schedule:SchedulerResourceView Resources="{Binding Resources}">
           <!--Customize the resource view appearance-->
           <schedule:SchedulerResourceView.HeaderTemplate>
              <DataTemplate>
                 <StackLayout Padding="5" Orientation="Vertical" VerticalOptions="Center" HorizontalOptions="Fill">
                   <Border StrokeThickness="5"
                           Stroke="{Binding Background}"
                           HorizontalOptions="Center"
                           HeightRequest="{OnIdiom Desktop = 70, Phone = 65}"
                           WidthRequest="{OnIdiom Desktop= 70, Phone=65}">
                     <Border.StrokeShape>
                         <RoundRectangle CornerRadius="150"/>
                     </Border.StrokeShape>
                     <Image WidthRequest="{OnIdiom Desktop = 55, Phone = 50}"
                            HeightRequest="{OnIdiom Desktop = 55, Phone = 50}"
                            HorizontalOptions="Center"
                            Source="{Binding DataItem.ImageName,Converter={StaticResource imageConverter}}"
                            VerticalOptions="Center"
                            Aspect="Fill"/>
                  </Border>
                  <Label Text="{Binding Name}" TextColor="Black" FontSize="{OnIdiom Desktop= 12, Phone=10}" VerticalTextAlignment="Center" HorizontalTextAlignment="Center"/>
               </StackLayout>
             </DataTemplate>
          </schedule:SchedulerResourceView.HeaderTemplate>
          <schedule:SchedulerResourceView.Mapping>
             <schedule:SchedulerResourceMapping Name="Name"
                                                Id="Id"
                                                Background="Background"
                                                Foreground="Foreground"/>
         </schedule:SchedulerResourceView.Mapping>
       </schedule:SchedulerResourceView>
     </schedule:SfScheduler.ResourceView>
     <schedule:SfScheduler.BindingContext>
         <local:ResourceViewModel/>
     </schedule:SfScheduler.BindingContext>
</schedule:SfScheduler>
public class ImageSourceConverter : IValueConverter
{
   public object Convert(object? value, Type targetType, object parameter, CultureInfo culture)
   {
      return ImageSource.FromFile(value as string);
   }

   public object ConvertBack(object value, Type targetType, object parameter, CultureInfo culture)
   {
      throw new NotImplementedException();
   }
}
Customize the .NET MAUI Scheduler resource view appearance
Resource availability
You can manage and track the availability of resources by using the special time region or blackout dates in timeline views.
The following code example adds Saturday and Sunday as blackout dates to avoid task planning during days off.
scheduler.SelectableDayPredicate = (date) =>
{
   if (date.DayOfWeek == DayOfWeek.Sunday || date.DayOfWeek == DayOfWeek.Saturday)
   {
      return false;
    }
    return true;
};
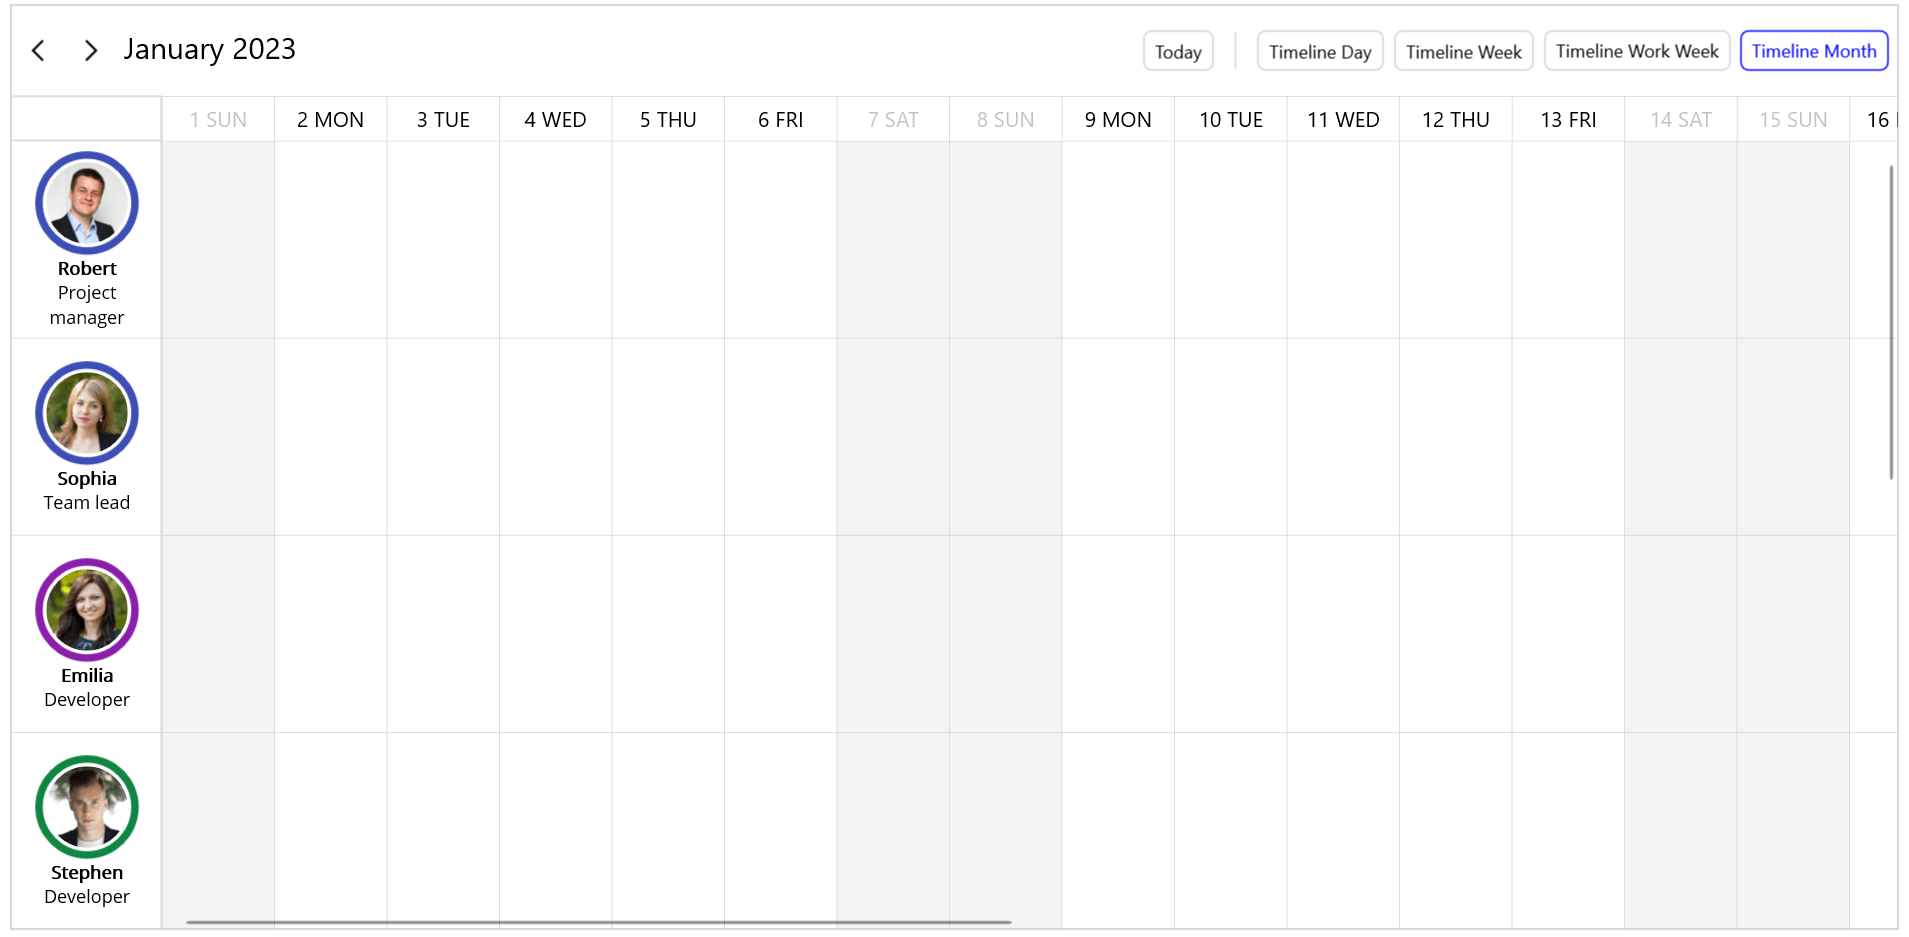
Plan resource availability
Scheduling tasks to the resources
Next, we are going to create tasks for employees by using the AppointmentsSource property.
Creating employee Task model
Create a custom Task data model for an employee with the required fields From, To, and other optional fields.
public class Task
{
        /// <summary>
        /// Gets or sets the value to display the start date.
        /// </summary>
        public DateTime From { get; set; }

        /// <summary>
        /// Gets or sets the value to display the end date.
        /// </summary>
        public DateTime To { get; set; }

        /// <summary>
        /// Gets or sets the value to display the subject.
        /// </summary>
        public string TaskName { get; set; }

        /// <summary>
        /// Gets or sets the value to display the background.
        /// </summary>
        public Brush Background { get; set; }

        /// <summary>
        /// Gets or sets the value to display the Rule.
        /// </summary>
        public string RecurrenceRule { get; set; }

        /// <summary>
        /// Gets or sets the value to display the resource collection.
        /// </summary>
        public ObservableCollection<object> Resources { get; set; }

        /// <summary>
        /// Gets or sets the value to an all-day appointment.
        /// </summary>
        public bool IsAllDay { get; set; }
 }
Mapping the custom task module to the Scheduler
Then, map the custom employee Task data model properties to the AppointmentMapping properties of the SfScheduler class. You can create tasks for employees by using the ResourceIds property of the SchedulerAppointmentMapping class.
<schedule:SfScheduler x:Name="Scheduler"
                        AllowedViews="TimelineDay,TimelineWeek,TimelineWorkWeek,TimelineMonth"
                        View="TimelineMonth">
   <schedule:SfScheduler.AppointmentMapping>
      <schedule:SchedulerAppointmentMapping
                    Subject="TaskName"
                    StartTime="From"
                    EndTime="To"
                    IsAllDay="IsAllDay"
                    Background="Background"
                    RecurrenceRule="RecurrenceRule"
                    ResourceIds="Resources"/>
   </schedule:SfScheduler.AppointmentMapping>
 </schedule:SfScheduler>
Create tasks for the employees
In the following, tasks are created for resources using the Resources of Task by assigning the Id of the scheduler resources.
this.Tasks = this.GetEmployeeTasks();
/// <summary>
/// Method to get tasks for employees.
/// </summary>
/// <returns>Employee tasks</returns>
private List<Task> GetEmployeeTasks()
{
            Random random = new();
            List<Task> tasks = new();
            DateTime dateFrom = DateTime.Now.AddDays(-80);
            DateTime dateTo = DateTime.Now.AddDays(80);

            List<string> managerTasks = new List<string> { "Project goal", "Project plan", "API review", "Project final review" };
            List<string> teamleadTasks = new List<string> { "Project requirments", "Project design", "API analysis", "Feature review", "Support coordinate", "Tech Blog", "Sprint plan", "Sprint review", "Sprint retrospect" };
            List<string> supportTasks = new List<string> { "Customer meeting", "User guide documentation", "Knowbase document" };
            List<string> developmentTasks = new List<string> { "Base for calendar", "Implement month calendar", "Implement year calendar", "Implement decade calendar", "Implement century calendar", "Implement date selection", "Implement range selection", "Implement blackout dates", "Implement multiple selection" };
            List<string> testingTasks = new List<string> { "Unit testing", "UI automation", "Performance testing", "Memory leak testing", "Feature testing", "Demos testing", "Automate test cases", "Peer testing", "Exploratory testing", "Sanity testing" };
            List<string> documentationTasks = new List<string> { "User guide documentation", "Feature tour", "Whats new", "Road map", "Knowledge base", "Technical review", "Content review", };
            for (DateTime date = dateFrom; date < dateTo; date = date.AddDays(1))
            {
                if (date.DayOfWeek != DayOfWeek.Monday)
                    continue;
                for (int i = 0; i < 9; i++)
                {
                    Employee resource = this.Resources[i] as Employee;
                    DateTime startDate = new DateTime(date.Year, date.Month, date.Day, random.Next(9, 18), 0, 0);
                    //// Create a task for an employee.
                    Task task = new();
                    task.From = startDate;
                    task.To = startDate.AddDays(4).AddHours(1);
                    task.Background = this.resourceColors[random.Next(resourceColors.Count)];
                    //// Assign tasks to the employees.
                    task.Resources = new ObservableCollection<object>() { resource.Id };
                    task.IsAllDay = true;
                    if (string.Equals(resource.Role, "Project manager"))
                    {
                        task.TaskName = managerTasks[random.Next(managerTasks.Count)];
                    }
                    else if (string.Equals(resource.Role, "Team lead"))
                    {
                        task.TaskName = teamleadTasks[random.Next(teamleadTasks.Count)];
                    }
                    else if (string.Equals(resource.Role, "Developer"))
                    {
                        task.TaskName = developmentTasks[random.Next(developmentTasks.Count)];
                    }
                    else if (string.Equals(resource.Role, "Tester"))
                    {
                        task.TaskName = testingTasks[random.Next(testingTasks.Count)];
                    }
                    else if (string.Equals(resource.Role, "Support Engineer"))
                    {
                        task.TaskName = supportTasks[random.Next(supportTasks.Count)];
                    }
                    else if (string.Equals(resource.Role, "Content writer"))
                    {
                        task.TaskName = documentationTasks[random.Next(documentationTasks.Count)];
                    }

                    tasks.Add(task);                 }
            }
            return tasks;
 }
Bind the employee’s tasks to the Scheduler
Then, bind the employees’ tasks by using the AppointmentsSource property.
In the following code, the Tasks property binds to the AppointmentsSource property from the view model to plan the employee’s tasks.
<!--Bind custom Tasks from the view model to AppointmentsSource property-->
 <schedule:SfScheduler x:Name="Scheduler"
                         AppointmentsSource="{Binding Tasks}"                              AllowedViews="TimelineDay,TimelineWeek,TimelineWorkWeek,TimelineMonth"
                         View="TimelineMonth">
     <schedule:SfScheduler.AppointmentMapping>
       <schedule:SchedulerAppointmentMapping
                    Subject="TaskName"
                    StartTime="From"
                    EndTime="To"
                    IsAllDay="IsAllDay"
                    Background="Background"
                    RecurrenceRule="RecurrenceRule"
                    ResourceIds="Resources"/>
    </schedule:SfScheduler.AppointmentMapping>
    <schedule:SfScheduler.BindingContext>
        <local:ResourceViewModel/>
    </schedule:SfScheduler.BindingContext>
</schedule:SfScheduler>
Sharing appointments with multiple resources
You can share the same event or common progress meetings with multiple resources to discuss the progress of the tasks by using multiresource sharing support.
Please refer to the following code example to create multiple-resource-sharing appointments by listing the required resource IDs for the appointments.
//// Plan weekly development meeting.
Task overAllDevelopmentMeeting = new();
overAllDevelopmentMeeting.TaskName = "Development meeting";
overAllDevelopmentMeeting.From = new DateTime(dateFrom.Year, dateFrom.Month, dateFrom.Day, 11, 30, 0);
overAllDevelopmentMeeting.To = overAllDevelopmentMeeting.From.AddMinutes(30);
overAllDevelopmentMeeting.Background = Color.FromArgb("#FF36B37B");
//// Same appointment will be shared with the multiresource.
overAllDevelopmentMeeting.Resources = new ObservableCollection<object>() { 1, 2, 3, 4, 5, 6, 7, 8, 9 };
overAllDevelopmentMeeting.IsAllDay = false;
overAllDevelopmentMeeting.RecurrenceRule = "FREQ=WEEKLY;BYDAY=TU;INTERVAL=1";
tasks.Add(overAllDevelopmentMeeting);

Plan task to multiple resources
GitHub reference
For more information, you can download the complete example of the project planning calendar for resource scheduling using the .NET MAUI Scheduler.
Conclusion
Thank you for reading! In this blog, we had a quick overview of how to create a project planning and resource management calendar using the Syncfusion .NET MAUI Scheduler.
Please let us know in the comments section below if you have any feedback, specific requirements, or controls that you’d like to see in our .NET MAUI suite.
You can also contact us through our support forum, support portal, or feedback portal. We are always happy to assist you!
Related blogs
Recommend
-
5
FeaturesBuilt using Angular Resource Calendar component from DayPilot Pro for JavaScriptThe resource calendar displays resources (peopl...
-
22
FeaturesReal-time filtering of columns of the JavaScript resource calendar componentFiltering by column nameFiltering b...
-
62
FeaturesJavaScript resource calendar web application that displays calendar for multiple resources side by side (as columns).Drag and d...
-
7
Resource Optimization Techniques In Project ManagementEffective resource optimization is imperative to achieving business goals. Let us see the resource optimization techniques implemented in proj...
-
10
OverviewThe Vue resource calendar component displays resources (people, rooms, cars, tools) as columns.It is built using the open-source Vue calen...
-
2
OverviewReact application that shows a resource scheduling calendar (with custom resources as columns).Learn how to load resources (co...
-
7
-
12
Dec 1st : MAUI App Accelerator ~ Matt Lacey Related Posts:
-
5
Resource Scheduling Calendar in ASP.NET CoreIn this tutorial, you will learn how to create a resource scheduling calendar in ASP.NET Core.Our resource scheduling ASP.NET Core application uses the
-
2
What is Resource Smoothing in Project Management? Written By Forecast Team 5 min read ...
About Joyk
Aggregate valuable and interesting links.
Joyk means Joy of geeK