

Settings On Your iPhone That Are Ruining Your Experience
source link: https://www.slashgear.com/1145689/settings-on-your-iphone-that-are-ruining-your-experience/
Go to the source link to view the article. You can view the picture content, updated content and better typesetting reading experience. If the link is broken, please click the button below to view the snapshot at that time.
Settings On Your iPhone That Are Ruining Your Experience
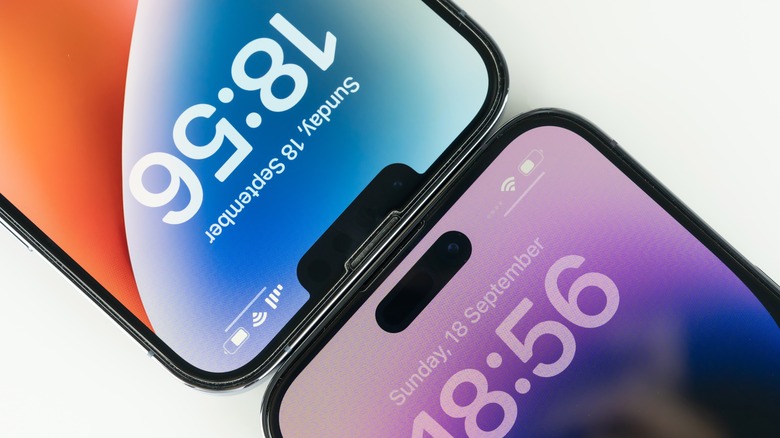
The iPhone isn't the only name in the smartphone game but it's certainly one of the biggest. It's practically the poster child for the smartphone generation and a big part of the reason why is consistency. Even as Apple's flagship device has evolved over time, iPhone users always know what they're going to get. Smooshed inside a machine little bigger than a pack of cards are technologies capable of granting access to all of the world's knowledge and an open line of communication to just about anywhere on Earth.
Despite your iPhone being a marvel of modern engineering, it probably isn't perfect straight out of the box. In fact, some of the settings you're using right now might be actively diminishing the experience of using your phone. Given how much time spend on our phones, either communicating with family and friends, keeping up on news, or following the latest viral trends, those little inconveniences can add up pretty quickly. The good news is you're only a few clicks away from solving them.
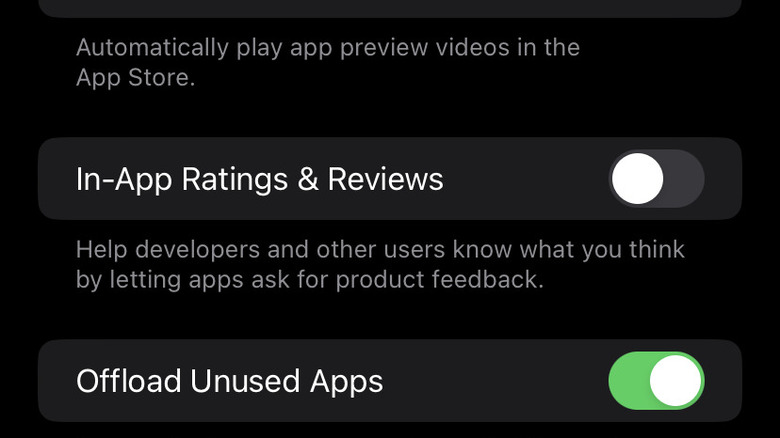
In-App Ratings & Reviews
We're living in a digital environment which increasingly relies on a reciprocal relationship between consumers and creators. Many companies and products rely on customer reviews to help spread word of mouth and build confidence in their offerings. It's a lot easier to throw your money down if a few thousand strangers have vouched for something. As a result, pop-up requests for ratings or reviews are becoming more and more common.
It isn't unusual while playing a game or using some other application, for a text box to appear, asking whether you're enjoying yourself. A simple yes or no question is inevitably followed by a request for a review or rating on a five-star scale. More often than not, you're likely to close those out, only momentarily irritated by the annoyance. It's not the world's biggest problem, but it's one you can fix.
This feature isn't new — it has been available since the release of iOS 11 (via OSX Daily) — but it isn't exactly widely advertised. To block rating or review requests once and for, access the Settings menu on your phone, then scroll to App Store and locate In-App Ratings & Reviews. There, you'll find a simple toggle switch. Flicking it into the off position will stop rating and review requests before they get to you.
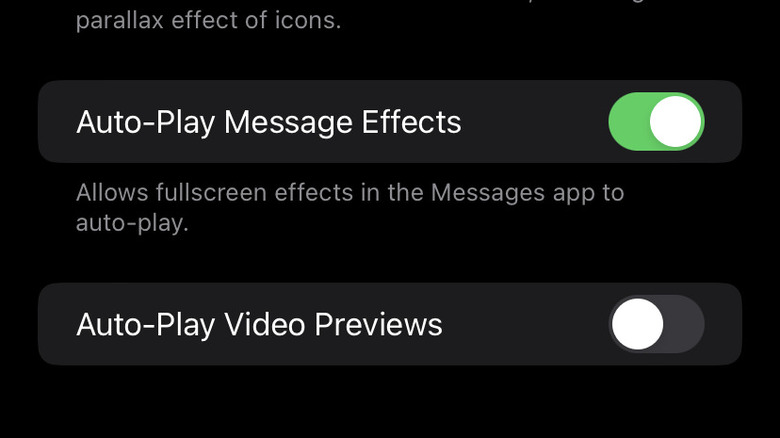
Video Autoplay
Over time, the content delivered to our phones has become more dynamic. For years, advertisements and content previews were largely static. You'd be presented with a photograph or still image and any video content would only initiate once you engaged the content. These days, you're likely to encounter embedded videos which start playing as soon as they enter the frame.
That might be convenient if you're doom scrolling Instagram or looking for something new to binge on Netflix, but it can be inconvenient or downright rude under other circumstances. Not to mention the unnecessary drain on your data plan and battery life. Luckily, there are ways to limit or eliminate video Autoplay in your settings.
If you're looking to turn off Autoplay on a specific app, like Twitter or YouTube, you'll find those options by launching the app in question (via iGeeksblog). Heading back to the same place we went for ratings and reviews — Settings, App Store — offers a toggle to turn off Autoplay in the App Store. If you want a blanket ban on Autoplay, head to Settings, Accessibility, Motion, and toggle the Auto-Play Video Previews button to the off position.
Default browser
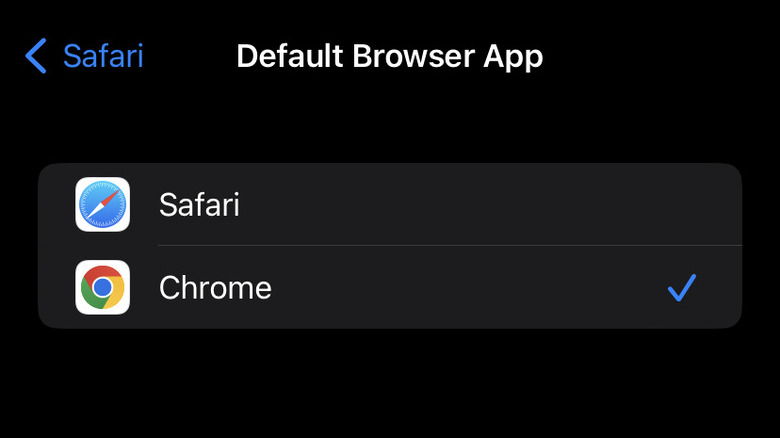
Safari is a perfect respectable internet browser, and it works well in most cases. That said, some site functionalities may not be optimized for Safari in the same ways they might be for something like Chrome. If you mostly use your phone for casual browsing it may not be an issue, but depending on your needs, you may be limited because your phone defaults to Safari. Having a separate browser for specific sites or uses and another for everything is not only inconvenient but also a good way for things to get lost.
If you find that you need something other than Safari, changing the default browser is quick and easy to accomplish. As long as you're running on iOS 14 or later (via Apple), you'll open Settings and scroll down until you see a browser app. It doesn't matter which one. Tap the browser icon and look for the Default Browser App field. Tapping it will open a menu with all of the browsers downloaded to your phone. Simply tap the one you want to make your default.
Don't forget to move your preferred browser into Safari's default position on your phone. Changing the default browser doesn't help if muscle memory keeps you opening Safari out of habit.
Display brightness
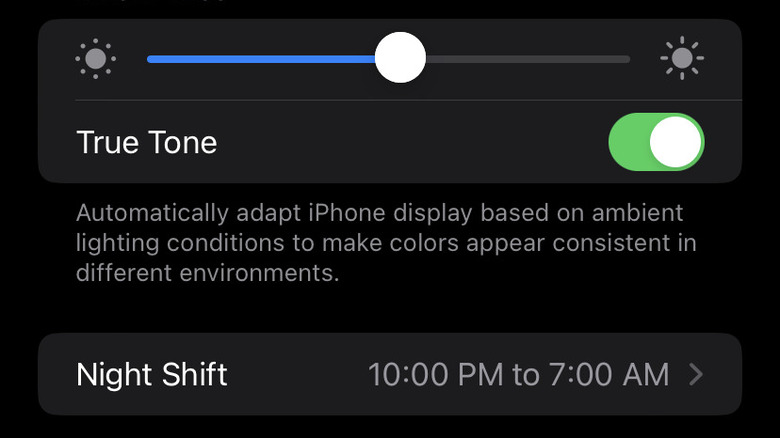
There are few things worse than waking up in the middle of the night, reaching to check the time, and temporarily blinding yourself with a combination of dilated pupils and a phone at full brightness. Adjusting the brightness is a simple process. Swiping down from the top of your home screen opens the control center. Look for the bar with the Sun icon and drag your finger up or down to adjust the lights manually.
Of course, that doesn't help the unexpected digital flashbang you've already experienced. For that, you're going to need some automation. Turning on True Tone uses your phone's sensors to detect ambient light and adjust the brightness accordingly. Picking up your phone in the middle of the night will automatically give you a lower brightness than during the day (via Apple). You'll find the option under Settings, Display & Brightness. You'll find Night Shift in the same place. It allows you to schedule periods of time, typically the nighttime hours but you can do what you want when colors become warmer and easier on your eyes in low light.
You can also make a full-time change by enabling Dark Mode within the same menu. It changes the color scheme of apps system-wide to one which relies on a darker motif and is less likely to light up a room when you least want or expect it.
Data settings
Many of us have data plans on our phones, granting us access to the wonders (and horrors) of the internet both at home and when out and about, as well as dedicated internet packages at home. When using your phone at home, you can find yourself in an intricate dance, straddling the two networks to get the best service. Sometimes that means bouncing back and forth between Wi-Fi and cellular data, especially if one or both connections are spotty. But there's a setting which takes some of the legwork out of this process and keeps your connection as strong as possible at all times.
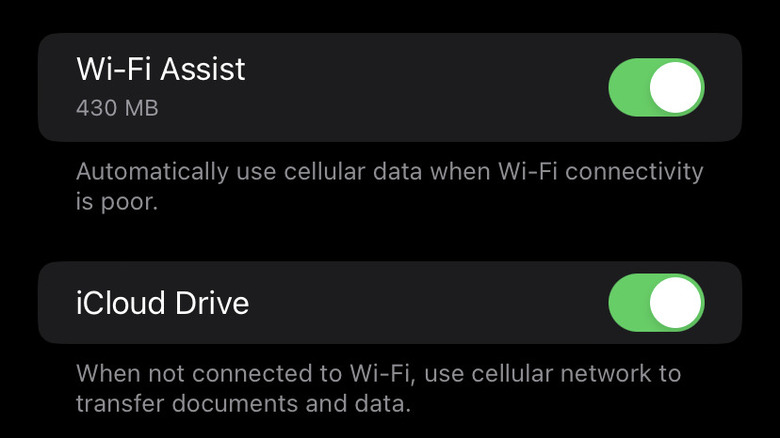
According to Apple, Wi-Fi assist pays attention when enabled, and actively switches to cellular data if your Wi-Fi signal drops below certain performance thresholds. What that means, is if you're trying to load a webpage, listen to music, or watch video content, and the speeds slow due to poor a Wi-Fi connection, your phone will automatically switch to cellular data. If all goes according to plan, you won't even be aware of the switch. Of course, if you have limited cellular data each month, it's something you'll want to keep an eye on.
To enable Wi-Fi Assist, open Settings and go to Cellular, then scroll all the way to the bottom and look for the toggle switch labeled Wi-Fi Assist.
Cluttered Home screen
Right out of the box, your phone defaults to placing every single app you download onto your Home screen. It's convenient for when you're just getting started and need easy access to your applications, but it defeats the purpose of a Home screen. It's not a huge problem if you're a spartan smartphone user but it seems like there are new social networks, games, restaurants, stores, and entertainment options coming out every day and they all have an app. Your Home screen can fill up pretty quickly and you end up nesting things inside clusters with loose associations.
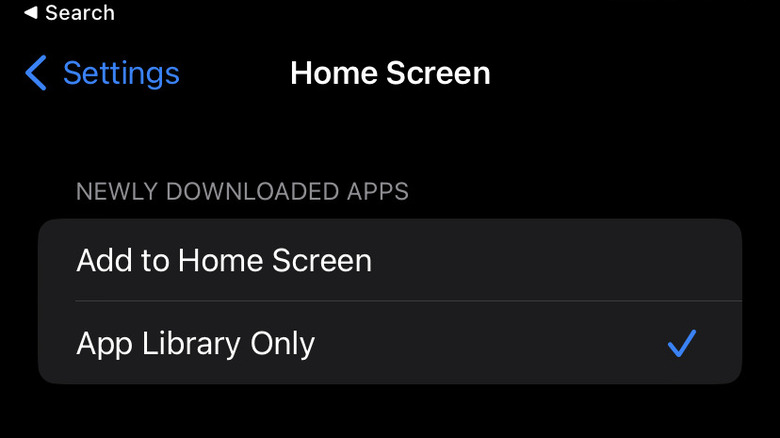
You can remove apps from the Home screen one at a time by pressing and holding on them and tapping Remove App. Just make sure you tap Remove from Home Screen in the popup or else you'll delete it entirely. Of course, there's no reason to do it manually when a quick change of settings is so much easier. Any apps you remove from the Home screen will remain on your phone and available in the app library, which you can access by swiping to the right from the Home screen (via Apple).
Clear up the clutter by going to Settings and tapping Home Screen. Then switch the Newly Downloaded Apps preferences from Add to Home Screen to App Library Only.
Limited Face ID
There was a time not so long ago when the idea of accessing a high-tech communications system with a biometric face scan was the sort of thing you only saw in movies. Now we have Face ID. In addition to bringing a decades-old technological fantasy into everyday life, Face ID liberated us from the mundane task of entering a passcode every time we want to use our phones.
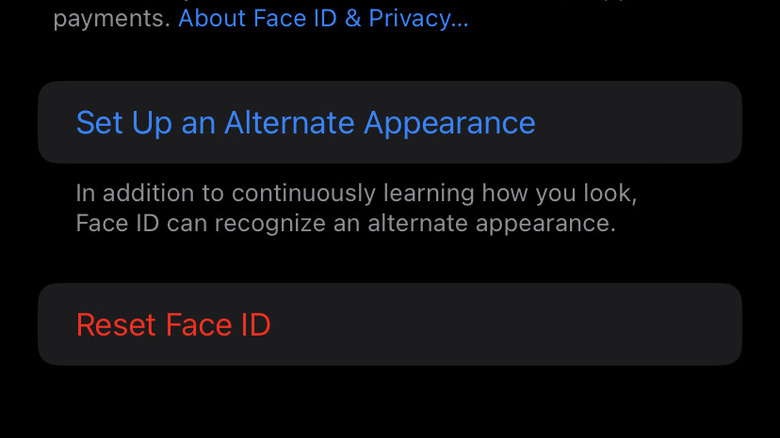
Your iPhone is constantly learning new things about your face, every time it scans you to open your phone or verify your identity for login credentials, but even the best algorithms sometimes stumble. That's especially true when you throw them visual curveballs. If you regularly change your appearance — maybe you wear glasses sometimes or you have an impressive wig collection — you can add an alternate appearance to your Face ID. That will give your phone more data to work with and will improve its ability to recognize you, even as your aesthetic evolves.
To add a second look, go to Settings and find Face ID & Passcode. You'll have to enter your passcode to get past that point, then tap the blue field labeled Set Up an Alternate Appearance (via Apple). It will run you through the Face ID setup process again to store your alternative look.
Lock screen functions
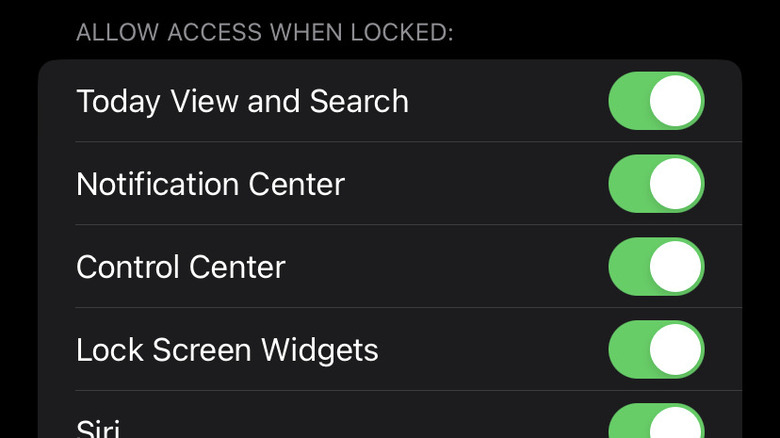
Speaking of Face ID, while it can be useful for securing your phone, accessing personal accounts, and making purchases (via Apple), your phone isn't totally useless without it. Even when locked, there are some functions, like notification alerts and music controls which remain in service. You can customize what's available to you when your phone is locked in the Face ID & Password settings to make sure you're getting the most out of your phone, even when you're out of view.
Head back to Settings, then Face ID & Passcode — pausing briefly to key in your passcode again — then scroll all the way down to the bottom of the screen. There, you'll find a collection of toggle switches, each one corresponding to a specific function, which you can use even when your phone is locked.
You can keep your daily preview, control, and notification centers, Siri, your Apple Wallet, return missed calls or texts, and more. Don't let a locked phone stop you from getting what you need. And if you're worried about security, you'll find one more toggle switch which sets your phone to self-destruct (erase all data) after 10 failed password attempts. Fun!
Things got even better with the release of iOS 16, which allows you to further customize the lock screen with additional widgets. Just tap and hold the lock screen and tap customize, then add widgets to your heart's content (via Apple).
Spam call floodgates
These days it feels like if your phone is ringing, there's a pretty good chance it's a robocall or an attempt to scam you out of money or information. Someone might try to sell you on a timeshare and, worst of all, you might be convinced. Even with improved spam call detection, most of us still field unwanted contact attempts more often than we'd like.
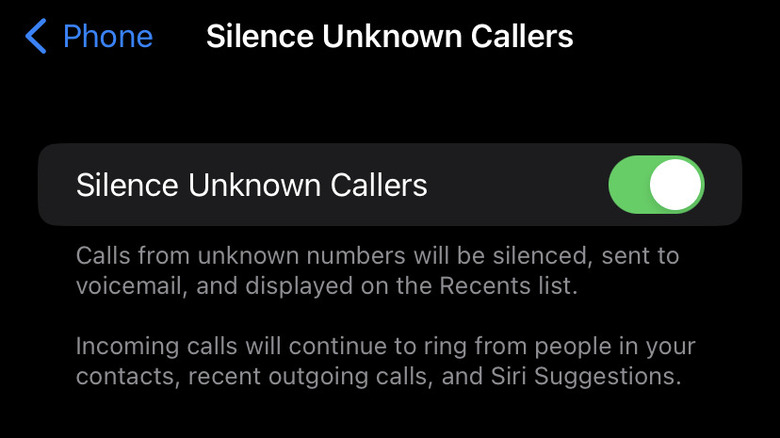
That's a problem you can fix by silencing unknown callers. When activated, this setting prevents you from being notified when you receive a call from an unknown number. And the way your iPhone determines whether a number is known or not is actually pretty nuanced. You'll still receive notifications for any numbers saved in your contacts list, that's a given. You'll also be notified of calls from any number you have called or texted before or from numbers with Siri Suggestions, usually numbers attached to text or email contacts (via Insider). In short, it makes an educated guess about whether or not this contact is legitimate before sending it along to you.
To turn it on, go to Settings, tap on Phone, and scroll down to the bottom of the screen. Tap Silence Unknown Callers and you'll move to another screen with a toggle switch. From then on, any calls from unknown numbers will quietly be shuffled to your voicemail and recent contact list, where you can find them if you need them.
So many notifications
Phones are ostensibly tools for communication, even if many of us dread actually talking on the phone. With that in mind, you'd think you'd want to know every time someone is trying to reach you, but you'd be wrong. With every passing day, there are more lines of communication and are phones become increasingly swollen with social networks, email clients, text messages, phone calls, Twitter, Instagram, TikTok, and Mastodon, plus whatever new thing will pop up tomorrow. Not to mention all of the messages from Slack, Discord, WhatsApp, Zoom... you get the idea.
Before you know it, your phone is pinging non-stop and any important messages are lost in the deluge, along with any memory of your once ordinary life. One of the easiest ways to fix that problem is to throw your phone into the sea but barring access to the ocean or the willingness to live a life alone and off the grid, there might still be a solution.
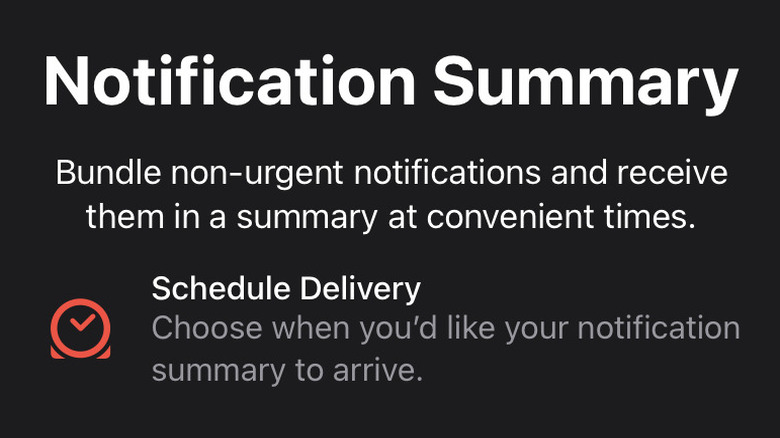
Tap Notifications in the Settings app and you'll find various ways to limit the flood of notifications (via Apple). Toward the bottom, you'll find a list of apps you use, and you can customize when or if they send notifications. Turn the notification flood down to trickle with the Scheduled Summary. It captures all non-urgent notifications and holds onto them. Then it delivers those to you in a bundle at a time of your choosing.
Focus
Perhaps the worst "setting" is the nature of the smartphone itself and our relationship to it. The endless rush of content, the constant notifications, the ceaseless demands for your attention and the allure of the small glowing screen can make it difficult to actually accomplish anything. It's like living with a small pocket gremlin who's always hungry. Every attempt at answering an email or making that difficult phone call is interrupted by the most recent viral phenomenon and it will never stop and less you make it.
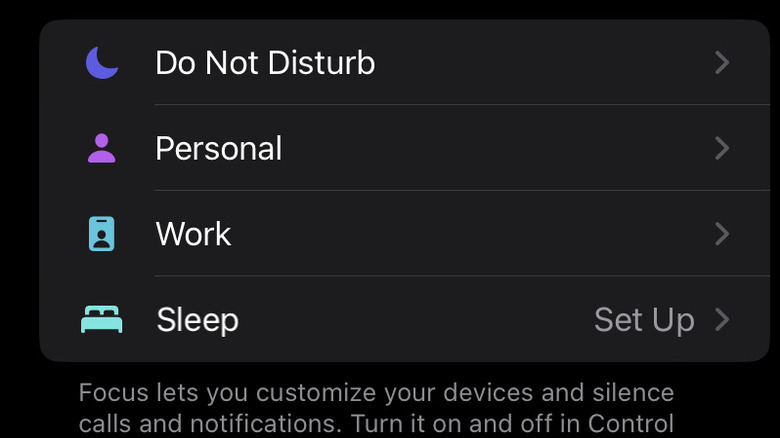
What we need is a way to take advantage of our phones' capabilities without being held hostage by them. That's where the iPhone's new Focus settings come in. Beginning with iOS 15, Apple introduced their Focus functionality which aims to filter the content you have access to during specified time periods (via Apple).
There are a couple of ways to find it. The first is back in the Settings app. The other is by swiping to your Control Center and looking for the Focus button, it has a crescent Moon icon. You'll find a few pre-programmed Focus modes including Sleep, Work, Persona, and Do Not Disturb. You'll also find a + symbol which lets you build customized Focus modes. You can restrict who can contact you and which apps you can access, which can make it a little easier to bend your attention toward what's important. The latest Twitter drama will be waiting for you when you're finished. Promise.
Recommend
About Joyk
Aggregate valuable and interesting links.
Joyk means Joy of geeK