

一起用Go来做一个游戏(上)
source link: https://darjun.github.io/2022/11/15/godailylib/ebiten1/
Go to the source link to view the article. You can view the picture content, updated content and better typesetting reading experience. If the link is broken, please click the button below to view the snapshot at that time.
一起用Go来做一个游戏(上)
最近偶然看到一个Go语言库,口号喊出“一个超级简单(dead simple)的2D游戏引擎”,好奇点开了它的官网。

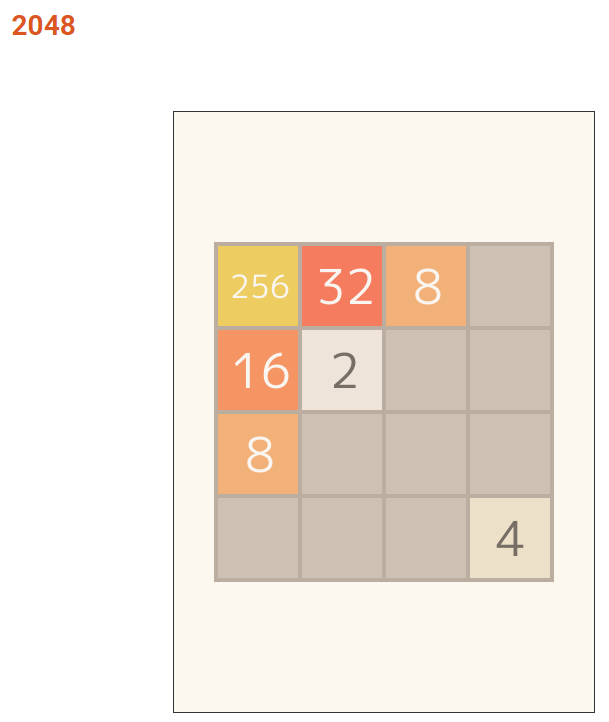
官网上已经有很多可以在线体验的小游戏了(利用WASM技术)。例如曾经风靡一时的2048:
当然只要安装了Go,我们也键入下面的命令本地运行这个游戏:
$ go run -tags=example github.com/hajimehoshi/ebiten/v2/examples/2048@latest
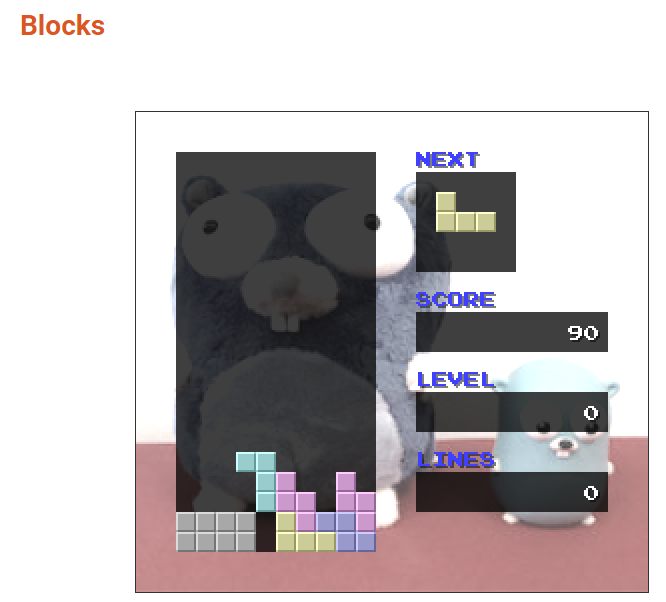
还有童年《俄罗斯方块》:
有14年左右让无数人疯狂的《Flappy Bird》(或许称为Flappy Gopher更贴切一点😀):

这些瞬间让我产生了极大的兴趣。简单浏览一下文档,整体感觉下来,虽然与成熟的游戏引擎(如Cocos2dx,DirectX,Unity3d等)相比,ebiten功能还不算丰富。但是麻雀虽小,五脏俱全。ebiten的API设计比较简单,使用也很方便,即使对于新手也可以在1-2个小时内掌握,并开发出一款简单的游戏。更妙的是,Go语言让ebitengine实现了跨平台!
接下来的3篇文章,我会介绍ebitengine这个库。对于游戏引擎来说,只介绍它的API用法似乎有点纸上谈兵。恰好我想起之前看到一个《外星人入侵》的小游戏,刚好可以拿来练手。那请大家坐稳扶好,我们出发咯。
ebitengine 要求Go版本 >= 1.15。使用go module下载这个包:
$ go get -u github.com/hajimehoshi/ebiten/v2
游戏开发第一步是将游戏窗口显示出来,并且能在窗口上显示一些文字。先看代码:
package main

import (
  "log"

  "github.com/hajimehoshi/ebiten/v2"
  "github.com/hajimehoshi/ebiten/v2/ebitenutil"
)

type Game struct{}

func (g *Game) Update() error {
  return nil
}

func (g *Game) Draw(screen *ebiten.Image) {
  ebitenutil.DebugPrint(screen, "Hello, World")
}

func (g *Game) Layout(outsideWidth, outsideHeight int) (screenWidth, screenHeight int) {
  return 320, 240
}

func main() {
  ebiten.SetWindowSize(640, 480)
  ebiten.SetWindowTitle("外星人入侵")
  if err := ebiten.RunGame(&Game{}); err != nil {
    log.Fatal(err)
  }
}
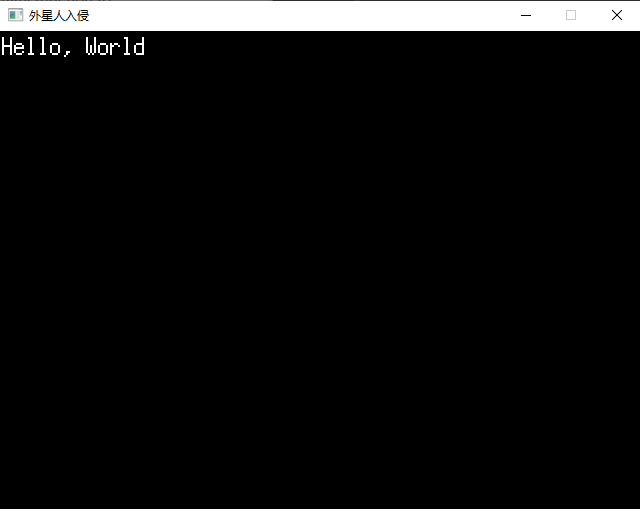
使用命令go run运行该程序:
$ go run main.go
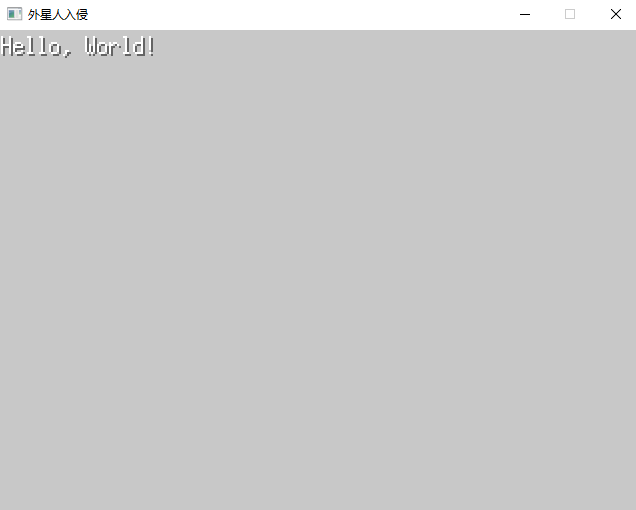
我们会看到一个窗口,标题为外星人入侵,并且左上角显示了文字Hello,World:
现在我们来分析使用ebiten开发的游戏程序的结构。
首先,ebiten引擎运行时要求传入一个游戏对象,该对象的必须实现ebiten.Game这个接口:
// Game defines necessary functions for a game.
type Game interface {
  Update() error
  Draw(screen *Image)
  Layout(outsideWidth, outsideHeight int) (screenWidth, screenHeight int)
}
ebiten.Game接口定义了ebiten游戏需要的3个方法:Update,Draw和Layout。
-
Update:每个tick都会被调用。tick是引擎更新的一个时间单位,默认为1/60s。tick的倒数我们一般称为帧,即游戏的更新频率。默认ebiten游戏是60帧,即每秒更新60次。该方法主要用来更新游戏的逻辑状态,例如子弹位置更新。上面的例子中,游戏对象没有任何状态,故Update方法为空。注意到Update方法的返回值为error类型,当Update方法返回一个非空的error值时,游戏停止。在上面的例子中,我们一直返回nil,故只有关闭窗口时游戏才停止。 -
Draw:每帧(frame)调用。帧是渲染使用的一个时间单位,依赖显示器的刷新率。如果显示器的刷新率为60Hz,Draw将会每秒被调用60次。Draw接受一个类型为*ebiten.Image的screen对象。ebiten引擎每帧会渲染这个screen。在上面的例子中,我们调用ebitenutil.DebugPrint函数在screen上渲染一条调试信息。由于调用Draw方法前,screen会被重置,故DebugPrint每次都需要调用。 -
Layout:该方法接收游戏窗口的尺寸作为参数,返回游戏的逻辑屏幕大小。我们实际上计算坐标是对应这个逻辑屏幕的,Draw将逻辑屏幕渲染到实际窗口上。这个时候可能会出现伸缩。在上面的例子中游戏窗口大小为(640, 480),Layout返回的逻辑大小为(320, 240),所以显示会放大1倍。
在main函数中,
ebiten.SetWindowSize(640, 480)
设置游戏窗口的大小。
ebiten.SetWindowTitle("外星人入侵")
设置窗口标题,标题显示在窗口的左上角。
一切准备就绪,创建一个Game对象,调用ebiten.RunGame()运行。是不是很简单?
没有交互的游戏不是真的游戏!下面我们来监听键盘的输入,当前只处理3个键:左方向←,右方向→和空格。
ebiten提供函数IsKeyPressed来判断某个键是否按下,同时内置了100多个键的常量定义,见源码keys.go文件。ebiten.KeyLeft表示左方向键,ebiten.KeyRight表示右方向键,ebiten.KeySpace表示空格。
为了代码清晰,我们定义一个Input结构来处理输入:
type Input struct {
  msg string
}

func (i *Input) Update() {
  if ebiten.IsKeyPressed(ebiten.KeyLeft) {
    fmt.Println("←←←←←←←←←←←←←←←←←←←←←←←")
    i.msg = "left pressed"
  } else if ebiten.IsKeyPressed(ebiten.KeyRight) {
    fmt.Println("→→→→→→→→→→→→→→→→→→→→→→→")
    i.msg = "right pressed"
  } else if ebiten.IsKeyPressed(ebiten.KeySpace) {
    fmt.Println("-----------------------")
    i.msg = "space pressed"
  }
}
Game结构中添加一个Input类型的字段,并且为了方便新增NewGame方法用于创建Game对象:
type Game struct {
  input *Input
}

func NewGame() *Game {
  return &Game{
    input: &Input{msg: "Hello, World!"},
  }
}
Game结构的Update方法中,我们需要调用Input的Update方法触发按键的判断:
func (g *Game) Update() error {
  g.input.Update()
  return nil
}
Game的Draw方法中将显示Input的msg字段:
func (g *Game) Draw(screen *ebiten.Image) {
  ebitenutil.DebugPrint(screen, g.input.msg)
}
将main函数中创建Game对象的方式修改如下:
game := NewGame()

if err := ebiten.RunGame(game); err != nil {
  log.Fatal(err)
}
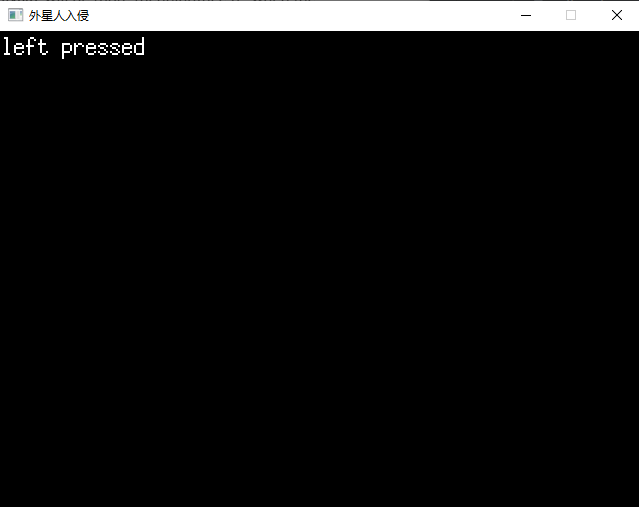
使用go run命令运行:
$ go run main.go
窗口与前一个例子相同,然而我们可以在窗口上按←→和空格,观察控制台输出:
黑色背景看起来有些无趣,我们现在就来换一个背景。
func (g *Game) Draw(screen *ebiten.Image) {
  screen.Fill(color.RGBA{R: 200, G: 200, B: 200, A: 255})
  ebitenutil.DebugPrint(screen, g.input.msg)
}
ebiten.Image定义了一个名为Fill的方法,可以传入一个颜色对象color.RGBA,将背景填充为特定颜色。Draw函数的参数为*ebiten.Image类型,它表示的是屏幕对象,ebitengine引擎最终会将screen显示出来,故填充它的背景即可修改窗口的背景。代码中我们将背景颜色修改为灰色(R:200,G:200,B:200)。
注意:由于每帧都会调用Draw方法刷新屏幕内容,所以每次调用都需要填充背景。
运行结果如下:
第一次重构
目前为止,我们的实现了显示窗口和处理输入的功能。我们先分析一下目前的程序有哪些问题:
- 所有逻辑都堆在一个文件中,修改不便
- 逻辑中直接出现字面值,例如640/480,字符串"外星人入侵"等,每次修改都需要重新编译程序
在继续之前,我们先对代码组织结构做一次重构,这能让我们走得更远。
为了清晰,方便管理,我们逻辑拆分到4个文件中:
- game.go:编写Game对象,并实现相关方法,同时负责协调其他各个模块
- input.go:输入相关的逻辑
- config.go:专门负责配置相关的逻辑
- main.go:main函数,负责创建Game对象,运行游戏
为了程序的灵活修改,我们将程序中的可变项都作为配置存放在文件中,程序启动时自动读取这个配置文件。我选择json作为配置文件的格式:
{
  "screenWidth": 640,
  "screenHeight": 480,
  "title": "外星人入侵",
  "bgColor": {
    "r": 230,
    "g": 230,
    "b": 230,
    "a": 255
  }
}
然后定义配置的结构和加载配置的函数:
type Config struct {
    ScreenWidth  int        `json:"screenWidth"`
    ScreenHeight int        `json:"screenHeight"`
    Title        string     `json:"title"`
    BgColor      color.RGBA `json:"bgColor"`
}

func loadConfig() *Config {
    f, err := os.Open("./config.json")
    if err != nil {
        log.Fatalf("os.Open failed: %v\n", err)
    }

    var cfg Config
    err = json.NewDecoder(f).Decode(&cfg)
    if err != nil {
    log.Fatalf("json.Decode failed: %v\n", err)
}

    return &cfg
}
将游戏核心逻辑移到game.go文件中,定义游戏对象结构和创建游戏对象的方法:
type Game struct {
  input *Input
  cfg   *Config
}

func NewGame() *Game {
  cfg := loadConfig()
  ebiten.SetWindowSize(cfg.ScreenWidth, cfg.ScreenHeight)
  ebiten.SetWindowTitle(cfg.Title)

  return &Game{
    input: &Input{},
    cfg:   cfg,
  }
}
先从配置文件中加载配置,然后根据配置设置游戏窗口大小和标题。拆分之后,Draw和Layout方法实现如下:
func (g *Game) Draw(screen *ebiten.Image) {
  ebitenutil.DebugPrint(screen, "Hello, World!")
  screen.Fill(g.cfg.BgColor)
}

func (g *Game) Layout(outsideWidth, outsideHeight int) (screenWidth, screenHeight int) {
  return g.cfg.ScreenWidth / 2, g.cfg.ScreenHeight / 2
}
第一次重构到此完成,现在来看一下文件结构,是否更清晰了呢?
├── config.go
├── config.json
├── game.go
├── input.go
└── main.go
注意,因为拆分成了多个文件,所以运行程序不能再使用go run main.go命令了,需要改为go run .。
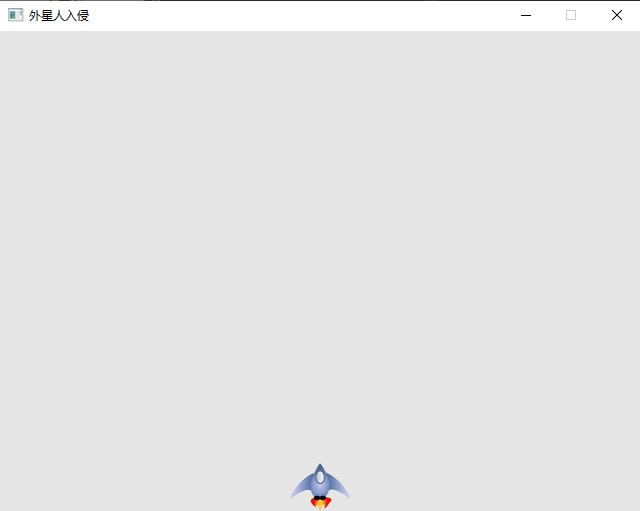
接下来我们尝试在屏幕底部中心位置显示一张飞船的图片:

ebitengine引擎提供了ebitenutil.NewImageFromFile函数,传入图片路径即可加载该图片,so easy。为了很好的管理游戏中的各个实体,我们给每个实体都定义一个结构。先定义飞船结构:
import (
    _ "golang.org/x/image/bmp"
)

type Ship struct {
  image  *ebiten.Image
  width  int
  height int
}

func NewShip() *Ship {
  img, _, err := ebitenutil.NewImageFromFile("../images/ship.bmp")
  if err != nil {
    log.Fatal(err)
  }

  width, height := img.Size()
  ship := &Ship{
    image:  img,
    width:  width,
    height: height,
  }

  return ship
}
我提供了两种图片格式,一种是png,一种是bmp,用哪种都可以。注意,需要将对应的图片解码包导入。Go标准库提供了三种格式的解码包,image/png,image/jpeg,image/gif。也就是说标准库中没有bmp格式的解码包,所幸golang.org/x仓库没有让我们失望,golang.org/x/image/bmp提供了解析bmp格式图片的功能。我们这里不需要显式的使用对应的图片库,故使用import _这种方式,让init函数产生副作用。
然后在游戏对象中添加飞船类型的字段:
func NewGame() *Game {
  // 相同的代码省略...
  return &Game {
    input:   &Input{},
    ship:  NewShip(),
    cfg:  cfg,
  }
}
为了将飞船显示在屏幕底部中央位置,我们需要计算坐标。ebitengine采用如下所示的二维坐标系:
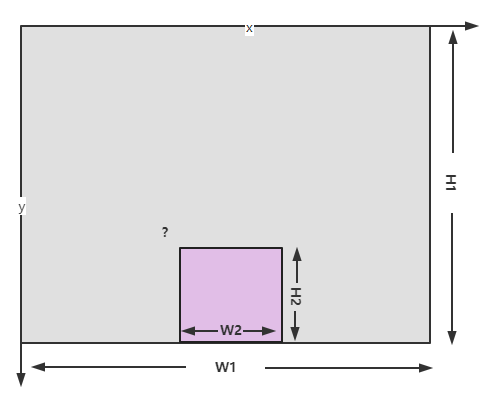
x轴向右,y轴向下,左上角为原点。我们需要计算飞船左上角的位置。由上图很容易计算出:
x=(W1-W2)/2
y=H1-H2
为了在屏幕上显示飞船图片,我们需要调用*ebiten.Image的DrawImage方法,该方法的第二个参数可以用于指定坐标相对于原点的偏移:
func (g *Game) Draw(screen *ebiten.Image) {
  screen.Fill(g.cfg.BgColor)
  op := &ebiten.DrawImageOptions{}
  op.GeoM.Translate(float64(g.cfg.ScreenWidth-g.ship.width)/2, float64(g.cfg.ScreenHeight-g.ship.height))
  screen.DrawImage(g.ship.image, op)
}
我们给Ship类型增加一个绘制自身的方法,传入屏幕对象screen和配置,让代码更好维护:
func (ship *Ship) Draw(screen *ebiten.Image, cfg *Config) {
    op := &ebiten.DrawImageOptions{}
    op.GeoM.Translate(float64(cfg.ScreenWidth-ship.width)/2, float64(cfg.ScreenHeight-ship.height))
    screen.DrawImage(ship.image, op)
}
这样游戏对象中的Draw方法就可以简化为:
func (g *Game) Draw(screen *ebiten.Image) {
    screen.Fill(g.cfg.BgColor)
    g.ship.Draw(screen, g.cfg)
}
现在我们来实现使用左右方向键来控制飞船的移动。首先给飞船的类型增加x/y坐标字段:
type Ship struct {
    // 与前面的代码一样
    x float64 // x坐标
    y float64 // y坐标
}
我们前面已经计算出飞船位于屏幕底部中心时的坐标,在创建飞船时将该坐标赋给xy:
func NewShip(screenWidth, screenHeight int) *Ship {
  ship := &Ship{
    // ...
    x: float64(screenWidth-width) / 2,
    y: float64(screenHeight - height),
  }

  return ship
}
由于NewShip计算初始坐标需要屏幕尺寸,故增加屏幕宽、高两个参数,由NewGame方法传入:
func NewGame() *Game {
  // 与上面的代码一样

  return &Game{
    input: &Input{},
    ship:  NewShip(cfg.ScreenWidth, cfg.ScreenHeight),
    cfg:   cfg,
  }
}
然后我们在Input的Update方法中根据按下的是左方向键还是右方向键来更新飞船的坐标:
type Input struct{}

func (i *Input) Update(ship *Ship) {
  if ebiten.IsKeyPressed(ebiten.KeyLeft) {
    ship.x -= 1
  } else if ebiten.IsKeyPressed(ebiten.KeyRight) {
    ship.x += 1
  }
}
由于需要修改飞船坐标,Game.Update方法调用Input.Update时需要传入飞船对象:
func (g *Game) Update() error {
  g.input.Update(g.ship)
  return nil
}
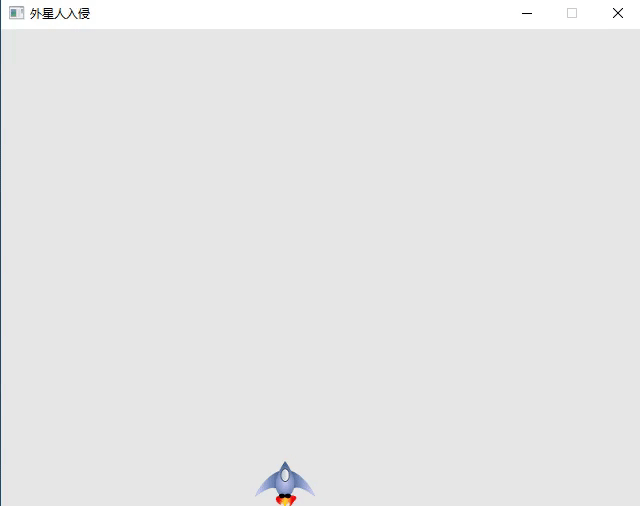
好了,现在可以运行程序了go run .,效果如下:
注意到,目前有两个问题:
- 可以移出屏幕
因为现在每次只对x坐标修改1个像素位置,故而显得太慢。我们可以在增加一个飞船速度的配置项来控制每次变化的像素数:
{
  "screenWidth": 640,
  "screenHeight": 480,
  "title": "外星人入侵",
  "bgColor": {
    "r": 230,
    "g": 230,
    "b": 230,
    "a": 255
  },
  "shipSpeedFactor": 3
}
config.go需要相应的修改:
type Config struct {
    // 一样的代码
    ShipSpeedFactor float64    `json:"shipSpeedFactor"`
}
修改Input.Update方法,每次更新ShipSpeedFactor个像素:
func (i *Input) Update(ship *Ship, cfg *Config) {
  if ebiten.IsKeyPressed(ebiten.KeyLeft) {
    ship.x -= cfg.ShipSpeedFactor
  } else if ebiten.IsKeyPressed(ebiten.KeyRight) {
    ship.x += cfg.ShipSpeedFactor
  }
}
因为在Input.Update方法中需要访问配置,因此增加Config类型的参数,由Game.Update方法传入:
func (g *Game) Update() error {
  g.input.Update(g.ship, g.cfg)
  return nil
}
运行,是不是快了很多呢?
本文介绍了2D游戏开发库ebiten的基本使用,并开始开发一个外星人入侵的游戏(1/3),目前只能在屏幕上移动飞船,下篇文章继续完成剩下的内容。
大家如果发现好玩、好用的 Go 语言库,欢迎到 Go 每日一库 GitHub 上提交 issue😄
欢迎关注我的微信公众号【GoUpUp】,共同学习,一起进步~

Recommend
About Joyk
Aggregate valuable and interesting links.
Joyk means Joy of geeK