

Control Your Kubernetes Cluster Compute Resources - DZone
source link: https://dzone.com/articles/control-your-kubernetes-cluster-compute-resources
Go to the source link to view the article. You can view the picture content, updated content and better typesetting reading experience. If the link is broken, please click the button below to view the snapshot at that time.
A Word About Kubernetes Cluster Resources
Kubernetes is a container orchestration platform. It is very popular for deploying container-based workloads. Kubernetes clusters could spread across many nodes. These nodes are physical or virtual machines spread across geographies and deployed at various data centers, ensuring high availability for the cluster.
These machines have a lot of computing resources aggregated at the cluster level and are at the disposal of the workloads that get deployed in the cluster. These computing resources include CPU and memory capabilities. Apart from that, the cluster also has a constraint on the number of API objects it can hold. The latest Kubernetes version supports 110 pods per node, as there are also constraints on assigning IP addresses.
A Kubernetes cluster is shared among multiple development teams and users. Different teams might have to deploy a different number of workloads. The resource requirements of those workloads might also vary. Some teams or users might need a higher or lower share of the entire cluster's resources. If there would not any restrictions on teams, one team might end up consuming the legitimate share of resources from other teams. One more use case: if two teams try to deploy an API object with the same type and name, the team that deploys it last may end up overriding the first one or failing.
So, to manage the resources better, a Kubernetes administrator must assign some restrictions to the teams so that each team will have the necessary amount of resources at their disposal to flawlessly carry out their work.
How to Control Resources
Fortunately for us, Kubernetes provides two API objects with which we can solve these issues. We don’t need to use any third-party tools. With the API objects, we can isolate teams or users inside the cluster. Also, we can definitely enable them with the computing resources they need. In addition, we will limit their consumption. These two API objects are Namespace and ResourceQuota. A namespace is an API object that is created at the cluster level. ResourceQuotas are created and applied at the namespace level. Kubernetes API objects are divided into two broad categories, namely, namespaced and non-namespaced. Namespace objects are created and visible within it. The cluster scope applies to non-namespaced objects.
Namespace
As mentioned earlier, Namespace is a way to isolate multiple teams or users in a single Kubernetes cluster. The idea is to divide the cluster's resources into groups, where each group is a namespace.
When a cluster is created, a few namespaces are added within it. There will always be a default namespace. Any namespaced object we create is automatically created in the default namespace. The Kubernetes control plane's objects are added to namespaces that begin with the "kube-" prefix. They are kube-system, kube-public, and kube-node-lease.
Aside from the namespaces listed above, administrators can create new namespaces based on their needs. In a production environment, teams will create the API objects in the namespaces allocated to them and not in the default namespace. Within the namespace, the name of a certain type of object must be unique. That is, two teams could create a pod named "alpha-pod" in their respective namespaces without causing a collision. This couldn’t have been possible if they had created the object at the cluster level.
Only namespaced objects like pods, services, deployments, and other similar objects are capable of object scoping at the namespace. That is not applicable to cluster-level objects like PersistentVolume or StorageClass.
When a user logs into the cluster, he is assigned to the default namespace. The user could change his namespace to a different one by using the “kubectl set-context” command. When the namespace is changed, it gets reflected in the user’s current context and in the ~/.kube/.config file. Any subsequent commands the user issues are only meant for his namespace. Users could execute the kubectl commands in another namespace by suffixing “-n [name-of-namespace]”. That includes creating API objects inside other namespaces as well. However, access to namespaces could again be controlled by Kubernetes RBAC.
ResourceQuota
ResourceQuota is a Kubernetes API object using which administrators allocate resources per namespace. ResourceQuotas are namespaced objects, meaning their scope is within the namespace in which they are created, edited, and applied.
It restricts what is the maximum and minimum CPU and Memory each Pod will consume. On top of that, it could also restrict how many objects of what type could be created in the namespace. That is, how many maximum number of Pods, services, deployments, configmaps, and such can be created in a namespace?
When a ResourceQuota is applied in a namespace with restrictions on CPU, memory, and object counts, the respective controller ensures that the quota must be honored. It keeps count of the number of objects part and validates if, for each new create request, the count is not getting exhausted. And whenever a create request is received for a Pod, it is verified that the Pod exclusively requests for CPU and memory. If any Pod creation request comes without the necessary resource request, it ends with a forbidden error. So it is for the object count.
A resource quota could be applied with a combination of all three, i.e., CPU, memory, and different object counts. It may be created with at least one restriction or any combination of restrictions out of the three.
LimitRange
LimitRange is another Kubernetes API object that works well with Resource Quota. It becomes worrisome for the administrator to include memory and CPU requests in all Pod specifications. If by mistake, a single Pod specification misses the memory and CPU requests with the namespace having a quota enforced within the namespace for CPU and memory, the Pod creation will fail. It may frequently lead to unexpected and unpleasant situations if proper care is not taken.
The solution is to use LimitRange. The LimitRange object could enforce the namespace's default, minimum, and maximum compute resources for each pod. If there is no request for CPU or memory in any Pod specification, the quota object assumes that whatever resource requests are defined by the LimitRange object are also requested by the Pod. So it doesn’t complain anymore. LimitRange objects could have either the CPU or memory or both of them in their specification.
A Small Tutorial
To help readers, we will try to simulate namespace and resource quota usage. We will also try to share a few kubectl commands that could be helpful for users while dealing with namespaces.
It is assumed that the readers have access to a Kubernetes cluster and are aware of kubectl commands. If users don’t have access to a Kubernetes cluster of their own, they could use the Oreilly Kubernetes Sandbox, which is available for free. I am using it for demo purposes.
Once ready, we will first use the commands related to the namespace.
- kubectl gets namespaces
- kubectl config get-contexts
- kubectl create namespace test
- kubectl config set-context –current –namespace test
- kubectl config get-contexts
The following output will be produced initially.
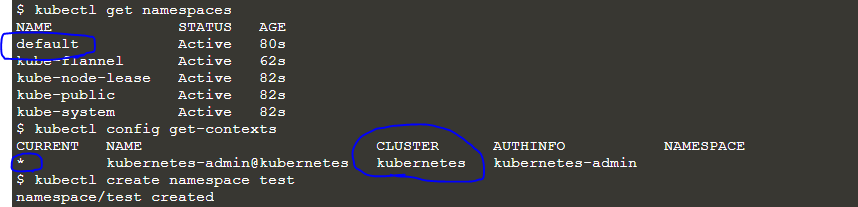

If we observe the output, we can see that the value for the namespace was initially blank. But after we set the namespace in the current context, the namespace value becomes "test," which is the new namespace we have created.
Now we'll make a few pods and see how they come together. Use the below commands for Pod creations and observe the output.
- kubectl run test1 --image=nginx
- kubectl run test2 --image=nginx
- kubectl gets pods
- kubectl get pods -n default
- kubectl get pods -n kube-system
For the first two commands, we are creating two pods named test1 and test2 in the test namespace using image Nginx. In the next command, we retrieved the pods from the namespace. The last two commands retrieved pods from the default and kube-system namespaces. So if the user is in the test namespace and he wants to execute commands for another namespace, he could do so by appending “-n [namespace-name]” in the command. This applies to any kubectl command where we are dealing with namespaced objects. You can execute create, delete, get, describe, and update commands inside another namespace, from within your current namespace by appending the namespace flag and namespace name. It doesn’t make a difference when operating on cluster-level objects.

As we get a better idea of how to operate with namespaces, we will proceed and create a resource quota in the test namespace and observe the behavior. We need to execute the below commands to do so.
- kubectl gets pods
- kubectl create quota test-quota --hard=cpu=1,memory=1G,pods=2
- kubectl gets quota
The last command shows the details of the quota. As for the quota, we can create max 2 pods, and all pods put together could use 1 CPU core and 1 gig of memory. The output displays that we have exhausted the pod counts. Let me check if I can create one more pod; if I fail, I will try deleting one pod and creating one more. Let me execute the below command and see what I get.
kubectl run test3 --image=nginx

So it complained about CPU and memory requests in the pod specification. Let’s add that to Pod specification and retry. Now we need to create a Pod manifest with below content in a file called pod.yaml.
apiVersion: v1
kind: Pod
metadata:
  name: nginx3
spec:
  containers:
  - name: nginx3and
    image: nginx
    resources:
      limits:
        memory: "200Mi"
        cpu: ".25"
In the above file, we have requested for 200Mib of memory and 250 milli cpu. Execute the below command and observe the output.
kubectl apply -f pod.yaml

Here it no longer complains about CPU or memory, but it clearly says that the pod quota is exhausted. So we need to delete one pod and create one more. Let me do that and observe the output.
- kubectl delete pod test2
- kubectl apply -f pod.yaml
- kubectl gets quota
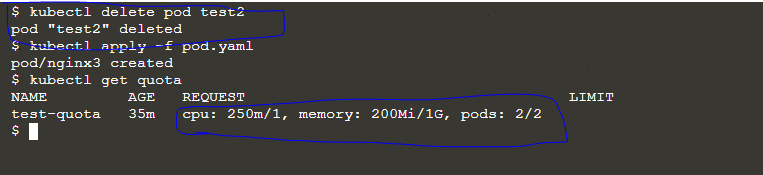
From the output, you can observe what the current state of the quota usage is.
Conclusion
So, with this little How to article, I have tried to give a glimpse of how to maturely handle resources within a Kubernetes cluster. I hope aspirants of Kubernetes technology will benefit from this and take it forward in their work.
Recommend
About Joyk
Aggregate valuable and interesting links.
Joyk means Joy of geeK