

Advanced Data Structures and Algorithms: “Tries”
source link: https://blog.bitsrc.io/advanced-data-structures-and-algorithms-tries-47db931e20e
Go to the source link to view the article. You can view the picture content, updated content and better typesetting reading experience. If the link is broken, please click the button below to view the snapshot at that time.

Advanced Data Structures and Algorithms: “Tries”
Building our own Google with Tries: Let’s look at the insides of a potential implementation of a search engine

We’re all used to building some sort of search into our web applications, especially if we consider “building” just adding an Algolia plugin to our project and calling their APIs using their SDK.
Really, implementing a basic search on a web application is not that difficult anymore.
But have you ever stopped to think about what kind of algorithms are used behind that “curtain” called API?
Today we’re going to look at what I like to call an “advanced” data structure that can be used to perform text searches inside a bigger text corpus, it’s called “Tries”.
I personally haven’t heard from them until recently, so I wouldn’t be surprised if that was your case too. Don’t worry though, they sound nastier than they really are.
Let’s get cracking!
What are Tries anyway?
The first thing to understand is that Tries are a special kind of Tree. We all know Trees, they’re simply a way to organize Node objects in which each node can have a varying number of child Node elements as well. If a Node has no children, it’s called a “leaf Node” (keeping with the “tree” analogy).
Now, Tries are special in the sense that each Node can have up to 26 children, sorted alphabetically (mind you, if you want to use a different alphabet, that number will vary, but all Nodes will have the same max number of children).
And on top of that, words are inserted “vertically” (or in levels) throughout the tree. Let me show you what a Trie looks like:
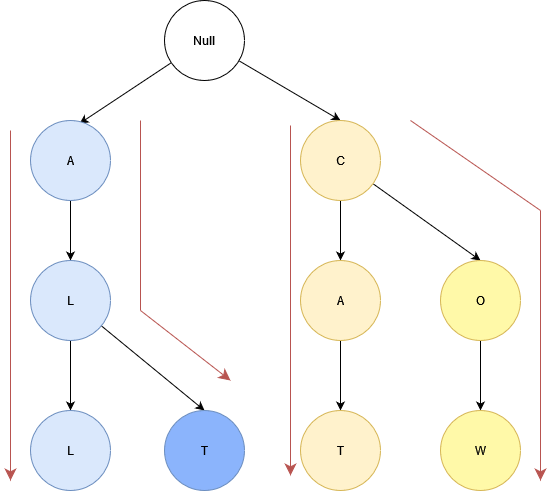
The root of a Trie is always going to be “null”, that’s one key characteristic of this data structure. You can see that I have added 4 words to it:
You can read them vertically, that’s what I mean by “levels” before. Each level is going to be a position in our word. The last node of each word will also be marked with a flag “isFinal”, to denote the fact that the word ended there. We’ll see how relevant this flag is in a minute.
You can also note the fact that whenever a node has multiple children, they’re sorted alphabetically, this is because that sorting will simplify the algorithms used to insert data and to search for it later on. Remember, we’re dealing with the assumption that we’re only working with 26 letters from “a” to “z” all lowercase. If you want to have more flexibility, you can increase that number and find the right way to index your Nodes.
So let’s take a look at how we could implement the two most basic operations with Tries: inserting data and searching for it afterward.
Did you like what you read? Consider subscribing to my FREE newsletter where I share my 2 decades’ worth of wisdom in the IT industry with everyone. Join “The Rambling of an old developer” !
Inserting data into a Trie
The basic algorithm required to insert data inside this data structure is simple:
- Lowercase the word you’re trying to insert
- Search for the first letter of your word inside the child Nodes of the root.
- Is the letter in the expected place? If it’s there, move on to the next letter of your word, and search for it inside the children of the current letter you just found.
- Is the letter not found? Then add a new Node, and move on to the next letter of your word.
You’ll keep going until you run out of letters, in that case, flag the last one as “isFinal” and you’re done.
For example, if you’re adding the word “ALL” to an empty Trie, you’ll do:
- Lowercase to “all”
- Does the root have the “a” on the first child Node? No, because it’s empty, so we’ll add a new Node in the first child slot.
- Now we move on to the first “l”, which is not on the 12th child of “a” because the latter was just added. So we’ll add a new Node for “l” in the 12th child slot.
- Moving on to the last “l”, we do the same: we look for the 12th child slot inside the previous letter (the first “l”), and since it’s empty, we’ll create a new Node for the last “l”. The only difference, is that we’ll also flag it as “isFinal”.
If we now wanted to add the “alt” word into it, we’ll find that the first two letters are already there, so we just skip the part where we add those Nodes.
Let’s take a look at the code to understand how this translates into JavaScript:
The Node is very simple to structure, to be honest, even the label attribute is optional, since the actual position of the Node will determine the letter it represents. That said, I think it’s easier to understand this way, so feel free to do what you want with it.
Now, the actual Trie looks like this:
As you can see, when created, the “root” node is initialized as null and then whenever we insert a new word, we start at the root’s children and move on from there.
The last node of the word, is then flagged with isFinalLetter so we know that’s where the word ended. This will become relevant once we see how the search is performed.
Searching for data inside a Trie
Searching is actually quite similar to inserting, because we have to go through the Trie following the same algorithms, only if the letter we’re looking for is not there, instead of adding it, we return false .
Now, the other small detail about the search, is that at the end of the word, if we found all letters, we’ll also have to check if the last Node found is flagged as isFinalLetter . If that’s the case, it means the word was present in the Trie, otherwise, it means we’re searching for a substring of an inserted word, so we actually got a “partial” match.
Essentially, imagine having the word “Words” in your Trie.
- If you look for “want” instead, by the time we get to the “a” we won’t find it inside the children of “w”, so it’s not there.
- If we look for “word” instead, we’ll get to the “d”, but that “d” won’t be flagged as
isFinalLetterso we’ll know that “word” isn’t inside the Trie, but some other word that contains it is.
Let’s see what that looks like in code now:
It’s the same class as before, but with the search method instead, so it’s easier to read.
This method returns one of three values:
falseif there is no match.full-matchif we get to the final letter of our word and the last letter is actually flagged asisFinalLetterpartial-matchif we get to the end, but the last letter is not flagged.
Notice that in this method I changed the forEach for a regular for becausewith the latter I can return earlier with a simple return statement, when the former wouldn’t let me out until I was done going through the full word.
The following example uses everything we’ve seen so far:
The result, as you would expect, looks like this:
Looking for 'fer':  full-match
Looking for 'angel':  null
Looking for 'fernando2':  null
Looking for 'federico':  full-match
Looking for 'fern':  partial-match
But let’s take this one step further, because the experiment is fun, but how do we use this inside a real-world application? Let’s see how to add this into a Next app, shall we?!
Using our Trie-search inside Next
You can use whatever framework you want, I went with Next because it provides a nice API framework as well.
I’ll simply create a brand new app with npx create-next-app@latest .
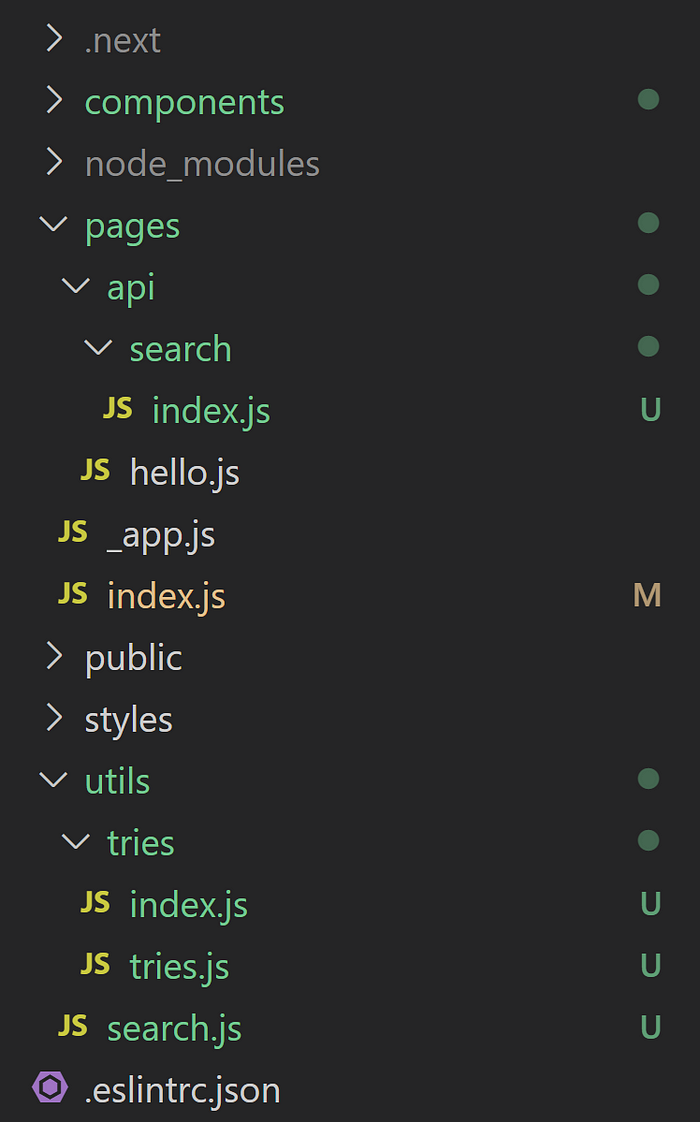
Inside the new app’s folder structure, I’ll create the following new folders:
/componentswhich is where I’ll add a newSearchcomponent./utilswhich is where I’ll save mytriesfolder (with the classes I just showed you) and where I’ll add a newsearch.jsfile that will act as a gateway to our Trie.
I’ll keep the search service on the back-end, so we’ll interact with it through an API endpoint that we’ll add inside the pages/api/search folder.
By the end, your folder structure should look like this:
Adding the search endpoint
The search endpoint is going to be really simple for this example. We’ll handle all requests and we’ll look for a q query parameter, which is where our search string will be stored.
So the whole code looks like this:
We’ll worry about the getSearch function in a second, now all you need to know about it, is that it gives you access to your Trie instance.
Adding the Search UI component
We’ll also need a UI component to let our users search for something and show them some sort of feedback.
In our case, the feedback will be “not found”, “partial match” or “full match”, but you can get as creative as you want.
The code for our component looks like this:
Again, nothing too crazy, just a component performing a Fetch request to our new API every time the input field changes. You can probably find ways to improve this and throttle the number of requests.
This is what this looks like rendered (no styles here, so be warned, it’s ugly!):
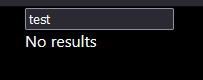
Told you!
Let’s now look at the getSearch function, because that one is doing something interesting.
The search gateway
To make sure we can search for something, we first have to insert that “something” into our Trie, so when do we do that?
I chose to load the “corpus” of our search engine with the first search request, and then, we’ll keep the Trie in memory and we’ll make sure we don’t overwrite it by implementing a basic singleton pattern, like this:
As you can appreciate, I’m calling the loadIndex function, which adds a few words to our Trie, when I first instantiate the actual Trie, then all I do is return the instance I created the first time around.
This is a neat little way of keeping a single instance throughout your entire app execution.
If you’d like to review this example in more detail, you can get the code here. Have fun with it!
Have you heard about Tries before? Or even better, have you used them for anything? Share your experiences in the comments, I’d love to know what you’ve done!
Build apps with reusable components like Lego

Bit’s open-source tool help 250,000+ devs to build apps with components.
Turn any UI, feature, or page into a reusable component — and share it across your applications. It’s easier to collaborate and build faster.
Split apps into components to make app development easier, and enjoy the best experience for the workflows you want:
→ Micro-Frontends
→ Design System
→ Code-Sharing and reuse
→ Monorepo
Recommend
About Joyk
Aggregate valuable and interesting links.
Joyk means Joy of geeK