

通过Shell脚本自动安装Hive&JDBC测试&提供CDH5网盘地址 - 哥们要飞
source link: https://www.cnblogs.com/liujinhui/p/16951031.html
Go to the source link to view the article. You can view the picture content, updated content and better typesetting reading experience. If the link is broken, please click the button below to view the snapshot at that time.
〇、参考地址
1、Linux下编写脚本自动安装hive
2、如何运行.sh脚本文件
https://blog.csdn.net/weixin_55821558/article/details/125830542
3、hive教程:启动hiveserver2,通过jdbc方式访问hive☆
https://blog.csdn.net/a12355556/article/details/124565395
2、CDH安装hadoop与版本比较
https://www.freesion.com/article/8763708397/
一、代码编写
1、下载Hive
原生:http://archive.apache.org/dist/hive/hive-1.1.0/
CDH版本(已失效):https://archive.cloudera.com/p/cdh5/cdh/5 注意:登录名为邮箱,密码大小写数字+符号!
命令下载(已失效):wget https://archive.cloudera.com/cdh5/cdh/5/hive-1.1.0-cdh5.14.2.tar.gz
CDH5网盘备份:链接:https://pan.baidu.com/s/1XUGRMpjTbrJWDy9QCT9vTw?pwd=gmyf
比较:CDH版本比原生的兼容性更强,下载哪个都可以
2、编写脚本
vi hive_insatll.sh
echo "----------安装hive----------"
#-C 指定目录
tar -zxf /usr/local/hive-1.1.0-cdh5.14.2.tar.gz -C /usr/local/
#改名
mv /usr/local/hive-1.1.0-cdh5.14.2 /usr/local/hive110
#配置环境变量
echo '#hive' >>/etc/profile
echo 'export HIVE_HOME=/usr/local/hive110' >>/etc/profile
echo 'export PATH=$PATH:$HIVE_HOME/bin' >>/etc/profile

#创建配置文件hive-site.xml
touch /usr/local/hive110/conf/hive-site.xml
path="/usr/local/hive110/conf/hive-site.xml"
#编写配置
echo '<?xml version="1.0" encoding="UTF-8" standalone="no"?>' >> $path
echo '<?xml-stylesheet type="text/xsl" href="configuration.xsl"?>' >> $path
echo '<configuration>' >> $path
#和jdbc如出一辙,更换自己的ip地址和用户名密码即可
echo '<property><name>javax.jdo.option.ConnectionURL</name><value>jdbc:mysql://192.168.91.137:3306/hive137?createDatabaseIfNotExist=true</value></property>' >> $path
echo '<property><name>javax.jdo.option.ConnectionDriverName</name><value>com.mysql.jdbc.Driver</value></property>' >> $path
echo '<property><name>javax.jdo.option.ConnectionUserName</name><value>root</value></property>' >> $path
echo '<property><name>javax.jdo.option.ConnectionPassword</name><value>123123</value></property>' >> $path
echo '<property><name>hive.server2.thift.client.user</name><value>root</value></property>' >> $path
echo '<property><name>hive.server2.thift.client.password</name><value>123123</value></property>' >> $path
echo '</configuration>' >>$path
添加执行权限:chmod u+x hive_insatll.sh
执行.sh文件:./hive_insatll.sh 或 sh hive_insatll.sh
4、使环境变量生效
source /etc/profile
二、运行后的其他操作
1、下载mysql的jar包
下载地址:https://mvnrepository.com/artifact/mysql/mysql-connector-java/5.1.38
其他jar包:mysql-binlog-connector-java、 eventuate-local-java-cdc-connector-mysql-binlog……
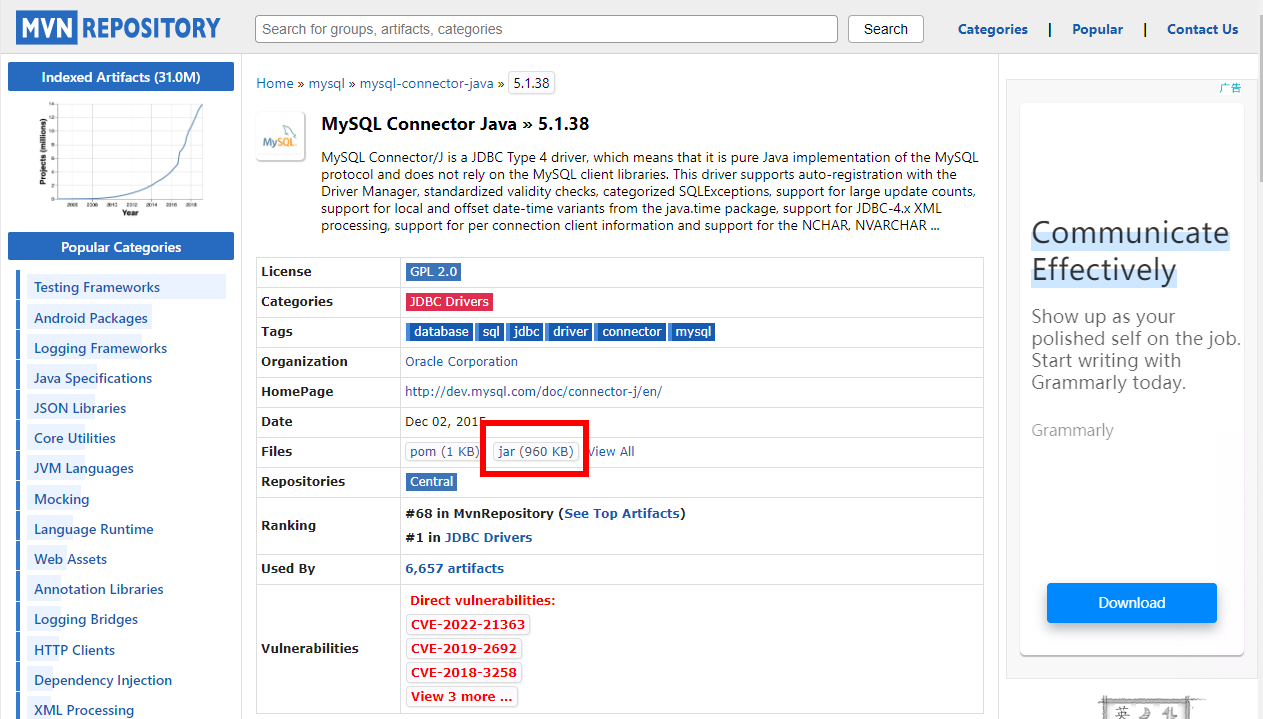
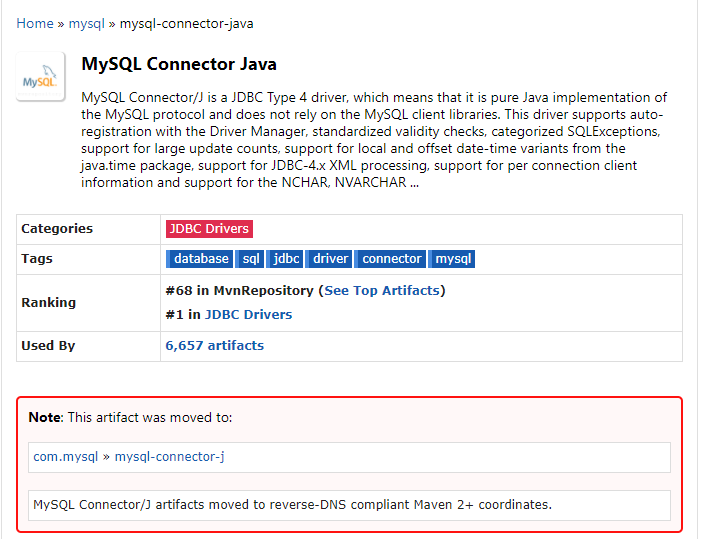
注意:已经转至新目录
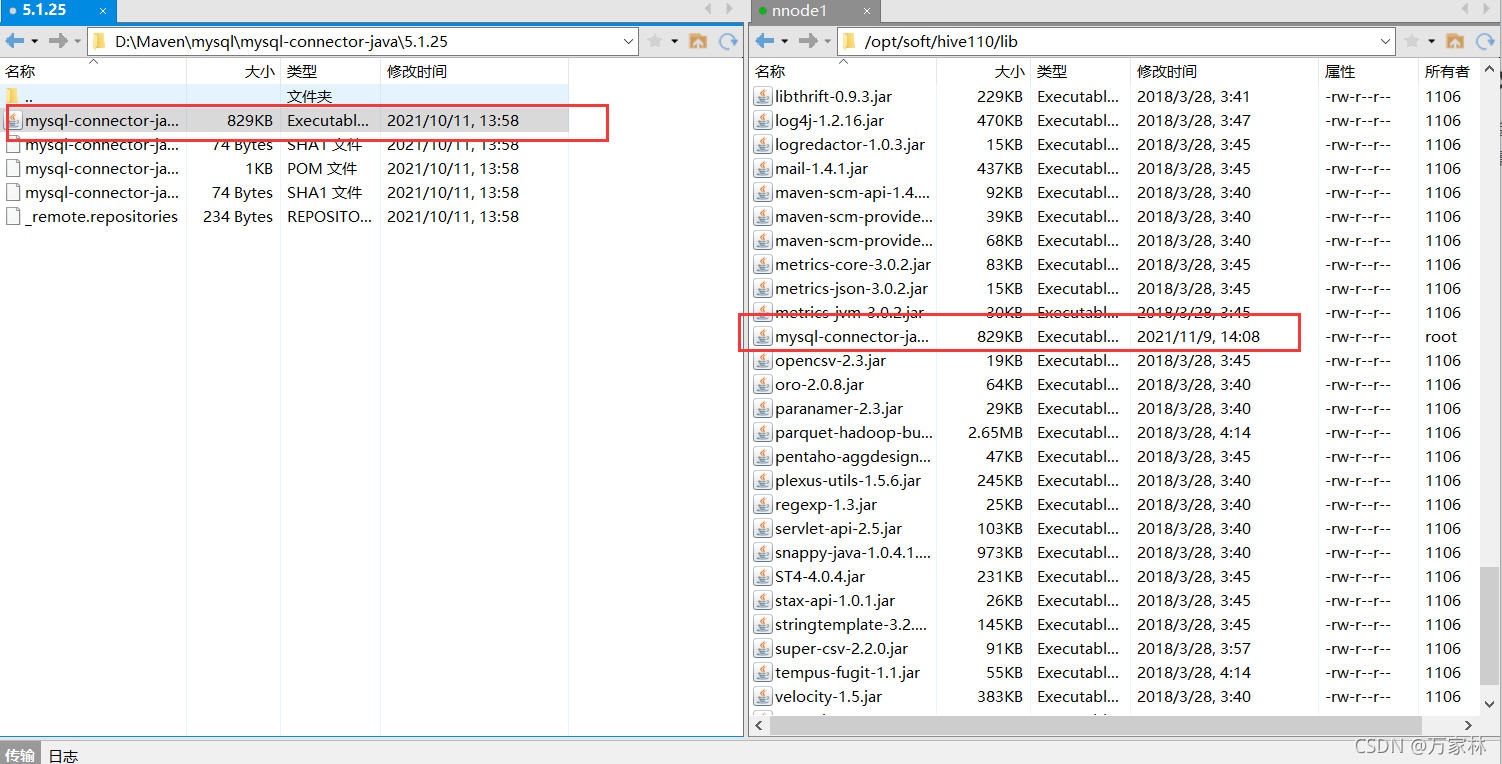
2、放入hive110/lib目录
3、执行格式化操作
schematool -dbType mysql -initSchema
4、启动hiveserver2
前台启动:hive --service hiveserver2
后台启动:nohup hive --service hiveserver2 2>&1 &
组合使用: nohup [xxx 命令操作]> file 2>&1 &,表示将 xxx 命令运行的结 果输出到 file 中(第一个2表示错误输出,另外0表示标准输入,1表示标准输出)
三、配置与验证
1、beeline 客户端连接hive
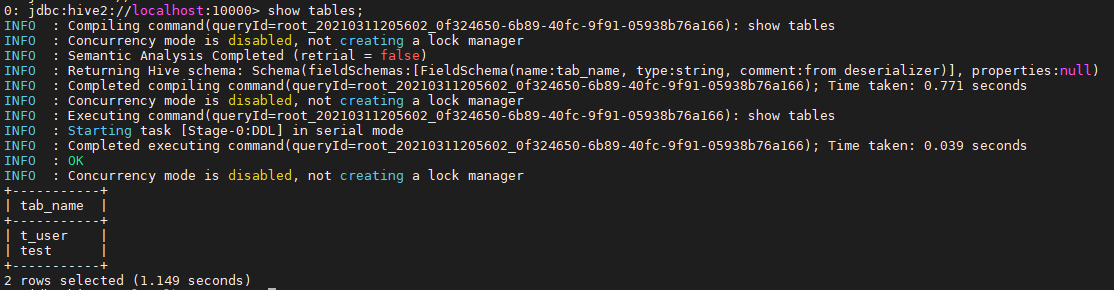
连接:beeline -u jdbc:hive2://localhost:10000 -n root

执行语句:show databases;
2、java验证
(1)引入依赖
<dependency>
      <groupId>org.apache.hive</groupId>
      <artifactId>hive-jdbc</artifactId>
      <version>1.1.0</version>
      <exclusions>
        <exclusion>
          <groupId>org.eclipse.jetty.aggregate</groupId>
          <artifactId>jetty-all</artifactId>
        </exclusion>
        <exclusion>
          <groupId>org.apache.hive</groupId>
          <artifactId>hive-shims</artifactId>
        </exclusion>
      </exclusions>
    </dependency>
(2)代码验证
import java.sql.SQLException;
import java.sql.Connection;
import java.sql.ResultSet;
import java.sql.Statement;
import java.sql.DriverManager;

public class HiveAPITest {
    private static String driverName = "org.apache.hive.jdbc.HiveDriver";

    public static void main(String[] args) throws SQLException {
        try {
            Class.forName(driverName);
        } catch (ClassNotFoundException e) {
            // TODO Auto-generated catch block
            e.printStackTrace();
            System.exit(1);
        }

        //replace "hive" here with the name of the user the queries should run as
        Connection con = DriverManager.getConnection("jdbc:hive2://localhost:10000/default",
"hive", "");
        Statement stmt = con.createStatement();
        String tableName = "testHiveDriverTable";
        stmt.execute("drop table if exists " + tableName);
        stmt.execute("create table " + tableName + " (key int, value string) row format delimited fields terminated by '\t'");

        // show tables
        String sql = "show tables '" + tableName + "'";
        System.out.println("Running: " + sql);
        ResultSet res = stmt.executeQuery(sql);
        if (res.next()) {
            System.out.println(res.getString(1));
        }

        // describe table
        sql = "describe " + tableName;
        System.out.println("Running: " + sql);
        res = stmt.executeQuery(sql);
        while (res.next()) {
            System.out.println(res.getString(1) + "\t" + res.getString(2));
        }

        // load data into table
        // NOTE: filepath has to be local to the hive server
        // NOTE: /opt/tmp/a.txt is a \t separated file with two fields per line
        String filepath = "/opt/tmp/a.txt";
        sql = "load data local inpath '" + filepath + "' into table " + tableName;
        System.out.println("Running: " + sql);
        stmt.execute(sql);

        // select * query
        sql = "select * from " + tableName;
        System.out.println("Running: " + sql);
        res = stmt.executeQuery(sql);
        while (res.next()) {
            System.out.println(String.valueOf(res.getInt(1)) + "\t" + res.getString(2));
        }

        // regular hive query
        sql = "select count(1) from " + tableName;
        System.out.println("Running: " + sql);
        res = stmt.executeQuery(sql);
        while (res.next()) {
            System.out.println(res.getString(1));
        }
    } }
3、Zeppelin验证
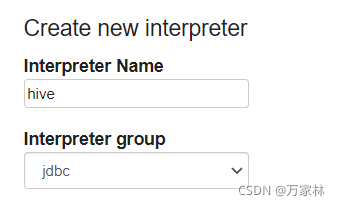
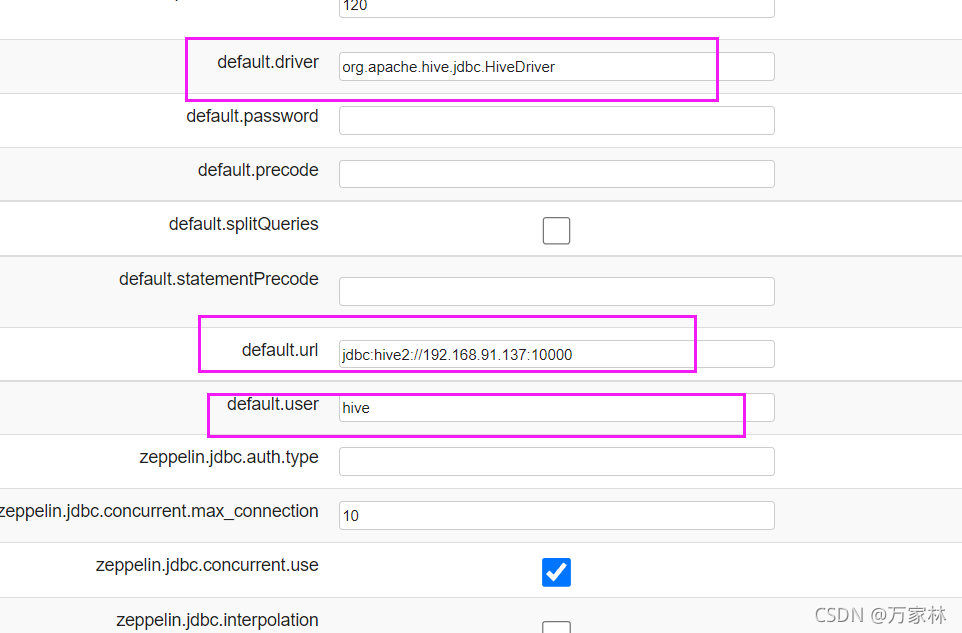
(1)配置interpreter
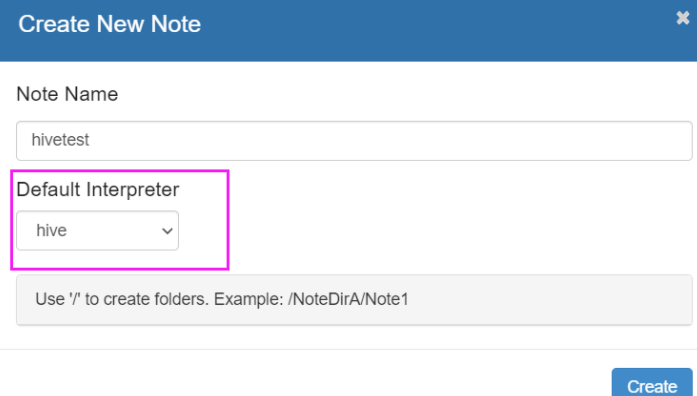
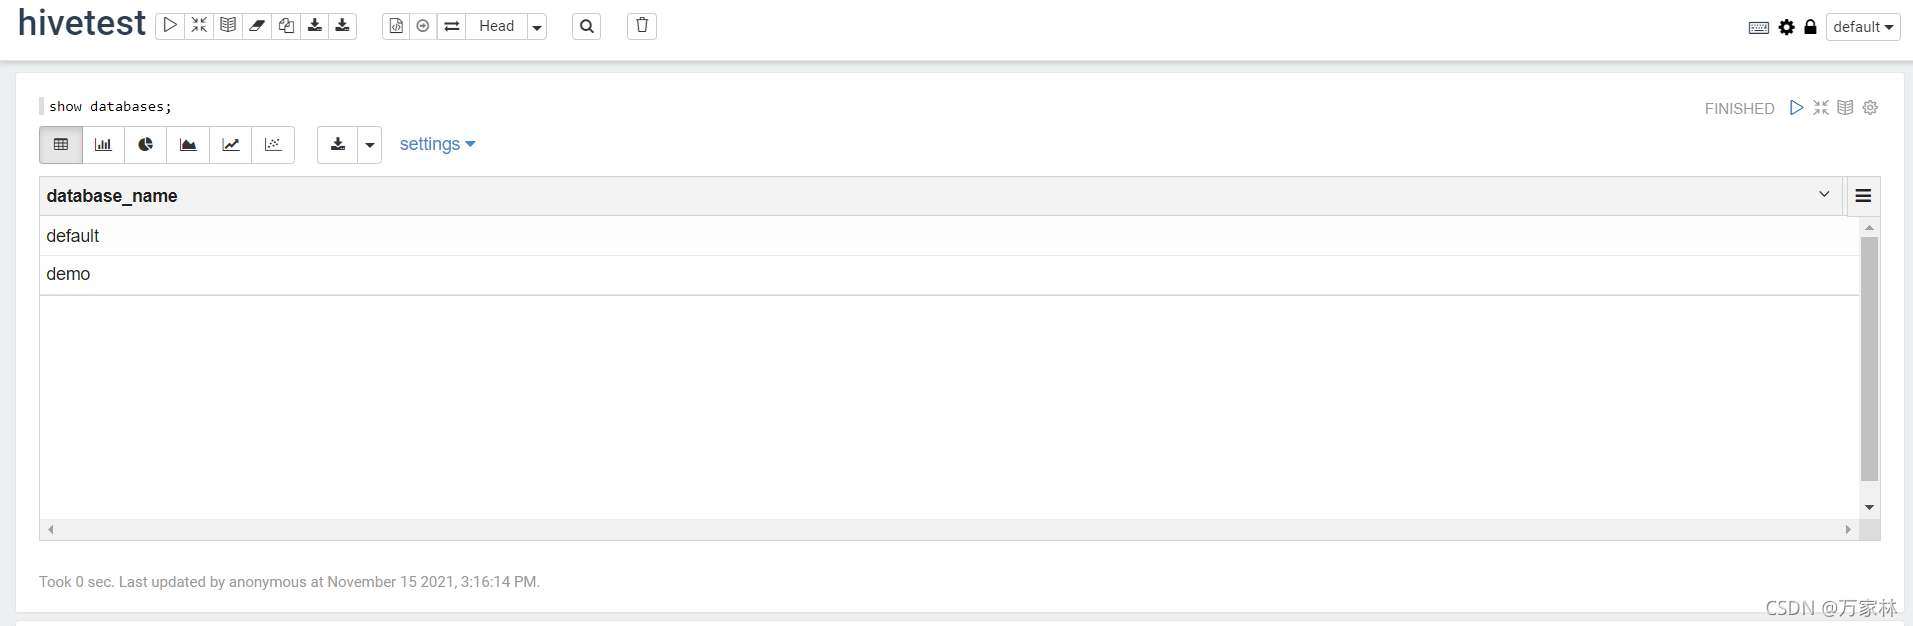
(2)验证-Note
Recommend
About Joyk
Aggregate valuable and interesting links.
Joyk means Joy of geeK