

Kotlin Native and GraalVM — The Story So Far
source link: https://itnext.io/kotlin-native-and-graalvm-the-story-so-far-e10d7e9cfc91
Go to the source link to view the article. You can view the picture content, updated content and better typesetting reading experience. If the link is broken, please click the button below to view the snapshot at that time.

Kotlin Native and GraalVM — The Story So Far

There is a lot of buzz today about a technology that we tend to call Native. Native technology or Native code usually is referred to code programmed in C that can be run in one particular system directly without a Virtual Machine after compiling. For example, all JVM language code (i.e. Java, Kotlin, Scala, Groovy) needs a Virtual Machine to run on. We first compile our source files to byte codes that can be read by the VM and then we start the VM with our bytecodes. Javascript code also needs a virtual machine to run on, and many other languages also need so. However, when we compile any code natively, even C code, what it actually means is that the code is compiled in such a way that we can just call these resulting executable files from the command line without resourcing to anything else. We don’t need NodeJS to run them, we don’t need the latest JRE to run them, and we don’t need any SBT, Gradle, or Python tool to run these. We simply run the executables. Of course, a catch to this is that we can’t run these files in any system. We can only run these files in the systems that understand them and we define this at compile time. This is why we can’t run windows files in Linux and vice-versa without anything to support them. So, for example, if we want to run any windows executable file in MAC-OS we will need something like Wine.
If you are from a few years back, and I mean the diskette times, you are probably familiar with the concept of EXE, COM, and BAT files. Things like AUTOEXEC.BAT should come to mind. For those of you who recognize these things, I can already give you this as an example, and you probably already know this, none of this works on a MAC-OS or LINUX. These files were specific to the old MS-DOS systems and a few old Windows versions. In any case, the point here is that we now know that when we talk about Native, we are referring to a way to run our code independently. Our compiled code will work natively. It will use low-level resources and cut-through abstractions as much as possible in order to execute commands on a very low level and preferably commands that need no pre-installation.
1. Introduction
We are going to make some experiments with Kotlin Native and other variants and forms of compiling native code. For this, we are going to need data, and that data is provided by chapter 2 of my novel: Good Story. For this article, we’ll look at Chapter 2 — The cat that helped Lucy
2. Requirements
For this article, the repository that I am providing was created considering only Linux systems running containers with Linux installed. I didn’t perform tests initially for MAC-OS. I intend to provide full support to MAC-OS machines and maybe Windows further down the line. If you really need to have my repository support also Windows and MAC-OS please open issues to my repo or any of my other repositories. I will then feel compelled to help you with that and will just increase my motivation to do it. And because of this, I really would appreciate it if you could open your issues here.
What you’ll also need to consider is the capacity of your machine. I have made several tests and my machine got quite blocked during compilation times until I finally raised the file listeners number:
echo fs.inotify.max_user_watches=33554432 | sudo tee -a /etc/sysctl.conf && sudo sysctl -p
cat /proc/sys/fs/inotify/max_user_watches
The inotify watches number 3354432 is what ended up working for me, but please try more if your machine can. You can find more info about this in my all things cloud repo.
If you intend to run all the examples that I’ll be describing in the following, please bear in mind that compilation in the native world also means that the bridge from strongly typed languages like the one we are using, Kotlin, is a very slow one and so you have to expect extraordinary slow compilation times. It has nothing to do with your machine, hardware, or any operating system you may be using and it can be quite frustrating to get compilations going. As a precaution, please do not use your IDE before performing the installation steps I indicate below.
3. Kotlin Native
With pure Kotlin native, we are only going to create some fun things with the command line. Kotlin Native provides wrappers around several command line instructions, which we can use quite easily. We will effectively use C underwater and make it run with GCC.
3.1. What is Kotlin Native and how it works?
Kotlin native is still very limited in what it can do and it also has a very different way of running and working. Because of this, we need to first dive into what working with Kotlin native actually looks like from the basics and then build up our knowledge from there.
When we first create a Kotlin Native initial solution with the initial IntelliJ layout we may be led to think that we are going to work with a normal environment where we can just add libraries and configure Gradle to work. Instead, we are going to work with libraries that are available for Native code generation. So before we do anything we start for example a Native Multiplatform Application project:
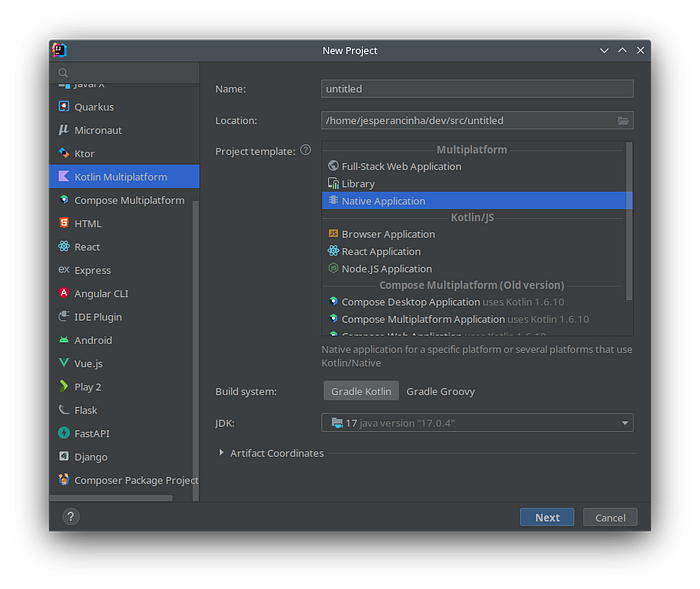
Starting a native Application in IntelliJ
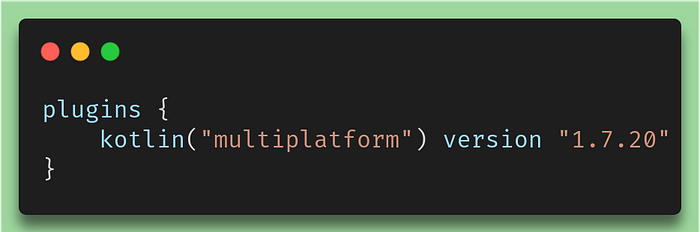
When I did this, I realized that the resulting project is a Gradle project. For example, let’s have a look at the good-feel project first. This project is simply a console-based project which simply outputs a random positive message to the screen to give you a good feel for the rest of your day. If we look at the basic plugins that are being used, there is just one called multiplatform:
Multiplatform declaration
Once this plugin is in place, Intellij also configures the Kotlin Native compilation.
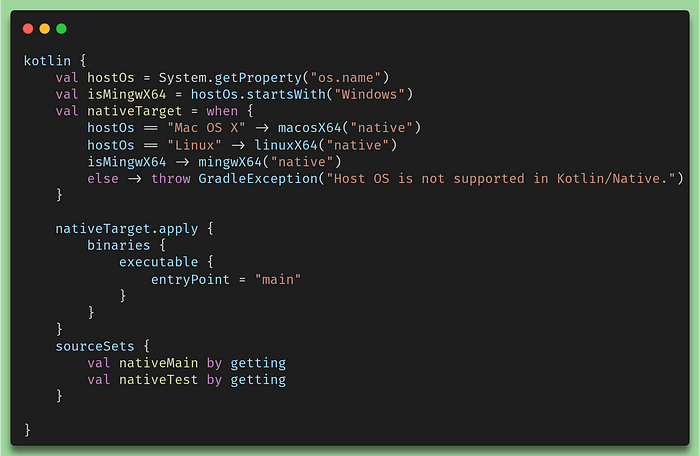
Gradle Native Code Compilation Configuration
What this means is that the compiler will figure out on which machine you are running it and then compile your code to native if that’s possible. This code comprises possible compatibility with Windows, Mac OS X, and Linux. As I mentioned before, in this article we’ll only have a look at implementing Native code in a Linux ecosystem.
Let’s have a look at the actual code. It is super simple and I made it so to provide some sort of leverage to understand how native code works:
fun main() {
    println("*.*.*.*.*.*.*.*.*.*.*.*.*.*.*.*.*.*")
    println(randomMessage())
    println("*.*.*.*.*.*.*.*.*.*.*.*.*.*.*.*.*.*")
}

fun randomMessage(): String {
   return listOf(
       "Good Morning!",
       "You are looking great today!",
       "What a great day today!",
       "Good job!",
       "I really appreciate what you just did! Thank you!",
       "Thanks for bringing me coffee!",
       "You are the best pal ever!",
       "I love working with you!",
       "Rise and shine!"
   ).random()
}
So in this module, we are only printing out a few strings, which are two separators that have a good feel message in between. If we click through the sources we quickly realize that not much has changed really. This is just standard Kotlin library code. And if we compile the code in that folder with the command make b we’ll end up getting an executable file in build/bin/native/releaseExecutable/plus.kexe. We can call this file manually via this precise link or by just running the script make run . You’ll be getting something like this in the output:
*.*.*.*.*.*.*.*.*.*.*.*.*.*.*.*.*.*
Good job!
*.*.*.*.*.*.*.*.*.*.*.*.*.*.*.*.*.*
The idea of this project is simply to illustrate how easy it is to start a project in Kotlin native. We’ll also see how difficult it can get. And this is why I created project plus, which essentially is just an extension of project good-feel. When clicking through, especially the Map class and especially where the source is, we quickly realize that we are not really working with normal jar libraries. In fact, we are not working with Java libraries at all. What we are working with is .knm files. These are natively compiled libraries that IntelliJ can partially interpret and provide easy interface access to them. This all happens during design time which means that IntelliSense is working for you:
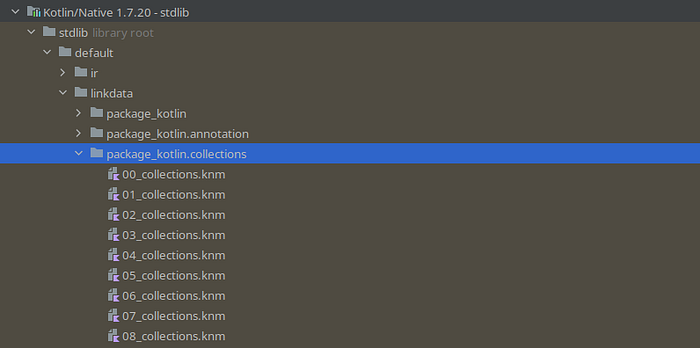
Kotlin Native stdlib layout
We are of course still using a standard library, but not the one we are used to using. The standard library in this case is code that runs natively. But first, let’s have a look at what are we using in the new code:
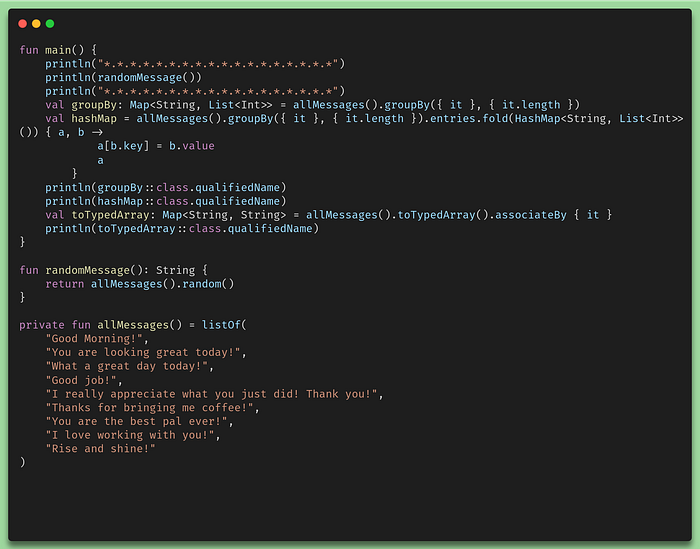
Plus code with extra groupBy
In this case, I’m just creating some maps, then I use the entities to recreate them, and essentially I’m just creating maps. What makes super simple code interesting is that it looks and feels like Kotlin. It is in many ways Kotlin, but this code will be compiled ahead of time. We call the compiler in this case an AOT (Ahead Of Time Compiler). What this means is that the resulting code is not just an executable. When we run it, it will start with a performance peak because there will be no just-in-time compiling process. In the JVM when we make what we call an executable jar, the compilation process didn’t stop there. It’s just enough so that we can start the jar in the JVM. The complete compilation will happen while processes are being optimized during the startup of the application. This is normally what we refer to when we talk about JIT. Bear this in mind as we go further because we’ll talk about these two concepts throughout the rest of this article.
If we for example analyze one of the generated knmfiles, we’ll see the following:
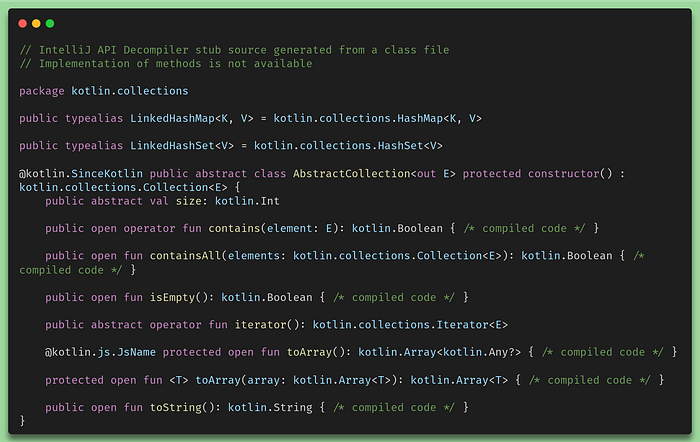
00_collections.knm of package kotlin.collections
We can see at the top that, instead of what we would normally see in the Kotling standard library for the SDK, we only see references like interfaces and unreadable function bodies. We also see some declared variables but we never ever get to see any implementation. For the moment, it is not really possible to see, at least not easily, the actual implementation of such methods in the Kotlin Native standard library. The native library is of course native and we can’t see that in the same way that we cannot see the implemented functions in C using the native bindings in Java. This is also one side of what implementing with Kotlin native SDK actually means. We are now programming in the gray area which separates JVM code from Native code and we do that of course because we want our final product not to have anything to do with the JVM anymore. Also, take notice of the first comment of the decompiler which basically states what we just discussed:
// IntelliJ API Decompiler stub source generated from a class file
// Implementation of methods is not available
This is essentially how Kotlin Native works in its purest and simplest form. We can of course combine our Kotlin code with C code, which allows us to explore more possibilities in what we can do with native code and our final assembly.
3.2. Kotlin native runner implementation
As we’ll see further, we’ll use an example where we will create a runnable that will make very simple operations. It will split a text and immediately concatenate it back without checking. This is an operation that costs time O(n) for the split and O(n) for the join which results in a total of O(n) complexity in time. In terms of space, it will also have an O(n) complexity for the split and an O(n) complexity for the concatenation. The code implementation is very simple and it looks like this:
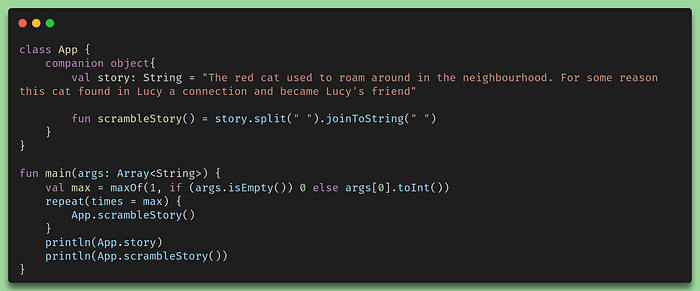
Native Runner without C interoperability bindings
This example was created in the same way as the good-feel example was created.
3.3. Kotlin native runner with C interop bindings runner
Before explaining how the Kotlin native runner works with C interoperability in place maybe it’s important to consider why running a code with this particular situation would be of any interest. As mentioned before, creating a code in C provides an alternative to creating native code via Kotlin code. This can provide multiple possibilities for creating new software. What we will want to test in this case is what sort of impact would have when running the same runnable with the particular difference that we use C code instead of Kotlin code. Now we can carry on to the fun part and this is the creation of the C bindings. But before we start I’d like to share a few things I quickly realized when doing this:
- It is very difficult to configure Kotlin Native to compile C code into the finally compiled runnable in such a way that it works for every machine.
- In this example, I found it better to have the C code compiled separately and then introduce that compiled native code into the assembly with Kotlin native.
So first we create our small library. This is the header file:
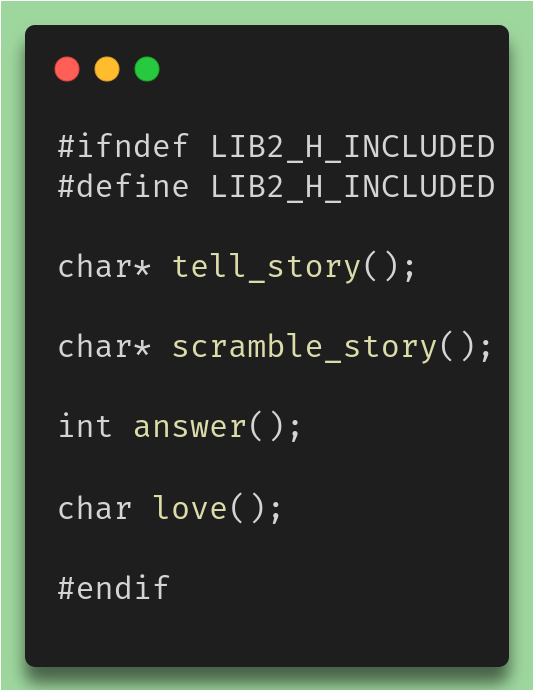
redcat.h
Now we need the implementation file:
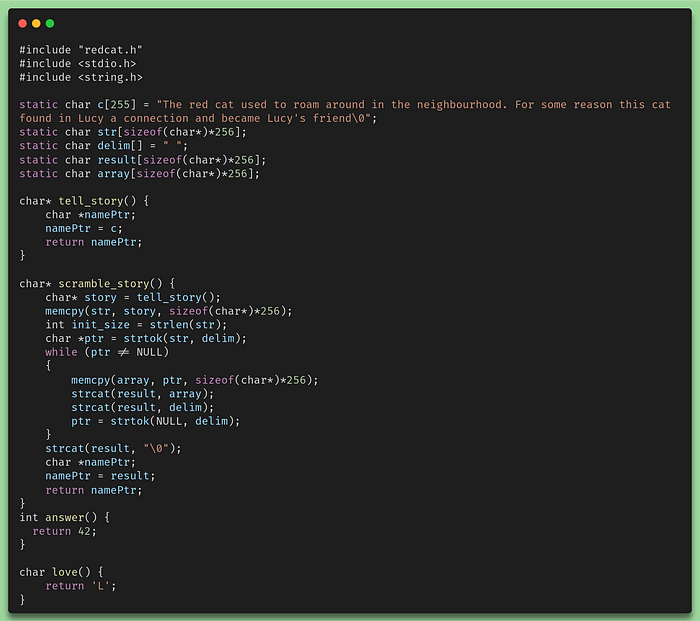
redcat.h
In my case, what I wanted to have is just a static library. This is ultimately what the Kotlin Native compiler needs to access the code we developed in C. This is a binary native version of our code that we can then inject into the Kotlin code as well. In the Make file of this project, we will see this set of instructions in order to be able to compile our code into the binaries we need:
gcc -c "-I$(PWD)" src/nativeInterop/cinterop/code/redcat.c -o src/nativeInterop/cinterop/code/redcat.o

ar rcs src/nativeInterop/cinterop/code/redcat.a src/nativeInterop/cinterop/code/redcat.o

./kotlin.native/bin/cinterop -def src/nativeInterop/cinterop/redcat.def -compiler-options "-I$(PWD)/src/nativeInterop/cinterop/code" -o src/nativeInterop/cinterop/code/redcat.klib

./kotlin.native/bin/konanc -l src/nativeInterop/cinterop/code/redcat.klib src/nativeMain/kotlin/Main.kt -linker-options src/nativeInterop/cinterop/code/redcat.a -o main
With gccwe get to build our o file. The .o file is in short, a merge between the .h and the .c files. This is called the object file which the compiler can then case use to link with all needed objects in order to create a final executable or binary. The arcommand creates a static library from a specified object file.
The following command we use is the cinterop command. Cinterop belongs to the Kotlin-Native Library. I provide the means to install it locally. There is a script for this called install-kotlin-native-linuxbut for now, that is not important. What cinteropdoes is precisely what’s in its name. C means C for the C language and interop stands for interoperability. The generated file is a readcat.klib file. If we type this file in the command line we’ll get something like this:
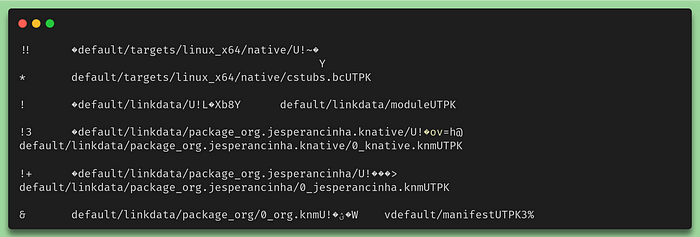
Last lines of the file content of the redcat.klib library
Looks familiar? Not an issue if it isn’t but remember just a few paragraphs above when we looked at the content of the Kotlin Native SDK? This is exactly the same for our own library. The Klibfiles are the jars in the Kotlin native world and the knm files are almost the same as Klibfiles but inside the SDK. So finally we have the Klibfile that we can import to our project. The way to do it is by the use of .def files. These files need to be located by default in src/nativeInterop/cinterop , but not necessarily. We’ll do all of this explicitly so that we have an idea of how this works. So before we get into the details of the .deffile, let’s first have a look at how the build.gradle.ktsworks:
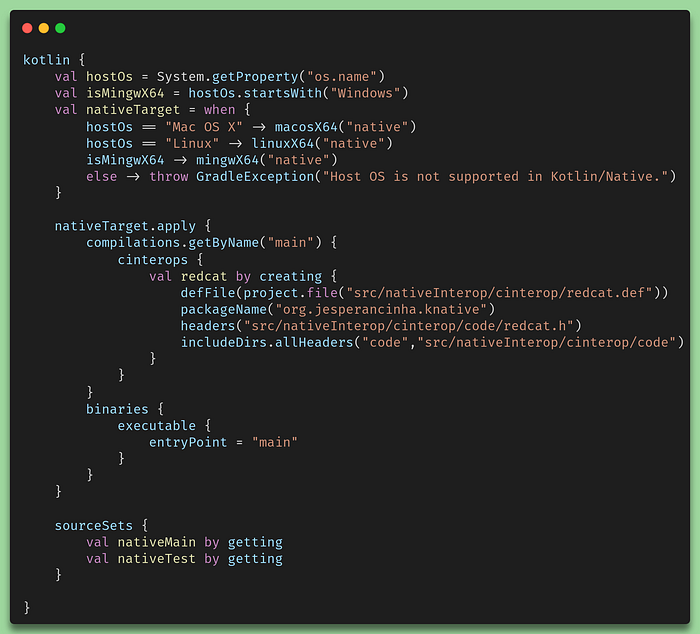
Gradle definitions to provide interoperability with C
We’ve already covered the usage of the multiplatform plugin before. For this configuration, we are going to look a bit more in-depth the cinteropsconfiguration. There we find that we create a variable called redcat. This variable is the configuration of our redcat libray. defFileis a method that accepts a File that contains the .def file we’ve mentioned before. packageName is the package that we want to generate via the C code. headers is the method used to configure all the headers files we are going to need and finally, we include the directories where the compiler should find all the headers. We’ve mentioned before that we make the compilation manually to avoid issues at compilation time. these last two properties headersand includeDirs aren’t necessary for our specific case.
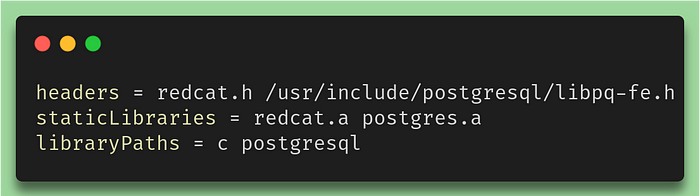
Finally, let’s have look at our .def file!
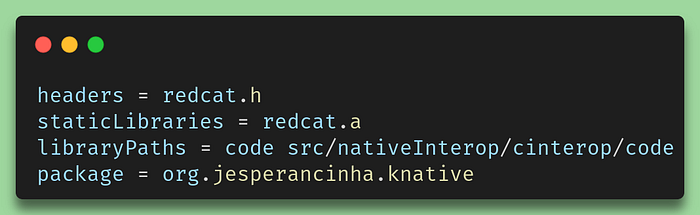
.def file redcat.def
The staticLibraries property is the one property we are interested in this file. There are plenty more properties that can be used, including the paths of the compilers, which compilers you may use, and extended amounts of configuration. For this article though and as we mentioned before, it doesn’t make sense to worry about that just yet because compiling without using the .def file is just easier. However, this could be something to debate in another article, and in the meantime here you can find more information about how to configure .def files on a more advanced level.
Finally, we can check our code:
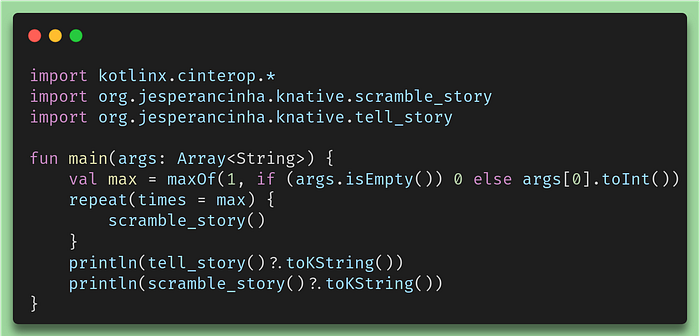
C Interoperability in the Kotlin Code
If we take a closer look, we then see our package org.jesperancinha.knative. And we can see that we get the tell_story and the scramble_story methods. This is great! We could have long discussions about naming methods but I think that conventions discussion shouldn’t find its place in this article where we are taking a look at how Native behaves in terms of performance for the different frameworks.
Maybe it’s also important to mention what the toKString() method does. We don’t really see it in the code, but tell_story and scramble_storyreturn both the type CPointer<ByteVar>. This is just a way to represent a c pointer to the beginning of a string in memory. If you don’t know what pointers are, it is probably a better idea to check what c pointers are first. So, via interoperability, Kotlin interprets the returned String as a ByteVar stream. Since this is Kotlin then of course we have a convenient method to do everything for us and that method is called toKString() .
3.4. Enterprise Kotlin Native Ktor Service implementation
One of the aspects of Kotlin Native that make it so interesting is that it allows us to create services with record starting times, and minimal resource memory usage. There could be also other benefits like performance. Here we will use the only possible alternative in the Ktor ecosystem, which is the CIO(Coroutine-based I/O) engine.
For this section, we’ll use the knowledge we’ve already built during all chapters above to create a service. If you are used to Spring, Micronaut, or any other web service framework, you’ll find this easy to understand. If not, I’ll try my best to make it clear.
Let’s recap the reasons why we want to build a Ktor Service at this stage. We want to compare Kotlin Native to GraalVM. We also want to check their similarities and differences. GraalVM is essentially used to convert jars into executables and Spring Native Cloud is used to create containers that we can run in the cloud. Spring Native, is only Native because it uses either GraalVM or a containerized version to run. The latter also uses GraalVM beneath the surface. Kotlin native has no way to create native services except by using the CIO alternative provided by Ktor, which is independent of GraalVM.
Now let’s also discuss another aspect of these services. In order to make the database work, I had to look for alternatives on the internet. There is a project called SQLDelight which provides some useful bindings that I needed for this project on GitHub. On another project by Philip Wedemann, there is code that allows connections to the database. So I used SQLDelight and some tips from postgres-native-sqldelightto create a small driver located in class Database.kt. The way the driver is implemented is quite complicated and not that useful for this article. The important part is that CIO allows for a service to be compiled natively without the need to resort to conversions. Still, it is important to understand how we get access to objects from the native code.
In this implementation, we are simply downloading the Postgres driver, extracting it, compiling it, and then we make the link using the following .def file:
Redcat definition
As we can see in the above script, we still need to access a libpq-fe.h file from the general postgresql includes. For this to work, we also need to install a few libraries locally:
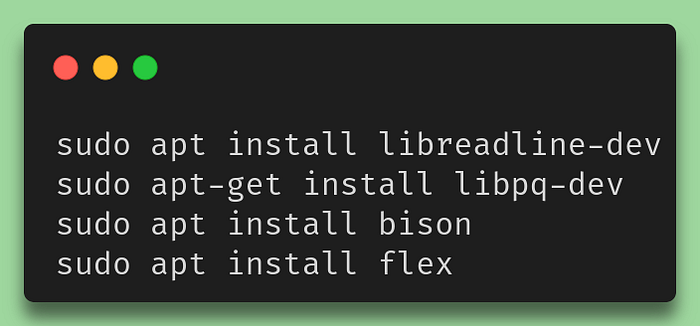
Necessary Libpq libraries for Linux
When that is done we still need to compile the whole driver directory we previously downloaded and that is done using the following sequence of commands:
./configure
make all
The postgres directory contains scripts that I’ve added to perform all of the necessary operations automatically. At some point in my investigation of this setup, I also found out that a file explicit_bzero_chk.cis also needed to successfully compile libpq . There are lots of suggestions on how to better do this, but I found the way I did it, a perfectly fine way to perform my tests. It’s probably not how we should do for production but while we wait for a release of reliable native libraries for PostgreSQL, we don’t really have much choice other than seeking out the best way to implement this, because at the moment, there aren’t many rules on how to use SQL natively nor there are many alternatives to it.
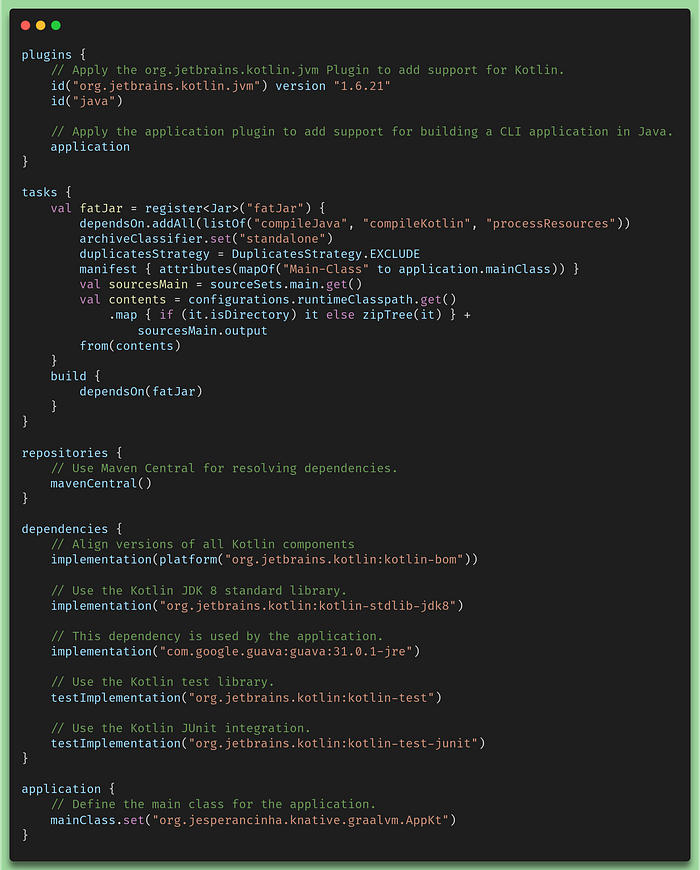
Let’s finally have a quick look at the build.gradle.kts file:
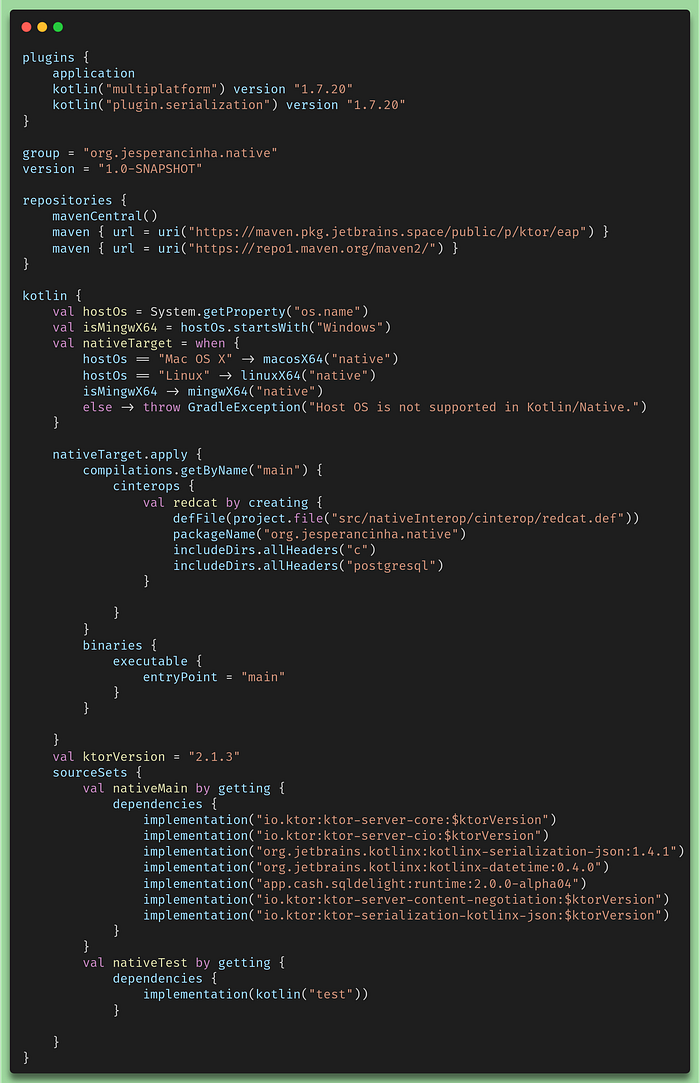
Build gradle file for the Ktor Service
One of the things that I found to be quite limiting when implementing a native service is the fact that everything needs to be activated via a plugin in order to work. If we think about it, it does make sense, because Kotlin Native is quite a different thing to work with. All libraries that we use, need to be able to support Native and that also means that, on the Kotlin side, we only see the interfaces and not the implementation. This means that, in order to be able to use some jars, we need to have that standard support. This has limited the implementation of this CIO server a lot. This is also part of the reason why I did not import the library provided by Philip Wedemann. Native libraries are difficult to configure and this particular library is still quite dependent on a particular local configuration. The way I did it, allows us to use Libpq with the link to the compiled library optimized for our local Linux machine.
Finally, we can look at how the CIO server is implemented. It essentially follows the typical Onion pattern followed by many enterprise solutions like Spring, JEE, KumuluzEE, Micronaut, etc. It is simply an MVC implementation at its core. But let’s have a look at the endpoint implementation:
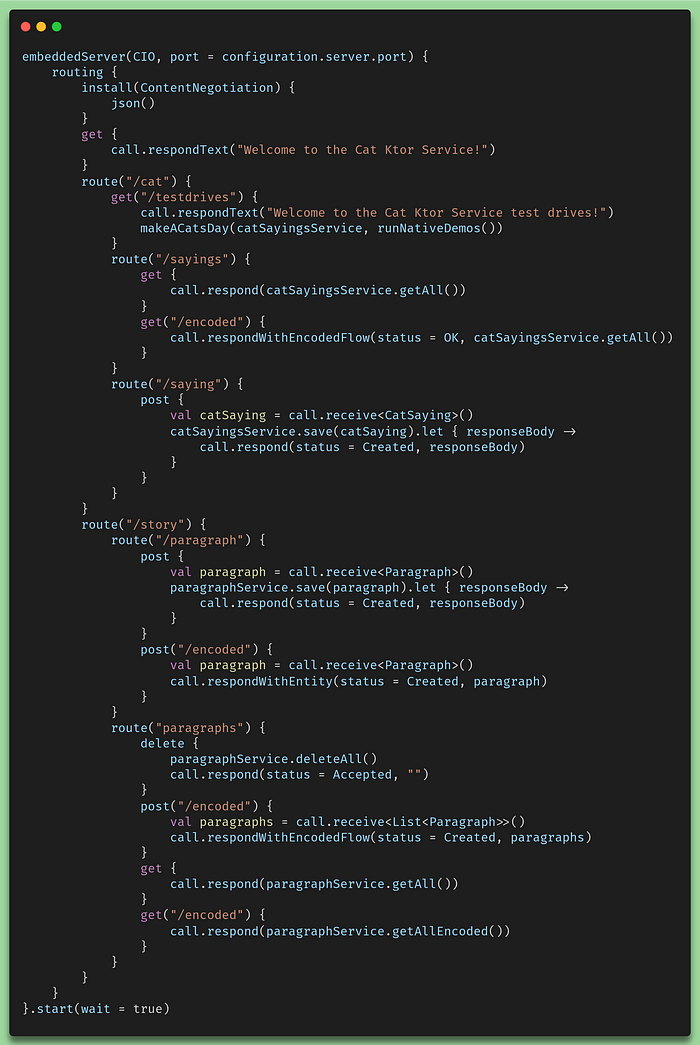
Embedded CIO implementation
This CIO implementation is the way we are going to perform tests on all our services. Essentially, we are going to perform GET’s to the cat statements, we will POST’s to insert paragraphs into the database, we will GET them and also test algorithms to GET them in an encoded way. We will see further exactly what tests will be performed.
4. GraalVM
GraalVM is a high-performance runtime that provides support to lots of different languages like Java, Javascript, LLVM languages, etc. The particular functionality we are going to have a look at in this section is the way GraalVM creates native images and executables. The idea is that we pick up a runnable jar file and then convert it to either an executable to be used in the command line or a docker image to be used in the cloud. For GraalVM we will use one of the favorite frameworks in the market called Spring Framework. We will use its reactive form which is the way Ktor’s CIO works. However, we need to bear in mind that here in this section we are not using Spring with CIO. Instead, we’ll be using Netty which is usually the default service for reactive implementations with Spring. We also need toconsider that this may have an effect on our results because simply put, CIO is not Netty.
At this point, I should give you a warning (if not given before) that the resource consumption to build stuff with GraalVM is just as high as building with Kotlin Native. Please be ready for out-of-memory issues, machine hanging, having to restart your computer, etc. It can be very difficult and frustrating at times to perform the builds.
4. 1. Runnable jar implementation
With GraalVM we can easily convert a jar into an executable native application. In the following items further in this article we’ll see how easier is to implement things with GraalVM but first let’s have a look at our gradle.build.kts file:
gradle.build.kts configuration file to make a build
You probably just realized that there is no reference to GraalVM whatsoever. This is because this is just a normal GraalVM project. We will, however, generate a native runnable by issuing the following command:
$(JAVA_HOME)/bin/native-image -jar build/libs/whiskers-runners-graalvm-standalone.jar
What this does is create a production-ready native image in the root directory.
This will create a program called whiskers-runners-graalvm-standalonewhich will contain exactly the same code as its Kotlin native counterparts.

Kotlin code for the runnable GraalVM native application
4. 2. Enterprise Spring Native Service implementation
Spring provides us with different ways to implement a native solution. One of them is a standalone solution that essentially allows us to create a compiled service in a native package that can be run in the operating system we’ve selected. For this case, our Gradle file needs to contemplate a configuration to allow this to happen. Let’s have a look at it:
gradle.build.kts for the GraalVM runnable
Take a moment to find out what could possibly be related to the GraalVM in this configuration. If you didn’t find it, it is really not a problem also because it is not visible anywhere in the file. It is the org.springframework.experimental.aotplugin. It comprises already the spring-native plugin. To generate a runnable file, we just need to run the following command:
./gradlew nativeCompile
Before showing where the executable has been generated, let’s first have at the code. It is implemented according to the Onion design pattern in the way that most Spring Framework MVC environments are created:
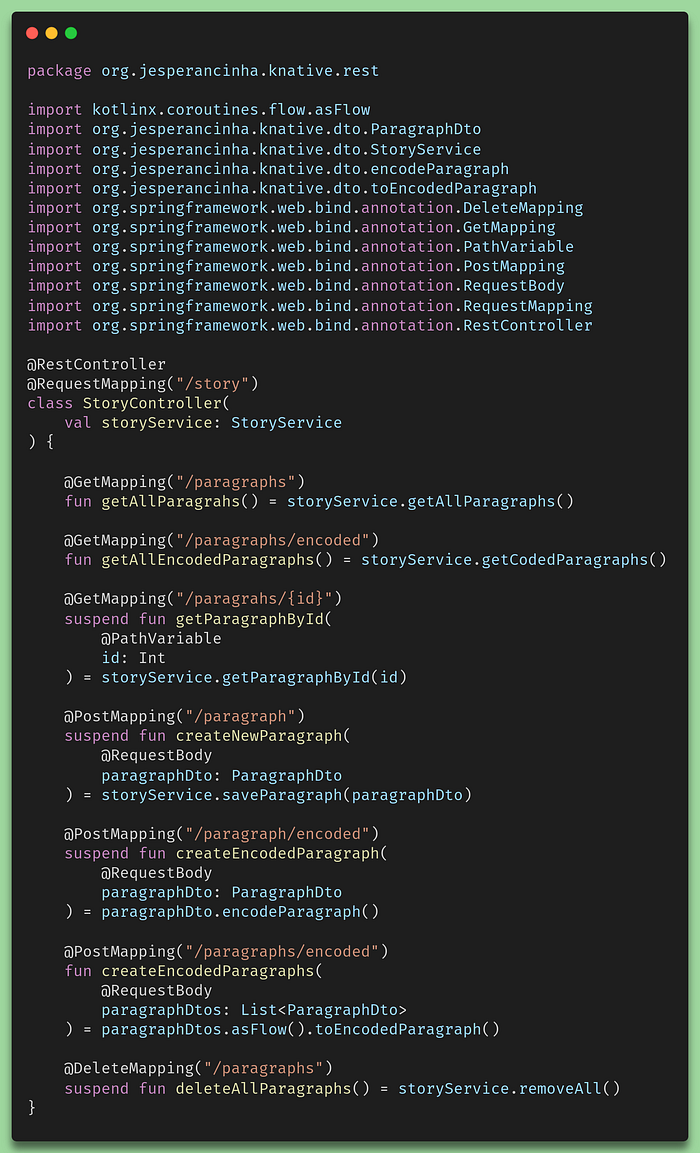
Story Controller
For the rest of the application, everything is done in this fashion.
Once the build has finished, a runnable will be available on this location from the root of the module:
./build/native/nativeCompile/whiskers-graalvm
4.3. Enterprise Spring Cloud Native Service implementation
A cloud-native implementation allows us to create an optimized image that runs our executable native packages inside a container created by Spring Cloud Native. How it works, which image it calls, and the volumes it creates don’t matter anymore to us and are no longer a concern. We simply can create Cloud Native images that then allow us to run our native solution inside a container. For now, let’s have a look at the Gradle build file:
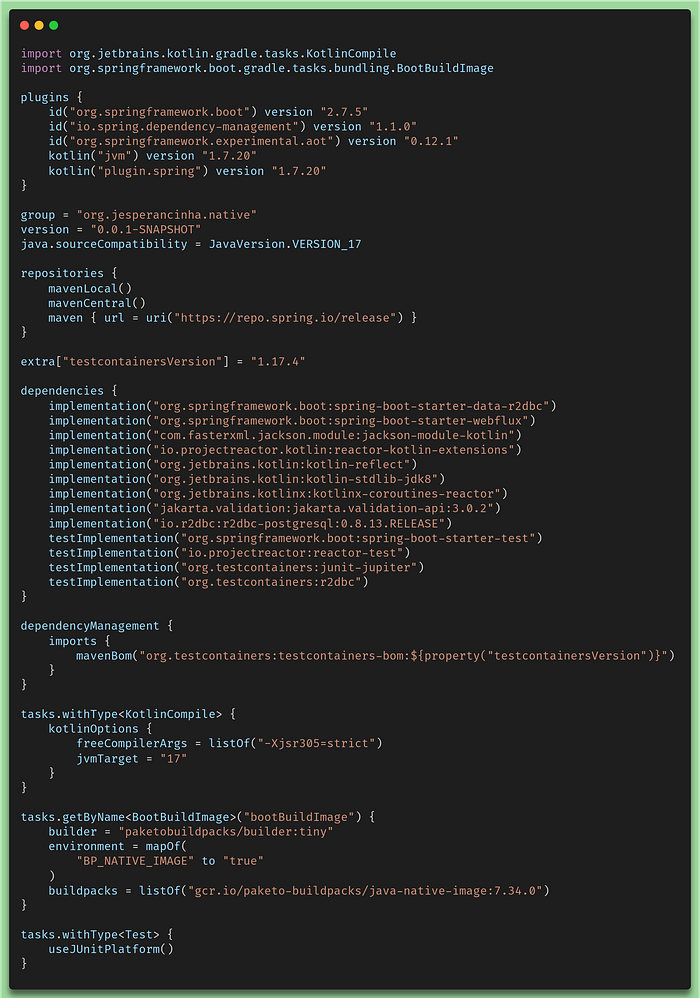
gradle.build.kts for the GraalVM Cloud Native image
In this gradle.build.kts file, it's very easy to see where the difference lies. Can you see it?
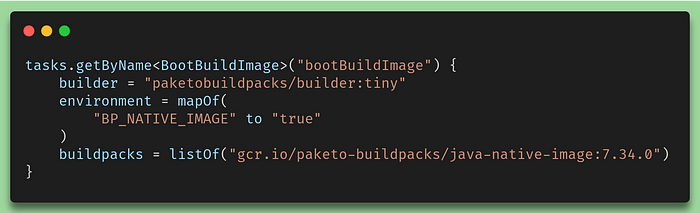
bootBuildImage script for the Native Cloud Image build
So using this BootBuildImagetask, we can easily build an image that will be pushed to our local Docker repo and it will be called: whiskers-cloudnative:0.0.1-SNAPSHOT .
This makes it easy to run with a simple command line:
docker run whiskers-cloudnative:0.0.1-SNAPSHOT
5. Running the applications
To be able to run these applications I have created quite a lot of scripts everywhere at the root of the project and in the root of individual modules. It is very difficult to guarantee that this will work on your Linux machine, but I have tested this on two Linux machines already and it seems to work flawlessly. So in steps, this is what we need to do.
- Install the environment: run
. ./graalVm.sh - Install all the necessary packages: run
make install-libs - Manually install all necessary redistributables: run
. ./init.sh - Make build: run
make b - Run all tests: run
make measure-all
All of these runs will take some time to finish. I advise you not to open IntelliJ while running the build. The build will consume resources but also creates lots of incremental files, which will make IntelliJ go completely confused. If you run into issues, and you’ll probably will, please open an issue on my repo. I’ll be very happy to assist you with that. The repo supporting this article will probably never support every single machine on this planet because of its native nature to it, but I will do my best to come as closest as possible to that goal, and with your input, I’ll reach that goal faster.
6. Performance tests
If you successfully ran all tests, you should be getting the final results in the Results.md file:
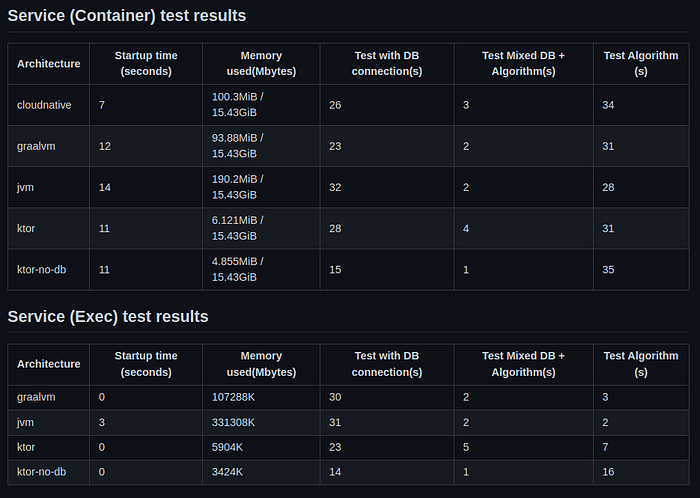
Running service results
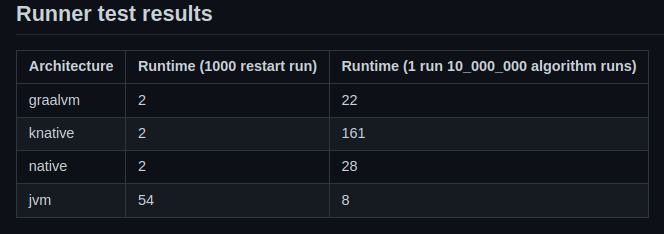
Runners results
7. Conclusion
When examining Kotlin Native and how it works, we have seen in this article that reality always falls a bit short of the publicity that is being made. I truly love the idea of Kotlin Native and I think it’s great to expand and allow ourselves to get out of our comfort zone and simply put just try something new.
This is what I wanted and it is exactly what I have achieved in writing this article and implementing the case to support it. I did see the faster startup times and I do see a future in this, namely because of how many resources we spare.
Unfortunately, not everything was very clear when it comes to performance. In the ’80s, we were used to dealing with memory manually while working directly with C and C++. Then Java came to the mainstream in the late 90s. Java’s inception went really well because most developers didn’t really want to get bothered with memory and most developers wanted a higher-level language. Kolin came to the scene around 2010 and the idea was the same. In short, Kotlin wanted to bring Java to an even higher level. And that has indeed been achieved. And the JVM has been evolving constantly to be ever more efficient and better. In my personal opinion, the idea of going native contradicts all of this because in a way we are giving credit to the way native code works and really going back to our roots when it comes to software development. This could actually be a good sign. At Uni one of my teachers kept telling me “You have to learn C, this Java thing is just a fad”. Years later Kotlin Native kind of gives credit to what my teacher initially said. But unfortunately going back to C or making Kotin compile into native code also means that the people behind C and even the usual developer will also need to know how C works and that also means going back to learning how memory allocation works. This also means learning how pointers work, memory references work, string terminators, pointer of pointers, content of pointers, struct, etc. This could be the reason for the interesting phenomenon we have seen when testing performance. It seems like, for an already running process, performance actually degrades with Native Code. If the JVM is so sophisticated to the point of it being much better than anything we can come up with in a few minutes, then it is probably a better option than going native.
So the key points about this article are that there are several Pros and Cons when it comes to going native in general and that both of them apply on the same level to both Kotlin Native and GraalVM. So let’s enumerate them:
Pros:
- Extremely faster startup time — But don’t get carried away. We’re talking about a few seconds' differences. For the impatient, this could be a good thing. If you are thinking about starting multiple processes multiple times then this could also be a great thing to keep on your radar.
- Low memory usage — It can have a huge impact on your budget to keep using the JVM for no good reason. For multiple runs or servers or services that perform tasks that do not require high performance and don’t need to comply with demanding SLAs and High Availability requirements, this could be an ideal option.
- Instant peak performance — This is a commonly not very well-interpreted property of native applications that just means that JIT doesn’t play a role in the running application because everything needed for the application has already been compiled ahead of time (AOT).This just means that once the application starts, it won’t perform any optimization tasks as it happens with the Just In Time compiler (JIT). This is the reason why multiple short runs are better performant with native and long-lasting runs in the JVM are much better performant.
- No need to run the JVM — We can run the executable wherever we want without a need to worry about the JDK being available or in the correct version
- Security issues — Because we are working with natively compiled code and we have that running online, most security issues related to the JVM are no longer a concern. A native compiled executable is much more difficult to change during runtime than a running jar executable.
Cons:
- Slow performance risk — As we have seen in our results, Native code, in whatever shape or form we tried it, seems to perform much worse than regular code that runs in the JVM.
- Compilation times — Compilation times can be quite a nightmare when compiling natively. This is valid for GraalVM and Kotlin Native. It also consumes so many resources that a developer may find that their machine just got blocked, memory just ran out and they just have to restart their machine. The point is, it is not that useful to have to wait for so long for the code to compile. This impacts development time and development costs.
If we analyze the Cons we may get convinced that Native is also a good story and that it does not make the cut yet. For me it really does make the cut, but not for most cases. With this article and the case for it, I can already guarantee that, and as I mentioned before, Kotlin native at the moment is the best thing to do if we want to start several independent finite processes. For services, I believe we still need to wait for CIO to evolve or that Netty also supports Native eventually. For the time being, I still don’t see a clear benefit of using a service natively. Quite the opposite still.
In terms of the database usage, well, the results vary so widely per run that I could not make any conclusion. Netty and PostgresSQL Native Support for Kotlin is still pretty much being developed so my expectation wasn’t that high to reach any meaningful conclusion. However, the project is already ready to perform that test once Native support is finally available. Another thing to point out is that although CIO supports coroutines, I could not make database access that performs reactively. This means that the database access tests were made in a non-reactive way to the database which has a detrimental effect on the way we reply back to the client.
When it comes to the runnable tests, I did see some clues to indicate that using our own implementation in C may be a bit better performant than using the Kotlin-Native’s own implementation. A difference of 161 to 28 seconds in our example to be exact. In any case, the interop configuration itself doesn’t seem to affect performance at all.
Finally, I just want to mention that this article will not be subject to major updates, but only revisions. When eventually Native services get better than normal services in terms of running performance, I will then make another article. This one stays in for historic reasons.
I hope, this article, has spiced up your interest in Kotlin-Native. It is quite obvious that Kotlin Native has quite a lot of limitations still and probably forever due to its nature, but it does show its benefits with independent executions. And it does this exactly in the same way that GraalVM does it. I did this whole code in Kotlin because I did not want to include further disparities by taking in another language like Java or Scala, but here comes my point about Kotlin vs Java. GraalVM does amazing things and it is already compatible with a lot more things. Natively it can already create executables with services that already run on netty and we don’t have any, or that many, limitations apparently on what we can implement. We don’t have to use GraalVM with Java because it is pretty much language-independent. So why Kotlin-Native? I do not know! I have no idea why Kotlin-Native specifically. In this article, I could not find a clear indication of why Kotlin-Native would be any different than using GraalVM. At the moment GraalVM does offer more possibilities, but long term, I have no idea what will happen with Kotlin-Native. They seem to be two technologies that will soon again compete with each other in some kind of Netflix-inspired nostalgia that I’m already ready to know all about and digest with a bucket of popcorn. But honestly saying like Java vs Kotlin, GraalVM vs Kotlin-Native it’s again kind of just amazing good-storyand nothing more than that. Goed verhaal in dutch anyway.
I have placed all the source code of this application on GitHub
I hope that you have enjoyed this article as much as I enjoyed writing it.
I’d love to hear your thoughts on it, so please leave your comments below.
Thank you for reading!
8. References
https://kotlinlang.org/docs/native-get-started.html
SQLDelight
SQLDelight generates typesafe kotlin APIs from your SQL statements. It verifies your schema, statements, and migrations…
GitHub - hfhbd/postgres-native-sqldelight: A Kotlin native Postgres driver for SqlDelight.
A native Postgres driver for SqlDelight. You need libpq installed and available in your $PATH. This package is uploaded…
GitHub - kotlin-orm/ktorm: A lightweight ORM framework for Kotlin with strong-typed SQL DSL and…
Ktorm is a lightweight and efficient ORM Framework for Kotlin directly based on pure JDBC. It provides strong-typed and…
Kotlin(-Native) as a Go alternative in 2021
Hi there, I have recently read a thread on this forum from 2019 comparing Kotlin/Native to Go and I was wondering if…
Native AOT deployment overview - .NET
Publishing your app as native AOT produces an app that is self-contained and that has been ahead-of-time (AOT) compiled…
Ahead-of-time compilation - Wikipedia
In computer science, ahead-of-time compilation ( AOT compilation) is the act of compiling an (often) higher-level…
Recommend
-
73
Java 10 - The Story So Far Nov 21, 2017...
-
73
If you are deploying serverless applications in AWS Lambda and using Java, you are well aware of cold start problems . Cold start happens becaus...
-
60
-
38
One of the most amazing projects I’ve learned about this year is GraalVM . I’ve learned about this project during Devoxx Poland (a Polish developer conference) at a talk...
-
56
r/Kotlin: Discussion about Kotlin, statically typed programming language for the JVM, Android and the browser.
-
10
I know, it’s been a while since the last time I published something newbies-friendly on my blog. The main reason is that most of my readers are either experienced devs or from C background having modest C++ encounters. Bu...
-
10
Standardizing Native Java: Aligning GraalVM and OpenJDK ...
-
5
Blog Quarkus 2.12.0.Final released - GraalVM/Mandrel 22.2, Kotlin 1.7 August 31, 2022...
-
8
CAPSTONE: The Story So Far After decades of delays and false starts, NASA is finally returning to the Moon. The world is eagerly awaiting the launch of Artemis I, the firs...
-
5
The 1 Sat Ordinals story so far: The first 24 hours Business 21 March 2023 At block height
About Joyk
Aggregate valuable and interesting links.
Joyk means Joy of geeK