

OpenHarmony BLE低功耗蓝牙-开源基础软件社区-51CTO.COM
source link: https://ost.51cto.com/posts/19301
Go to the source link to view the article. You can view the picture content, updated content and better typesetting reading experience. If the link is broken, please click the button below to view the snapshot at that time.

作者:徐金生
目标:实现BLE蓝牙设备与DAYU200设备之间数据交互,即中心设备接收外围设备的通知数据,OpenHarmony社区提供了详细的API文档,可以移步到:蓝牙
之前在HarmonyOS系统上实现了BLE蓝牙的连接与数据传输,《鸿蒙BLE蓝牙通信开发总结》,现在需要在OpenHarmony上也实现BLE蓝牙的通信。
设备与环境
设备:BLE蓝牙设备、DAYU200设备
系统:OpenHarmony 3.2 beta1
SDK:9
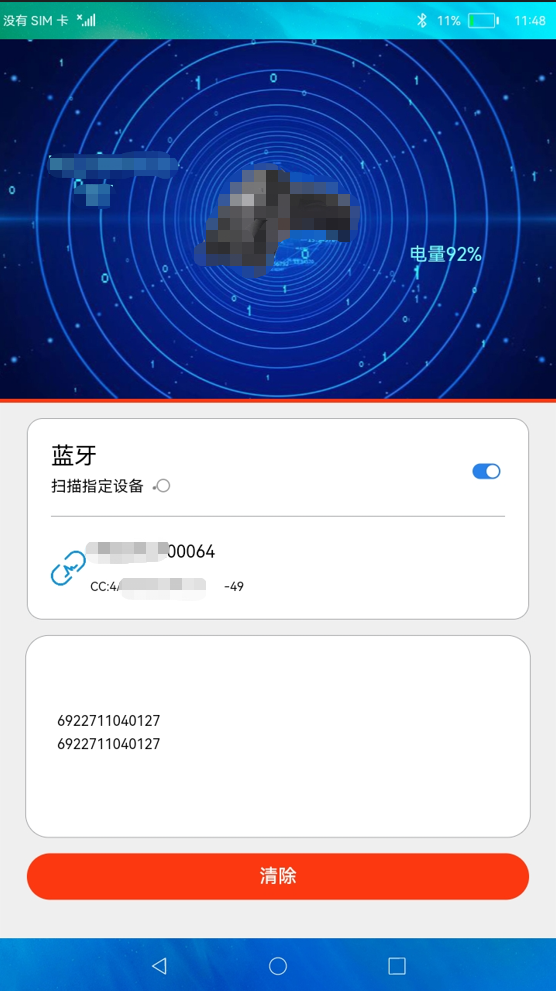
先看下效果
说在前面的话
如果你需要了解蓝牙的基础知识,可以查看《鸿蒙BLE蓝牙通信开发总结》这篇文章的“蓝牙介绍”部分。
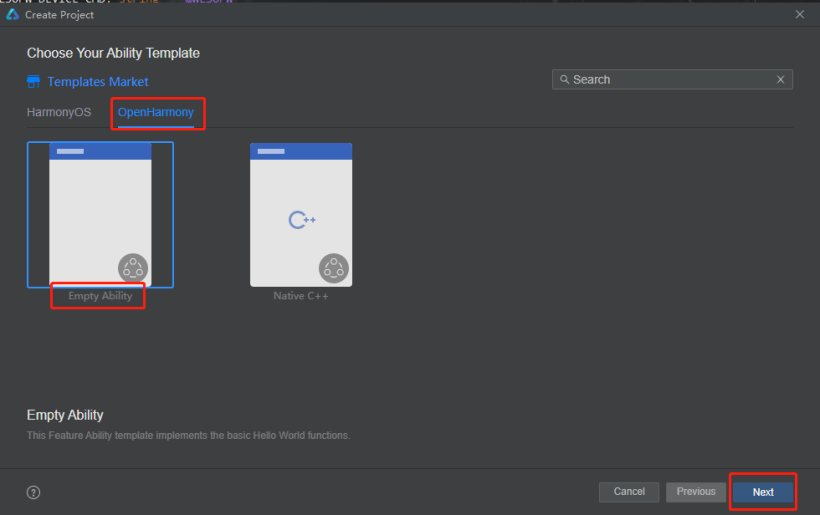
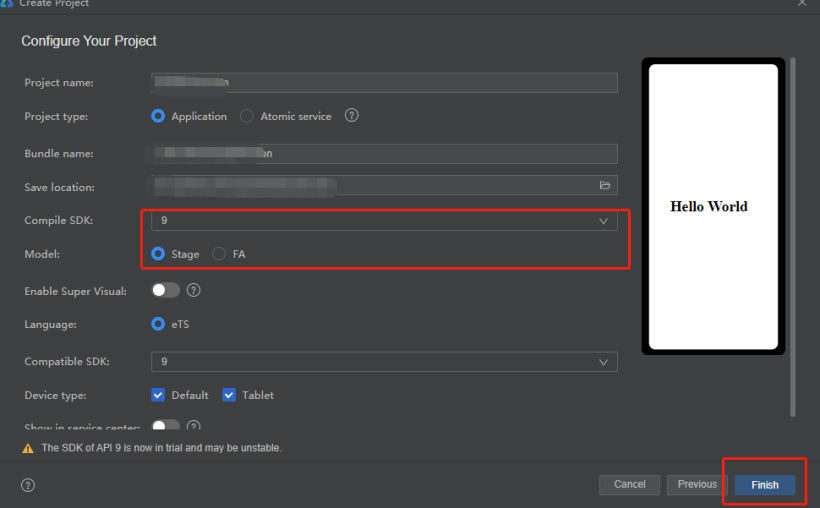
说明:创建项目的过程比较简单,注意在选择SDK 9的版本,使用Stage模型,如下:
业务逻辑梳理
1、权限问题,首先需要注册蓝牙相关权限;
2、搜索蓝牙,应用启动后可以手动的开启和关闭蓝牙扫描;
3、连接蓝牙,根据蓝牙的mac地址,调用connect进行连接;
4、遍历蓝牙特征,在蓝牙连接成功后,获取蓝牙的服务特征,设置指定GATT特征通知;
5、通知数据,将数据通过蓝牙服务中的通知属性发送;
6、接受通知,中心设备通过characteristicChangedEvent接收通知数据,并显示在屏幕上;
7、断开蓝牙,根据需要断开连接的蓝牙;
8、关闭蓝牙,在应用退出,需要结束扫描,释放资源。
1、申请权限
开发之前,通过API文档可以指导,需要实现目标需要获得以下权限:
- ohos.permission.USE_BLUETOOTH // 允许应用查看蓝牙的配置。
- ohos.permission.DISCOVER_BLUETOOTH // 允许应用配置本地蓝牙,查找远端设备且与之配对连接。
- ohos.permission.LOCATION // 允许应用获取设备位置信息。
- ohos.permission.MANAGE_BLUETOOTH // 允许应用配对蓝牙设备,并对设备的电话簿或消息进行访问。
以上权限中ohos.permission.MANAGE_BLUETOOTH级别是system_basic,此权限在应用打包签名时需要在UnsgnedReleasedProfileTemplate.json文件中的acls字段下添加此权限,否则安装时会出现:Failed due to grant request permissions failed,具体原因可以查看:#夏日挑战赛#OpenHarmony 应用安装报权限错误,如下代码:
"acls": {
    "allowed-acls": [
      "ohos.permission.MANAGE_BLUETOOTH"
    ]
  }
如下图:

应用开发时,将需要申请的权限在modele.json5文件中声明,权限相关的说明可以查看:应用权限列表
"requestPermissions": [
      {
        "name": "ohos.permission.USE_BLUETOOTH",
        "reason": "$string:grant_use_bluetooth",
        "usedScene": {
          "abilities": [
            "MainAbility"
          ],
          "when": "inuse"
        }
      },
      {
        "name": "ohos.permission.DISCOVER_BLUETOOTH",
        "reason": "$string:grant_discovery_bluetooth",
        "usedScene": {
          "abilities": [
            "MainAbility"
          ],
          "when": "inuse"
        }
      },
      {
        "name": "ohos.permission.LOCATION",
        "reason": "$string:grant_location",
        "usedScene": {
          "abilities": [
            "MainAbility"
          ],
          "when": "inuse"
        }
      },
      {
        "name": "ohos.permission.MANAGE_BLUETOOTH",
        "reason": "$string:grant_manage_bluetooth",
        "usedScene": {
          "abilities": [
            "MainAbility"
          ],
          "when": "inuse"
        }
      }
    ]
2、打开并搜索蓝牙
2.1、打开蓝牙
- 打开蓝牙并监听蓝牙状态
let result:boolean = bluetooth.enableBluetooth() // 开启蓝牙
- 监听蓝牙状态(开启或关闭)
  /***
   * 添加监听器
   */
  addBlueListener() {
    // 订阅蓝牙连接状态改变事件。
    let self = this
    bluetooth.on('stateChange', (data) => {
      logger.info(TAG, `enter on stateChange`)
      // 蓝牙打开
      if (data === bluetooth.BluetoothState.STATE_ON) {
        logger.info(TAG, `enter BluetoothState.STATE_ON`)
        self.startBleScan()
      }
      // 蓝牙关闭
      if (data === bluetooth.BluetoothState.STATE_OFF) {
        logger.info(TAG, `enter BluetoothState.STATE_OFF`)
        self.disconnect()
        self.stopBleScan()
        bluetooth.stopBluetoothDiscovery() // 关闭蓝牙扫描
        self.mDeviceName = ''
        self.mDeviceRower = ''
        self.discoveryList = []
      }
      logger.info(TAG, `BluetoothState = ${JSON.stringify(data)}`)
    })
  }
2.2、bluetooth.getState()
点击蓝牙开关,进行开启和关闭蓝牙操作,程序启动后会先自动检测系统蓝牙是否开启,如果开启则打开蓝牙开关,默认状态下关闭蓝牙。蓝牙被开启后会进入蓝牙扫描。目前主要针对BLE低功耗蓝牙进行操作,所以这里只开启BLE蓝牙扫描,下面说到的蓝牙相关操作,都是指BLE蓝牙。
- 获取蓝牙状态
| 接口 | 说明 | 返回值 |
|---|---|---|
| bluetooth.getState | 获取蓝牙开关状态。 | BluetoothState 蓝牙开关状态。 |
import bluetooth from '@ohos.bluetooth';

let state = bluetooth.getState()
    if (state === bluetooth.BluetoothState.STATE_ON) {
      this.isOn = true
      // 针对BLE蓝牙
      this.startBleScan() // 发现BLE蓝牙
    }
    if (state === bluetooth.BluetoothState.STATE_OFF) {
      this.isOn = false
    }
2.3、启动蓝牙扫描,并注册发现设备监听器
启动BLE蓝牙扫描,并注册“BLEDeviceFiind”蓝牙监听器,用于接收扫描到蓝牙,为了方便调试我这里只将需要的蓝牙设备过滤出来。扫描出来的蓝牙状态默认为:未连接
| 参数名 | 类型 | 必填 | 说明 |
|---|---|---|---|
| filters | Array<ScanFilter> | 是 | 表示扫描结果过滤策略集合,如果不使用过滤的方式,该参数设置为null。 |
| options | ScanOptions | 否 | 表示扫描的参数配置,可选参数。 |
| 参数名 | 类型 | 必填 | 说明 |
|---|---|---|---|
| type | string | 是 | 填写"BLEDeviceFind"字符串,表示BLE设备发现事件。 |
| callback | Callback<Array<ScanResult>> | 是 | 表示回调函数的入参,发现的设备集合。回调函数由用户创建通过该接口注册。 |
  /**
   * 开启BLE蓝牙扫描
   * @param data
   */
  startBleScan() {
    logger.info(TAG, `startBleScan`)
    bluetooth.BLE.on('BLEDeviceFind', this.onBLEDeviceFind)
    bluetooth.BLE.startBLEScan([{
                                  deviceId: DEVICE_MAC
                                }])
  }
  onBLEDeviceFind = (scanResult: Array<bluetooth.ScanResult>) => {
    let self = this
    //    logger.info(TAG, `BLE scan device find result= ${JSON.stringify(scanResult)}`)
    if (typeof (scanResult) === 'undefined' || scanResult.length <= 0) {
      return
    }
    for (let result of scanResult) {
      let temp: string = result.deviceId
      //  只过滤需要的设备
      if (DEVICE_MAC !== temp) {
        break
      }
      if (!self.isExistDevice(self.discoveryList, temp)) {
        self.createBleBlueInfo(temp, result.rssi).then((info) => {
          logger.info(TAG, `BLE scan device find,add = ${JSON.stringify(info)}`)
          // 连续两次发送相同的广播,时间间隔5ms,过滤极短时间发现的设备
          let curTime: number = Date.now()
          let diff: number = curTime - self.mLastFindDeviceTime
          logger.info(TAG, `BLE scan device find,Time diff = ${diff} curTime=${curTime}  mLastFindDeviceTime=${self.mLastFindDeviceTime}`)
          if (diff > 5) {
            logger.info(TAG, `BLE scan device find,Time is less than 5 ms, so back`)
            self.discoveryList.push(info)
          }
          this.mLastFindDeviceTime = curTime
        });
      } else {
        let curBlueInfo: baseInfo = self.getBlueInfoByDeviceId(self.discoveryList, temp)
        if (curBlueInfo !== null) {
          curBlueInfo.deviceRssi = result.rssi
          logger.info(TAG, `BLE scan device find,update rssi = ${curBlueInfo.deviceRssi}`)
          let index: number = self.getIndexByDeviceId(self.discoveryList, temp)
          if (index >= 0) {
            self.discoveryList.splice(index, 1)
            logger.info(TAG, `BLE scan device find,delete index= ${index}`)
            self.discoveryList.push(curBlueInfo)
            logger.info(TAG, `BLE scan device find,add new info = ${JSON.stringify(curBlueInfo)}`)
          }
        }
      }
    }
  }
问题1:在bluetooth.BLE.startBLEScan()接口中传递需要过滤的deviceId,但是无效,问题已向社区反馈,如果有兴趣可以关注相关 issues
3、连接蓝牙
点击列表中的蓝牙信息,根据当前的状态发起蓝牙连接,涉及的接口:GattClientDevice.connect()
返回值:
| 类型 | 说明 |
|---|---|
| boolean | 连接操作成功返回true,操作失败返回false。 |
this.mGattClientDevice = bluetooth.BLE.createGattClientDevice(deviceId)
let connectStatus = this.mGattClientDevice.connect()
logger.info(TAG, `BLE Device connect = ${connectStatus}`)
4、获取蓝牙服务,遍历蓝牙特征
通过GattClientDevice.on(type: “BLEConnectionStateChange”, callback: Callback<BLEConnectChangedState>)注册蓝牙连接状态变化监听器,获取蓝牙连接状态,当蓝牙连接成功,则通过GattClientDevice.getServices() 获取蓝牙支持的服务,这里提醒一句,获取服务需要耗时3秒左右,通过蓝牙服务设置
readCharacteristicValue()、writeCharacteristicValue()、setNotifyCharacteristicChanged()、on(‘BLECharacteristicChange’) 来完成对蓝牙的读、写、监听特征值变化的操作。
- 通过GattClientDevice.getServices()
        // BLE蓝牙连接成功,获取当前BLE蓝牙的服务
        this.mGattClientDevice.getServices().then((result: Array<bluetooth.GattService>) => {
          logger.info(TAG, `BLE Device getServices successfully`)
          for (let blueService of result) {
            logger.info(TAG, `BLE Device blue ${connectDeviceId} Service uuid=${blueService.serviceUuid}`)
            if (SERVICE_UUID === blueService.serviceUuid) {
              let curCharacteristics = blueService.characteristics
              for (let characteristic of curCharacteristics) {
                logger.info(TAG, `BLE Device characteristic= ${JSON.stringify(characteristic)}`)
                if (NOTIFY_UUID === characteristic.characteristicUuid) {
                  self.mNotifyCharacteristic = characteristic
                  self.blueSetNotifyCharacteristicChanged()
                } else if (WRITE_UUID === characteristic.characteristicUuid) {
                  self.mWriteCharacteristic = characteristic
                  logger.info(TAG, `BLE Device blue send : 获得WriteCharacteristic `)
                  // 延迟500ms再向蓝牙设备发送获取设备信息消息,防止未注册消息通知导致无法收到
                  setTimeout(() => {
                    self.getDeviceInfo()
                  }, 100)
                }
              }
            }
            // todo 使用ReadCharacteristic 时会导致WriteCharacteristic、NotifyCharacteristic失败,这里先注释
            //            else if (SERVICE_BATTERY_UUID === blueService.serviceUuid) {
            //              // 监听BLE设备主动发送的消息
            //              let curCharacteristics = blueService.characteristics
            //              for (let characteristic of curCharacteristics) {
            //                logger.info(TAG, `BLE Device characteristic2= ${JSON.stringify(characteristic)}`)
            //                if (LEVEL_BATTERY_UUID === characteristic.characteristicUuid) {
            //                  self.mReadCharacteristic = characteristic
            //                  self.blueSetReadCharacteristic()
            //                }
            //              }
            //            }
          }
        });
      } else if (connectState === bluetooth.ProfileConnectionState.STATE_DISCONNECTED) {
        // 断开连接
        this.refreshBleConnect(connectDeviceId, STATE.DISCONNECT)
        this.mDeviceName = ''
        this.mDeviceRower = ''
      } else if (connectState === bluetooth.ProfileConnectionState.STATE_CONNECTING) {
        // 连接中
        this.refreshBleConnect(connectDeviceId, STATE.CONNECTING)
        this.mDeviceName = ''
        this.mDeviceRower = ''
      }
    })
5、向低功耗蓝牙设备写入特定的特征值
通过步骤4可以获取到BLECharacteristic,调用:GattClientDevice.writeCharacteristicValue() 就可以向低功耗蓝牙设备写入特定的特征值。
  blueWriteCharacteristicValue(str: string) {
    if (this.mWriteCharacteristic === null) {
      return
    }
    let strUpper: string = str.toUpperCase()
    let temp: string = HexUtil.stringToHex(strUpper)
    let dataPacket: string = HexUtil.getWriteDataPacket(temp)
    let data: Uint8Array = HexUtil.hexStringToBytes2(dataPacket)
    this.mWriteCharacteristic.characteristicValue = data.buffer
    let success: boolean = this.mGattClientDevice.writeCharacteristicValue(this.mWriteCharacteristic)
    logger.info(TAG, `BLE Device WriteCharacteristicValue  success =${success}`)
  }
6、接受通知
向服务端发送设置通知此特征值请求:setNotifyCharacteristicChanged(characteristic: BLECharacteristic, enable: boolean)
  blueSetNotifyCharacteristicChanged() {
    logger.info(TAG, `BLE Device SetNotifyCharacteristicChanged`)
    let success1: boolean = this.mGattClientDevice.setNotifyCharacteristicChanged(this.mNotifyCharacteristic, true)
    logger.info(TAG, `BLE Device SetNotifyCharacteristicChanged success1=${success1}`)
    logger.info(TAG, `BLE Device blue send :  注册通知监听器 success1 =${success1}`)
    if (success1) {
      this.onBLECharacteristicChange()
      let descriptor: bluetooth.BLEDescriptor = this.getDescriptor(this.mNotifyCharacteristic, this.mNotifyCharacteristic.characteristicUuid);
      if (descriptor != null) {
        descriptor.descriptorValue = new Uint8Array(this.ENABLE_NOTIFICATION_VALUE).buffer
        let success2: boolean = this.mGattClientDevice.writeDescriptorValue(descriptor)
        logger.info(TAG, `BLE Device SetNotifyCharacteristicChanged success2=${success2}`)
      } else {
        logger.info(TAG, `BLE Device SetNotifyCharacteristicChanged descriptor is null`)
      }
    }
  }
- 订阅蓝牙低功耗设备的特征值变化事件:GattClientDevice.on(type: “BLECharacteristicChange”, callback: Callback<BLECharacteristic>)
  /**
   *订阅蓝牙低功耗设备的特征值变化事件。
   * 需要先调用setNotifyCharacteristicChanged接口才能接收server端的通知。
   * @param deviceId
   */
  onBLECharacteristicChange() {
    this.mGattClientDevice.on('BLECharacteristicChange', (data: bluetooth.BLECharacteristic) => {
      let serviceUuid = data.serviceUuid;
      let characteristicUuid = data.characteristicUuid;
      logger.info(TAG, `BLE Device data on BLECharacteristicChange ${serviceUuid}, ${characteristicUuid}`)
      let characteristicValue:ArrayBuffer = data.characteristicValue
      if (characteristicValue !== null && typeof(characteristicValue) === 'undefined') {
        return
      }
      let valueTemp = HexUtil.ab2hex(characteristicValue);
      let value = HexUtil.filterValue(valueTemp)
      let temp: string = HexUtil.hexToString(value)
      let tempStrs: string[] = temp.split(',')
      let count: number = tempStrs.length
      let curStr: string = tempStrs[count - 1] + '\n'
      // 解析设备基础信息
      this.analysisDeviceInfo(curStr)
      // 解析设备电量信息
      this.analysisRower(curStr)
      if (this.filterResult(curStr)) {
        return
        }
      this.mScanStr = curStr + '' + this.mScanStr
    })
  }
问题1:监听多服务通道特征通知会导致异常,相关issues
7、断开蓝牙
蓝牙连接成功后,点击蓝牙列表中的蓝牙信息,弹窗窗口提示用户需要断开蓝牙,点击"确定"则断开蓝牙,涉及的接口:GattClientDevice.disconnect()
AlertDialog.show({
          title: $r('app.string.disconnect'),
          message: '此操作将会断开您与以下设备的连接:' + ((typeof (blue.deviceName) !== 'undefined') ? blue.deviceName : blue.deviceId),
          primaryButton: {
            value: $r('app.string.cancel'),
            action: () => {
            }
          },
          secondaryButton: {
            value: $r('app.string.confirm'),
            action: () => {
              this.disconnectBlue(blue)
            }
          }
        })
  /**
   * 断开蓝牙
   * @param blue
   */
  disconnectBlue(blue: baseInfo) {
    logger.info(TAG, `disconnectBlue info = ${JSON.stringify(blue)}`)
    if (blue === null || typeof (this.mGattClientDevice) === 'undefined') {
      return
    }
    let deviceId: string = blue.deviceId
    let ret = this.mGattClientDevice.disconnect()
    logger.info(TAG, `BLE Device ${deviceId} disconnect Status = ${ret}`)
    if (ret === true) {
      this.removeBlueDevice(deviceId)
      this.mGattClientDevice = null
    } else {
      this.showToast('断开蓝牙失败')
    }
  }
8、关闭蓝牙
关闭蓝牙后,会通知再2.1中蓝牙关闭状态的回调
let result:boolean = bluetooth.disableBluetooth()
到此BLE低功耗蓝牙的整体流程就介绍完毕,如果有什么问题,可以在评论区留言。
问题与思考
1、BLE蓝牙创建加密通信通道时需要进行绑定,目前SDK9的版本上还不支持,只能使用不绑定的方式进行通信。相关 issues
 build() {
    Column() {
      Stack({ alignContent: Alignment.Top }) {
        Image($r('app.media.top_bg'))
          .objectFit(ImageFit.Cover)
        Row() {
          Text(this.mDeviceName)
            .width('30%')
            .fontColor('#71fbfd')
            .align(Alignment.Center)
            .textAlign(TextAlign.Center)
            .fontSize(32)
            .margin({
              bottom: '15%'
            })
          Image($r('app.media.project_hr22'))
            .objectFit(ImageFit.Contain)
            .width('30%')
            .onClick(() => {
              this.onClickDevice()
            })
          Text(`电量 ${this.mDeviceRower}%`)
            .width('30%')
            .margin({
              top: '20%'
            })
            .fontColor('#71fbfd')
            .align(Alignment.Center)
            .textAlign(TextAlign.Center)
            .fontSize(24)
        }
        .alignItems(VerticalAlign.Center)
        .justifyContent(FlexAlign.Center)
        .width('100%')
        .height('100%')
      }
      .width('100%')
      .height('40%')

      Divider()
        .vertical(false)
        .color('#fc3811')
        .strokeWidth(5)

      Column() {
        Row() {
          Column() {
            Text($r('app.string.bluetooth'))
              .fontSize(30)
              .alignSelf(ItemAlign.Start)
            if (true === this.isOn) {
              Row() {
                Text($r('app.string.discovery'))
                  .fontSize(20)
                  .alignSelf(ItemAlign.Start)
                  .margin({
                    top: '10'
                  })

                LoadingProgress()
                  .color(Color.Grey)
                  .width(30)
                  .height(30)
                  .align(Alignment.Center)
                  .margin({
                    left: 10
                  })
              }
              .height(40)
            }
          }.margin({ top: 20, bottom: 20 })

          Blank() // 空白填充

          Column() {
            Toggle({ type: ToggleType.Switch, isOn: this.isOn })
              .selectedColor('#ff2982ea')
              .key('toggleBtn')
              .onChange((isOn: boolean) => {
                if (isOn) {
                  this.isOn = true
                  let result:boolean = bluetooth.enableBluetooth() // 开启蓝牙
                  logger.info(TAG, `enable Bluetooth ${result}`)
                } else {
                  this.isOn = false
                  let result:boolean = bluetooth.disableBluetooth()
                  logger.info(TAG, `disable Bluetooth ${result}`)
                }
              })
          }
        }.width('100%')

        if (this.isOn) {
          Divider()
            .width('100%')
            .vertical(false)
            .color('#a3a4a7')
            .strokeWidth(1)
            .margin({
              bottom: '1%'
            })
        }


        Column() {
          ForEach(this.discoveryList, (item: baseInfo) => {
            Row() {
              Image(item.state === STATE.CONNECTED ? $r('app.media.blue_connect') :
                (item.state === STATE.CONNECTING ? $r('app.media.blue_connecting') : $r('app.media.blue_disconnect')))
                .width(45)
                .height(45)
                .objectFit(ImageFit.Cover)
                .margin({
                  right: '1%'
                })

              Column() {
                Text(item.deviceName)
                  .width('100%')
                  .fontSize(22)
                  .margin({
                    top: '2%',
                    bottom: '2%'
                  })
                Row() {
                  Text(item.deviceId)
                    .fontSize(16)
                  Text(item.deviceRssi.toString())
                    .fontSize(16)
                    .margin({
                      left: '5%'
                    })
                }
                .width('100%')
                .margin({
                  bottom: '2%'
                })
              }
            }
            .justifyContent(FlexAlign.Start)
            .alignSelf(ItemAlign.Start)
            .width('100%')
            .key('pairedDevice')
            .onClick(() => {
              this.onClickBlueItem(item)
            })
          })
        }
      }
      .width('90%')
      .padding({ top: 10, left: 30, right: 30, bottom: 10 })
      .margin({ top: 20, bottom: 20 })
      .backgroundColor(Color.White)
      .borderRadius(20)
      .borderWidth(1)
      .borderColor('#a3a4a7')

      Column() {
        Scroll(this.scroller) {
          Column() {
            Text(this.mScanStr)
              .width('100%')
              .fontSize(18)
              .lineHeight(30)
              .align(Alignment.Start)
          }
          .width('100%')
          .padding({
            left: '20',
            right: '20'
          })
          .alignSelf(ItemAlign.Start)
          .justifyContent(FlexAlign.Start)
        }
        .scrollable(ScrollDirection.Vertical)
        .scrollBarColor(Color.Gray)
        .scrollBar(BarState.Auto)
        .scrollBarWidth(10)
        .width('90%')
        .height('20%')
      }
      .padding({
        left: '20',
        right: '20',
        top: '20',
        bottom: '20'
      })
      .margin({
        bottom: '20'
      })
      .border({
        width: 1,
        color: '#a3a4a7'
      })
      .borderRadius(30)
      .backgroundColor(Color.White)


      Button('清除')
        .width('90%')
        .height(60)
        .backgroundColor('#fc3811')
        .fontSize(24)
        .onClick(() => {
          this.mScanStr = ''
        })
    }
    .width('100%')
    .height('100%')
    .backgroundColor('#dcdcdc')
  }
数据转换工具:HexUtil
import TextUtils from './TextUtils'

type char = string;
type byte = number;

export default class HexUtil {
  private static readonly DIGITS_LOWER: char[] = ['0', '1', '2', '3', '4', '5',
  '6', '7', '8', '9', 'a', 'b', 'c', 'd', 'e', 'f'];
  private static readonly DIGITS_UPPER: char[] = ['0', '1', '2', '3', '4', '5',
  '6', '7', '8', '9', 'A', 'B', 'C', 'D', 'E', 'F'];
  private static readonly UPDATE_HEAD: string = 'xxxxxxxx';
  private static readonly WRITE_PACKET_DATE_START: string = "xxxxxxxxx"; //发送数据固定起始数据域格式
  public static readonly WRITE_PACKET_DATE_END: string = "xxxx"; // 发送数据固定结束数据域格式
  public static readonly NOTIFY_DATE_START: string = "xxxxxxxx"; // 通知数据头
  public static readonly NOTIFY_DATE_END: string = "xxxxxxxxx"; // 通知数据尾

  public static encodeHex(data: byte[], toLowerCase: boolean = true): char[] {
    return HexUtil.encodeHexInner(data, toLowerCase ? HexUtil.DIGITS_LOWER : HexUtil.DIGITS_UPPER);
  }

  protected static encodeHexInner(data: byte[], toDigits: char[]): char[] {
    if (!data)
    return null;
    let l: number = data.length;
    let out: char[] = new Array(l << 1);
    let index:number = 0
    for(let item of data) {
      index += 1
      out[index] = toDigits[(0xF0 & item) >>> 4]
      index += 1
      out[index] = toDigits[0x0F & item]
    }
    return out;
  }

  protected static encodeHexInner2(data: Uint8Array, toDigits: char[]): char[] {
    if (!data)
    return null;
    let l: number = data.length;
    let out: char[] = new Array(l << 1);
    let index:number = 0
    for(let item of data) {
      index += 1
      out[index] = toDigits[(0xF0 & item) >>> 4]
      index += 1
      out[index] = toDigits[0x0F & item]
    }
    return out;
  }

  private static byteToString(data: char[]): string {
    let str = '';
    for(let item of data) {
      str += item
    }
    return str;
  }

  public static encodeHexStr(data: byte[], toLowerCase: boolean = true): string{
    return HexUtil.encodeHexStrInner(data, toLowerCase ? HexUtil.DIGITS_LOWER : HexUtil.DIGITS_UPPER);
  }

  protected static encodeHexStrInner(data: byte[], toDigits: char[]): string {
    return HexUtil.byteToString(HexUtil.encodeHexInner(data, toDigits));
  }

  public static encodeHexStr2(data: Uint8Array, toLowerCase: boolean = true): string{
    return HexUtil.encodeHexStrInner2(data, toLowerCase ? HexUtil.DIGITS_LOWER : HexUtil.DIGITS_UPPER);
  }

  protected static encodeHexStrInner2(data: Uint8Array, toDigits: char[]): string {
    return HexUtil.byteToString(HexUtil.encodeHexInner2(data, toDigits));
  }

  public static formatHexString(data: Uint8Array, addSpace: boolean = false): string {
    if (!data || data.length < 1)
    return null;
    let sb: string = '';
    for (let item of data) {
      let hex: String = (item & 0xFF).toString(16);
      if (hex.length == 1) {
        hex = '0' + hex;
      }
      sb = sb + hex;
      if (addSpace)
      sb = sb + " ";
    }
    return sb;
  }

  public static decodeHex(data: char[]): byte[] {
    let len: number = data.length;

    if ((len & 0x01) != 0) {
      throw new Error("Odd number of characters.");
    }

    let out: byte[] = new Array(len >> 1);
    let i:number = 0
    let j:number = 0
    while(j < len) {
      let f : number = HexUtil.toDigit(data[j], j) << 4
      j += 1
      f = f | HexUtil.toDigit(data[j], j)
      j += 1
      out[i] = (f & 0xFF)
    }
    return out;
  }

  protected static toDigit(ch: char, index: number): number {
    let digit: number = HexUtil.charToByte(ch.toUpperCase()); //Character.digit(ch, 16);
    if (digit == -1) {
      throw new Error("Illegal hexadecimal character " + ch
      + " at index " + index);
    }
    return digit;
  }

  public static hexStringToBytes(hexString: string): Uint8Array {
    if (TextUtils.isEmpty(hexString)) {
      return null;
    }
    hexString = hexString.trim();
    hexString = hexString.toUpperCase();
    let length: number = hexString.length / 2;
    let hexChars: char[] = TextUtils.toCharArray(hexString);
    let d: byte[] = new Array(length);
    let index = 0
    while (index < length) {
      let pos = index * 2;
      d[index] = (HexUtil.charToByte(hexChars[pos]) << 4 | HexUtil.charToByte(hexChars[pos + 1]));
      index += 1
    }
    return new Uint8Array(d);
  }

  public static hexStringToBytes2(hexString: string): Uint8Array {
    if (TextUtils.isEmpty(hexString)) {
      return null;
    }
    hexString = hexString.trim();
    hexString = hexString.toUpperCase();
    let length: number = hexString.length / 2;
    let hexChars: char[] = TextUtils.toCharArray(hexString);
    let d: byte[] = new Array(length);
    let index = 0
    while (index < length) {
      let pos = index * 2;
      d[index] = (HexUtil.charToByte(hexChars[pos]) << 4 | HexUtil.charToByte(hexChars[pos + 1]));
      index += 1
    }
    return new Uint8Array(d);
  }

  public static charToByte(c: char): byte {
    return "0123456789ABCDEF".indexOf(c);
  }

  public static extractData(data: Uint8Array, position: number): String {
    return HexUtil.formatHexString(new Uint8Array([data[position]]));
  }

  public static getWriteDataPacket(hexString: string): string {
    if (TextUtils.isEmpty(hexString) || hexString.length % 2 !== 0) {
      return ''
    }

    let dataField: string = ''
    if (hexString.startsWith(HexUtil.UPDATE_HEAD)) {
      dataField = hexString.replace(HexUtil.UPDATE_HEAD, '')
    } else {
      dataField = HexUtil.WRITE_PACKET_DATE_START.concat(hexString, HexUtil.WRITE_PACKET_DATE_END)
    }
    return dataField
  }

  public static stringToHex(s: string): string {
    let str: string = ''
    let len: number = s.length
    let index: number = 0
    while (index < len) {
      let ch: number = s.charCodeAt(index)
      let s4: string = ch.toString(16)
      str = str + s4
      index += 1
    }
    return str
  }

  public static hexToString(data:string):string {
    let val : string = ''
    let arr:string[] = data.split(',')
    let index:number = 0
    while(index < arr.length) {
      val += String.fromCharCode(parseInt(arr[index], 16))
      index += 1
    }
    let b:string = decodeURIComponent(val)
    console.log('hexToString b' + b)
    return b
  }

  public static  ab2hex(buffer:ArrayBuffer):string {
    var hexArr = Array.prototype.map.call(
      new Uint8Array(buffer),
      function (bit) {
        return ('00' + bit.toString(16)).slice(-2)
      }
    )
    return hexArr.join(',');
  }

  /**
   * 过滤通知消息头和消息尾
   * @param data
   */
  public static filterValue(data:string) : string {
    if (data === null) {
      return ''
    }
    return data.replace(this.NOTIFY_DATE_START, '').replace(this.NOTIFY_DATE_END, '')
  }
}
字符工具:TextUtils
export default class TextUtils{
    public static isEmpty(text: string): boolean {
        return text == null || text == undefined || text.length==0;
    }

    public static toCharArray(text: string): Array<string> {
        let arr: string[] = new Array(text.length);
        let index = 0
        while(index < text.length) {
            arr[index] = text.charAt(index);
            index += 1
        }
        return arr;
    }
}
如果您能看到最后,还希望您能动动手指点个赞,一个人能走多远关键在于与谁同行,我用跨越山海的一路相伴,希望得到您的点赞。
Recommend
About Joyk
Aggregate valuable and interesting links.
Joyk means Joy of geeK