

使用 Spring Cloud Loadbalancer 实现客户端负载均衡 - Grey Zeng
source link: https://www.cnblogs.com/greyzeng/p/16892071.html
Go to the source link to view the article. You can view the picture content, updated content and better typesetting reading experience. If the link is broken, please click the button below to view the snapshot at that time.

使用 Spring Cloud Loadbalancer 实现客户端负载均衡
作者:Grey
原文地址:
博客园:使用 Spring Cloud Loadbalancer 实现客户端负载均衡
CSDN:使用 Spring Cloud Loadbalancer 实现客户端负载均衡
背景#
在Spring Cloud G 版发布时提到,
Spring Cloud Netflix 那套组件很多都进入了维护期,如下表所示
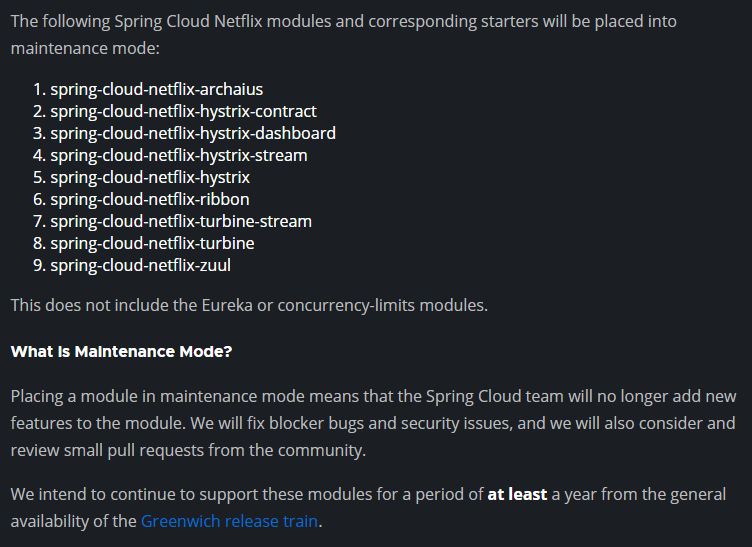
同时,针对一些组件,Spring 官方给出了一些替代方案
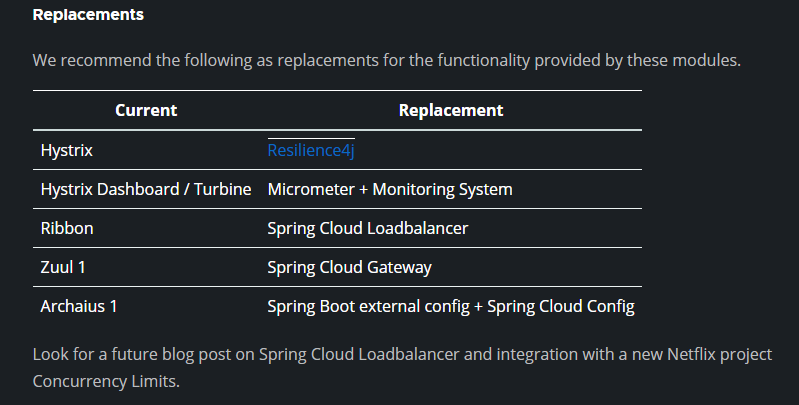
针对 spring-cloud-ribbon 这个负载均衡组件,Spring 官方提出的替换解决方案是 Spring Cloud Loadbalancer。本文主要通过一个示例介绍了 Spring Cloud Loadbalancer 的基础使用。
环境#
-
JDK 1.8+
-
Maven 3.5+
-
Spring Boot 版本:2.7.5
-
Spring Cloud 版本:2021.0.5
项目结构和说明#
- spring-cloud-loadbalanced-usage:父项目名称
- server : 服务端端模块
- pom.xml
- client : 客户端模块
- pom.xml
- pom.xml:父项目 pom 配置
- server : 服务端端模块
流程#
整个过程如下示例图

注:Spring Cloud Loadbalancer 是在客户端实现负载均衡策略。
代码说明#
服务端主要暴露一个服务,未做特殊配置
    @GetMapping("/greeting")
    public String greet() {
        log.info("Access /greeting");
        int randomNum = rand.nextInt(greetings.size());
        return greetings.get(randomNum);
    }
客户端的核心配置如下,主要是针对负载均衡配置:
package git.snippet.client.config;

import org.springframework.cloud.client.DefaultServiceInstance;
import org.springframework.cloud.client.ServiceInstance;
import org.springframework.cloud.client.loadbalancer.LoadBalanced;
import org.springframework.cloud.loadbalancer.annotation.LoadBalancerClient;
import org.springframework.cloud.loadbalancer.core.ServiceInstanceListSupplier;
import org.springframework.context.annotation.Bean;
import org.springframework.context.annotation.Configuration;
import org.springframework.context.annotation.Primary;
import org.springframework.web.reactive.function.client.WebClient;
import reactor.core.publisher.Flux;

import java.util.Arrays;
import java.util.List;

@Configuration
@LoadBalancerClient(name = "server")
public class WebClientConfig {

    @LoadBalanced
    @Bean
    WebClient.Builder webClientBuilder() {
        return WebClient.builder();
    }

    @Bean
    @Primary
    ServiceInstanceListSupplier serviceInstanceListSupplier() {
        return new ServiceInstanceListSupplier() {
            @Override
            public String getServiceId() {
                return "server";
            }

            @Override
            public Flux<List<ServiceInstance>> get() {
                return Flux.just(Arrays.asList(
                        new DefaultServiceInstance(getServiceId() + "1", getServiceId(), "localhost", 8090, false),

                        new DefaultServiceInstance(getServiceId() + "2", getServiceId(), "localhost", 9092, false),

                        new DefaultServiceInstance(getServiceId() + "3", getServiceId(), "localhost", 9999, false)));
            }
        };
    }
}
其中 @LoadBalancerClient(name = "server") 指定了 服务端的名称;
getServiceId()指定了服务端的服务 ID;
serviceInstanceListSupplier()方法中列出了三个服务端实例的地址;
new DefaultServiceInstance(getServiceId() + "1", getServiceId(), "localhost", 8090, false)
new DefaultServiceInstance(getServiceId() + "2", getServiceId(), "localhost", 9092, false)
new DefaultServiceInstance(getServiceId() + "3", getServiceId(), "localhost", 9999, false)
有了这个配置,在客户端的 Controller 中,做如下注入即可
package git.snippet.client.controller;

import org.springframework.cloud.client.loadbalancer.reactive.ReactorLoadBalancerExchangeFilterFunction;
import org.springframework.web.bind.annotation.RequestMapping;
import org.springframework.web.bind.annotation.RequestParam;
import org.springframework.web.bind.annotation.RestController;
import org.springframework.web.reactive.function.client.WebClient;
import reactor.core.publisher.Mono;

@RestController
public class HiController {
    private final WebClient.Builder loadBalancedWebClientBuilder;
    private final ReactorLoadBalancerExchangeFilterFunction lbFunction;


    public HiController(WebClient.Builder loadBalancedWebClientBuilder, ReactorLoadBalancerExchangeFilterFunction lbFunction) {
        this.loadBalancedWebClientBuilder = loadBalancedWebClientBuilder;
        this.lbFunction = lbFunction;
    }

    @RequestMapping("/hi")
    public Mono<String> hi(@RequestParam(value = "name", defaultValue = "Mary") String name) {
        return loadBalancedWebClientBuilder.build().get().uri("http://server/greeting").retrieve().bodyToMono(String.class).map(greeting -> String.format("%s, %s!", greeting, name));
    }

    @RequestMapping("/hello")
    public Mono<String> hello(@RequestParam(value = "name", defaultValue = "John") String name) {
        return WebClient.builder().filter(lbFunction).build().get().uri("http://server/greeting").retrieve().bodyToMono(String.class).map(greeting -> String.format("%s, %s!", greeting, name));
    }
}
启动并测试#
首先启动 server,注意:
启动 server 的时候,需要启动多实例,且每个实例要定义 VM options
实例一定义 VM options 为 -Dserver.port=8090;
实例二定义 VM options 为 -Dserver.port=9092;
实例三定义 VM options 为 -Dserver.port=9999。
如果使用 IDEA Intellij,配置方式如下

三个 Server 启动后,接下来启动 client,运行 ClientApplication,启动完毕后,多次访问: http://localhost:8888/hi
可以通过每个 server 实例的运行日志,查看到每个实例都轮流获取到了请求,实现了负载均衡。
完整代码#
见:spring-cloud-loadbalancer-usage
参考文档#
Spring Tips: Spring Cloud Loadbalancer
Recommend
-
34
什么是负载均衡器? 假设有一个分布式系统,该系统由在不同计算机上运行的许多服务组成。但是,当用户数量很大时,通常会为服务创建多个副本...
-
45
负载均衡我们都知道在微服务架构中,微服务之间总是需要互相调用,以此来实现一些组合业务的需求。例如组装订单详情数据,由于订单详情里有用户信息,所以订单服务就得调用用户服务来获取用户信息。要实现远程调用就需要发送网络请求,而每个微服务都可能会存在有...
-
24
golang grpc 客户端负载均衡、重试、健康检查 19 October 2019 Go GRPC 客户端是如何管理与服务端的连接的? grpc.ClientConn 表示...
-
30
前言 上篇 介绍了如何使用 etcd 实现服务发现,本篇将基于etcd的服务发现前提下,介绍...
-
13
在介绍Nginx的负载均衡实现之前,先简单的说下负载均衡的分类,主要分为硬件负载均衡和软件负载均衡,硬件负载均衡是使用专门的软件和硬件相结合的设备,设备商会提供完整成熟的解决方案,比如F5,在数据的稳定性以及安全性来说非常可靠,但是相比...
-
9
某云负载均衡真实IP的问题,我们这边已经遇到过两次了。而且每次和售后沟通的时候都大费周折,主要是要给售后说明白目前文档的获取真实IP是有问题的,他们觉得文档上说明的肯定没问题,售后要是不明白,他们不会给LB部门上报,这个事就没法推进。...
-
6
1、Ribbon客户端负载均衡 1.1 依赖
-
7
一 main.go开发 至此,咱们的项目服务端代码,已经开发完毕,现在来看一下main.go文件中的代码: package main import ( micro2 "account/common/micro" "account/config/logger" "account/confi...
-
5
使用 Skupper 实现 Kubernetes 多集群负载均衡 在本文中,您将了解如何利用Skuppe...
-
4
【Spring Cloud】实现微服务调用的负载均衡 精选 原创 什...
About Joyk
Aggregate valuable and interesting links.
Joyk means Joy of geeK