

Wiring my home with Fiber
source link: https://sschueller.github.io/posts/wiring-a-home-with-fiber/
Go to the source link to view the article. You can view the picture content, updated content and better typesetting reading experience. If the link is broken, please click the button below to view the snapshot at that time.

Many thanks to for the inspiration and information about his setup. Also thanks to Init7 (for the great service), r/FiberOptics, FS and Netshop24 for providing me with what I needed to get this setup going.
Planning
Alway good to have a plan before you start shopping.
My network diagram
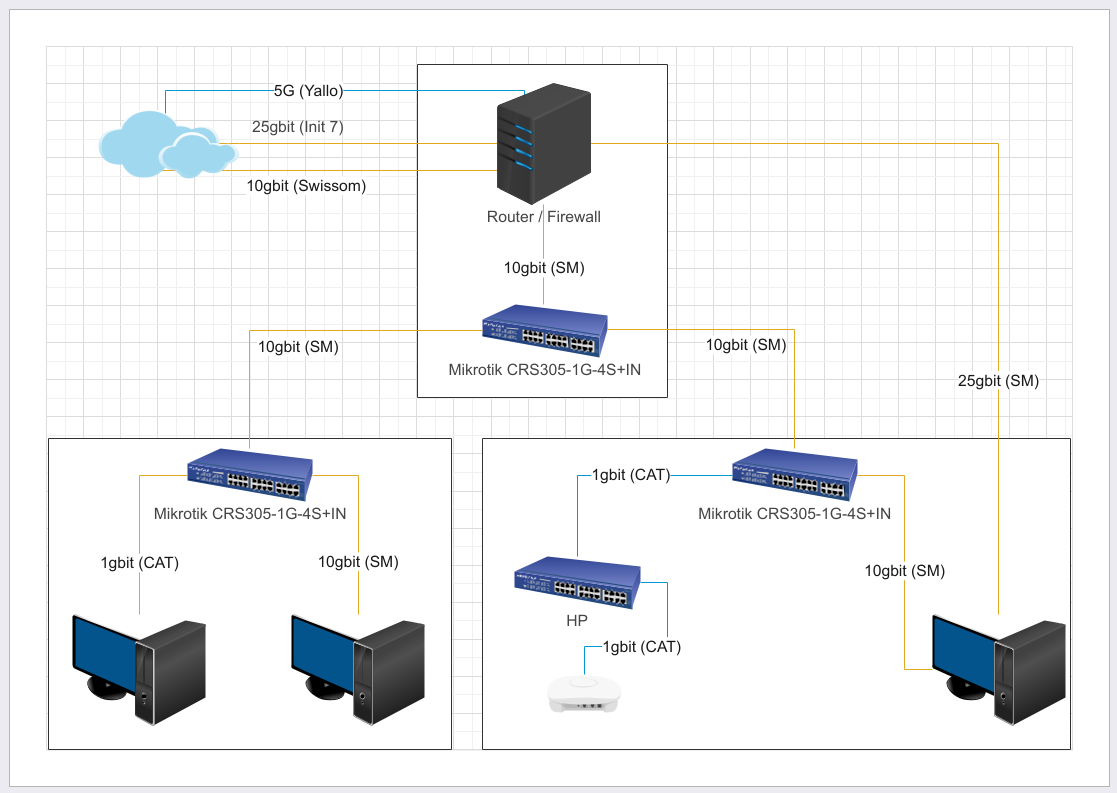
I came to the following requirement for my setup:
- At least 10gbits to each PC
- At least one fiber link per floor
- Ability to utilize 25gbit internet connection
no splicing Fiber- Outlets, no direct wiring
Keep the costs down (reasonable)- No noisy Switches or Routers
- No drilling, no cutting holes into the house
In the end some of these didn’t pan out as I will explain further down.
Type of fiber
- APC and UPC polished fibers do not mate, don’t connect the two together, it will not work. Always connect APC to APC and UPC to UPC
- You can not mix multimode with singlemode. They are completely different. Pick one and stick with it.
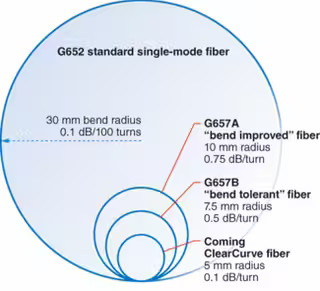
- Do not bend fiber beyond the rated bending radius.
Singlemode vs multimode
From that I can gather most internal wiring of fiber use multimode but there is no “rule” against using singlemode.
Since the cost difference is not that big now I decided to go with singlemode. It allows for upgrading to higher bandwidth by just replacing the SFP modules on each end. My ISP plans on proving 100gbits in about 2 years so I don’t need pull new fiber if I decide to upgrade.
Connectors
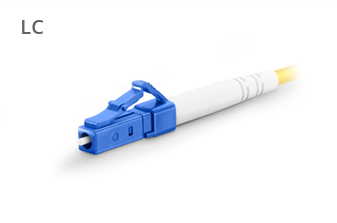
There are a lot of connectors for fiber but generally in FTTH I only see LC connectors. The benefit is that they are quite small and can therefore be pulled through conduits without needing to terminate the fiber at a later time (if the conduit permits it).
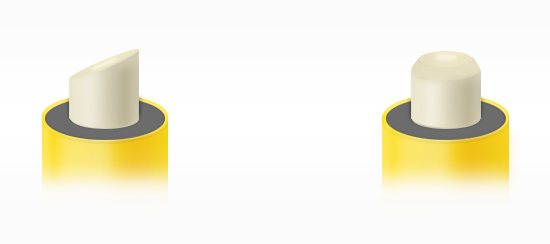
Polish
The most common polishes appear to be APC (Green) and UPC (Blue). The incoming FTTH line from the street is APC (Green) most SFP modules are UPC (Blue). As I am not directly connecting devices I will be using APC (Green) to APC (Green) inside walls and APC (Green) to UPC (Blue) wall to device. So to avoid any confusion about polish. All outlets are APC (Green), all devices are UPC (Blue).
Splicing

My plan was to buy pre-terminated fibers however it turned out that the conduits are too small to pull pre-terminated fiber through it. For this reason I decided to purchase a fiber fusion splicer for around CHF 600 which blew my budget.
Fiber stock
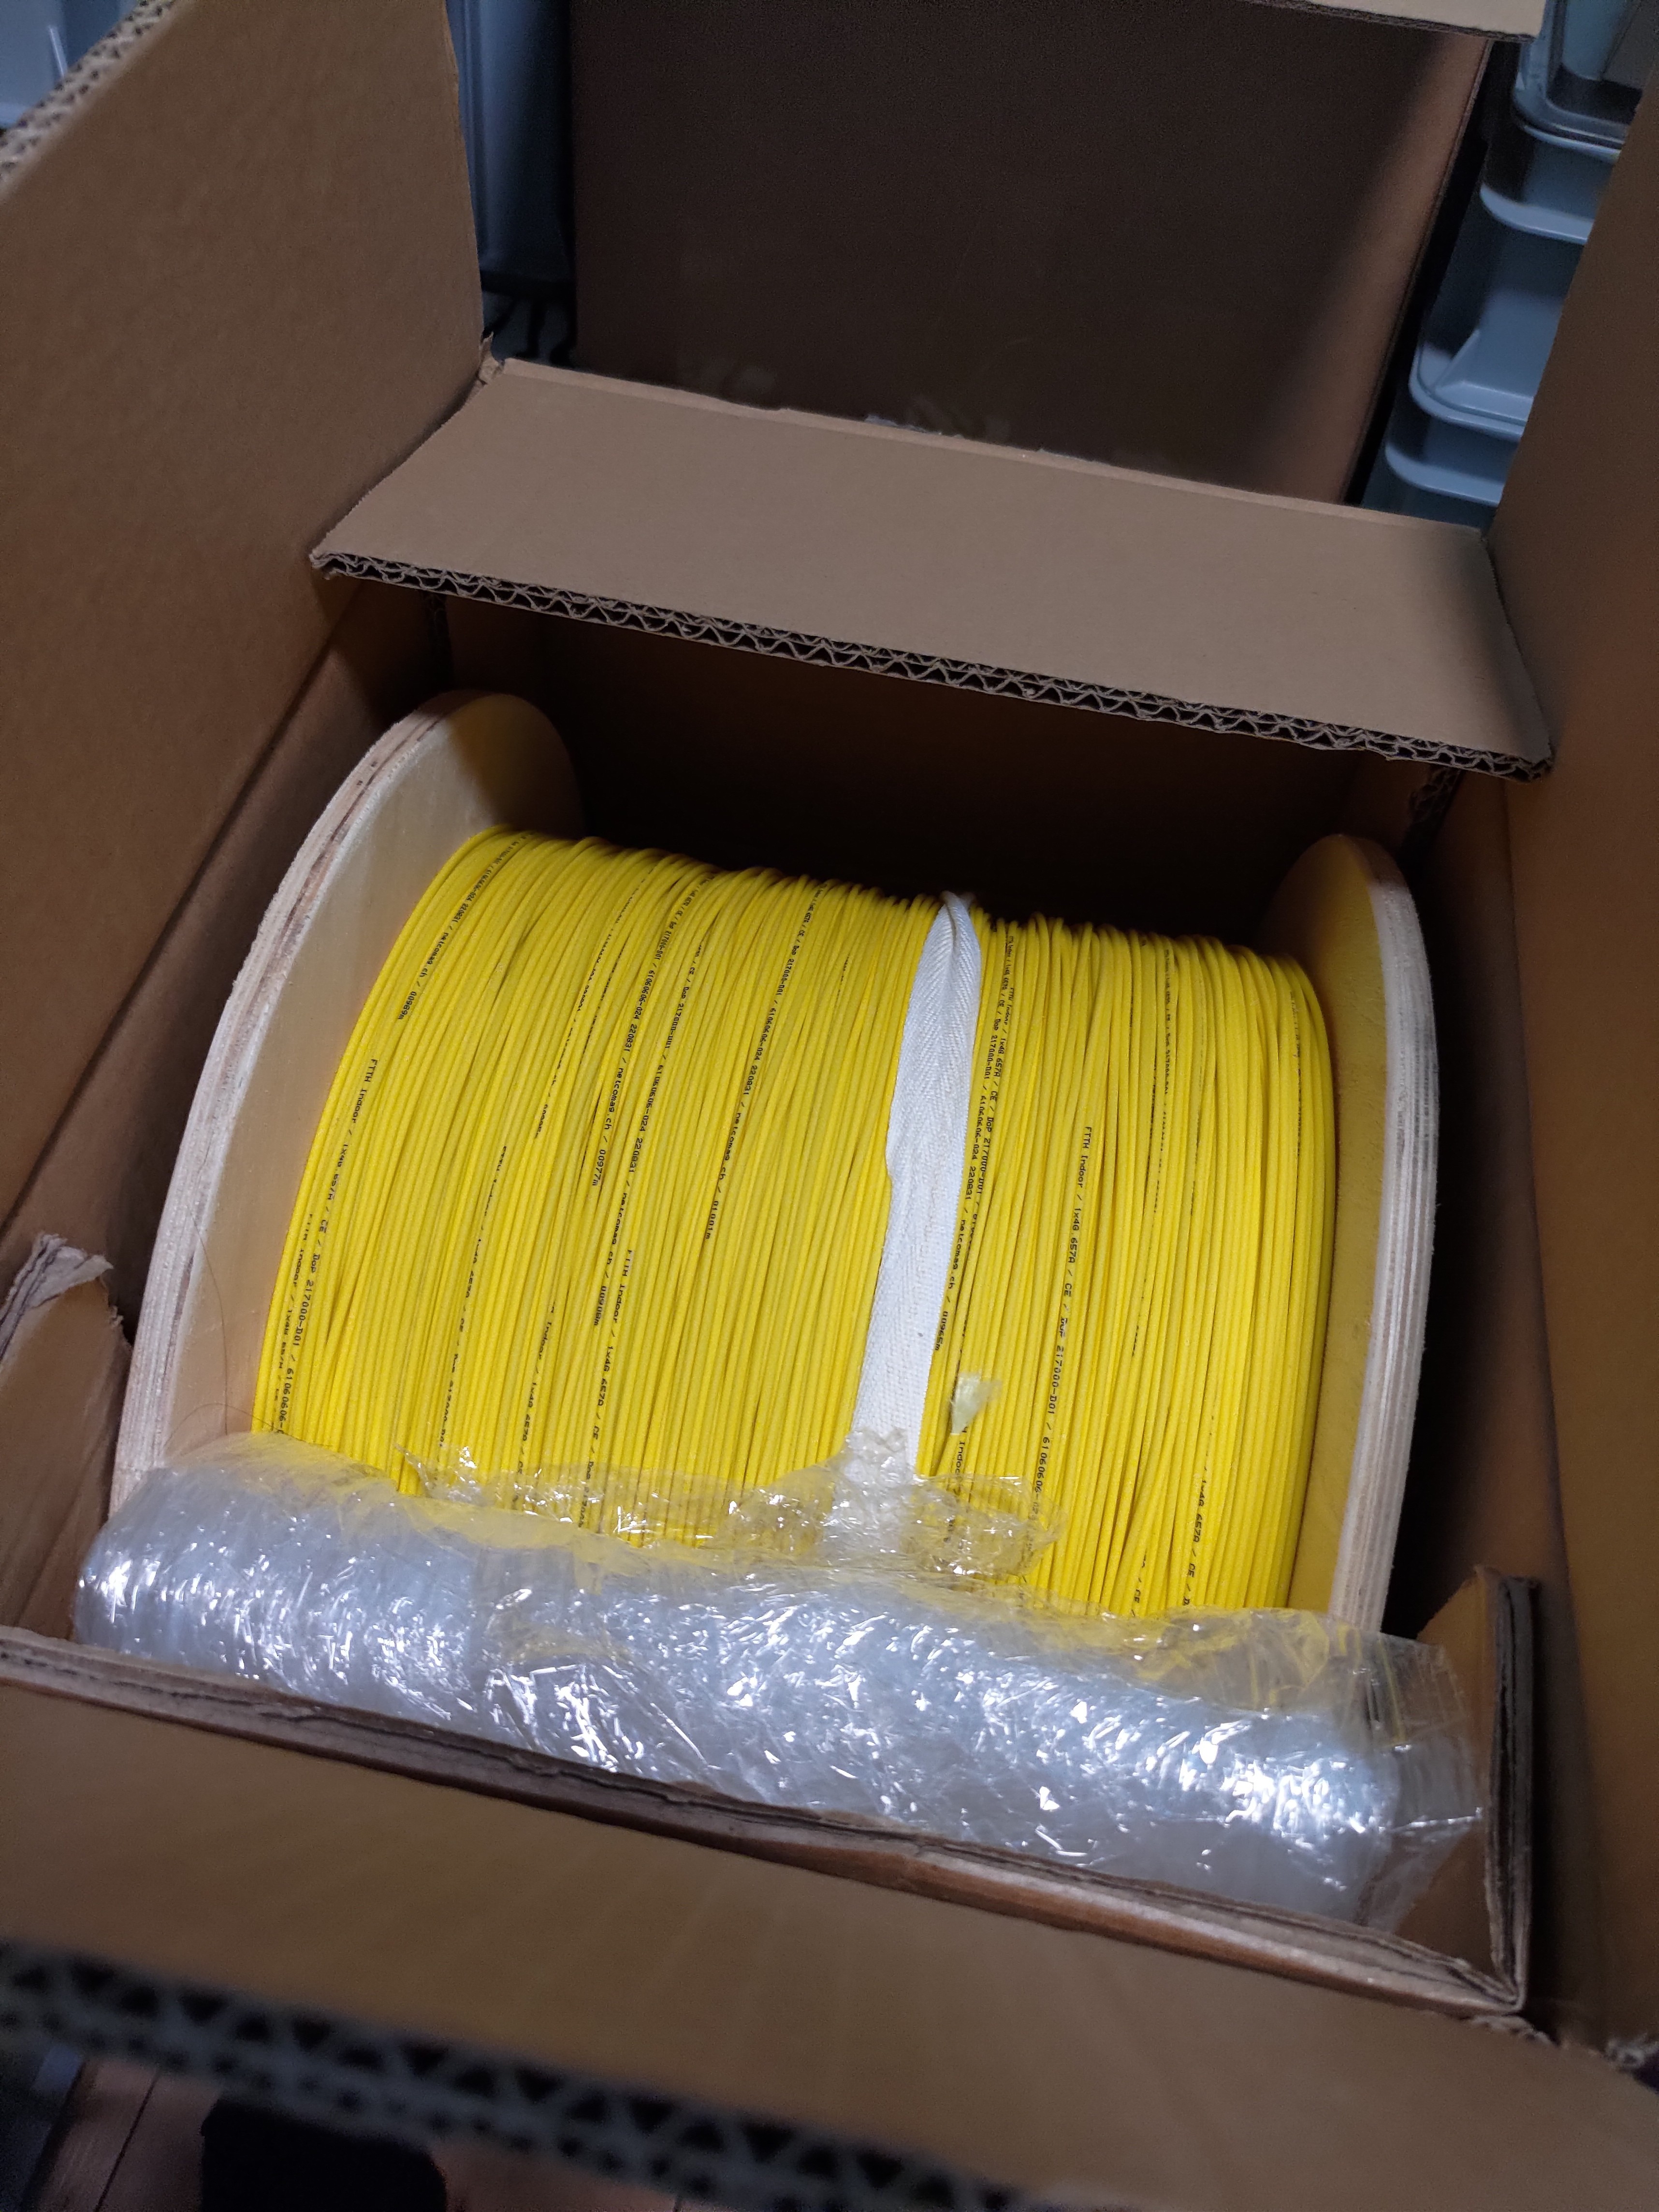
For material I chose a G.657.A1 4 core fiber with a 2.2mm LSFH jacket FTTH-IHK-GE-2.2-0500 The minimum turning radius for G.657.A1 is 10mm which should also be enough.
Pig-tails
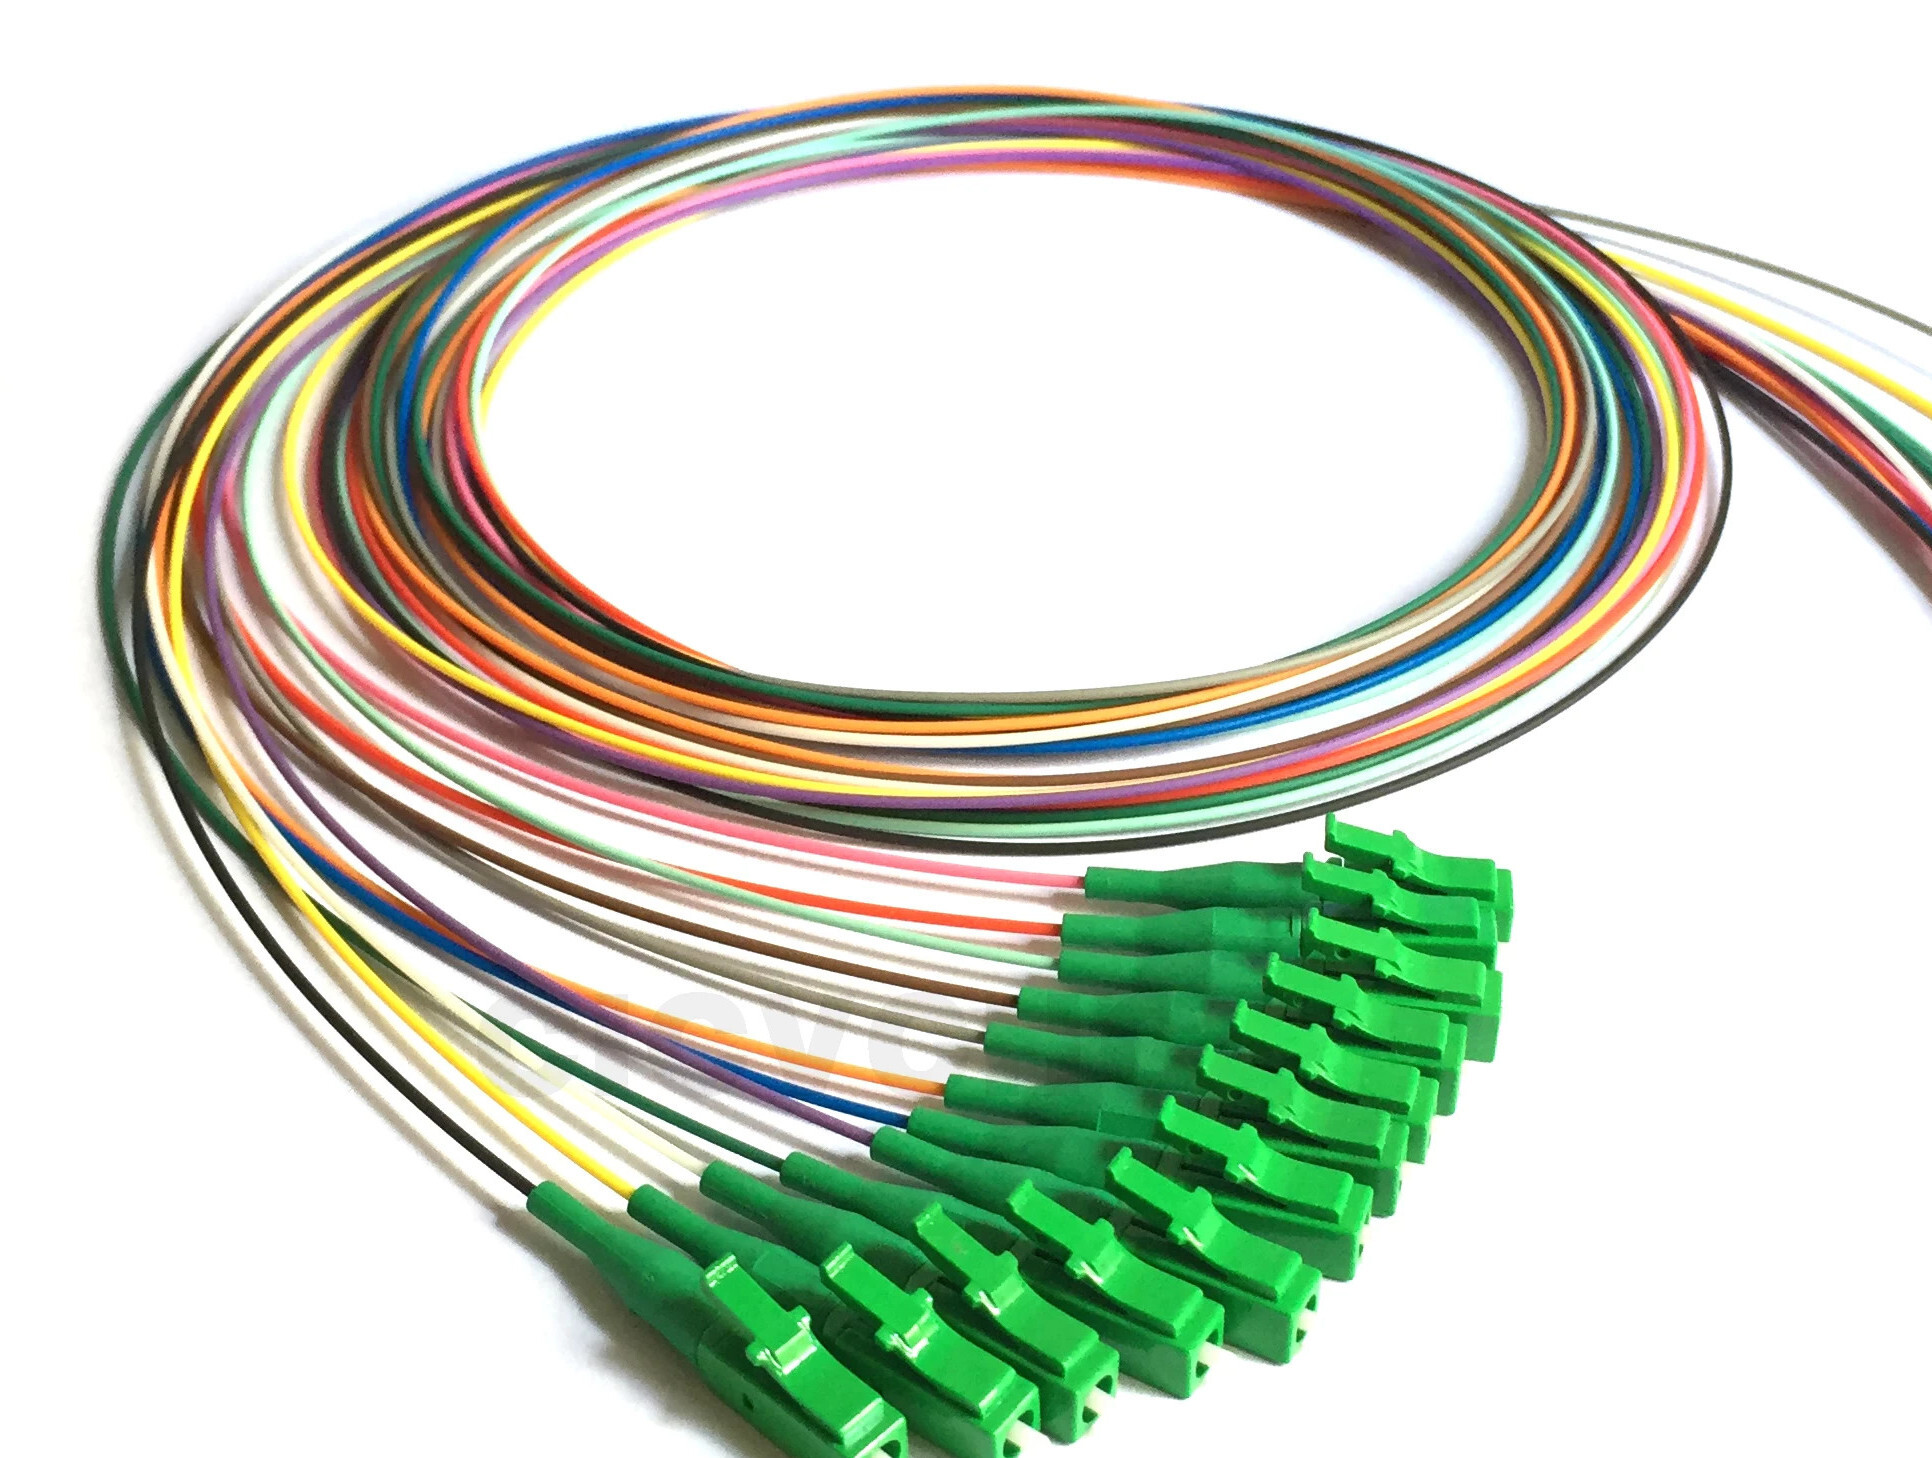
In order to connect ends to the fiber using a fusion splicer I used pig-tails. These are one side pre-terminated pieces of fiber. 12 colors LC/APC Fiber Pigtail with Single mode I went with G.657.A2 which have a min bending radius of 7.5mm.
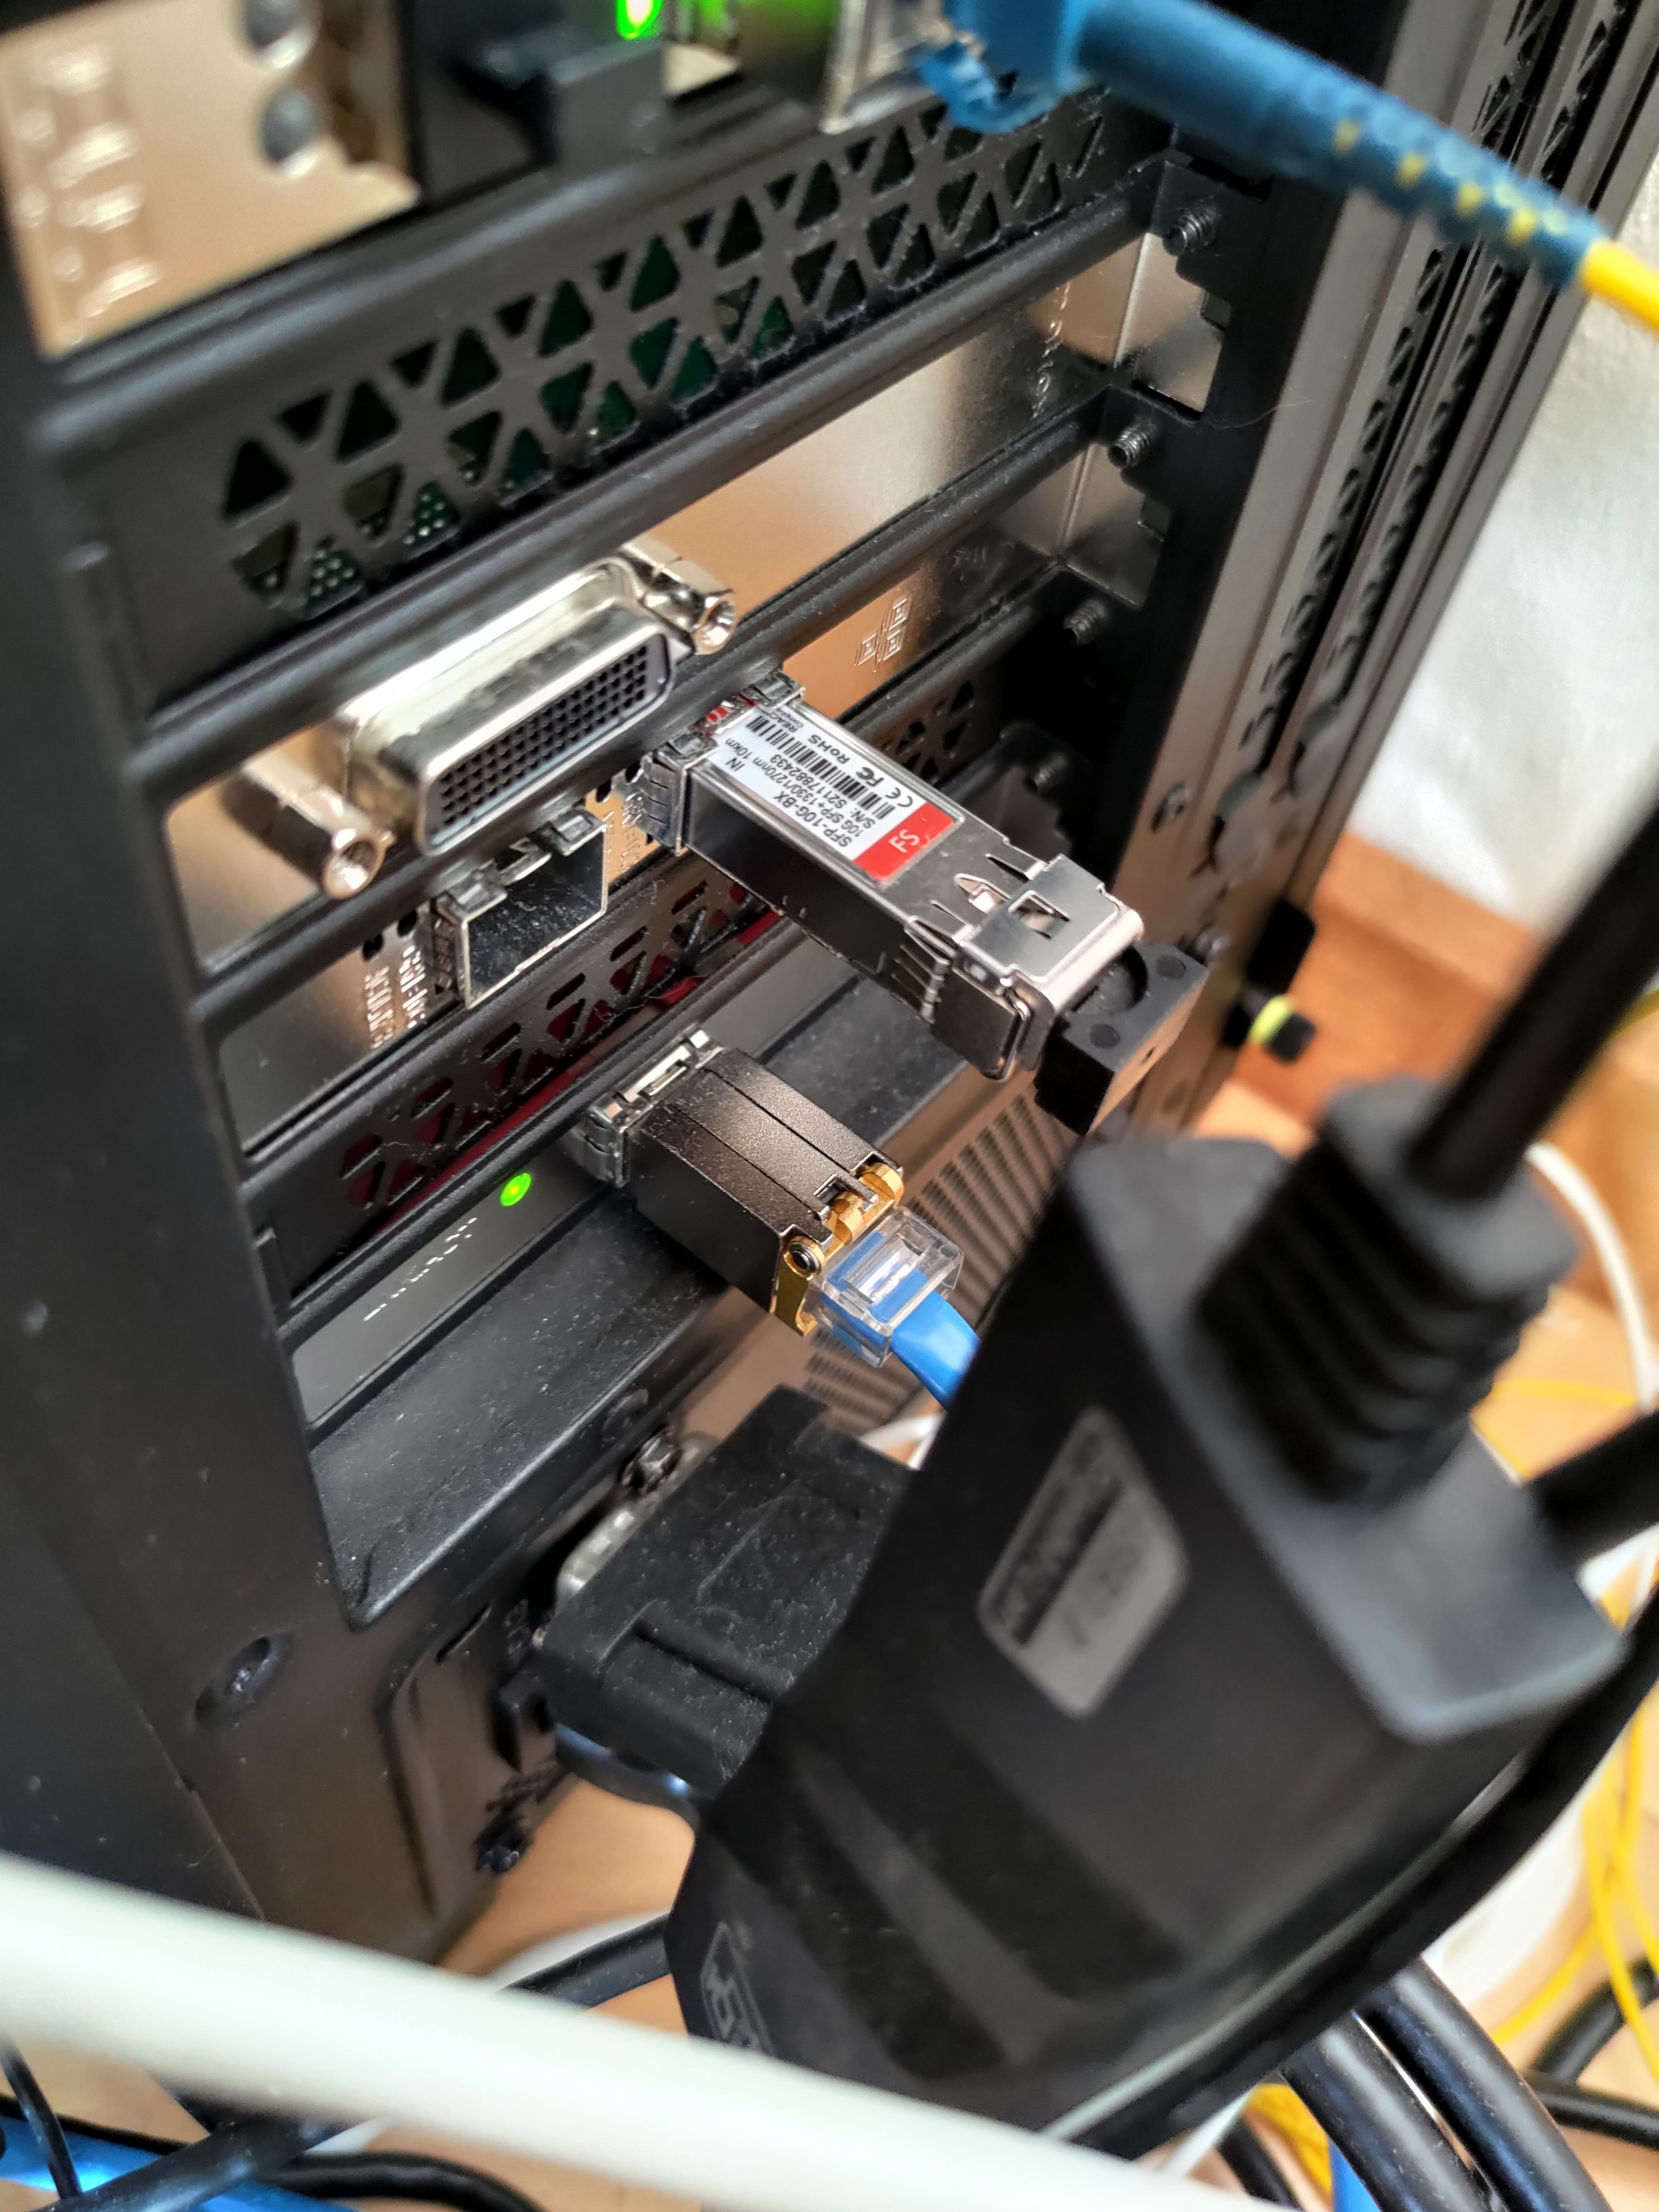
SFP modules
SFP, SFP+, SFP28, etc.
First thing was to decide what speed I wanted to use. I settled on 10gbits for now as I can do this with someone lower cost SFP+ modules and switches. SFP28 is still quite costly especially switching hardware.
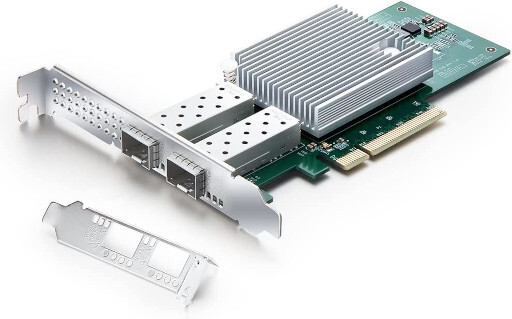
The router requires a SFP28 module to connect to the ISPs 25gibt line which was provided by the ISP. It is running in a Broadcom BCM957414A4142CC Cloud PCIe card.
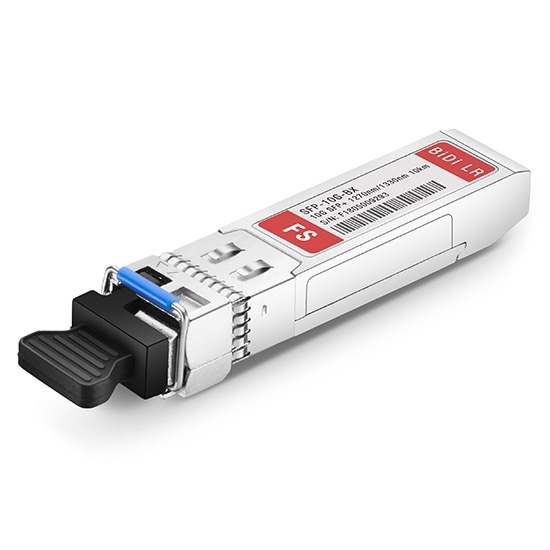
I also decided to go withe BiDi modules which can do RX and TX on the same fiber on two different wavelengths. To achieve this however you need opposite modules on each end so you need to plan a bit. The ISP also uses BiDi modules for their FTTH.
Fiber attenuators
When you use singlemode SFP modules you may need an attenuator if the fiber run is short. However in this case FS confirmed that as long as I used their same matching modules I would not need any.
Module coding
Coding is what will ruin your day. Thanks to companies like Cisco and Dell we have to deal with such crap when SFP is a standard yet they code them specifically for their devices. Luckily companies like FS will do free coding for what ever you need when you purchase a SFP module or you can even purchase their coding box which will let you change the coding at a later date. Other companies will even send you a free box but most of these boxes can only change the coding of the modules from those companies.
Some devices don’t really care what coded module is inserted but I didn’t want to take that risk and decided to plan which module goes into which device.
Module locations, TX/RX and coding
| Device | SFP+/SFP28 Module | Dir. (Internet) | Coded |
|---|---|---|---|
| Router | SFP28 (init7) | In | Broadcom |
| Router | SFP-10G-BX (1330nm-TX/1270nm-RX) | Out | Intel |
| Switch 1 | SFP-10G-BX (1270nm-TX/1330nm-RX) | In | Microtik |
| Switch 1 | SFP-10G-BX (1330nm-TX/1270nm-RX) | Out | Microtik |
| Switch 1 | SFP-10G-BX (1330nm-TX/1270nm-RX) | Out | Microtik |
| Switch 2 | SFP-10G-BX (1270nm-TX/1330nm-RX) | In | Microtik |
| Switch 2 | SFP-10G-BX (1330nm-TX/1270nm-RX) | Out | Microtik |
| Switch 3 | SFP-10G-BX (1270nm-TX/1330nm-RX) | In | Microtik |
| Switch 3 | SFP-10G-BX (1330nm-TX/1270nm-RX) | Out | Microtik |
| PC 1 | SFP-10G-BX (1270nm-TX/1330nm-RX) | In | Intel |
| PC 2 | SFP-10G-BX (1270nm-TX/1330nm-RX) | In | Intel |
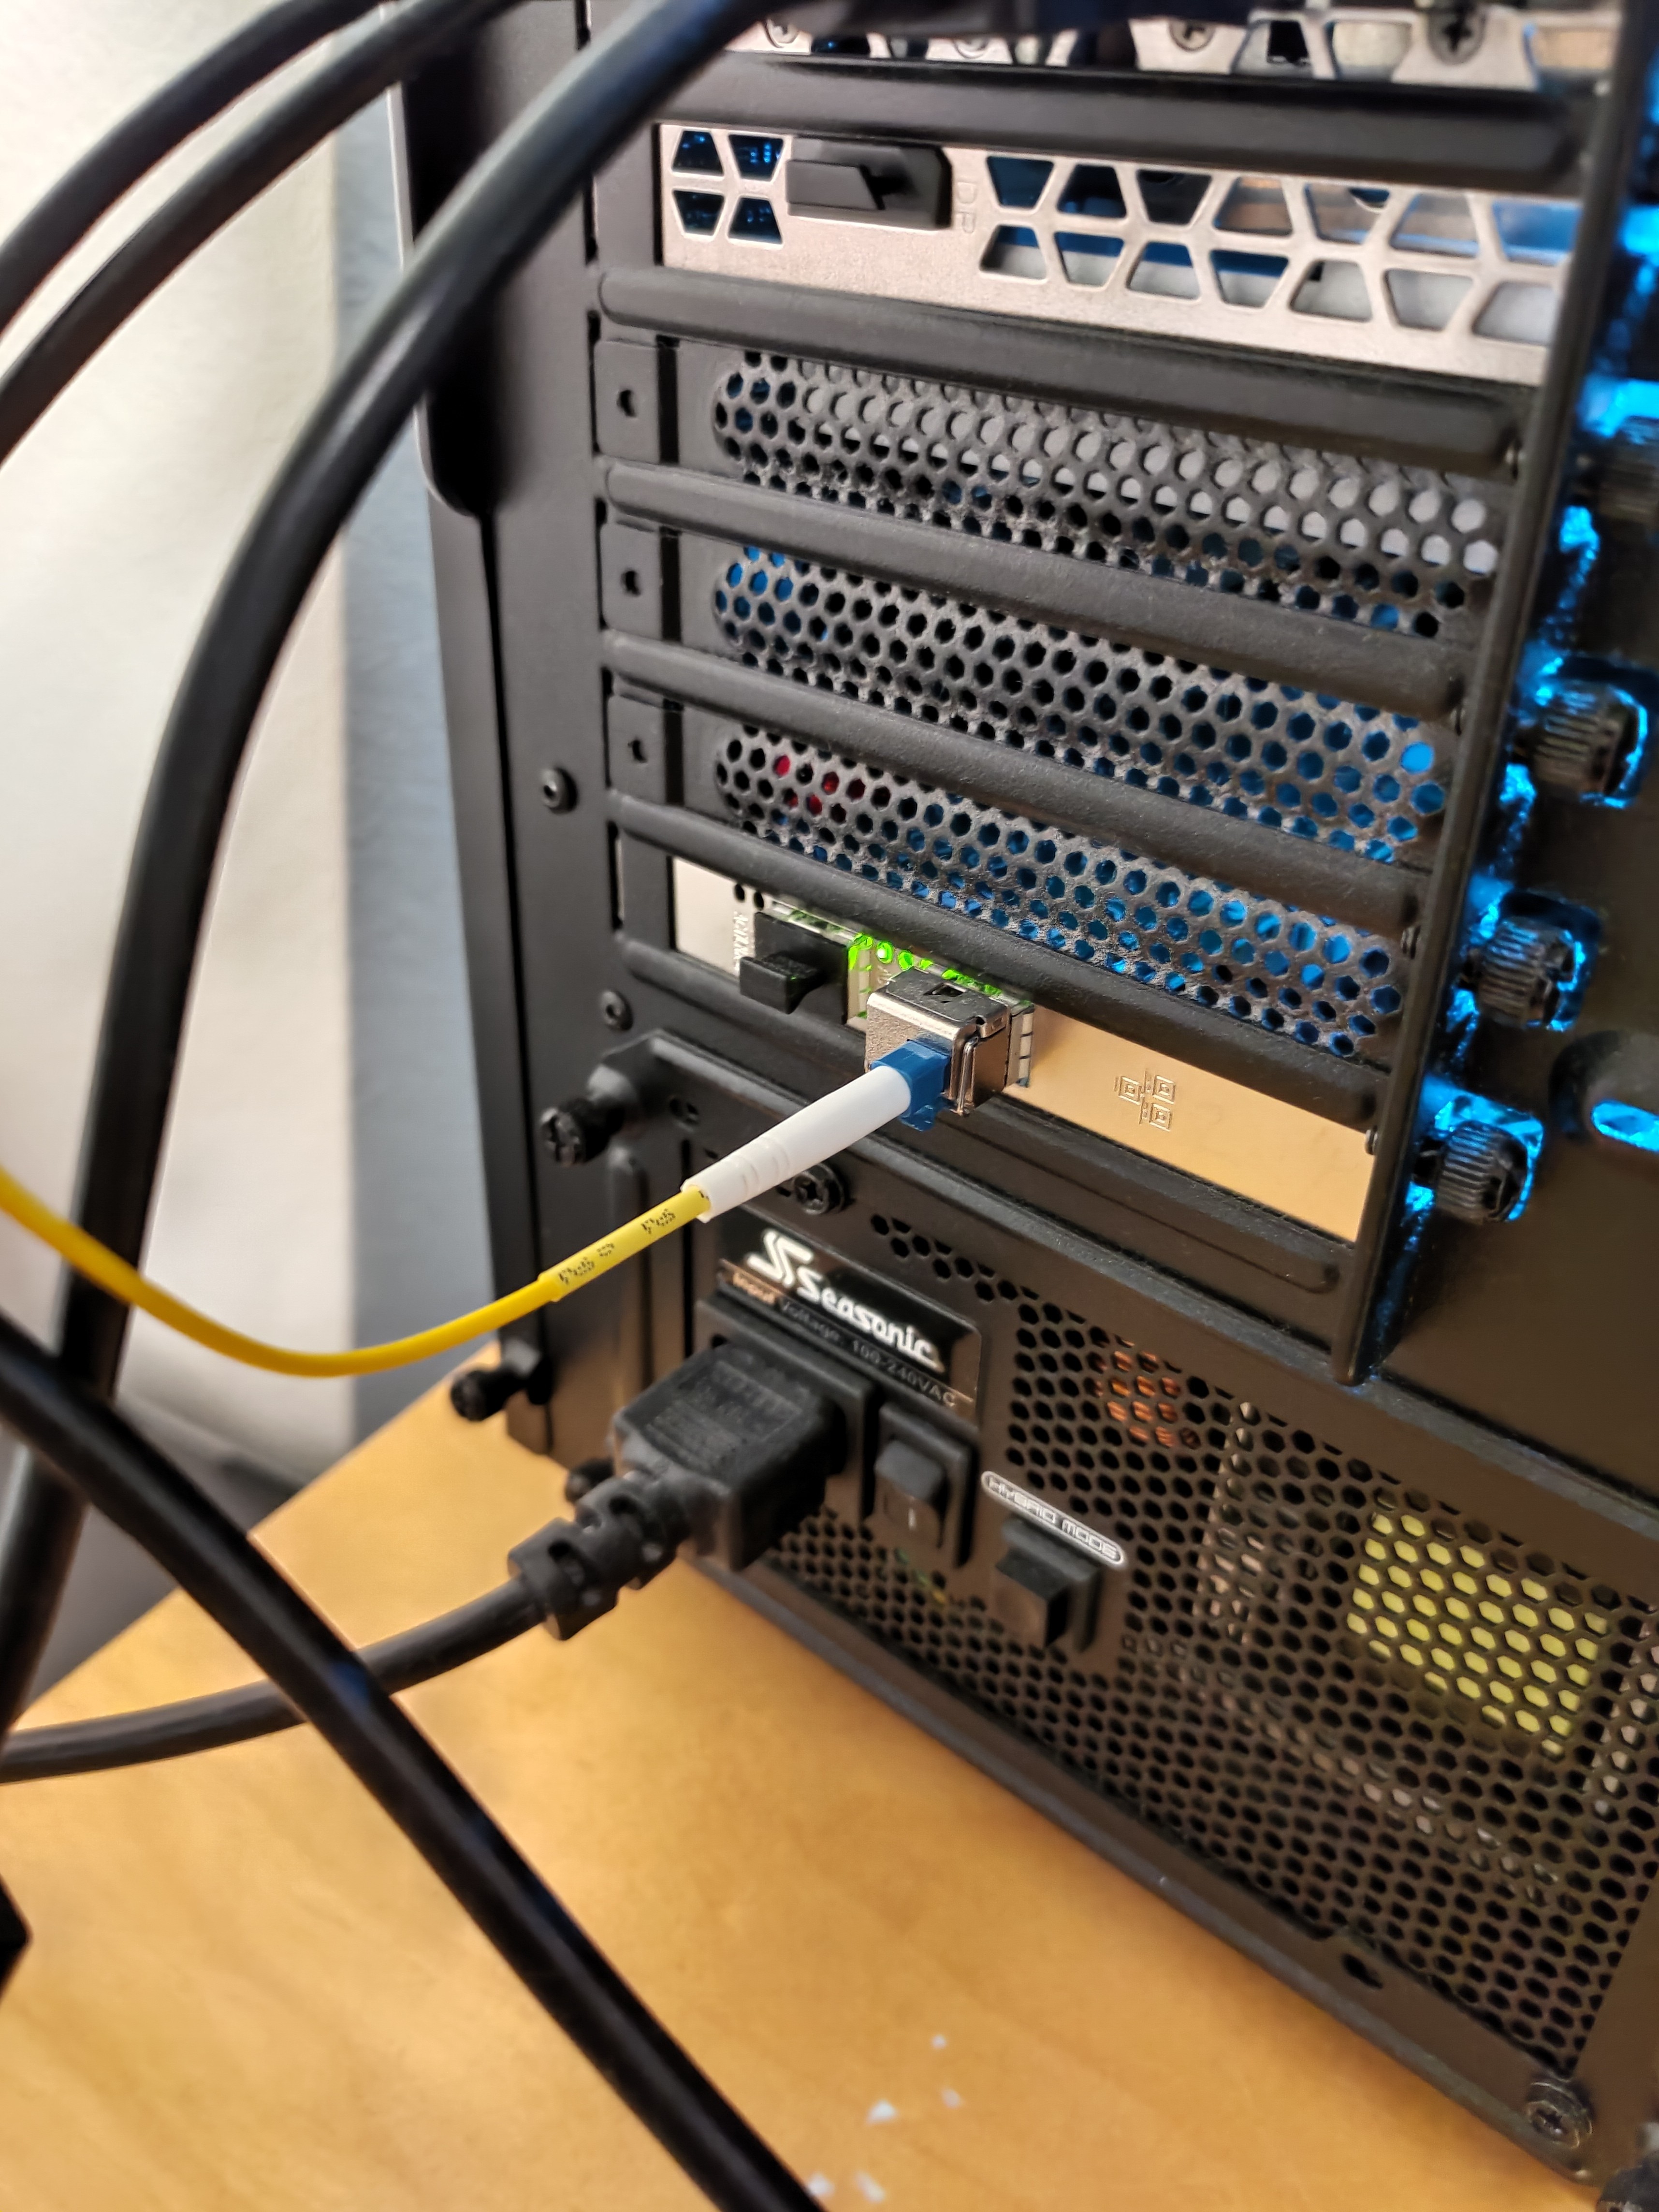
SFP modules PCIe cards
In order to use the SFP+ modules you need the correct PCIe cards on your PC. I was able to find some used Intel SFP+ cards which work very well with Linux and many other OSs.
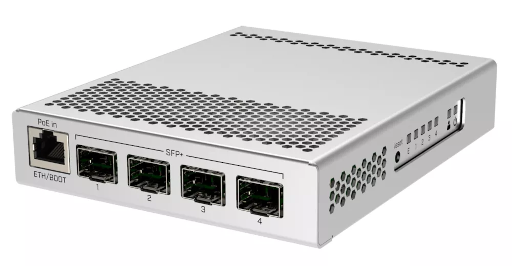
SFP switches
Generally SFP+ Switches are not cheap and quite loud but thanks to Mikrotik there is a fan-less switch with 4 ports which is more than enough for me. I am using one of these per floor which covers my needs. It also has one RJ45 copper gigabit port so I can split of into another switch for devices that don’t need 10gbit (Printers..).
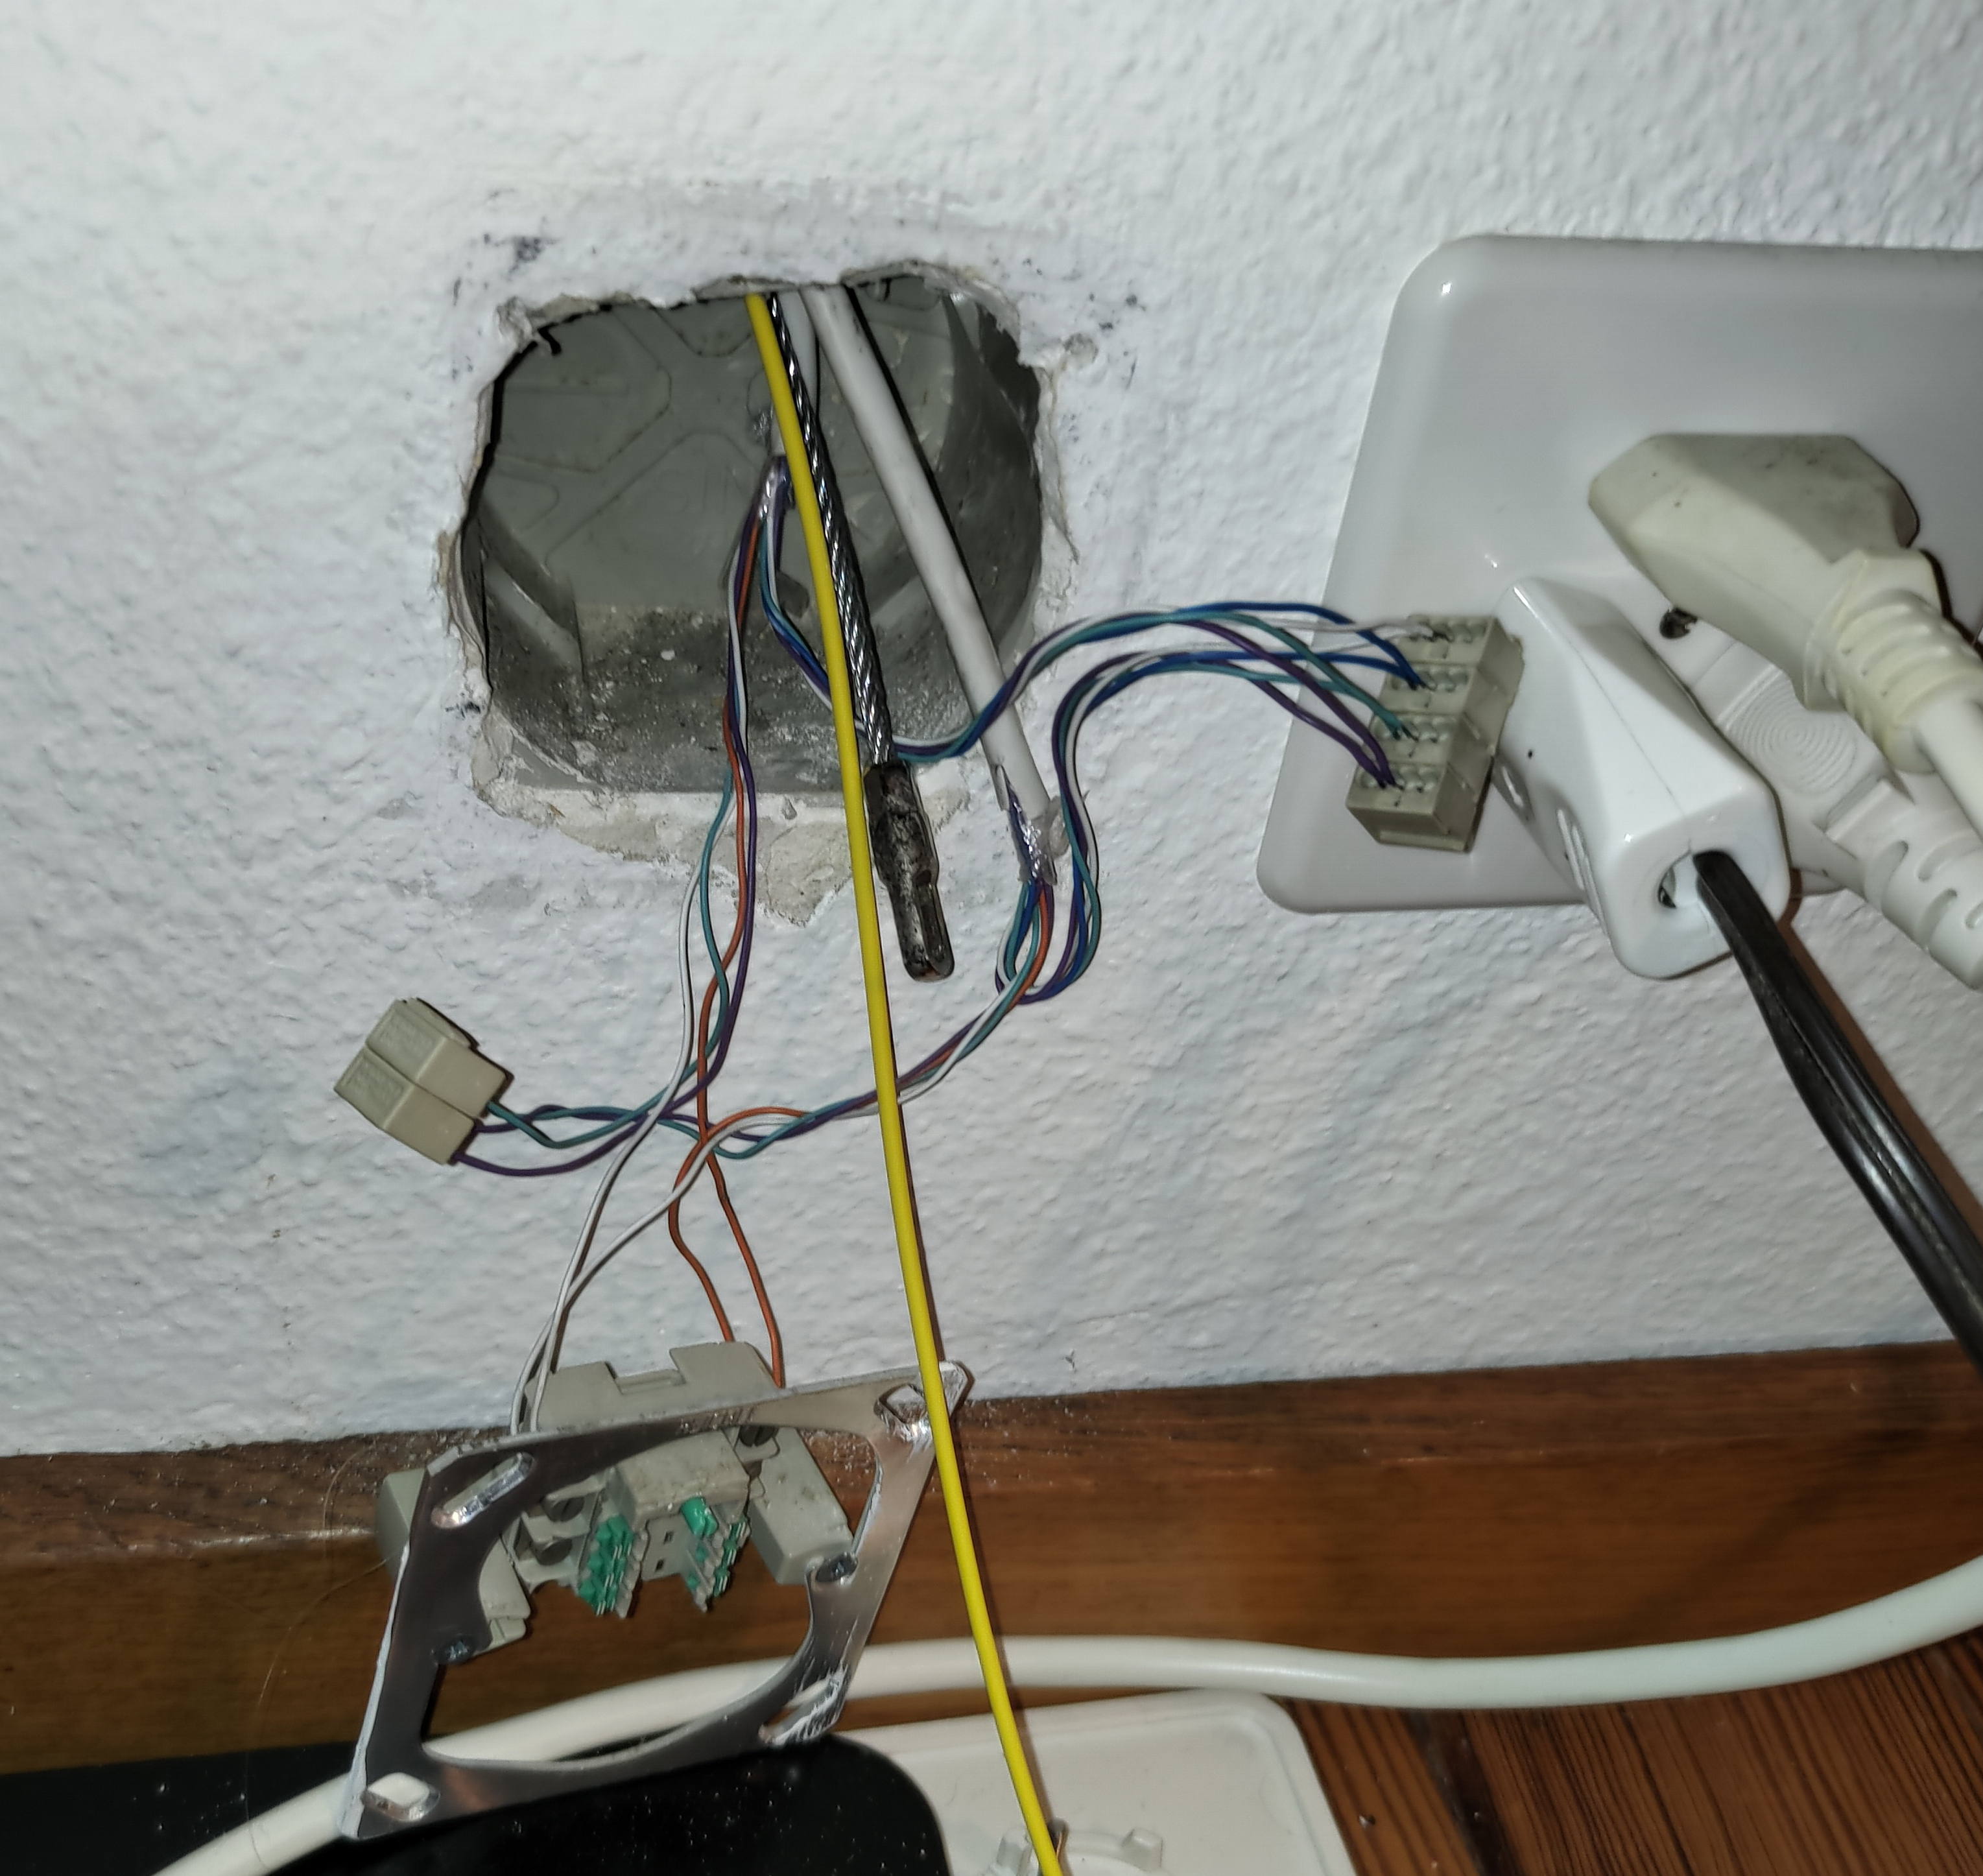
Outlets
I did not want to run fiber directly from device to device but instead install fiber outlets in the rooms. There are different options for this but I opted for the “FTTH Squeeze OTO” which is a outlet that can be installed behind and existing one without having to disconnect the existing outlet. So for example I can run fiber in the same conduit as power or cable TV and the cover plate is just moved out a bit. This design is specifically for Swiss/European style outlets. These are only available with APC (Green) polish couplers.
I also used these Delock Keystone Anschlussdose, 2 Port with APC Keystone fiber couplers outlets.
Router
Hardware SFP28 routers are expensive and very loud. Since this is going into a home I decided to custom build a router using a simple PC running Proxmox and Opnsense. Although the cost ist sill not low I can use this system for other things as well such as a Pi-hole.
The installation
Pulling the fiber
This was quite straight forward. Find a conduit that runs into the basement and push the pull line through. Then attach the fiber to it and pull it back very carefully.
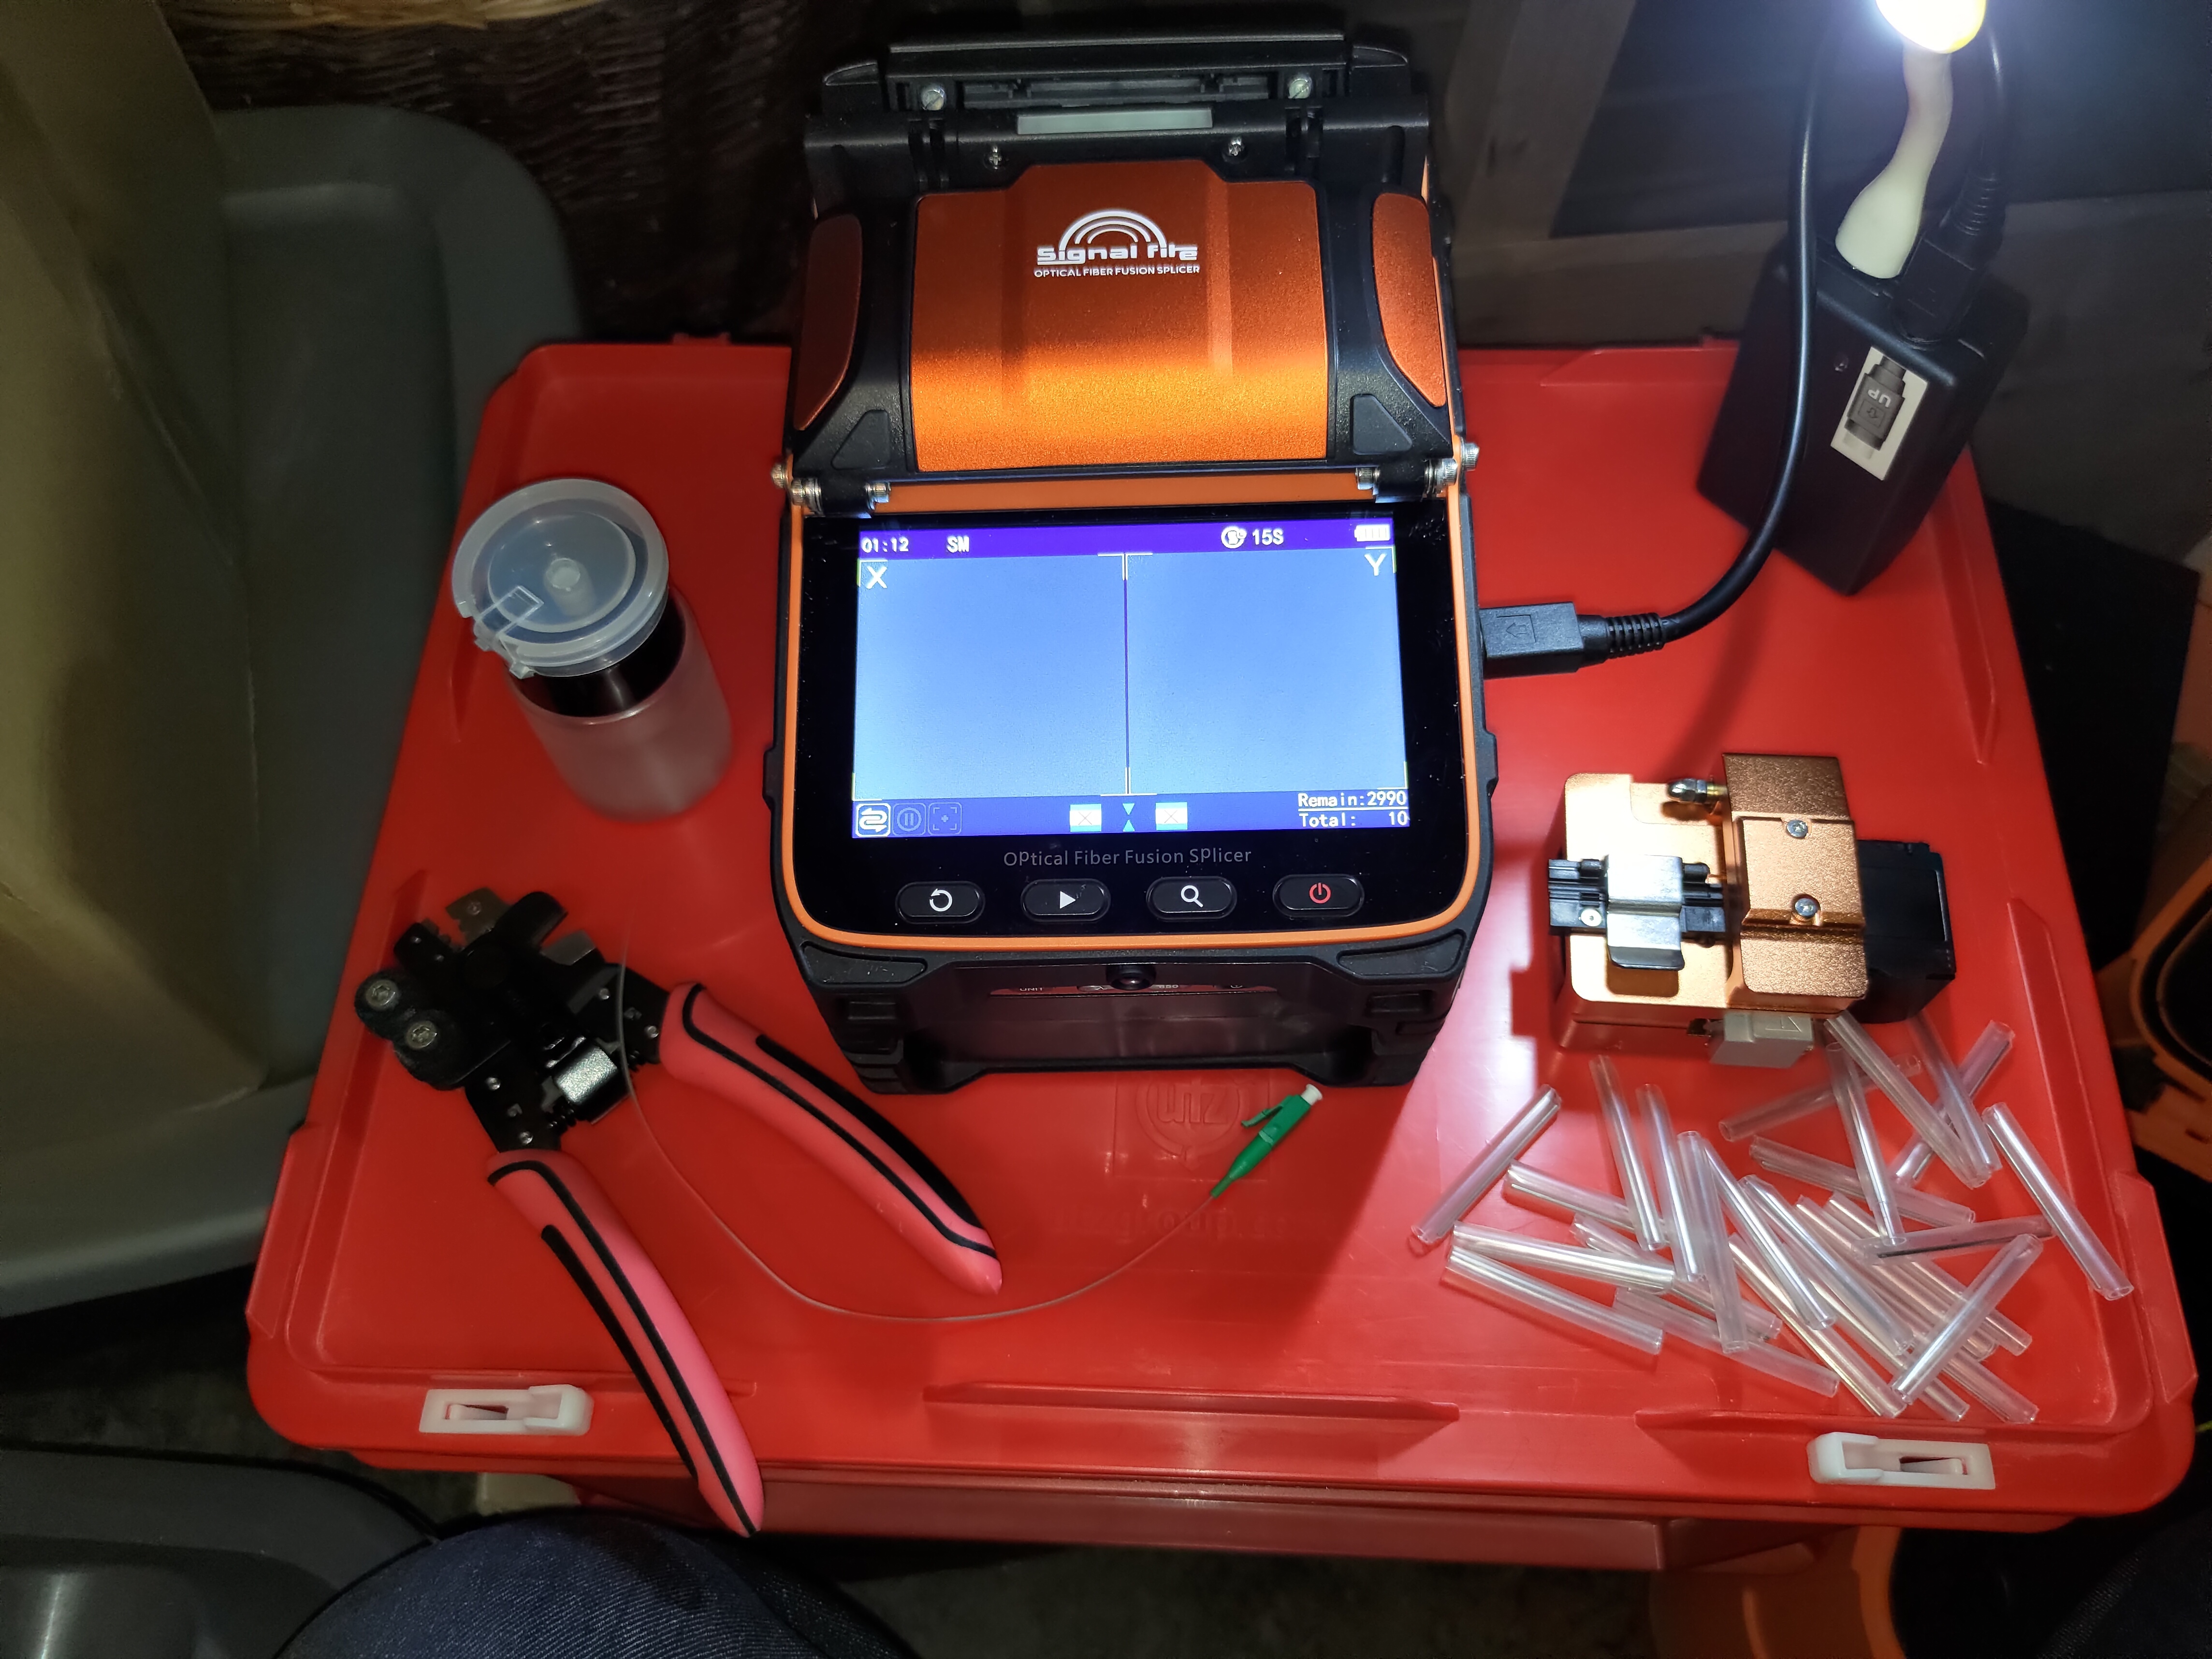
Terminating (splicing) the fiber
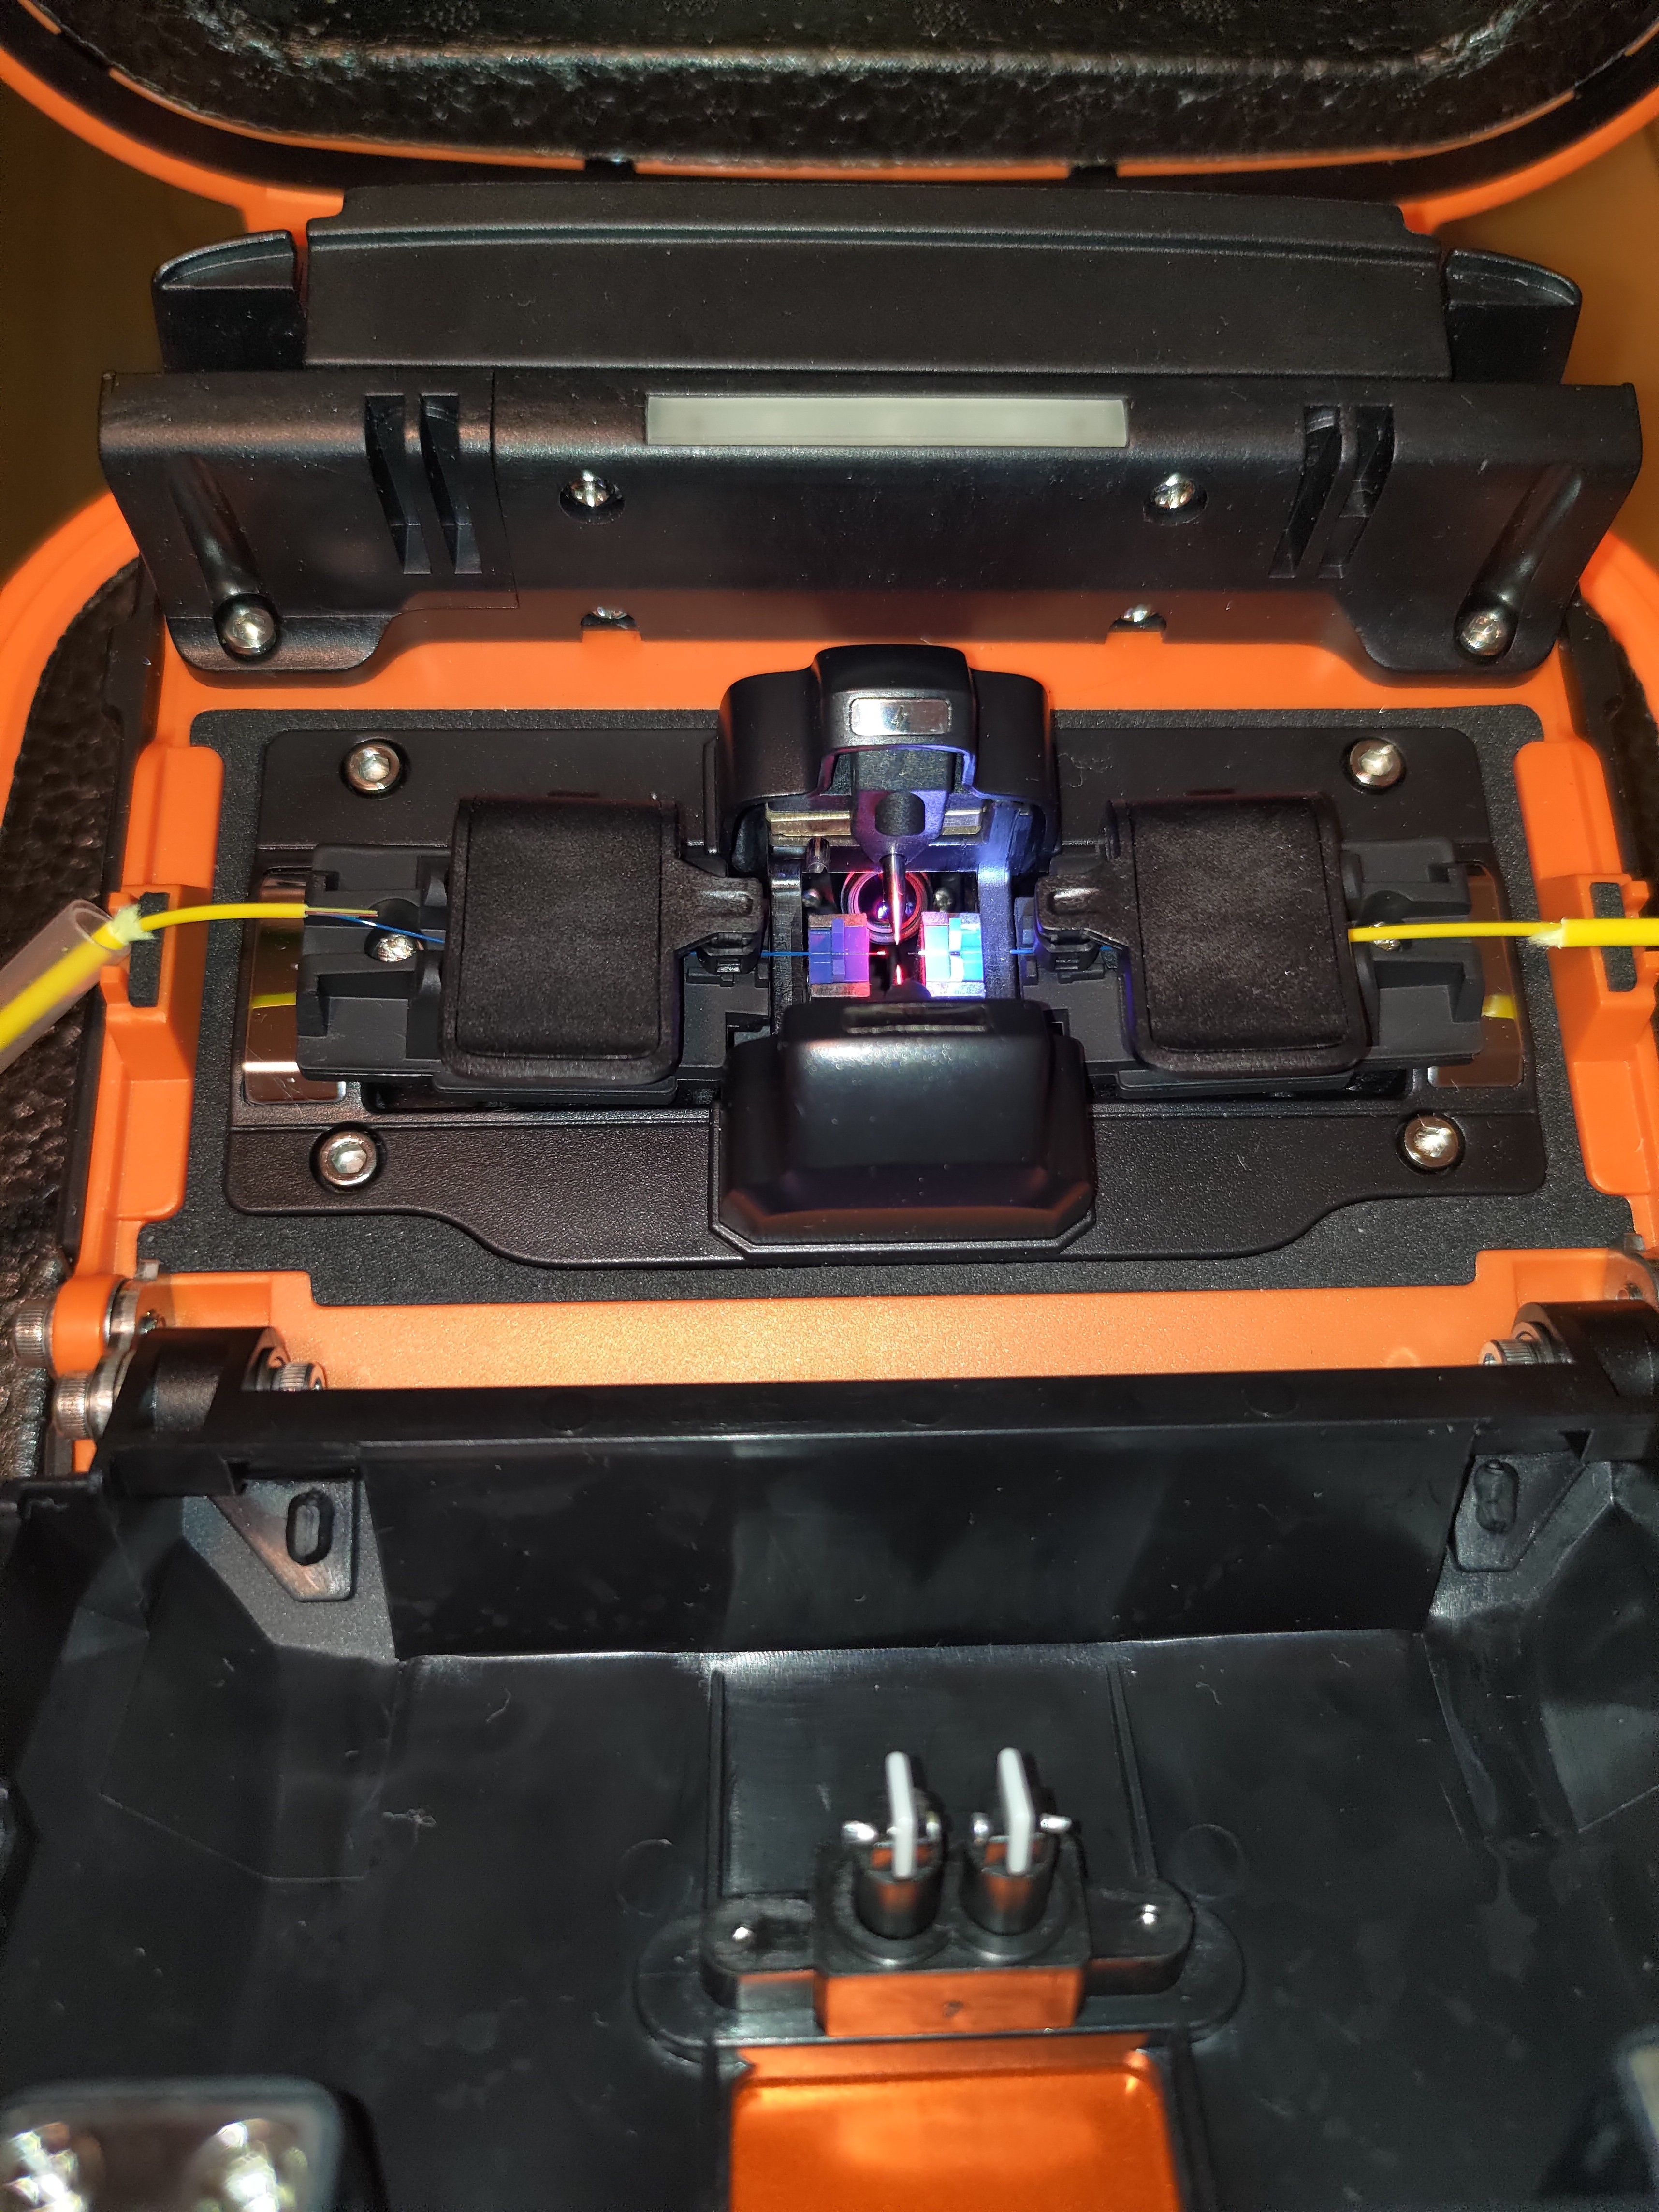
Although this was my first time splicing fiber it was quite straight forward and thanks to videos on youtube I was able to get a successful splice on the first try.
My splice setup in the basement where I had to terminate most Fibers.
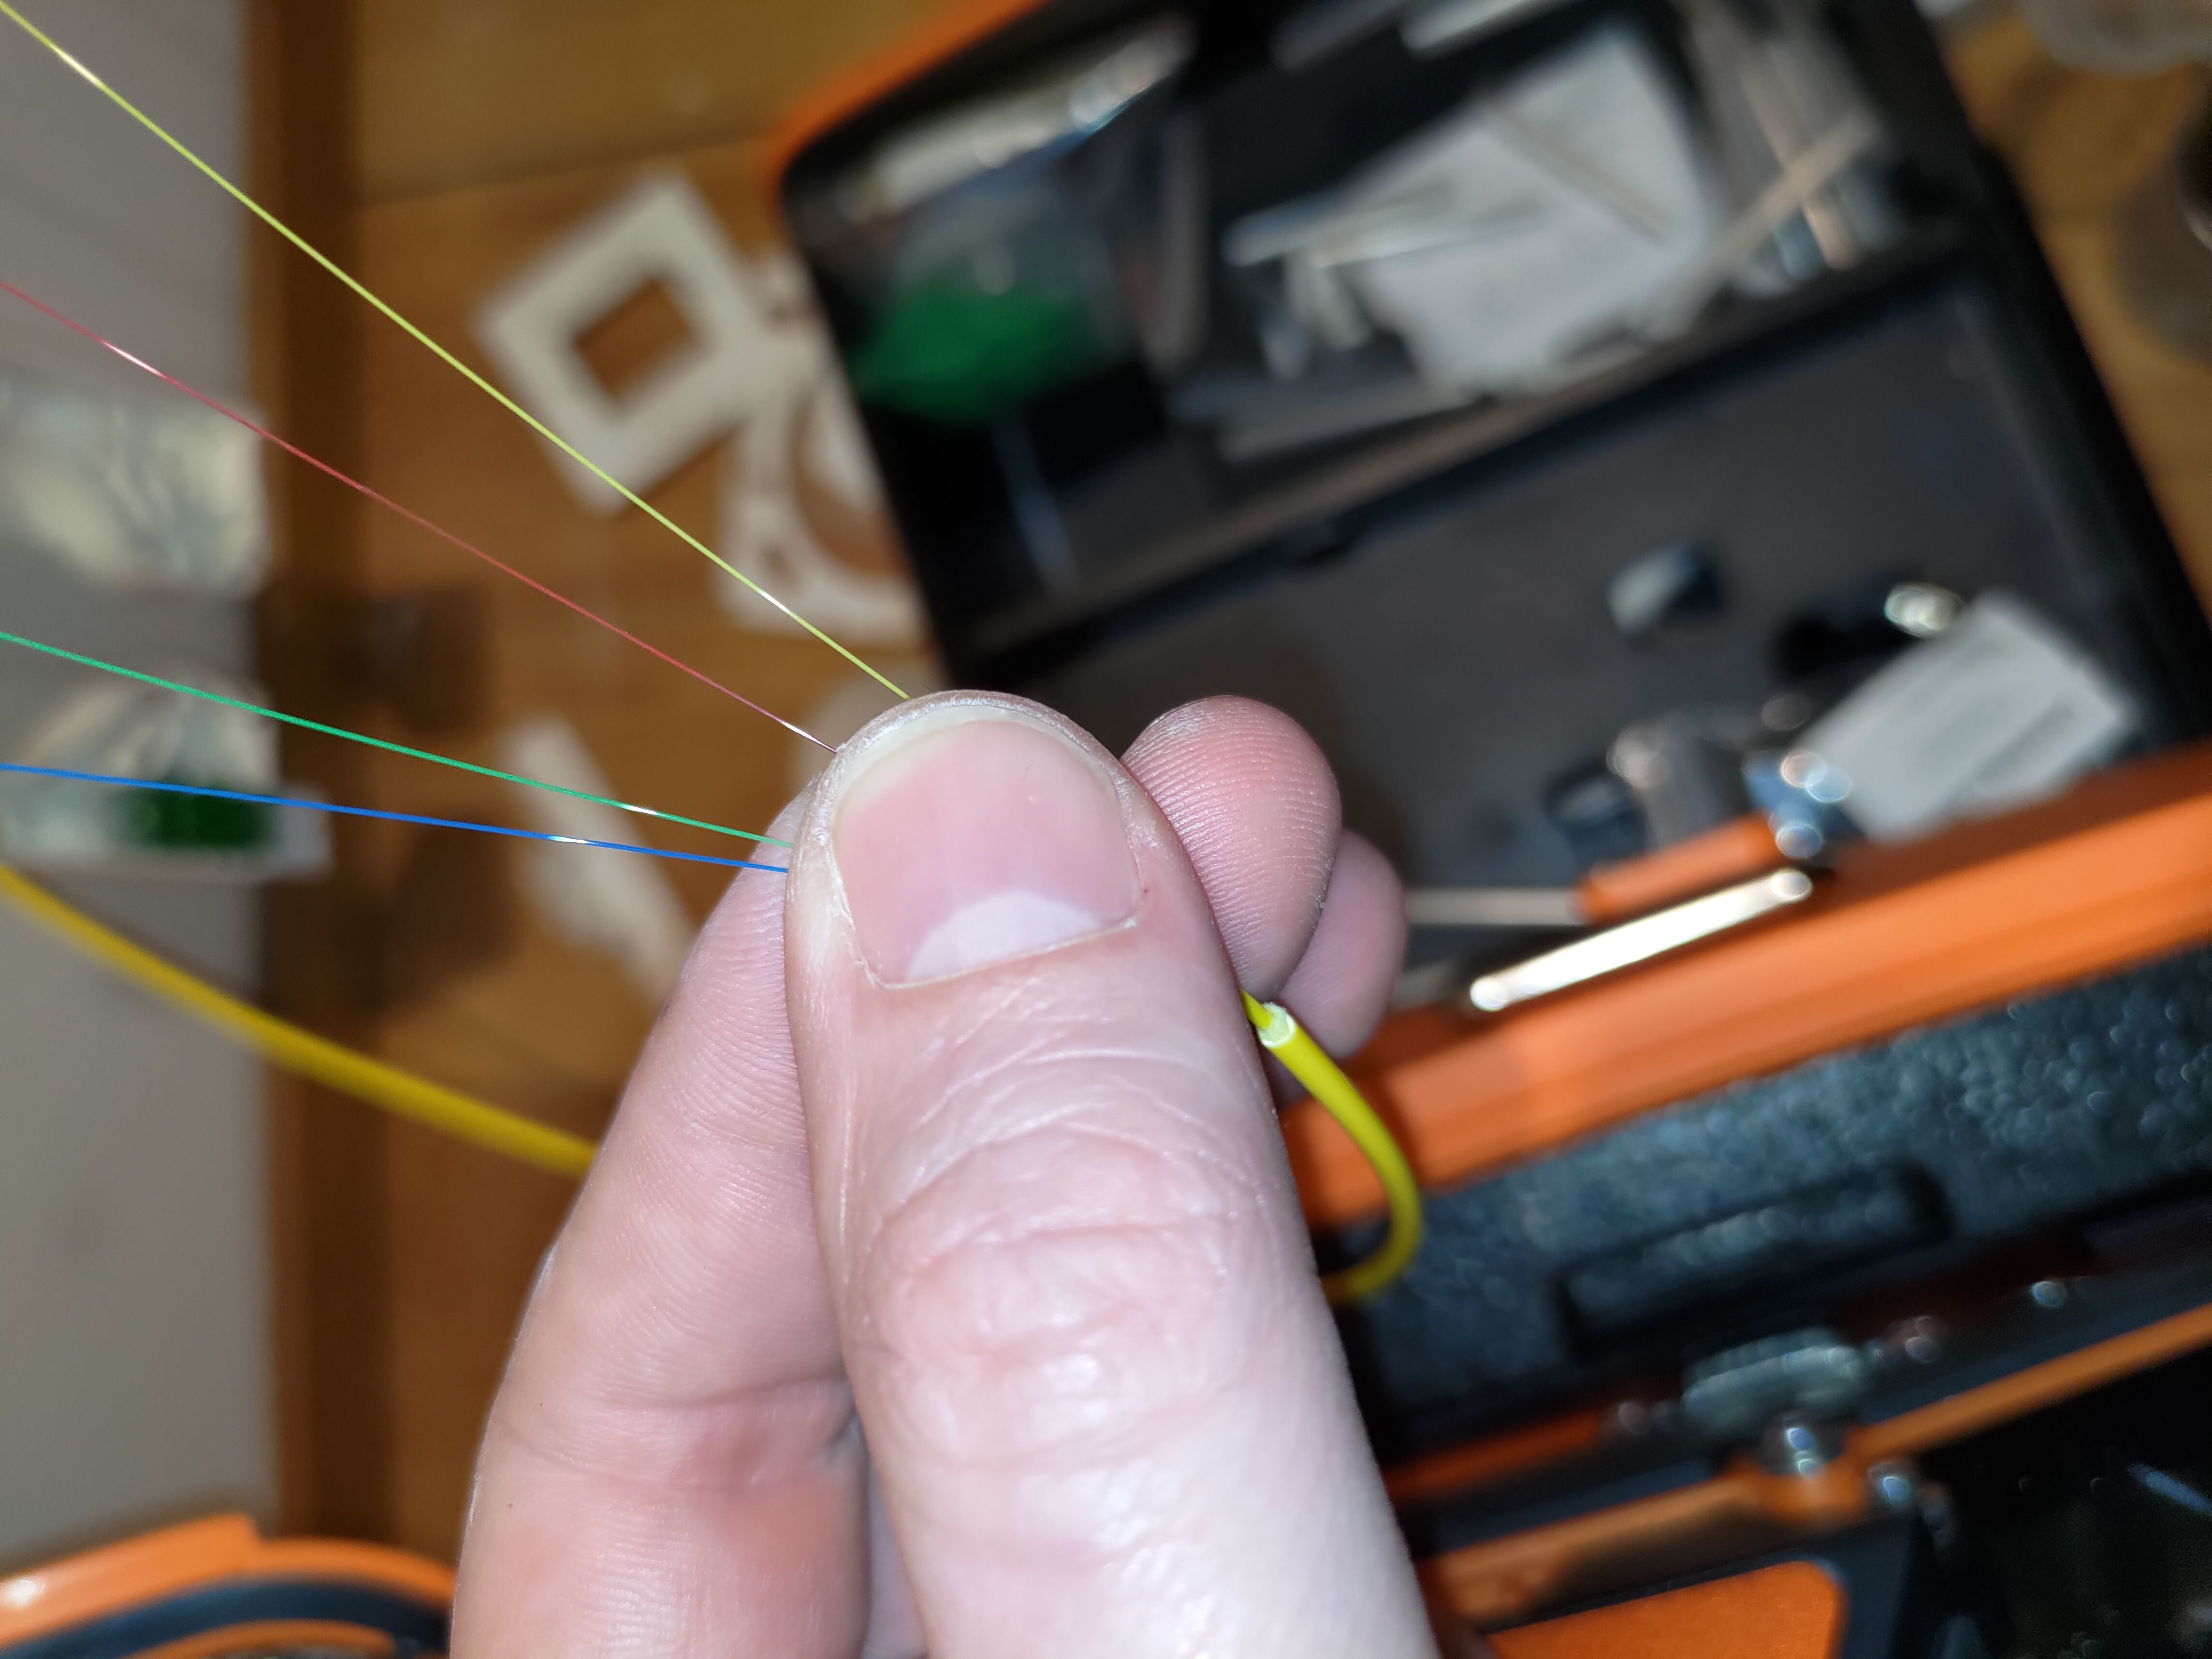
The distribution fiber is color coded. I terminated Blue and Red.
Fiber stripped and cleaved ready for fusion.
Fusion
The end result after heat-shrinking a protective sleave around the splice.

Basement splice box
To clean things up in the basement I added a small splice box from aliexpress together with APC Couplers. Although not ideal it was good enough.
Very messy at the moment.
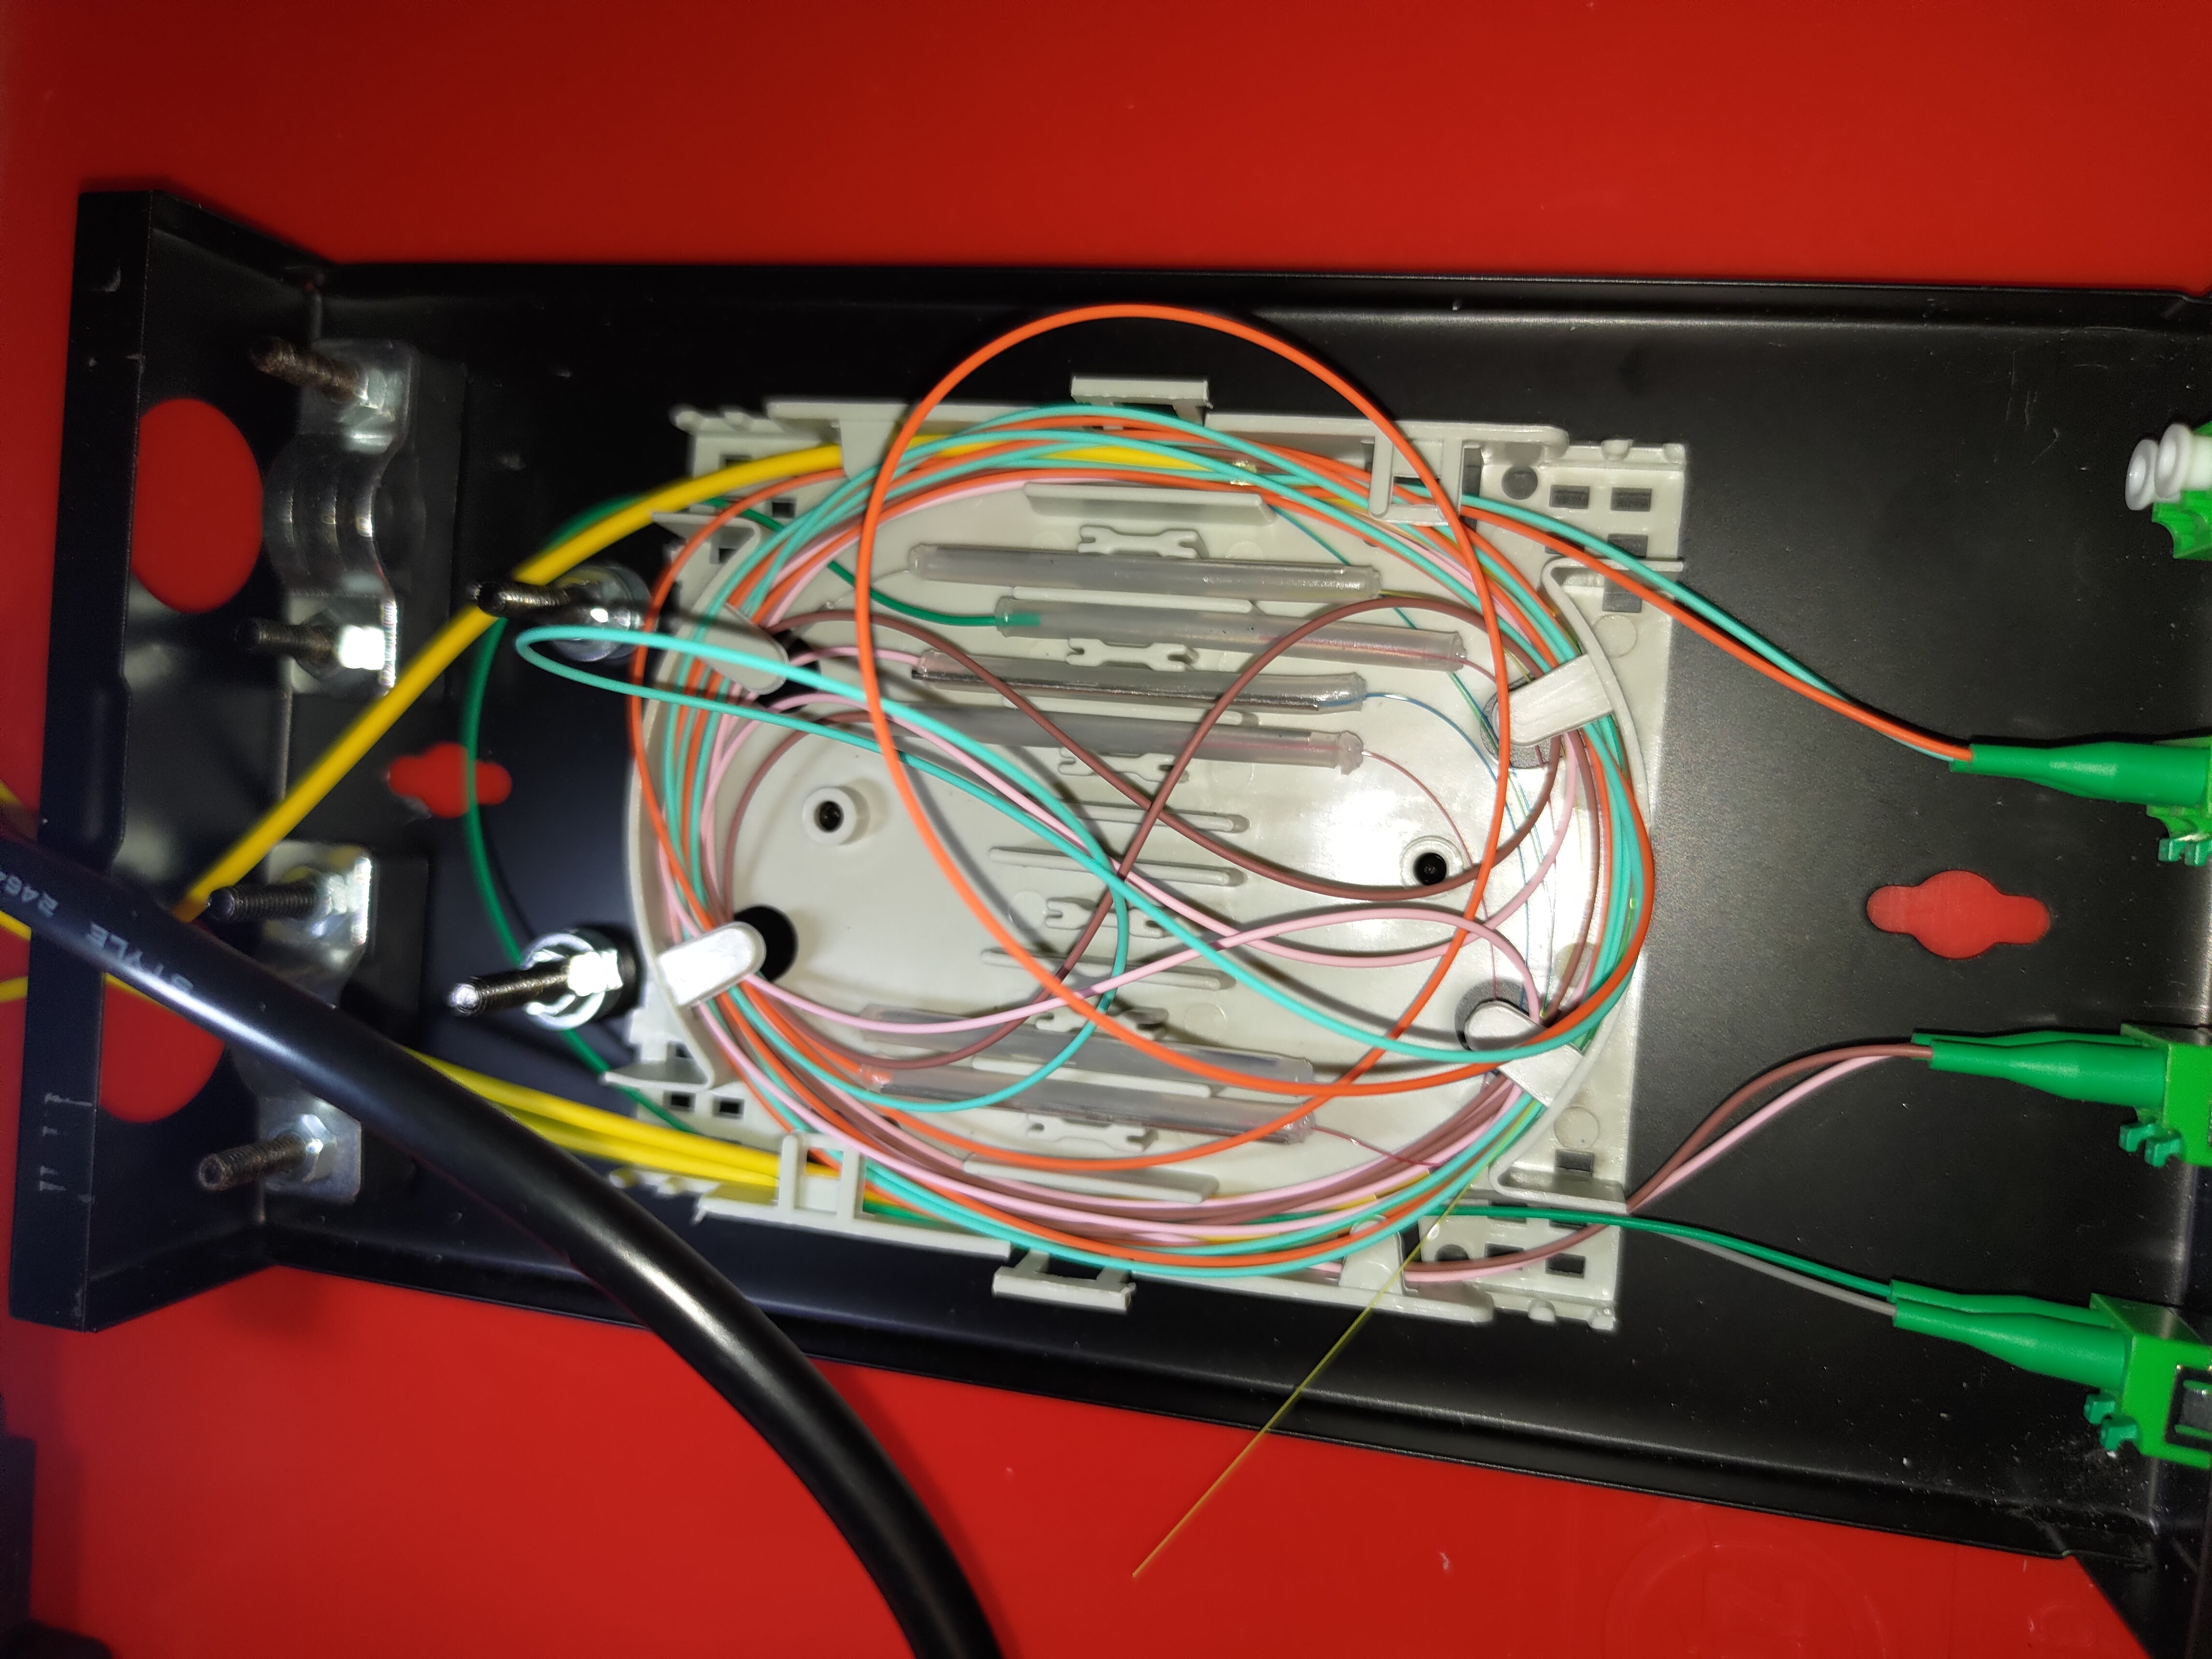
Incoming fibers also need some organizing.
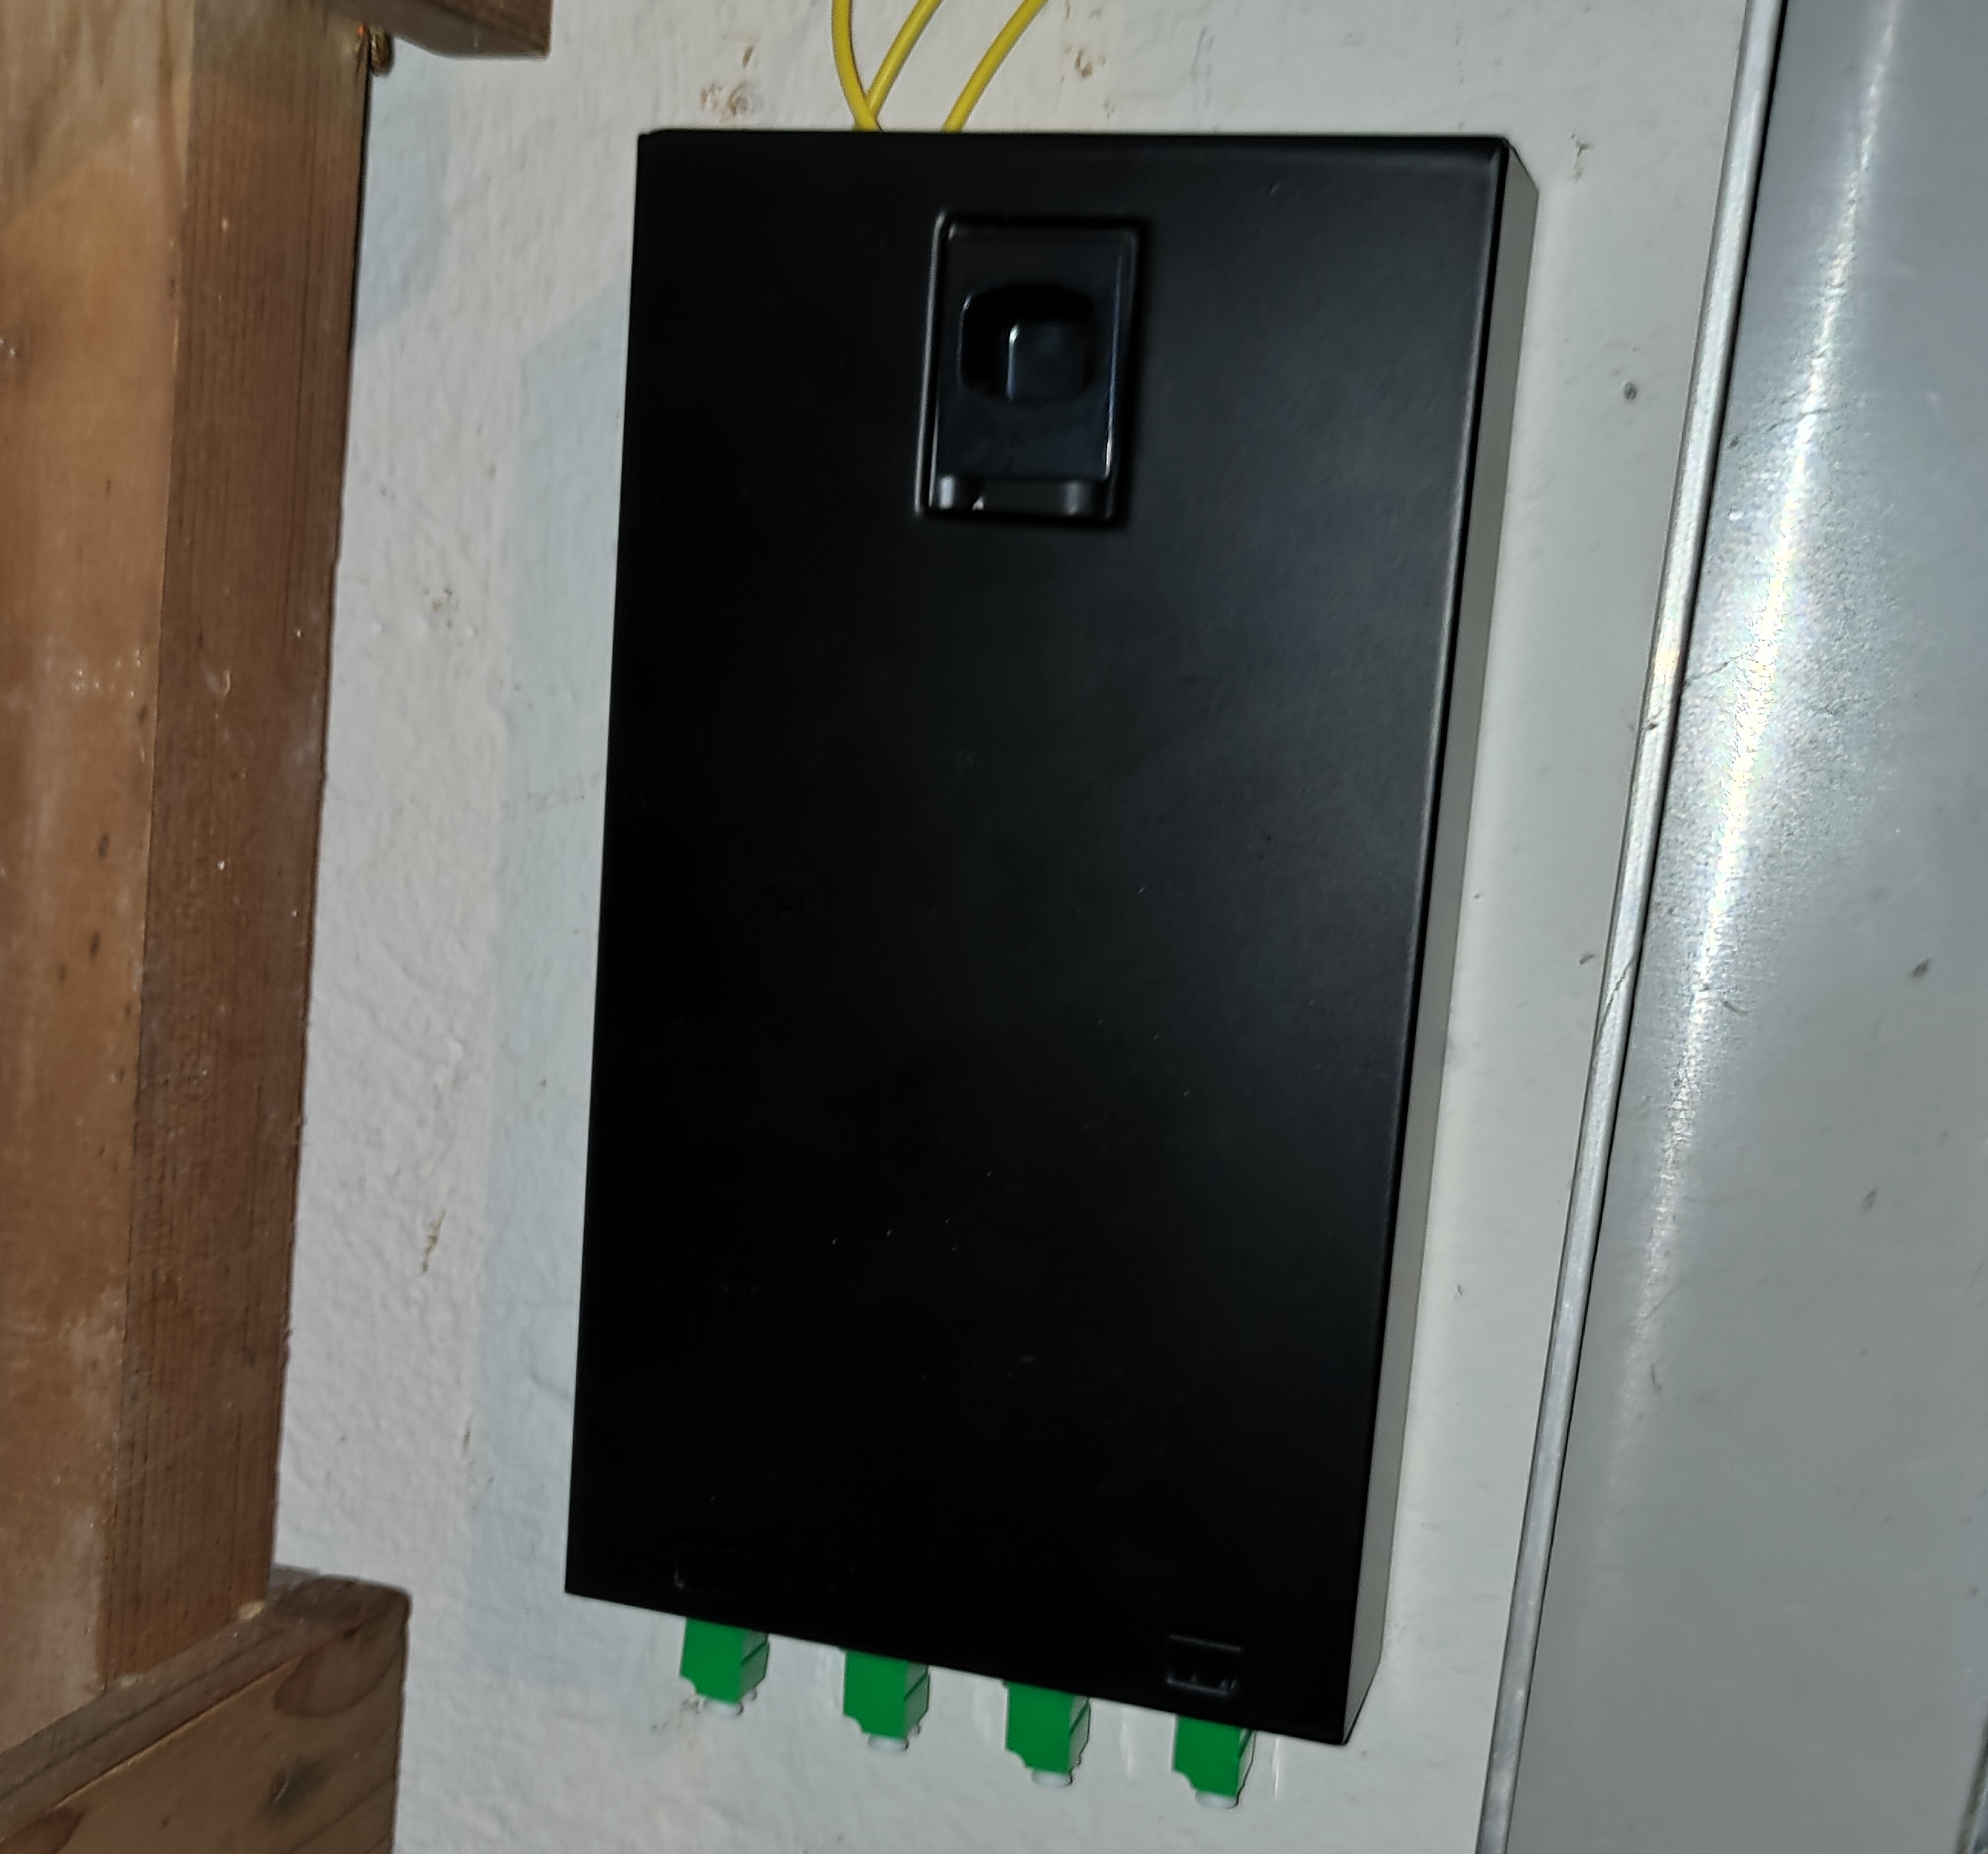
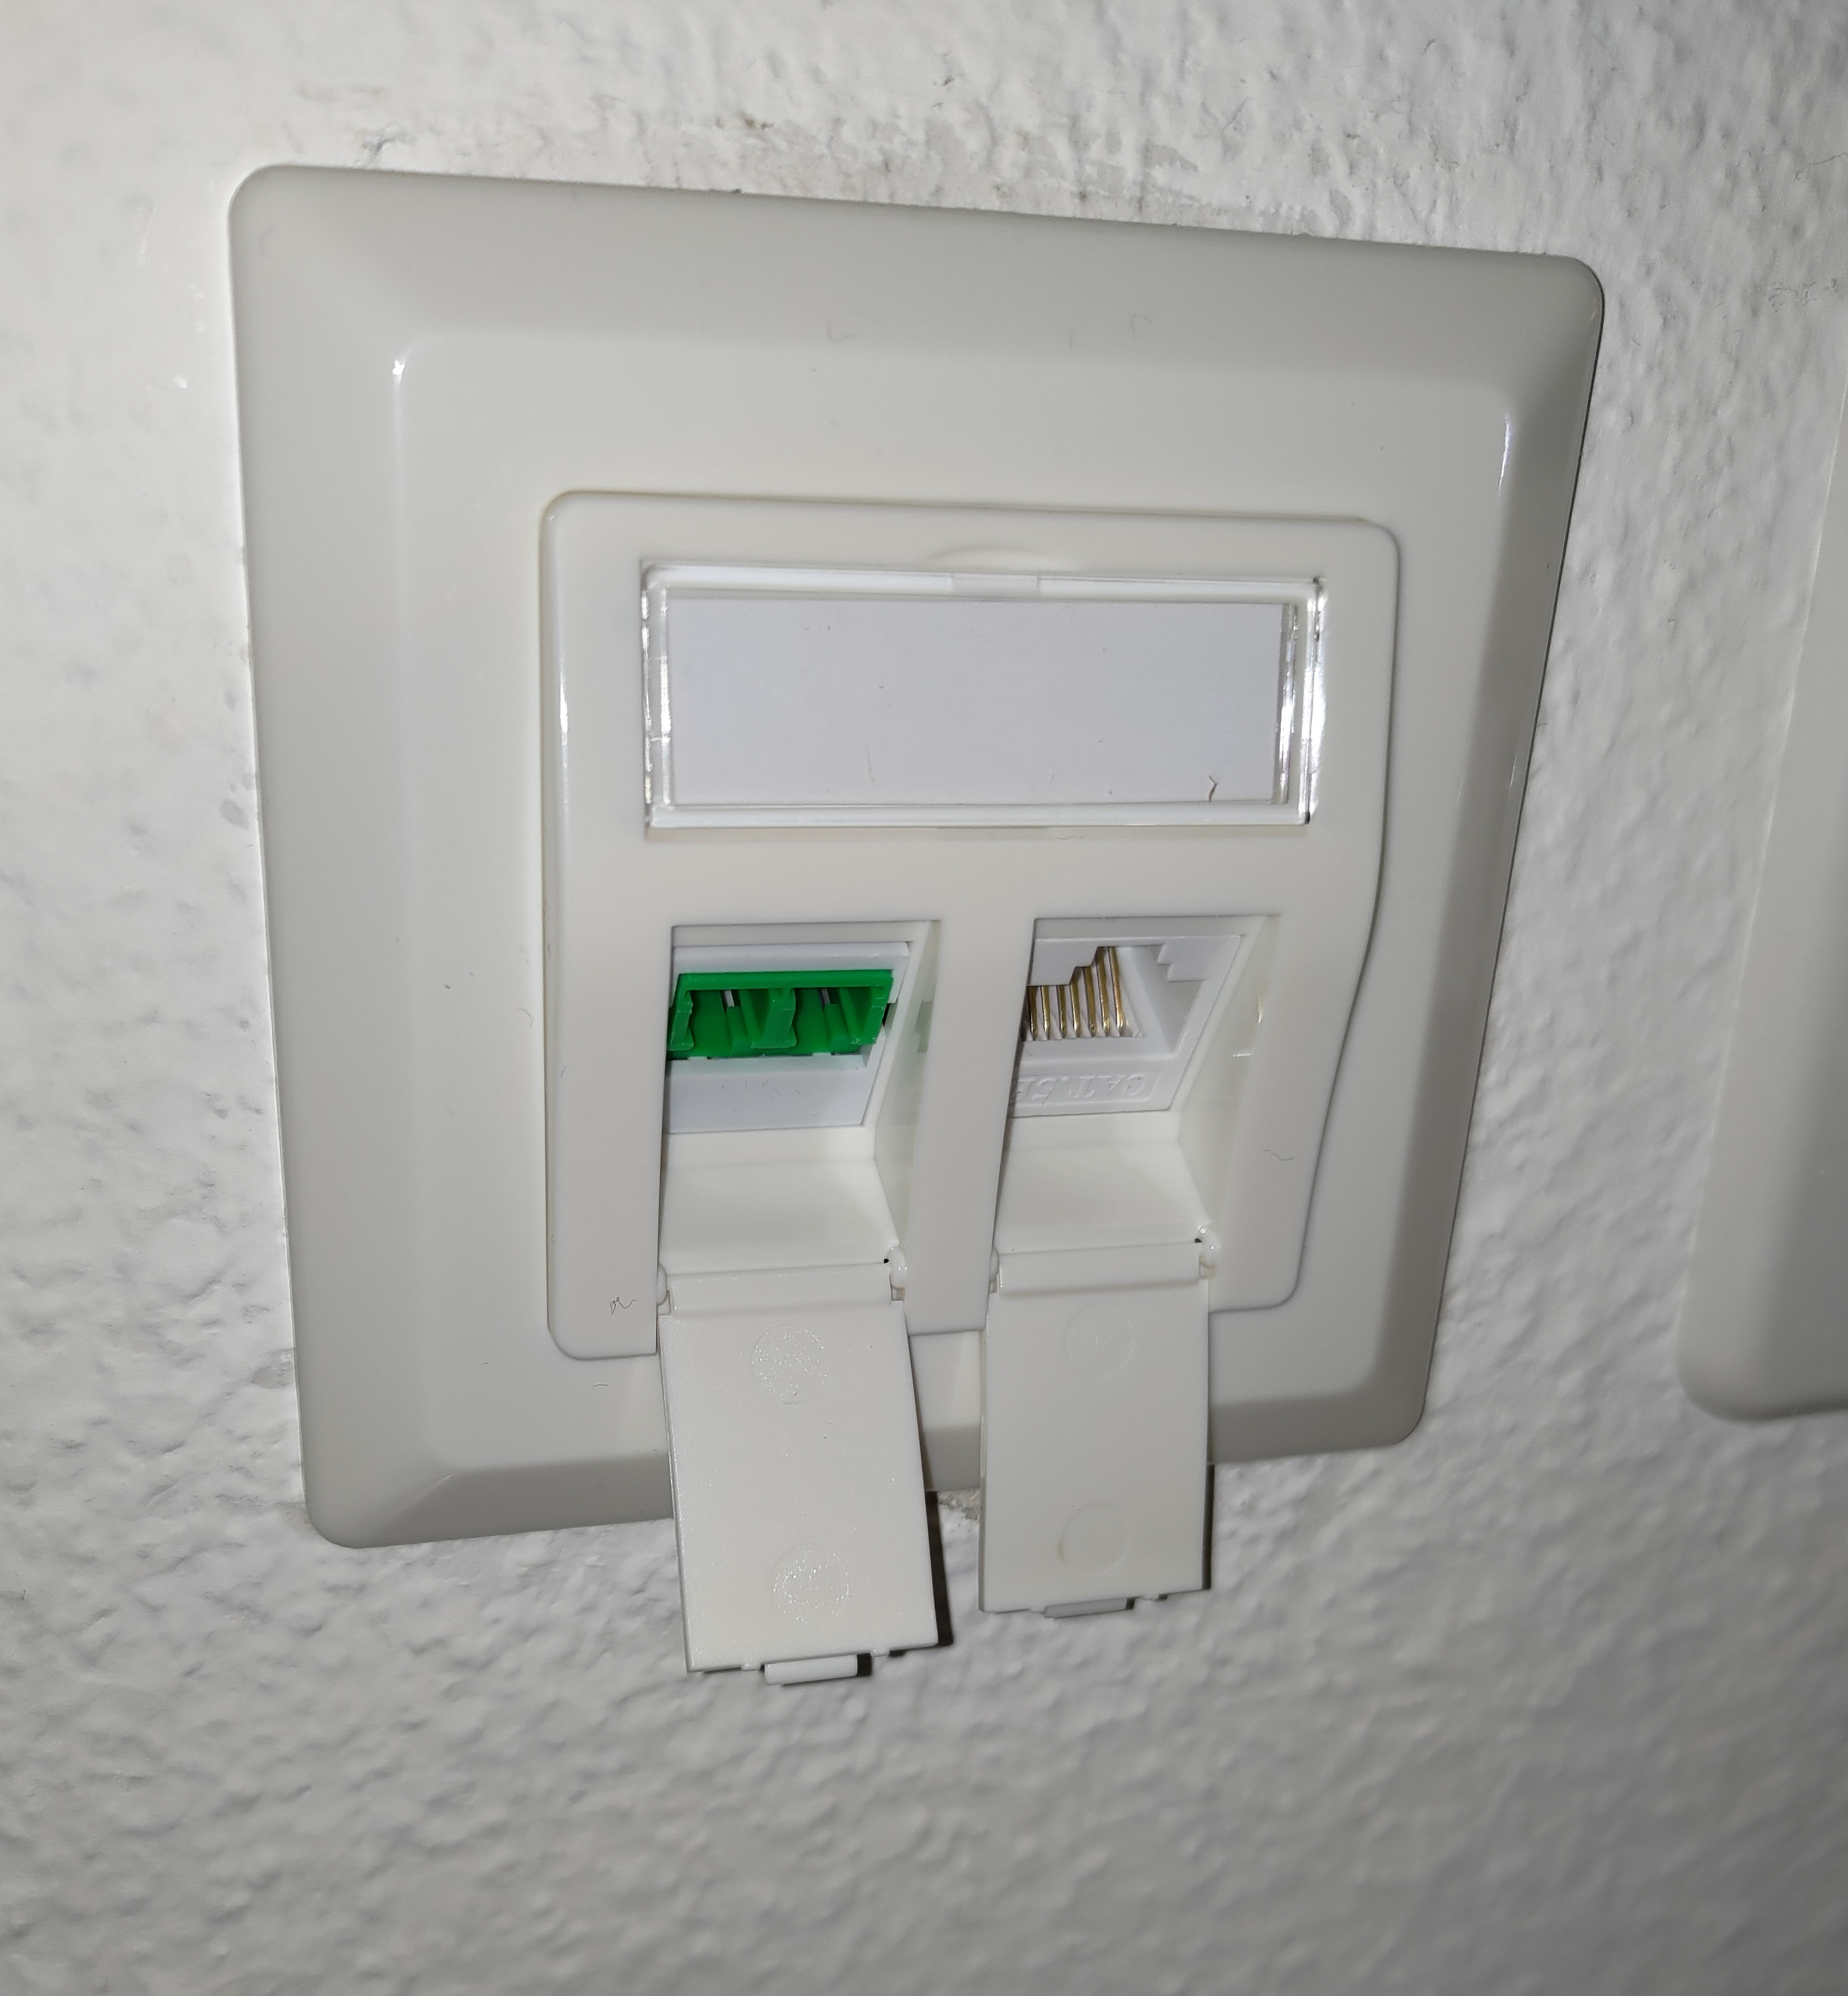
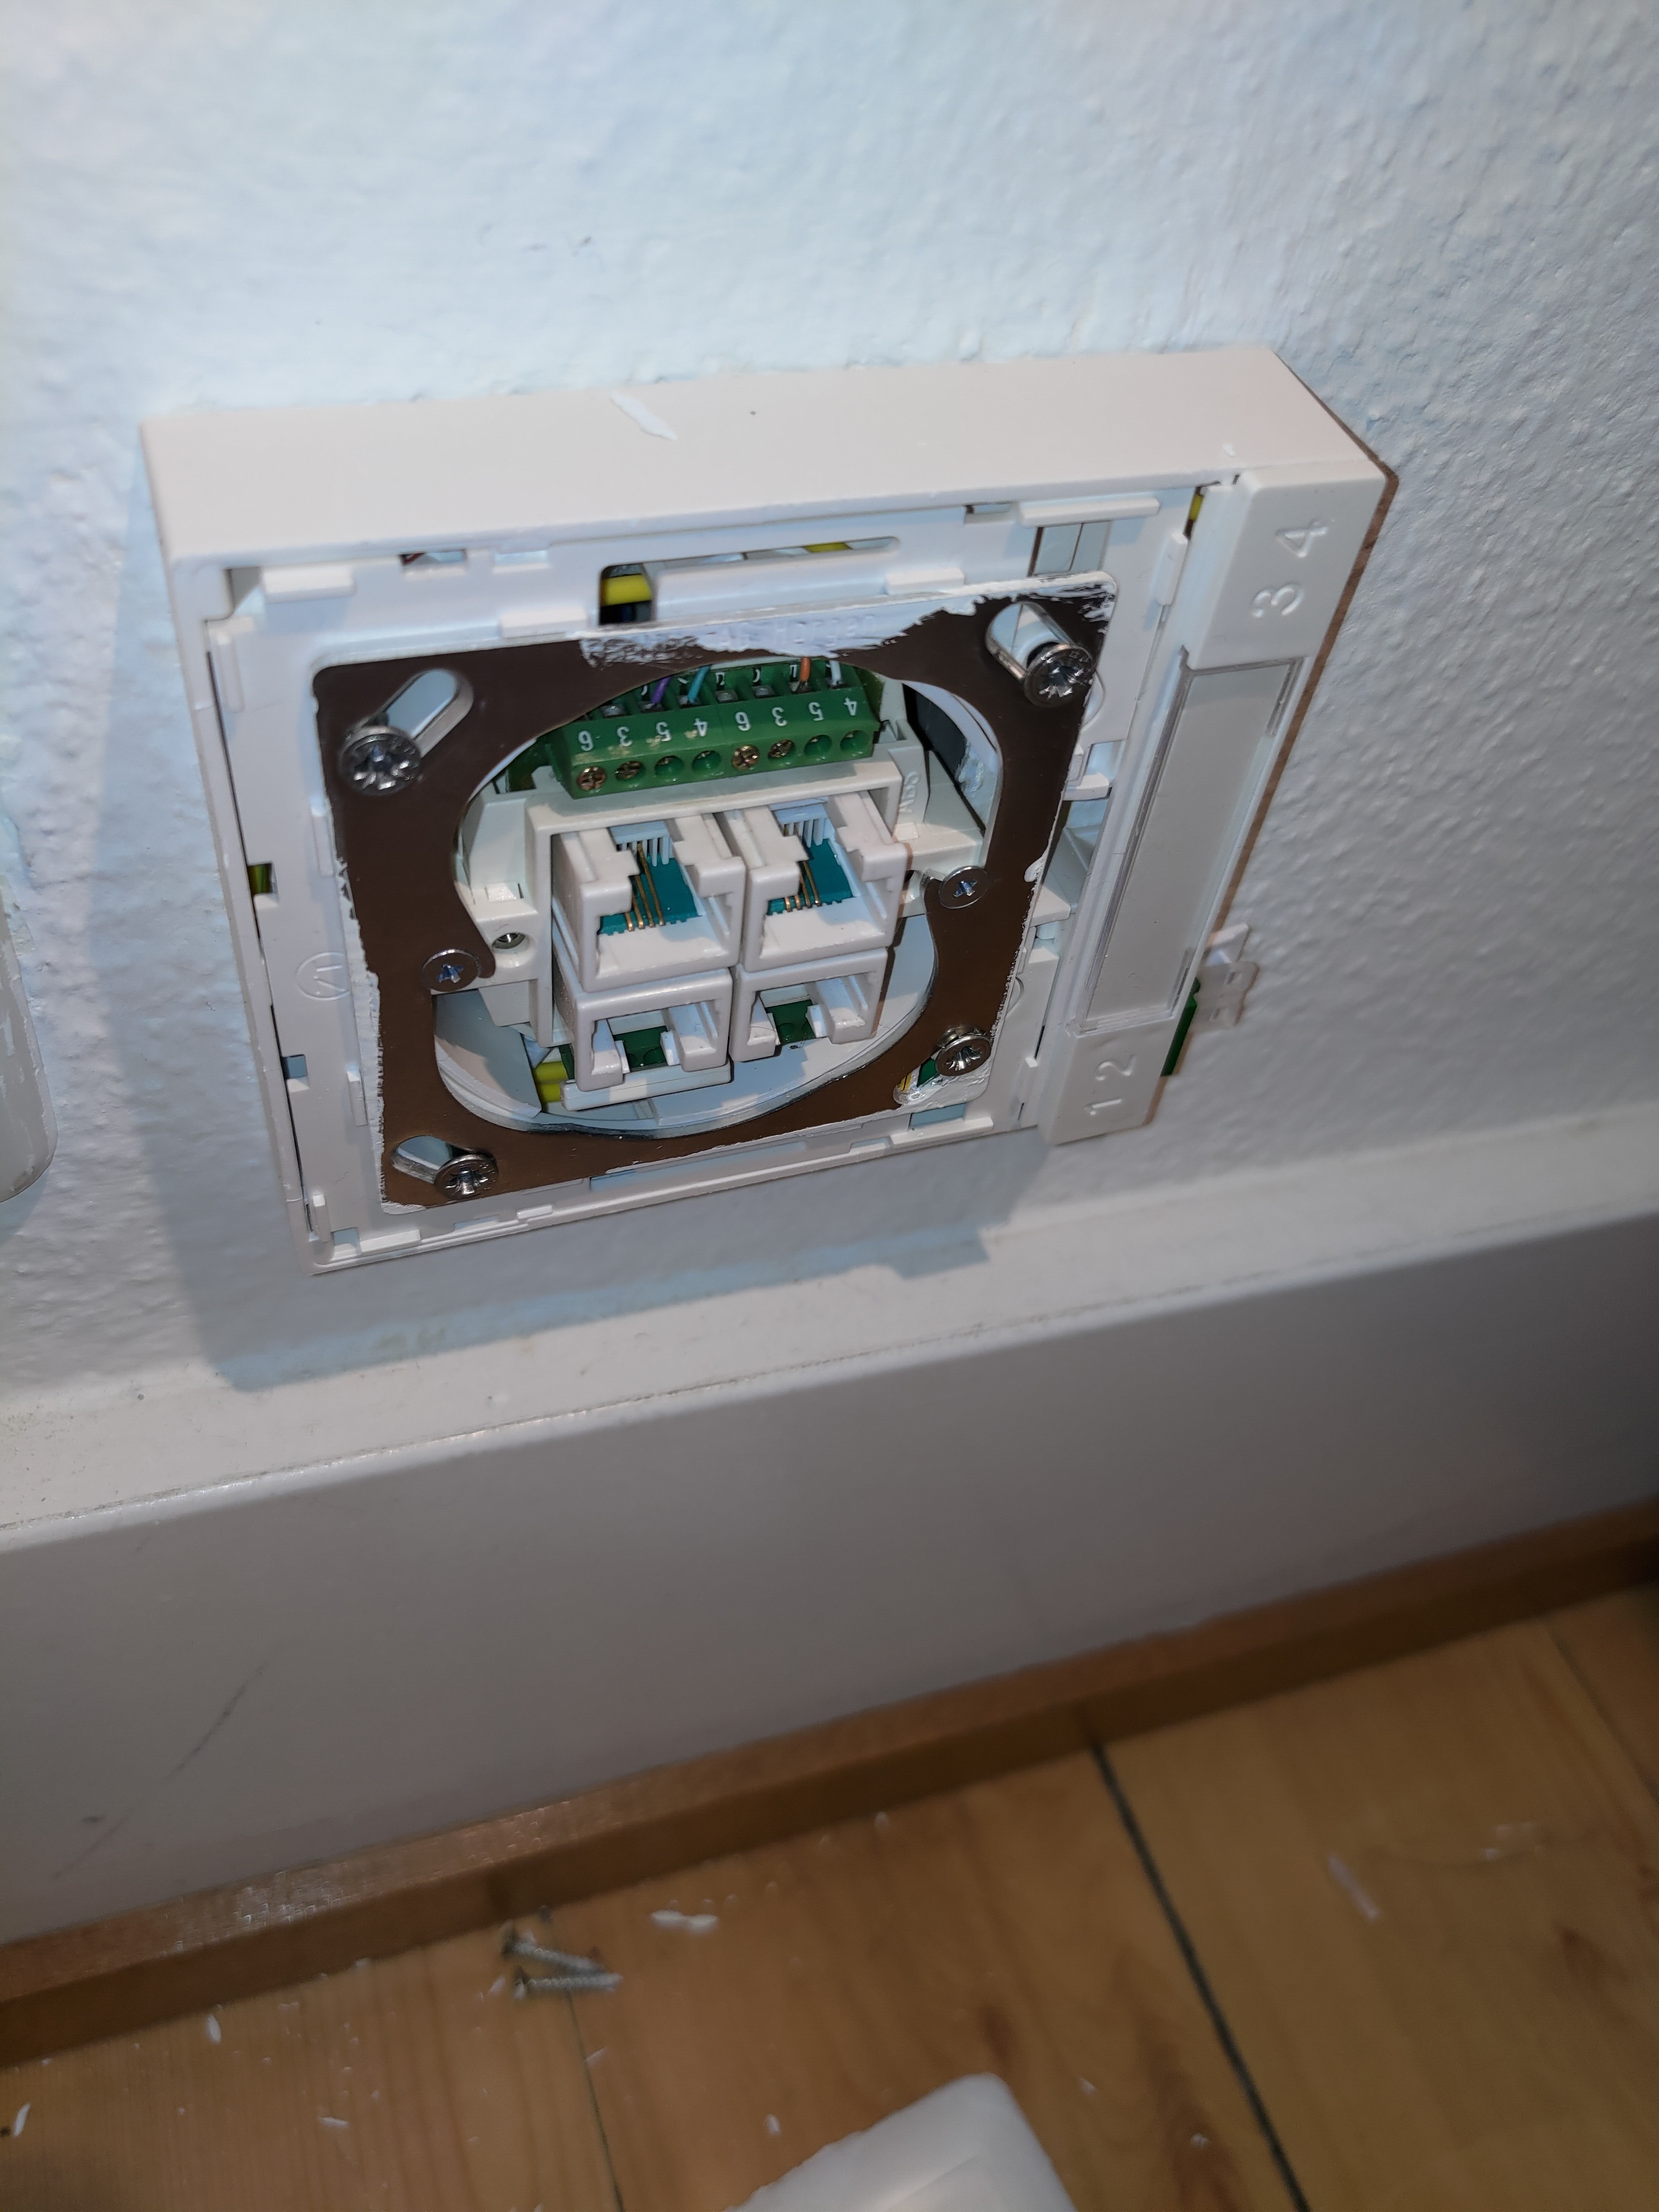
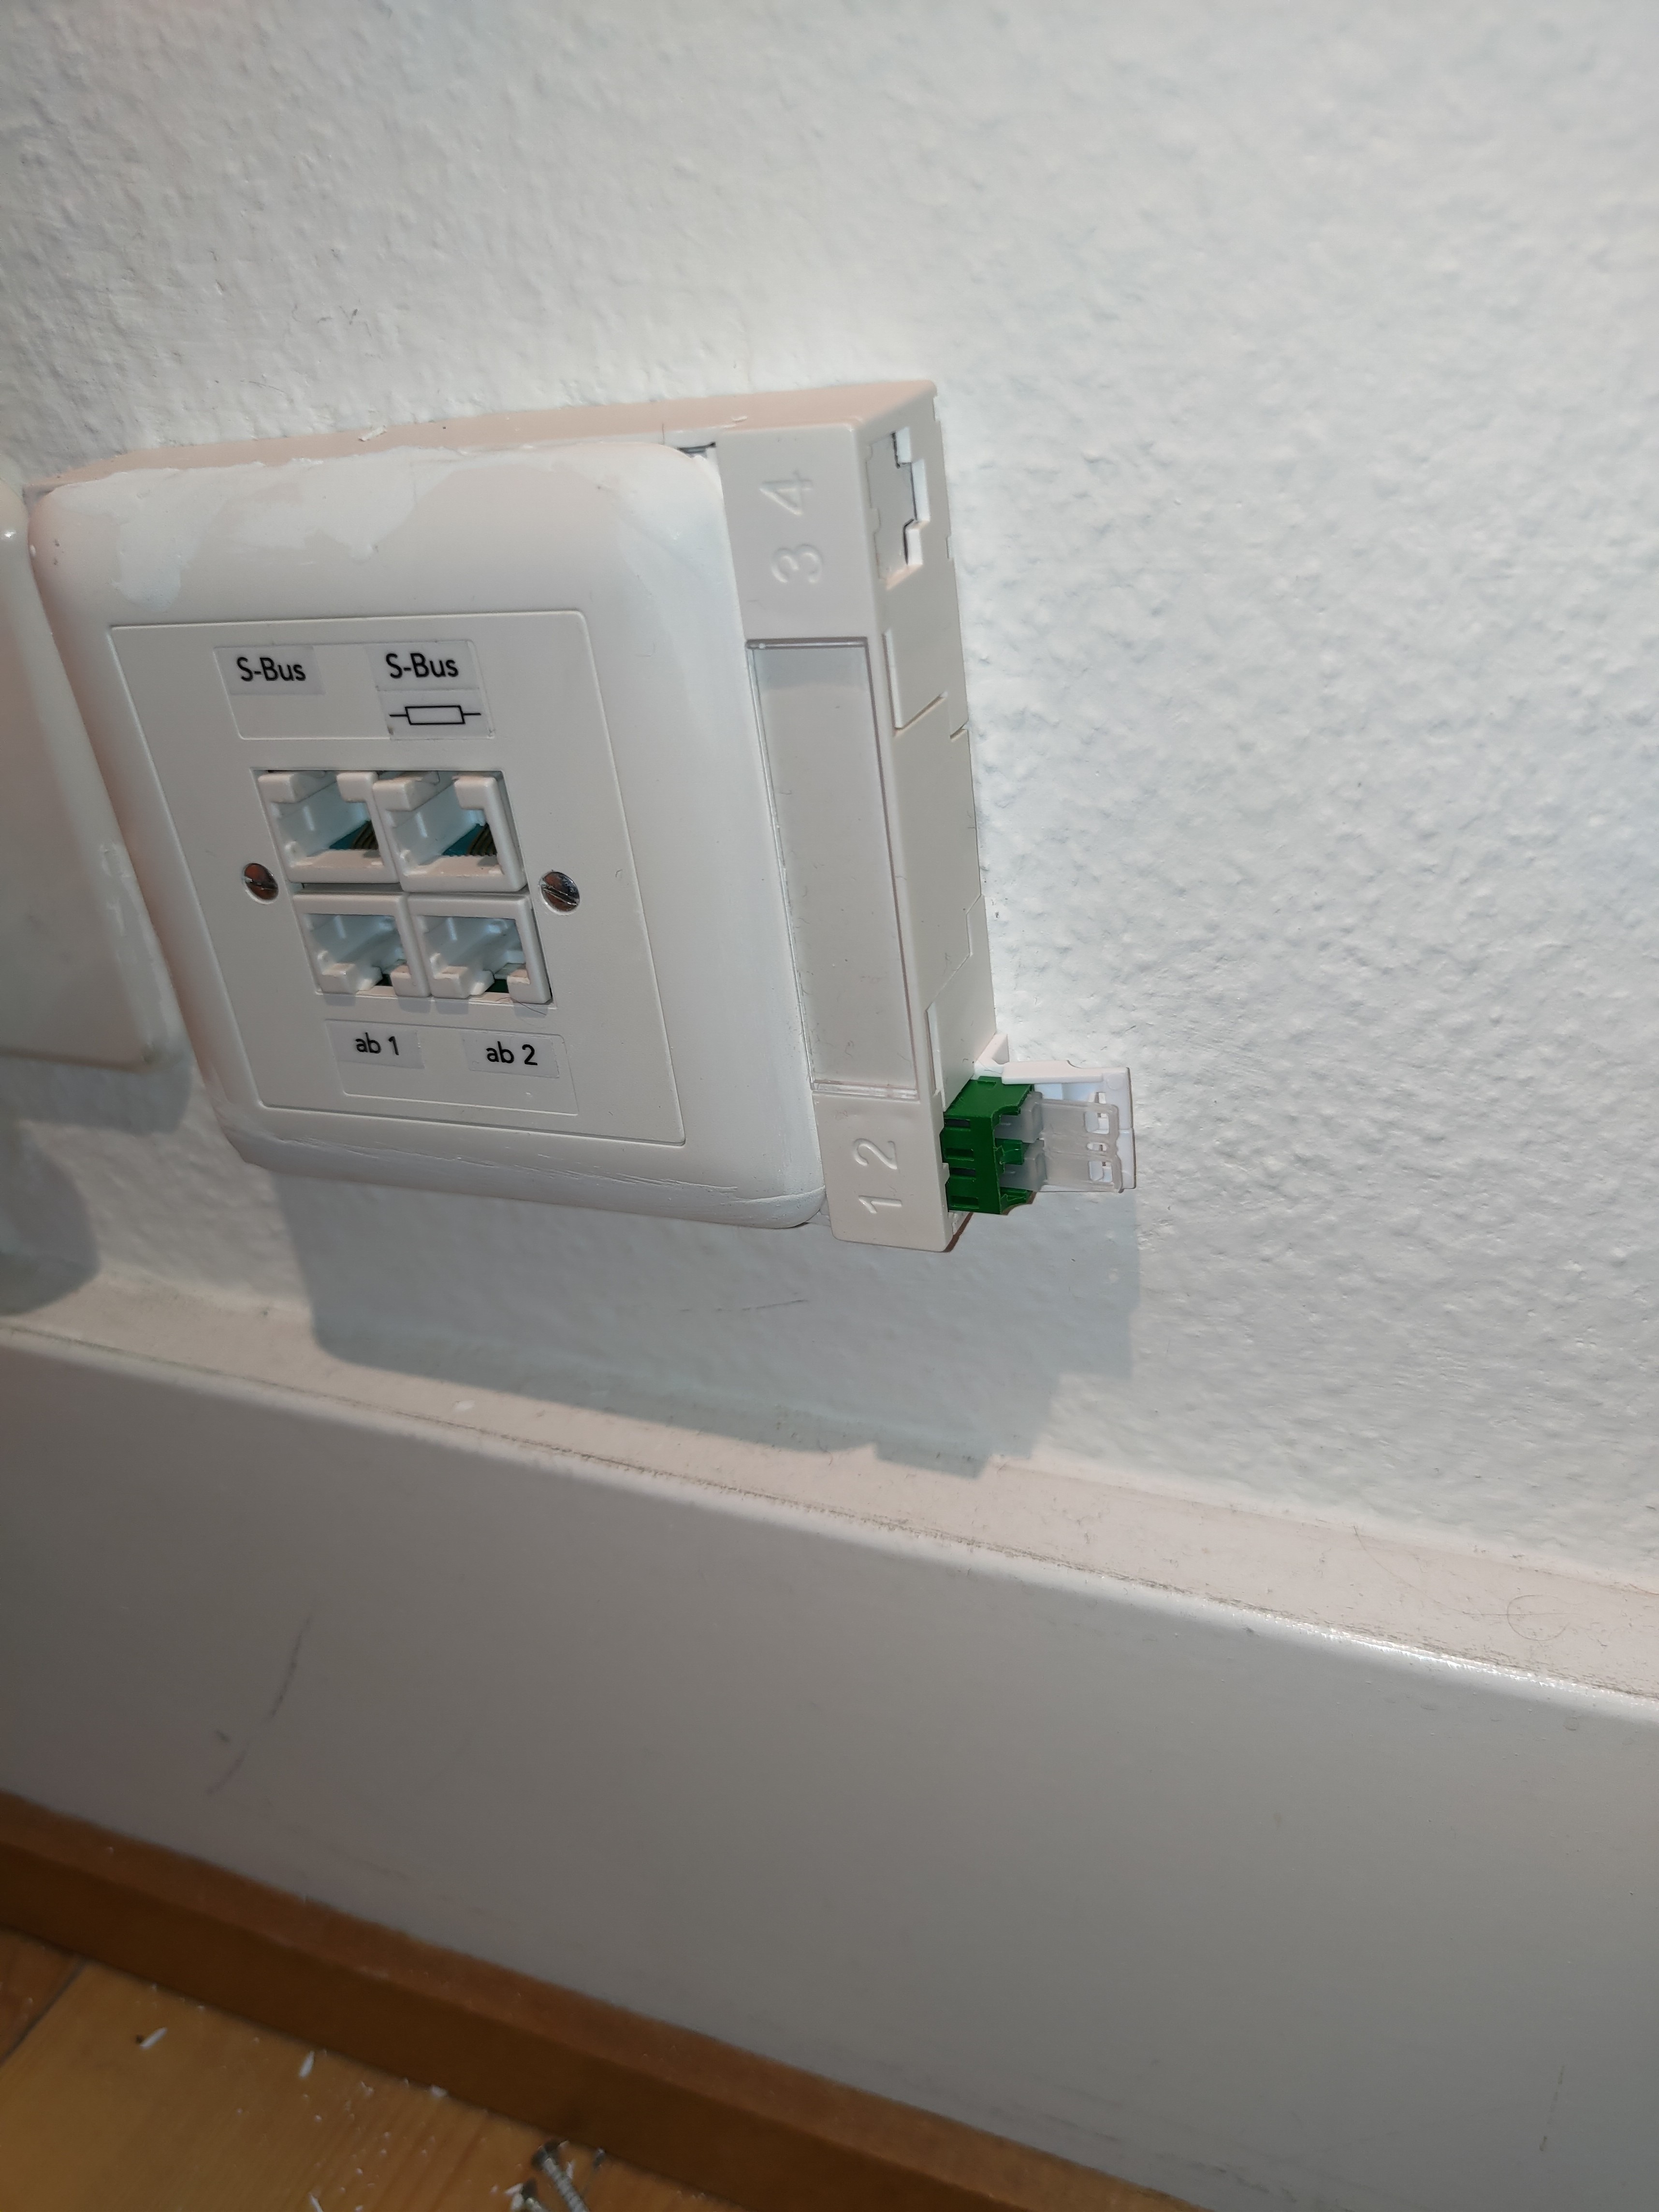
Outlets
In the end I had two different types of outlets. In some places I used these keystone plates and in one place I used the FTTH Squeeze one.
I did not want to disconnect the existing phone wiring (S-BUS) so I used a FTTH Squeeze OTO around the existing jack. This worked very well although my fiber routing needs some work. Some of those loops are close to the limit of this type of fiber.
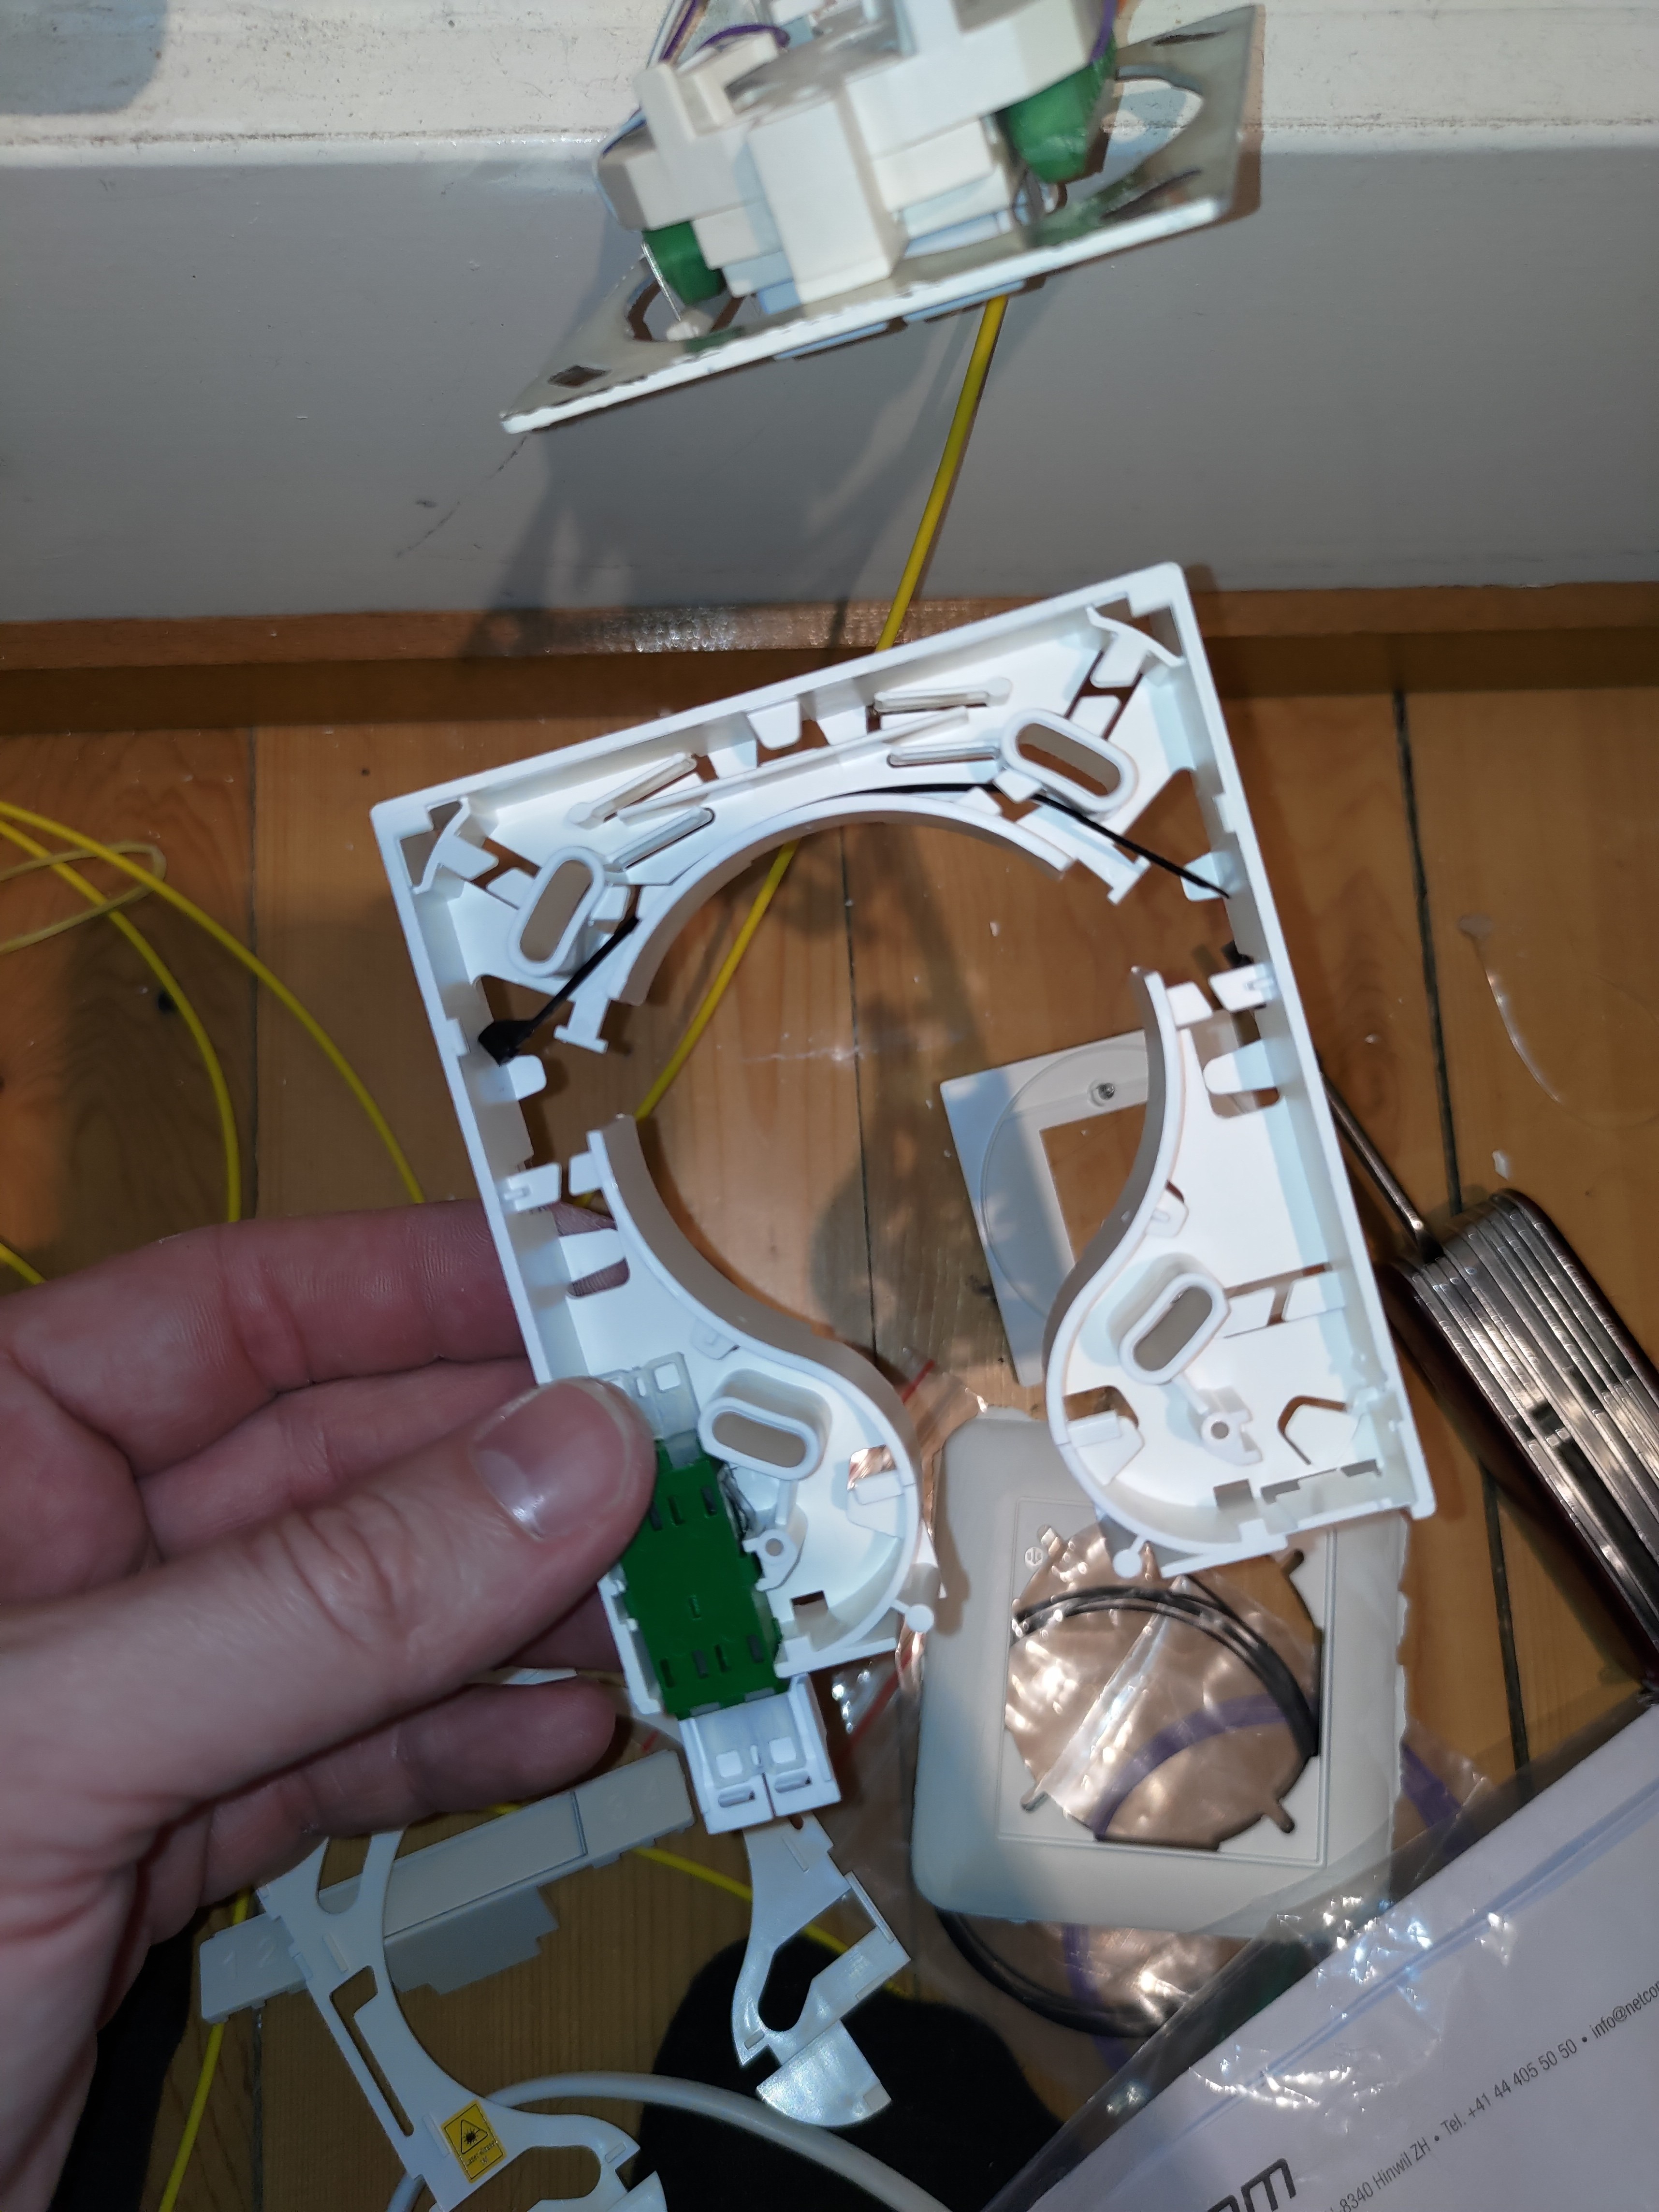
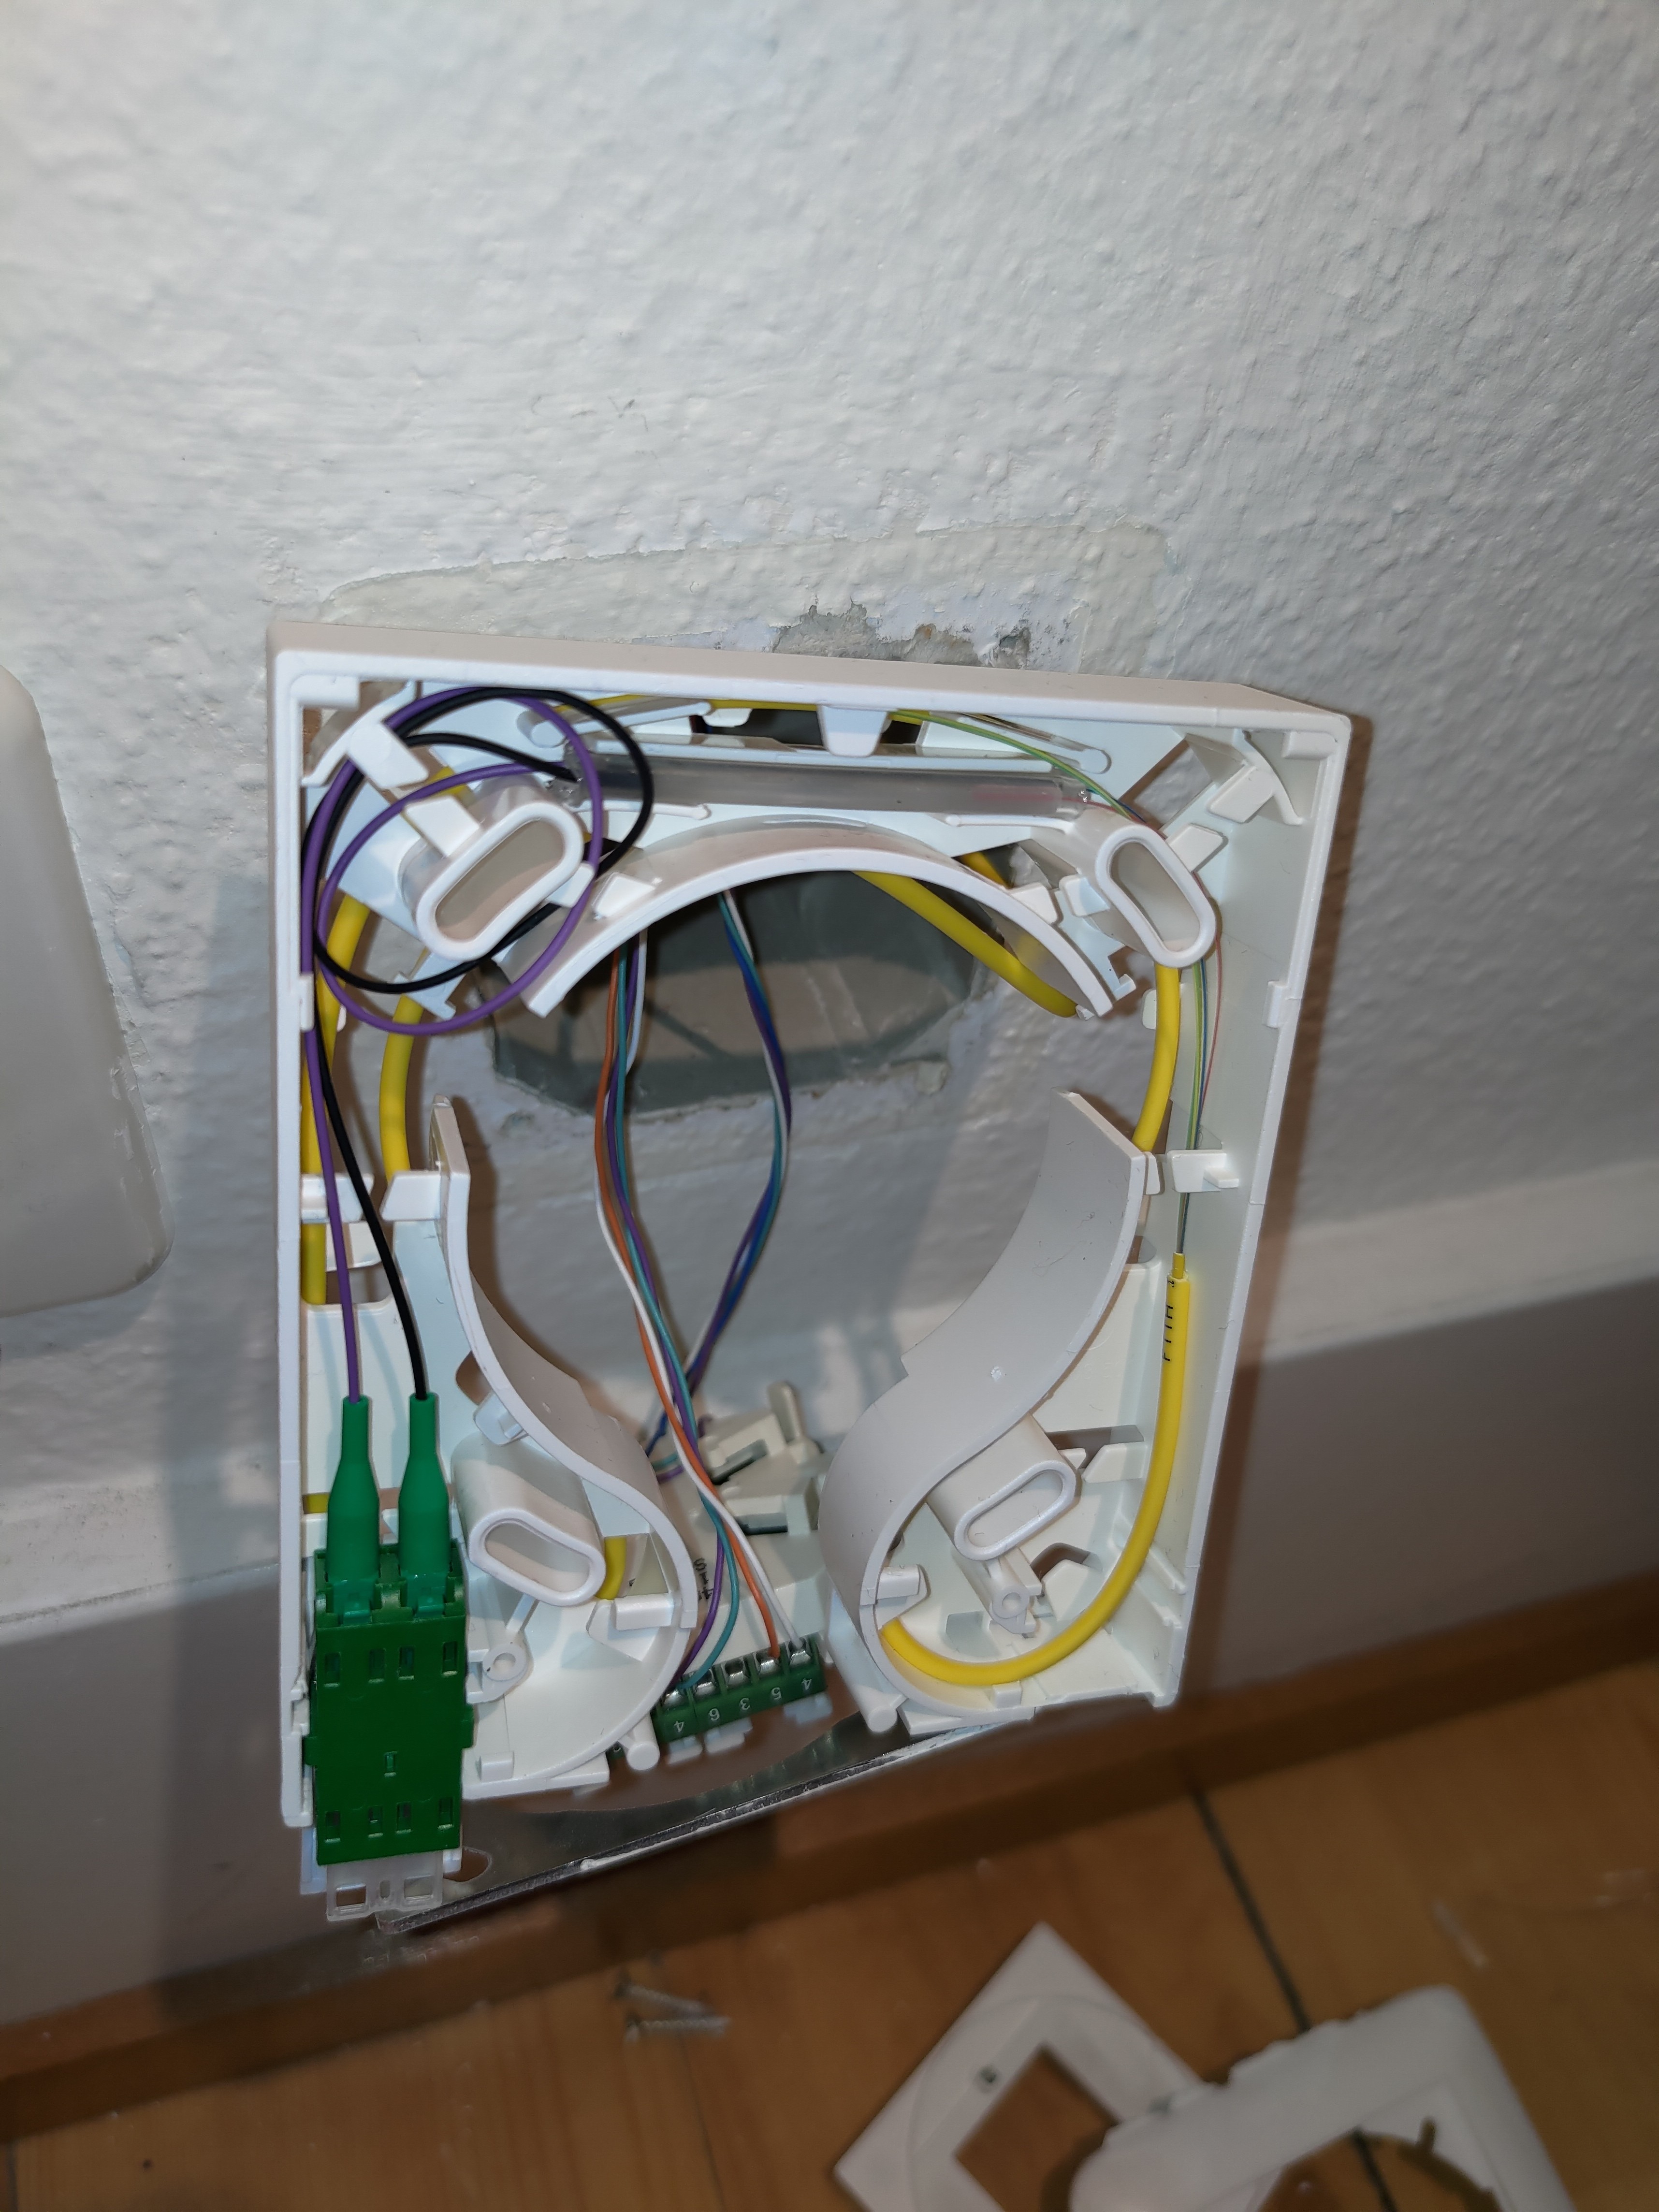
In this case I also had to turn the FTTH Squeeze OTO 90 degrees because of the baseboard being in the way.
On the PC side it is a simple PCIe card and SFP+ module. Patch coord I purchased from FS and some from Aliexpress.
Conclusions
Generally I am very happy with how everything turned out but it did cost more than I wanted to spend.
Rough cost breakdown
| Part | Cost |
|---|---|
| Router/Server | CHF 1360.- |
| Microtik Switches | CHF 150.- (ea.) |
| Fiber (500m) | CHF 170.- |
| Fusion Splicer | CHF 650.- |
| 200 x Splice Sleeves | CHF 12.- |
| SFP+ Modules | CHF 39.- (ea.) |
| 12 x Pig-Tails | CHF 12.- |
| 10 x Patch Coords | CHF 20.- |
| Splice enclosure | CHF 15.- |
| APC Couplers | CHF 15.- |
| Keystone inserts | CHF 8.- |
| Keystone wall-plate | CHF 3.- |
| FTTH Squeeze OTO wall-plate | CHF 34.- |
Would I do it again?
Yes :)
Comparing it to running CAT I would say it is very similar if not easier as with CAT my hands would usually be in pain the next day especially with CAT6 or CAT7. The fusion splicing is not difficult but requires some finesse and patience. You do loose the ability to do PoE but for that you have a future proof setup.
Recommend
-
43
Ridiculously simple Vuex setup + wiring
-
24
README.md Node-RED http://nodered.org
-
10
This gadget ‘helps’ you lose weight by wiring your jaw shut Which SAW movie is this?
-
9
Interactive components: less wiring, more inspiringNikolas KleinProduct Designer, FigmaOctober 26, 2021Design isn’t just about how something looks. It’s equally important to nail down how i...
-
6
Wiring Libraries with CleanseGain control of your dependency graph with Wiring LibrariesCleanse is a Swift dependency injection framework
-
5
May 7th, 2013 | 2 minute readSlash Your Wiring Code With DaggerWhy we created a new dependency injector for Android.
-
6
Table of contents My favorite internet service provider, init7, is rolling out faster speeds with their infrastructure upgrade. Last week, the point of presence (POP) that my apartment’s fiber connection terminates in was upgraded,...
-
5
T-Mobile may be looking to spend big on fiber home internet / Currently, the company’s home internet plans revolve around 5G and LTE — could it be looking to expand?By
-
7
M&M announces inspection of over 108k XUVs for potential wiring problems Mahindra will inspect 108,306 units of XUV700 due to potential damage risk to the w...
-
6
Wiring the Winning Organization by Gene Kim and Steven J. Spear Sandor Dargo 6 days ago2024-01-06T00:00:00+01:00When I was asked whether I’d like to read
About Joyk
Aggregate valuable and interesting links.
Joyk means Joy of geeK