

2流高手速成记(之五):Springboot整合Shiro实现安全管理 - 14号程序员
source link: https://www.cnblogs.com/itfantasy/p/16837917.html
Go to the source link to view the article. You can view the picture content, updated content and better typesetting reading experience. If the link is broken, please click the button below to view the snapshot at that time.

2流高手速成记(之五):Springboot整合Shiro实现安全管理
废话不多说,咱们直接接上回
上一篇我们讲了如何使用Springboot框架整合Nosql,并于文章最后部分引入了服务端Session的概念
而早在上上一篇中,我们则已经讲到了如何使用Springboot框架整合Mybatis/MybatisPlus实现业务数据的持久化(写入数据库)
本篇我们把关注点放在一个于这两部分有共同交集的内容——安全管理,并且引入我们今天的主角——Shiro框架
Apache Shiro是一个强大且易用的Java安全框架,执行身份验证、授权、密码和会话管理。使用Shiro的易于理解的API,您可以快速、轻松地获得任何应用程序,从最小的移动应用程序到最大的网络和企业应用程序。
—— 来自百度百科
Shiro框架包含三个核心组件:
Subject —— 泛指当前与Shiro交互中的实体,可以是用户或者某后台进程
SecurityManager —— Shiro的核心组件,对内管理各种组件实例,对外提供各种安全服务
Realm —— Shiro与安全数据之间的桥接器
Shiro框架还包含有其他诸多概念,为降低大家的心智负担,这些我们暂且不谈,文末会给大家推荐延展阅读的相关文章
还是老规矩直接上干货,以完整的实例让大家对【如何基于Shiro实现权限的细粒度控制】有一个整体上的认知
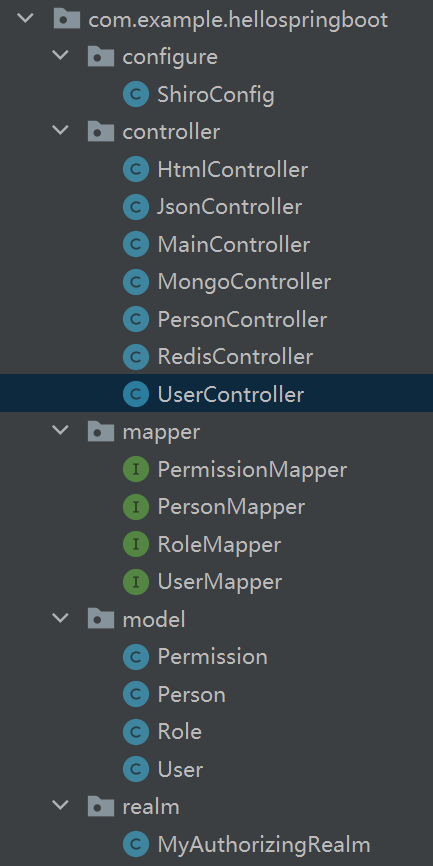
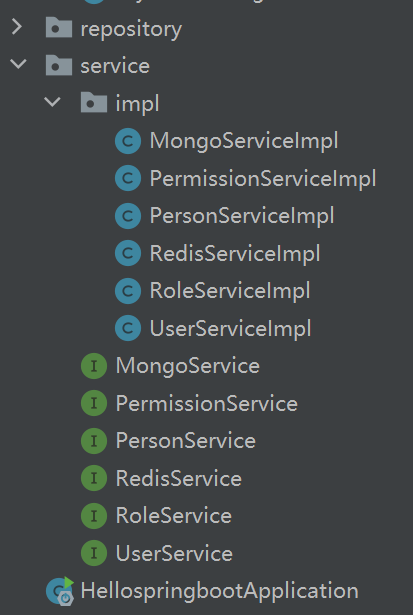
不知道大家会不会觉得项目结构突然变复杂?别担心,接下来我会给大家逐一拆解
1. 创建数据表
首先是角色表——role
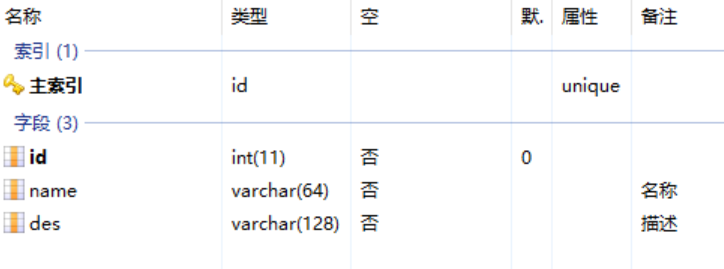

然后是用户表——user


最后是权限表——permission


2. 创建三个对应的Mapper
package com.example.hellospringboot.mapper;

import com.baomidou.mybatisplus.core.mapper.BaseMapper;
import com.example.hellospringboot.model.Role;
import org.apache.ibatis.annotations.Mapper;
import org.springframework.stereotype.Repository;

@Mapper
@Repository
public interface RoleMapper extends BaseMapper<Role> {
}
package com.example.hellospringboot.mapper;

import com.baomidou.mybatisplus.core.mapper.BaseMapper;
import com.example.hellospringboot.model.User;
import org.apache.ibatis.annotations.Mapper;
import org.springframework.stereotype.Repository;

@Mapper
@Repository
public interface UserMapper extends BaseMapper<User> {
}
package com.example.hellospringboot.mapper;

import com.baomidou.mybatisplus.core.mapper.BaseMapper;
import com.example.hellospringboot.model.Permission;
import org.apache.ibatis.annotations.Mapper;
import org.springframework.stereotype.Repository;

@Mapper
@Repository
public interface PermissionMapper extends BaseMapper<Permission> {
}
这里我们用到了上上一节讲到的内容
这里的Mapper会辅助于后续的安全数据读取
3. 接下来是Service及其实现类
package com.example.hellospringboot.service;

import com.example.hellospringboot.model.Role;

public interface RoleService {
    Role findRoleById(int id);
}
package com.example.hellospringboot.service.impl;

import com.example.hellospringboot.mapper.RoleMapper;
import com.example.hellospringboot.model.Role;
import com.example.hellospringboot.service.RoleService;
import org.springframework.beans.factory.annotation.Autowired;
import org.springframework.stereotype.Service;

@Service
public class RoleServiceImpl implements RoleService {

    @Autowired
    RoleMapper mapper;

    public Role findRoleById(int id){
        Role role = mapper.selectById(id);
        return role;
    }
}
package com.example.hellospringboot.service;

import com.example.hellospringboot.model.User;

public interface UserService {
    boolean checkUserByUsernameAndPassword(String userName, String passWord);
    User findUserByUserName(String userName);
}
package com.example.hellospringboot.service.impl;

import com.baomidou.mybatisplus.core.conditions.query.QueryWrapper;
import com.example.hellospringboot.mapper.UserMapper;
import com.example.hellospringboot.model.User;
import com.example.hellospringboot.service.UserService;
import org.springframework.beans.factory.annotation.Autowired;
import org.springframework.stereotype.Service;

import java.util.List;

@Service
public class UserServiceImpl implements UserService {

    @Autowired
    UserMapper mapper;

    public boolean checkUserByUsernameAndPassword(String userName, String passWord){
        QueryWrapper<User> wrapper = new QueryWrapper<User>();
        wrapper = wrapper.eq("user_name", userName).eq("pass_word",passWord);
        List<User> userList = mapper.selectList(wrapper);
        return userList.size() > 0;
    }

    public User findUserByUserName(String userName){
        QueryWrapper<User> wrapper = new QueryWrapper<User>();
        wrapper = wrapper.eq("user_name", userName);
        User user = mapper.selectOne(wrapper);
        return user;
    }

}
package com.example.hellospringboot.service;

import com.example.hellospringboot.model.Permission;

import java.util.List;

public interface PermissionService {
    List<Permission> findPermissionsByRoleId(int roleId);
}
package com.example.hellospringboot.service.impl;

import com.baomidou.mybatisplus.core.conditions.Wrapper;
import com.baomidou.mybatisplus.core.conditions.query.QueryWrapper;
import com.example.hellospringboot.mapper.PermissionMapper;
import com.example.hellospringboot.model.Permission;
import com.example.hellospringboot.service.PermissionService;
import org.springframework.beans.factory.annotation.Autowired;
import org.springframework.stereotype.Service;

import java.util.List;

@Service
public class PermissionServiceImpl implements PermissionService {

    @Autowired
    PermissionMapper mapper;

    public List<Permission> findPermissionsByRoleId(int roleId){
        QueryWrapper<Permission> wrapper = new QueryWrapper<>();
        wrapper = wrapper.eq("role_id", roleId);
        List<Permission> list = mapper.selectList(wrapper);
        return list;
    }

}
ok,我们已经准备好了所有的安全数据,及对应的读取方法
到这里,我们就算是做好了所有的准备工作
接下来看我们如何通过Shiro框架来运用这些已经装配好的枪炮子弹
4. 引入Shiro框架相关依赖(pom.xml)
        <!-- 引入shiro框架依赖 -->
        <dependency>
            <groupId>org.apache.shiro</groupId>
            <artifactId>shiro-spring</artifactId>
            <version>1.10.0</version>
        </dependency>
这次pom.xml终于不是第一步了,哈哈哈。。。
5. 创建Realm嫁接Shiro框架及安全数据(realm/MyAuthorizingRealm)
package com.example.hellospringboot.realm;

import com.example.hellospringboot.model.Permission;
import com.example.hellospringboot.model.Role;
import com.example.hellospringboot.model.User;
import com.example.hellospringboot.service.PermissionService;
import com.example.hellospringboot.service.RoleService;
import com.example.hellospringboot.service.UserService;
import org.apache.shiro.authc.*;
import org.apache.shiro.authz.AuthorizationInfo;
import org.apache.shiro.authz.SimpleAuthorizationInfo;
import org.apache.shiro.realm.AuthorizingRealm;
import org.apache.shiro.subject.PrincipalCollection;
import org.springframework.beans.factory.annotation.Autowired;

import java.util.HashSet;
import java.util.List;
import java.util.Set;

public class MyAuthorizingRealm extends AuthorizingRealm {

    @Autowired
    UserService userService;

    @Autowired
    RoleService roleService;

    @Autowired
    PermissionService permissionService;

    @Override
    protected AuthenticationInfo doGetAuthenticationInfo(AuthenticationToken authenticationToken) {
        UsernamePasswordToken token = (UsernamePasswordToken) authenticationToken;
        String userName = token.getUsername();
        String passWord = String.valueOf(token.getPassword());
        if (!userService.checkUserByUsernameAndPassword(userName, passWord)) {//判断用户账号是否正确
            throw new UnknownAccountException("用户名或密码错误!");
        }
        return new SimpleAuthenticationInfo(userName, passWord, getName());
    }

    @Override
    protected AuthorizationInfo doGetAuthorizationInfo(PrincipalCollection principalCollection) {
        SimpleAuthorizationInfo info = new SimpleAuthorizationInfo();
        String userName = principalCollection.getPrimaryPrincipal().toString();
        User user = userService.findUserByUserName(userName);
        if (user == null) {
            throw new UnknownAccountException("用户名或密码错误!");
        }
        List<Integer> rolesList = user.rolesList();
        Set<String> roles = new HashSet<>();
        Set<String> permissions = new HashSet<>();
        for (Integer roleId : rolesList) {
            Role role = roleService.findRoleById(roleId);
            roles.add(role.getName());
            List<Permission> permissionList = permissionService.findPermissionsByRoleId(roleId);
            for (Permission permission : permissionList) {
                permissions.add(permission.getName());
            }
        }
        info.setRoles(roles);
        info.setStringPermissions(permissions);
        return info;
    }
}
Realm的创建对于整个Shiro安全验证体系搭建而言是至关重要的一步!
其中两个抽象方法
doGetAuthenticationInfo —— 用于校验用户名及密码的合法性
doGetAuthorizationInfo —— 用于赋予实体对应的角色及交互权限
6. 测试用Controller创建
package com.example.hellospringboot.controller;

import org.apache.shiro.SecurityUtils;
import org.apache.shiro.authc.AuthenticationException;
import org.apache.shiro.authc.UsernamePasswordToken;
import org.apache.shiro.subject.Subject;
import org.springframework.web.bind.annotation.GetMapping;
import org.springframework.web.bind.annotation.PostMapping;
import org.springframework.web.bind.annotation.RequestMapping;
import org.springframework.web.bind.annotation.RestController;

@RequestMapping("/user")
@RestController
public class UserController {

    @PostMapping("/login")
    public String login(String user, String pass) {
        UsernamePasswordToken token = new UsernamePasswordToken(user, pass);
        Subject subject = SecurityUtils.getSubject();
        if(!subject.isAuthenticated()) {
            try {
                subject.login(token);
            } catch (AuthenticationException e) {
                return e.getMessage();
            }
        }
        return "ok";
    }

    @PostMapping("/logout")
    public String logout(){
        Subject subject = SecurityUtils.getSubject();
        if(subject.isAuthenticated()) {
            try {
                subject.logout();
            } catch (AuthenticationException e) {
                return e.getMessage();
            }
        }
        return "ok";
    }

    @GetMapping("/admin")
    public String admin() {
        return "admin";
    }

    @GetMapping("/user")
    public String user() {
        return "user";
    }

}
内容很简单:
login——登录方法
logout——登出方法
admin、user——两个测试方法,用于测试不同角色对于不同方法可访问的细粒度控制
7. ShiroConfig配置类创建,实现用户访问权限的细粒度控制
package com.example.hellospringboot.configure;

import com.example.hellospringboot.realm.MyAuthorizingRealm;
import org.apache.shiro.mgt.SecurityManager;
import org.apache.shiro.realm.Realm;
import org.apache.shiro.spring.web.ShiroFilterFactoryBean;
import org.apache.shiro.web.mgt.DefaultWebSecurityManager;
import org.springframework.context.annotation.Bean;
import org.springframework.context.annotation.Configuration;

import java.util.LinkedHashMap;
import java.util.Map;

@Configuration
public class ShiroConfig {

    @Bean
    public SecurityManager securityManager(Realm realm) {
        DefaultWebSecurityManager securityManager = new DefaultWebSecurityManager();
        securityManager.setRealm(realm);
        return securityManager;
    }

    @Bean
    public MyAuthorizingRealm getRealm() {
        MyAuthorizingRealm realm = new MyAuthorizingRealm();
        return realm;
    }

    @Bean
    public ShiroFilterFactoryBean shiroFilterFactoryBean(SecurityManager securityManager) {
        ShiroFilterFactoryBean shiroFilter = new ShiroFilterFactoryBean();
        shiroFilter.setSecurityManager(securityManager);
        Map<String, String> filterChainMap = new LinkedHashMap<String, String>();
        filterChainMap.put("/user/login", "anon");
        filterChainMap.put("/user/logout", "anon");
        filterChainMap.put("/user/admin", "authc,roles[admin],perms[admin:read]");
        filterChainMap.put("/user/user", "authc,roles[user],perms[user:read]");
        shiroFilter.setFilterChainDefinitionMap(filterChainMap);
        return shiroFilter;
    }
}
securityManager 和 getRealm 显示指定了Shiro两大组件的实例声明
shiroFilterFactoryBean 则是实现角色访问权限控制的重要方法
filterChainMap.put("/user/login", "anon"); // 代表login方法可以匿名访问
filterChainMap.put("/user/logout", "anon"); // 代表logout方法可以匿名访问
filterChainMap.put("/user/admin", "authc,roles[admin],perms[admin:read]"); // 代表admin方法需要用户满足admin角色,同时具备admin:read权限
filterChainMap.put("/user/user", "authc,roles[user],perms[user:read]"); // 代表user方法需要用户满足user角色,同时具备user:read权限
至此,整个接入流程便结束了
我们再次结合最开始我们配置的数据来对业务逻辑进行分析
用户 admin,同时具备admin、user两种角色
用户 juste,仅具备user一种角色
角色 admin,同时具备admin:write、admin:read两种权限
角色 user,同时具备user:write、user:read两种权限
用户 admin,同时具备admin:write、admin:read、user:write、user:read 四种操作权限
用户 juste,同时具备user:write、user:read两种操作权限
大家理清楚这其中的关系了吗?^ ^
8. 执行Postman验证结果
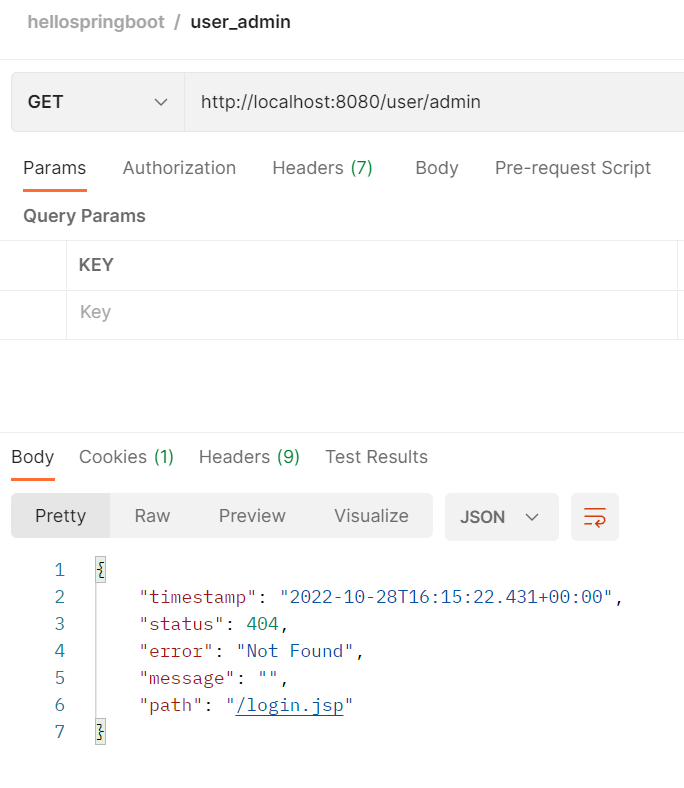
我们在执行login之前,admin方法无权访问
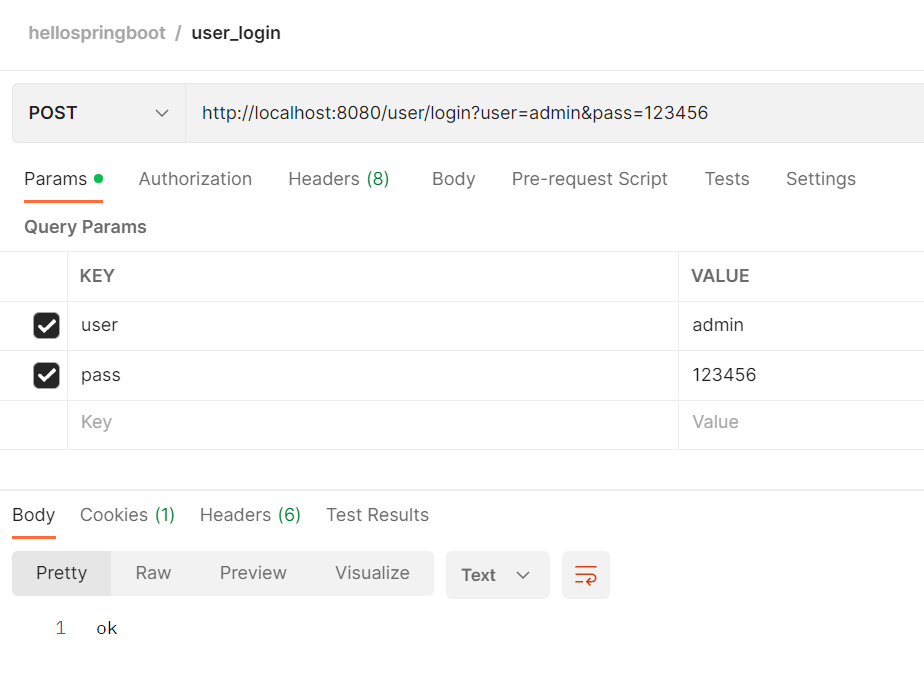

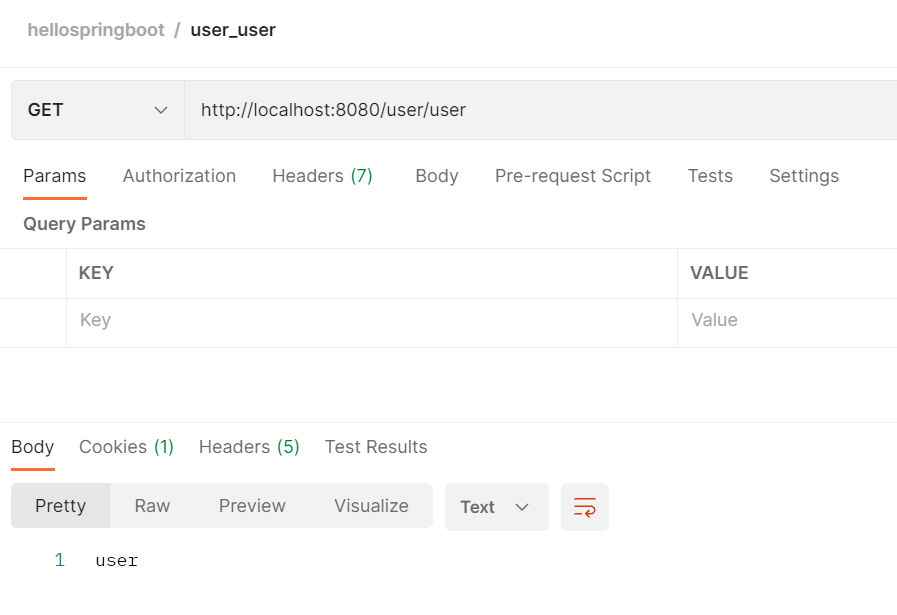
登录admin之后,同时具备admin和user方法的访问权限
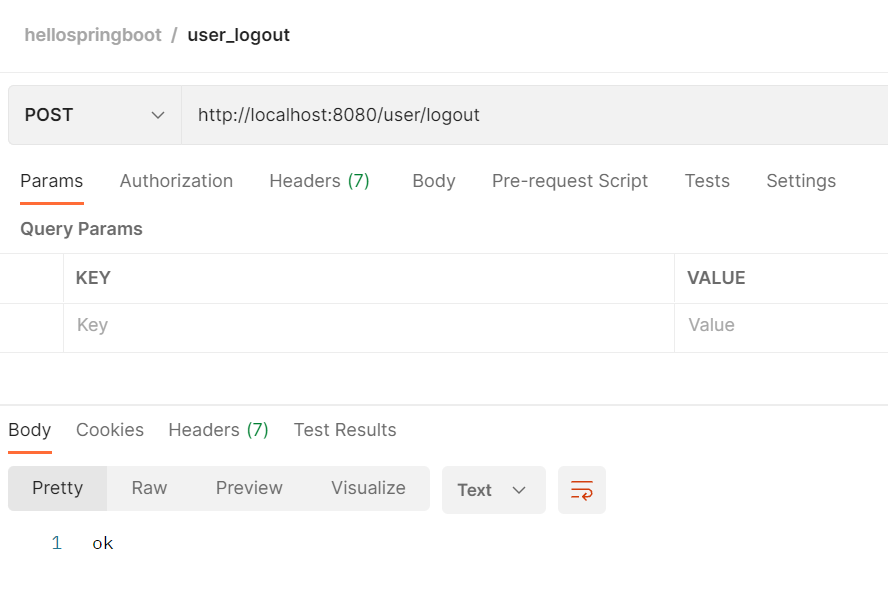
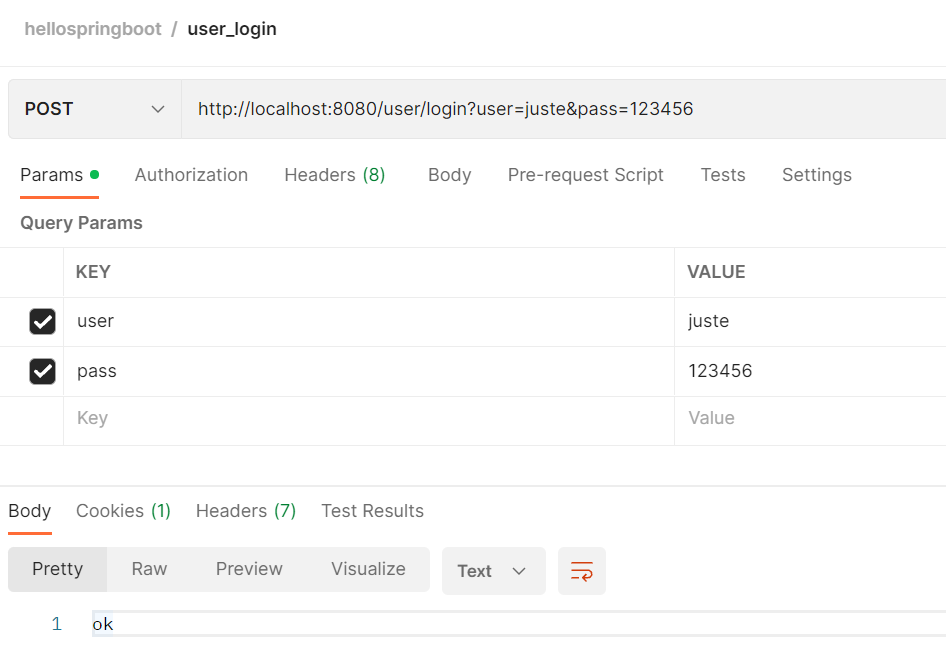

logout登出,然后login登录普通用户juste
会发现依然具备user方法的访问权限,但是失去了admin方法的访问权限
到此,验证我们基于Shiro框架的细粒度权限控制已经实现
除了Shiro框架,我们还有另一个选择,那就是同样可以通过集成Spring Security框架来达成相同的目的
关于更多Shiro框架的内容,及其和Spring Security之间的异同,大家感兴趣可以参考这篇文章:
对于Spring Security框架,我们暂且留个悬念,以后会专门再给大家讲解这部分内容
下一节,我们将把关注点投向微服务领域,SpringCloudAlibaba将会是接下来几个章节的重头戏,敬请期待~
MyAuthorizingRealm
Recommend
-
 9
9
Linux时间子系统之五:低分辨率定时器的原理和实现 2017-07-23 16:38:00 http://blog.csdn.net/DroidPhone/article/details/8051405
-
 9
9
jackson 学习之五:JsonInclude 注解 作者:程序员欣宸
-
 16
16
jackson 学习之十 (终篇):springboot 整合 (配置类) 作者:程序员欣宸2022 年 4 月 15 日本文字数:4194 字 阅读完...
-
 6
6
jackson 学习之九:springboot 整合 (配置文件) 作者:...
-
 6
6
在前面的文章中,我们详细的介绍了 MongoDB 的配置和使用,如果你对 MongoDB 还不是很了解,也没关系,在 MongoDB 中有三个比较重要的名词:数据库、集合、文档! 数据库(Database):和关系型数据库一样,每个数据...
-
 0
0
接上回 上一篇我们简单介绍了基于SpringBoot实现简单的Web开发,本节来看Web开发中必不可少的内容——数据持久化 先看项目结构:
-
 22
22
2流高手速成记(之四):SpringBoot整合redis及mongodb ...
-
 5
5
2流高手速成记(之六):从SpringBoot到SpringCloudAlibaba ...
-
 0
0
2流高手速成记(之七):基于Dubbo&Nacos的微服务简要实现 ...
-
 11
11
今天给大家分享一个SpringBoot整合Tess4j库实现图片文字识别的小案例,希望xdm喜欢。 文末有案例代码的Git地址,可以自己下载了去玩玩儿或继续扩展也行。 话不多说,开整吧。
About Joyk
Aggregate valuable and interesting links.
Joyk means Joy of geeK