

Shadowsocks with v2ray
source link: https://mullvad.net/en/help/shadowsocks-with-v2ray/
Go to the source link to view the article. You can view the picture content, updated content and better typesetting reading experience. If the link is broken, please click the button below to view the snapshot at that time.

This guide will show you how to connect using Shadowsocks with v2ray and the Mullvad app.
What this guide covers
Using Windows
Requirements
Download and install:
Download:
- Unzip the Shadowsocks-4.4.1.0.zip file.
- Right click on the “v2ray-plugin-windows-amd64-v1.3.2.tar.gz” file and extract it with 7-Zip. Right click on the extracted .tar file and extract it with 7-Zip also.
- Move the extracted file (v2ray-plugin_windows_amd64.exe) to the Shadowsocks folder.
- Start the Shadowsocks app. Enter the information from the screenshot below and click on Apply. Shadowsocks runs in the Windows taskbar tray and connects automatically.
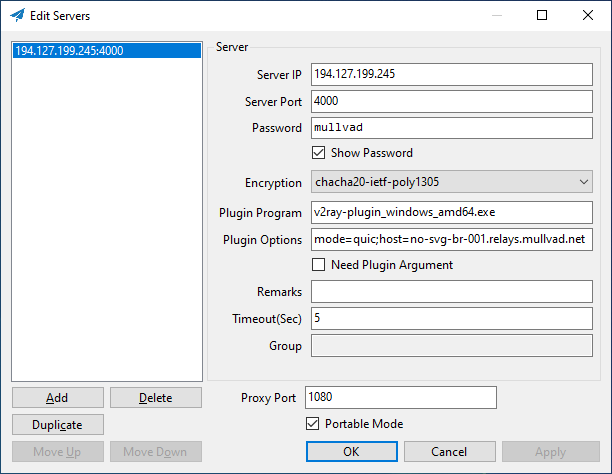
Server IP: 194.127.199.245
Server Port: 443
Password: mullvad
Encryption: chacha20-ietf-poly1305
Plugin Program: v2ray-plugin_windows_amd64.exe
Plugin Options: mode=quic;host=no-svg-br-001.relays.mullvad.net
Proxy Port: 1080 -
Go to the Mullvad app settings > Split tunneling and click on the button “Find another app” in the bottom. Browse to the location of the Shadowsocks app (in the Downloads folder) and select Shadowsocks.exe and click on Add.
-
Open the Command Prompt and run the following commands:
mullvad bridge set custom local 1080 194.127.199.245 443

mullvad relay set tunnel-protocol openvpn

mullvad bridge set state on

mullvad connect
Other ports
If it doesn't work then you can try to change the Server Port from 443 in the Shadowsocks app and the mullvad bridge command. You can use any port between 1300 - 32999.
Other bridge servers (quic)
To use other Mullvad bridge servers replace the Server IP and replace the hostname ("no-svg-br-001.relays.mullvad.net") from the Plugin Options field. Then use the same IP with the mullvad bridge command above. You can find more bridge servers in our Servers list. Here is one:
- 198.54.134.178 (us-sjc-br-001.relays.mullvad.net)
Connect using websockets
In case it does not work then try to connect using websockets instead of quic. In the Shadowsocks app in the “Plugin Options” field change the text “mode=quic” to only “tls” (don’t change it to “mode=tls”). Edit the Server IP and use the same IP with the mullvad bridge command. Here are some you can use with websockets only:
- 194.127.199.246 (no-svg-br-001.relays.mullvad.net)
- 198.54.134.179 (us-sjc-br-001.relays.mullvad.net)
Using Linux
Requirements
Download and install:
Open the Terminal and run the following command to install the v2ray plugin for Shadowsocks:
sudo apt-get install shadowsocks-v2ray-plugin
Run the following Mullvad commands:
1. Set Mullvad to use a specific bridge server and port:
mullvad bridge set custom local 1080 194.127.199.245 443
2. Connect Shadowsocks outside the VPN:
mullvad-exclude ss-local -s 194.127.199.245 -p 443 -l 1080 -k mullvad -m chacha20-ietf-poly1305 -b 127.0.0.1 --fast-open --no-delay --plugin ss-v2ray-plugin --plugin-opts "mode=quic;host=$HOST"
3. Set Mullvad to use OpenVPN protocol:
mullvad relay set tunnel-protocol openvpn
4. Set Mullvad to use Bridge mode:
mullvad bridge set state on
5. Connect Mullvad:
mullvad connect
Other ports
If it doesn't work then you can try to change the server port from 443 in both command #1 and #2 above where it says "443". You can use any port between 1300 - 32999.
Other bridge servers (quic)
To use other Mullvad bridge servers replace the server IP in both command #1 and #2 above where it says "194.127.199.245". You can find more bridge servers in our Servers list. Here is one:
- 198.54.134.178 (us-sjc-br-001.relays.mullvad.net)
Connect using websockets
In case it does not work then try to connect using websockets instead of quic. First change the server IP in command #1 above from 194.127.199.245 to 194.127.199.246. Then use the following command instead of command #2 above.
mullvad-exclude ss-local -s 194.127.199.246 -p 443 -l 1080 -k mullvad -m chacha20-ietf-poly1305 -b 127.0.0.1 --fast-open --no-delay --plugin ss-v2ray-plugin --plugin-opts "tls;host=$HOST"
Here is another bridge server that you can use with websockets only:
- 198.54.134.179 (us-sjc-br-001.relays.mullvad.net)
Using Ubuntu 20.04
If you have the older Ubuntu 20.04 which does not have the v2ray plugin package then you can download it (64-bit version) using the following commands.
wget https://github.com/shadowsocks/v2ray-plugin/releases/download/v1.3.2/v2ray-plugin-linux-amd64-v1.3.2.tar.gz

tar xvf v2ray-plugin-linux-amd64-v1.3.2.tar.gz

mv v2ray-plugin_linux_amd64 ss-v2ray-plugin
Using Android
Requirements
Download and install:
Configure the Shadowsocks app
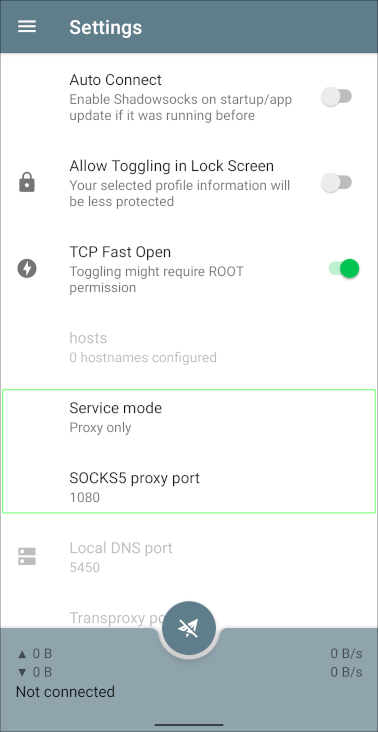
- Tap on the ☰ menu icon, then Settings.
- Tap on Advanced and then tap on Service mode and select Proxy only.
- Make sure that the SOCKS5 proxy port is set to 1080.
- Tap on your device's back button.
- Tap on the plus icon on the tool bar and select Manual Settings.
- Tap on Server, enter194.127.199.246 and tap on OK.
- Tap on Remote Port, change the number to 443 and tap on OK.
- Tap on Password, change it to mullvad and tap on OK.
- Tap on Encrypt Method, select chacha20-ietf-poly1305 and tap on OK.
- Scroll down and select Plugin: v2ray.
- Tap on Configure...
- Tap on Transport mode, select websocket-tls.
- Tap on Hostname, enter no-svg-br-001.relays.mullvad.net and tap on OK.
- Tap on the checkmark icon in the top right corner two times to save the settings.
Configure the OpenVPN app
- Download an OpenVPN configuration file for Android and make sure that Connect via bridges is checked.
- Open the OpenVPN for Android app.
- Tap on the + icon and tap on import and then choose the OpenVPN configuration file that you downloaded before.
- Tap on the pen edit icon next to the profile you imported.
- In the top bar, scroll left and tap on Advanced. Then scroll down and tap on Custom Options.
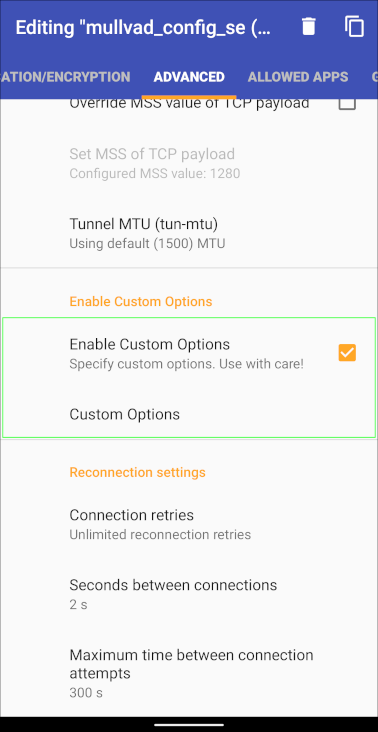
- On a new line add:
socks-proxy 127.0.0.1 1080 - Tap on OK. Then in the top bar tap on Allowed apps.
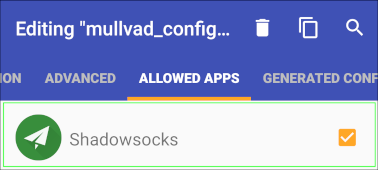
- Make sure that VPN is used for all apps but exclude selected is enabled.
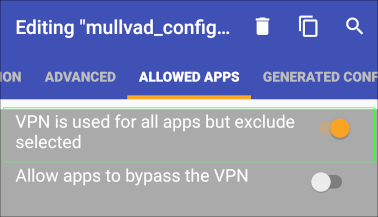
- Scroll down the list and find Shadowsocks and tap on the square icon to enable it.
- Tap on your device's back button.
Connect using Shadowsocks
- In the Shadowsocks app, tap on your profile and then tap on the connect icon in the bottom (looks like a paper airplane).
- In the OpenVPN app, tap on the server profile to connect to it. The first time you connect to a profile, you will be asked for a username and password. Use the following:
username – use your Mullvad account number (without any spaces)
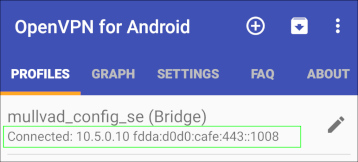
password – use the letter m - In the log window it should say "Initialization Sequence Completed" in the bottom.
- Tap on the arrow button in the top left corner.
- Both apps should now say "Connected".
- Verify your connection with our Connection check. Note that it will only show the OpenVPN exit server, not the Shadowsocks server.
Other ports and servers
If it doesn't work then you can try to change the remote port from 443 on your profile in the Shadowsocks app. You have to disconnect first by tapping on the paper airplane icon. You can use any port between 1300 - 32999. You can also try the following Server IP and Hostname:
- 198.54.134.179 (us-sjc-br-001.relays.mullvad.net)
Then tap on the connect button (paper airplane icon) and see that the OpenVPN app connects.
Using macOS
Requirements
Download and install:
Open the Terminal app and install Homebrew by running the following command:
/bin/bash -c "$(curl -fsSL https://raw.githubusercontent.com/Homebrew/install/HEAD/install.sh)"
Then install Shadowsocks and the v2ray plugin using Brew:
brew install shadowsocks-libev v2ray-plugin
Configure Tunnelblick
- Visit our OpenVPN configuration file generator.
- Select a country and (if available) a city.
- Click on Advanced and enable Connect via bridges.
- Click on Download zip archive.
- Double-click on the Zip file to extract it.
- Right click on the Mullvad.tblk file and choose Show Package Contents.
- Open the OpenVPN configuration file (mullvad_xx.conf) with TextEdit.
- Remove the line "tun-ipv6".
- Save and close the file in TextEdit.
- Double-click on the Mullvad.tblk file to open it with Tunnelblick, and install it.
Connect using Shadowsocks
In the Terminal app, connect to one of our bridge servers using Shadowsocks and v2ray using the following command:
ss-local -s 194.127.199.246 -p 443 -l 1080 -k mullvad -m chacha20-ietf-poly1305 -b 127.0.0.1 --fast-open --no-delay --plugin v2ray-plugin --plugin-opts "tls;host=no-svg-br-001.relays.mullvad.net" -v
Then connect with Tunnelblick:
- Click on the Tunnelblick icon in the macOS top menu bar and click on VPN Details...
- Click on the server configuration and then the Connect button.
- The Log window will say "Initialization Sequence Completed" when it connects successfully.
- Visit our Connection check to make sure that you are connected.
Other ports and servers
If it doesn't work then press control+c on the keyboard to stop ss-local in the Terminal. You can try to change the port in the ss-local command where it says "443". You can use any port between 1300 - 32999. You can also try replace the server IP "194.127.199.246" and hostname "no-svg-br-001.relays.mullvad.net" in the command with the following server IP and hostname:
- 198.54.134.179 (us-sjc-br-001.relays.mullvad.net)
Save and close the file in TextEdit. Click on Connect in Tunnelblick and enter your computer login password to update the configuration. Then click on Connect again.
Recommend
-
84
V2Ray安装使用教程 2019-6-3 21:26:23 | 作者: 月光 | 分类:
-
274
可以先看我写的一篇总结:【篇1:科学上网总结】,该文有记录如何搭建影梭,可以当做先了解下相关知识也可以。 1. 第一步:安装脚本 安装脚本1 参考:
-
14
v2ray安装和加速 发表于2020年9月3日 yum -y install wget zip unzip vim curl curl -O https://raw....
-
20
使用 V2Ray 代理访问外网¶ 随着墙的更新与升级, 之前一直使用的 Shadowsocks 代理最近开始无法访问, 给日常的工作和生活带来了很大的麻烦。 为了解决这个问题, 近日将自己的...
-
21
Files Permalink Latest commit message Commit time
-
270
Files Permalink Latest commit message Commit time
-
30
V2Ray最新协议VLESS一键安装脚本 发表于 2020.08.24 12:21 浏览量 11277 评论数 8...
-
13
关于 shadowsocks 的替代方案 v2ray 安卓端推荐使用 BifrostV 作为客户端, 使用方式接近 ss, 上手容易~ 桌面端(windows) 只用过 v2rayN, 界面奇丑无比, 但是效果却好的不可思议, 上手很容易, 先添加服务器, 小白就用二维码好了, 然后右键本软...
-
9
如何在 V2ray 服务端配置 Shadowsocks首先你需要...
-
25
Shadowsocks with v2ray plugin Requirement Point your domain or subdomain to the IP address with A record. (You can use Cloudflare) A VPS with Ubuntu 18.04 or 20.04 or 22.04 Install Shadowsoc...
About Joyk
Aggregate valuable and interesting links.
Joyk means Joy of geeK