

[WPF] 抄抄超强的苹果官网滚动文字特效实现 - dino.c
source link: https://www.cnblogs.com/dino623/p/iPhone14ProTextAnimation.html
Go to the source link to view the article. You can view the picture content, updated content and better typesetting reading experience. If the link is broken, please click the button below to view the snapshot at that time.
1. 前言#
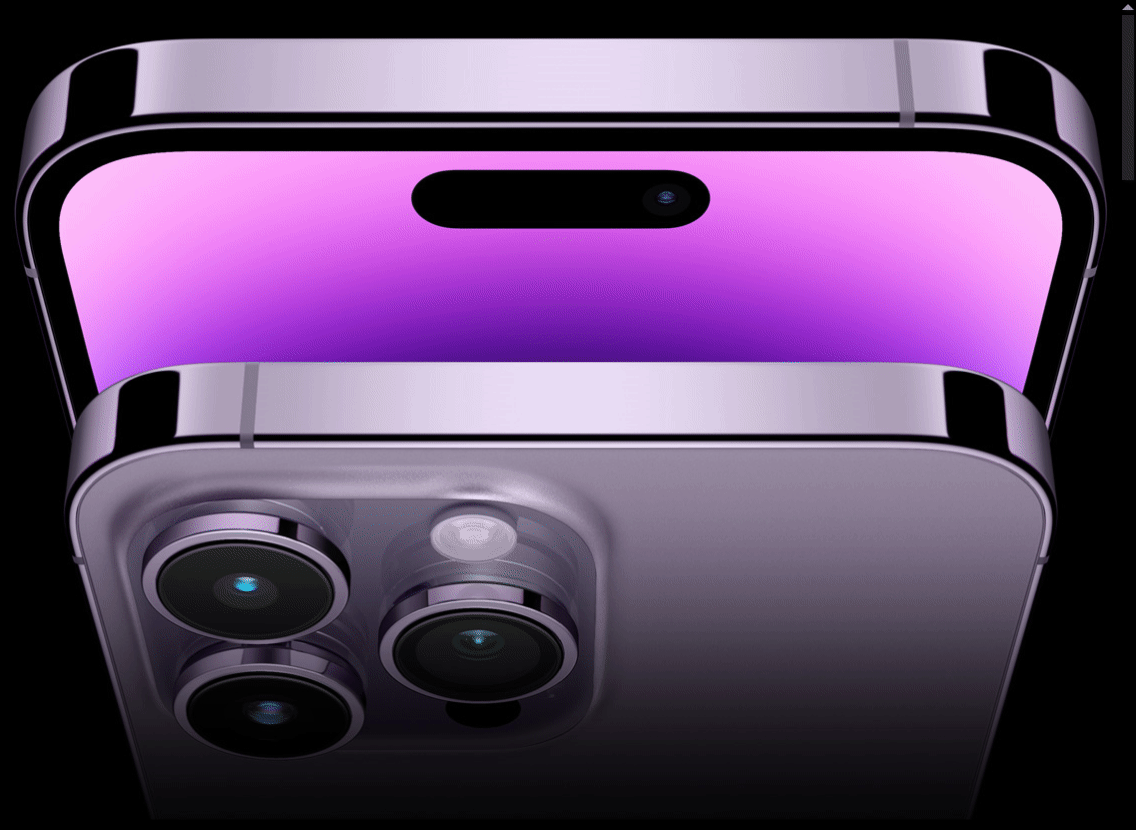
今天 ChokCoco 大佬发布了一篇博客 超强的苹果官网滚动文字特效实现,iPhone 我是买不起的,但不妨碍我对抄特效感兴趣,正好我这周安排的工作已经完成了,于是有空练练手实现了一个 WPF 版本。最终效果如下:
2. 原理#
这个特效的原理在 ChokCoco 的文章里已经讲解得很详细了,简单来说只有两部:
1,在前面固定一个黑色的图层,但是裁剪出文字的形状。
2,在背景放一个渐变色的图层,滚动页面时透过前面图层的镂空部分观察到这个移动的渐变色的图层,随着页面的向下滚动,整个文字从无到出现,再经历一轮渐变色的变化,最后再逐渐消失。
所以我们主要做的有两样:一个镂空的图层,一个渐变的图层。
3. 使用自定义 Effect 实现文字任意形状的镂空#
之前用自定义 Effect 玩 InnerShadow 时实现了一个 ClipEffect,它就实现了镂空(正确来说是裁剪)的功能,这次正好用得上。
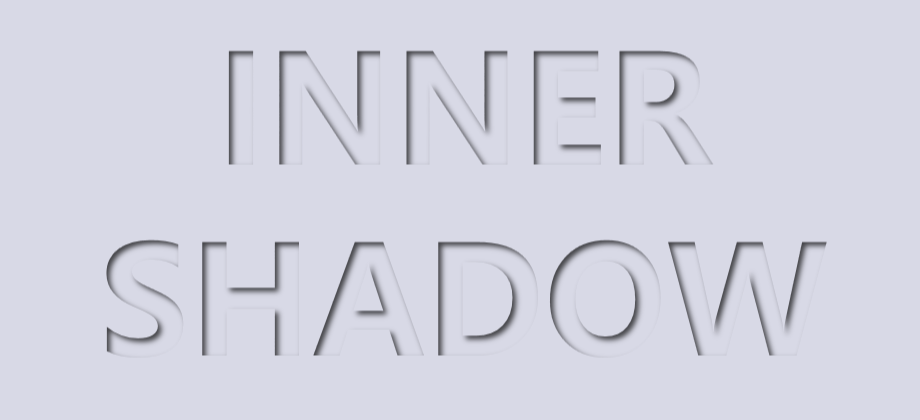
ClipEffect 的代码很简单,就只是几行,关键的功能是用 input 的Alpha 通道减去 blend 的 Alpha 通道作为结果输出:
sampler2D blend : register(s1);

float4 main(float2 uv : TEXCOORD) : COLOR
{
    float4 inputColor = tex2D(input, uv);
    float4 blendColor = tex2D(blend, uv);
    float4 resultColor = 0;
    float opacity = inputColor.a - blendColor.a;
    resultColor.rgb = inputColor.rgb * opacity;
    resultColor.a = opacity;

    return resultColor;
}
使用的时候,在一个不透明的元素上应用 ClipEffect,将它的 Blend 属性设置为要裁剪的形状的 VisualBrush,例如下面的代码里使用了文字作为 VisualBrush,最终在 Grid 上裁剪出一段文字的镂空:
<Grid Background="Black">
    <Grid.Effect>
        <effects:ClipEffect>
            <effects:ClipEffect.Blend>
                <VisualBrush Stretch="None" Visual="{Binding ElementName=TextElement}" />
            </effects:ClipEffect.Blend>
        </effects:ClipEffect>
    </Grid.Effect>
</Grid>
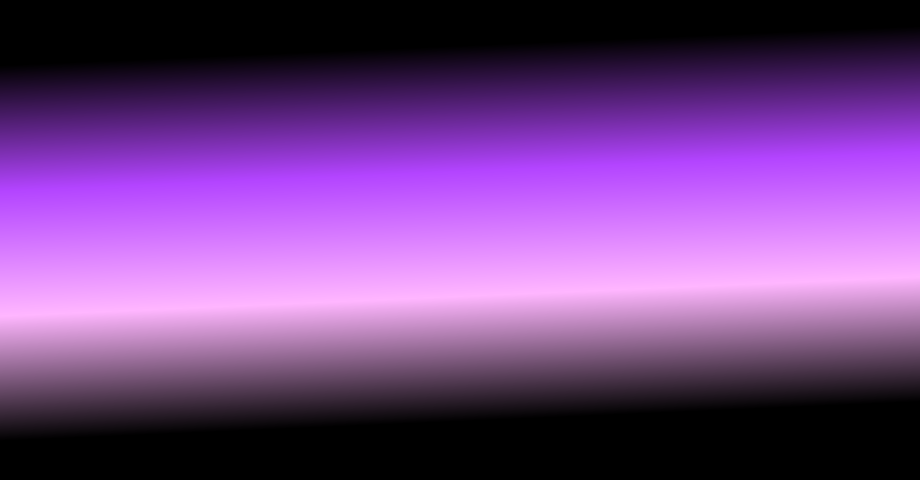
4. 渐变#
渐变大部分就更简单了,抄 ChokCoco 大佬的就是了。在 CSS 中,一个带点倾斜角度的渐变只需要一行 CSS 定义:
linear-gradient(-3deg, #000, #000 25%, #ffb6ff, #b344ff, #000 75%, #000);
而到了 XAML 中就复杂多了(当然,如果真的有必要省那么几行的话也可以自定义扩展、自定义行为之类的简化写法):
<LinearGradientBrush StartPoint="0.5,1" EndPoint="0.5,0">
    <LinearGradientBrush.RelativeTransform>
        <TransformGroup>
            <ScaleTransform CenterX="0.5" CenterY="0.5" />
            <SkewTransform CenterX="0.5" CenterY="0.5" />
            <RotateTransform Angle="-3" CenterX="0.5" CenterY="0.5" />
            <TranslateTransform />
        </TransformGroup>
    </LinearGradientBrush.RelativeTransform>
    <GradientStop Color="#000" />
    <GradientStop Offset=".25" Color="#000" />
    <GradientStop Offset=".416" Color="#ffb6ff" />
    <GradientStop Offset=".583" Color="#b344ff" />
    <GradientStop Offset=".75" Color="#000" />
    <GradientStop Offset="1" Color="#000" />
</LinearGradientBrush>

上面的 XML 定义了一个渐变的 LinearGradientBrush,这个 LinearGradientBrush 需要旋转 -3 度。有两种方式可以实现 LinearGradientBrush 的旋转,其中一种是 改变 StartPoint 和 EndPoint,但这种方式计算上比较麻烦,这里采用了另一种方式,即直接改变 LinearGradientBrush.RelativeTransform。最后呈现的效果如下:
5. 最后#
有了上面这两个图层,接下来结合它们:将镂空的图层固定在前面,渐变色的图层放进 ScrollViewer,滚动 ScrollViewer 时让这个渐变图层滑过镂空的部分,一个酷炫的效果就完成了。
最近无论工作还是学习都很饱和,正好今天告一段落可以摸一下鱼,感谢 ChokCoco 大佬一直发掘和实现各种有趣的特效,让我摸鱼摸得更有意义。
6. 源码#
Recommend
About Joyk
Aggregate valuable and interesting links.
Joyk means Joy of geeK