

NextJS Form Overview
source link: https://jsdevs.co/blog/nextjs-form-overview
Go to the source link to view the article. You can view the picture content, updated content and better typesetting reading experience. If the link is broken, please click the button below to view the snapshot at that time.
HTML Forms
One might wonder how web pages manage to collect user input through text fields, numeric fields or checkboxes for further processing. It is the HTML Form element that does the trick. For those who do not know much about HTML, it stands for a Hyper Text Markup Language and it serves as a markup language that determines the content and layout of web applications and is one of the most integral parts of our web. It has several elements that are used for layout and content definition and the <form> tag that denotes an HTML Form is the one that is used to collect the visitor's data in a variety of formats i.e., text, numeric or boolean. The form element then uses HTTP POST method to send a POST request consisting of the collected data in its body to a backend server developed in a server-side language like Python, JavaScript, GoLang etc for further processing. It can also use the HTTP GET method to send form data but in that case the form data appears as URL variables and form data often contains confidential information so this method is not recommended in case the intention is to keep the user input hidden.
The HTML <form> tag functions as a container for several type of input elements such as text fields, numeric fields, radio buttons, check boxes and
submit buttons. The following HTML code snippet demonstrates the use of a <form> tag in HTML:
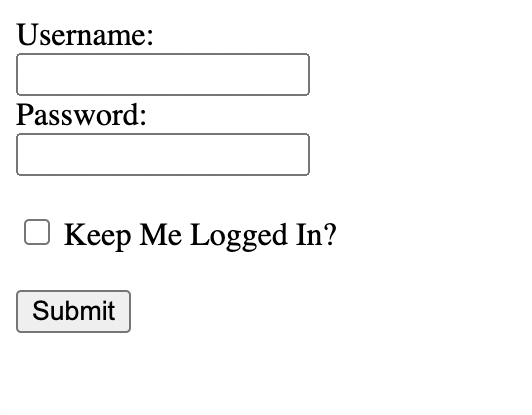
<form action="/handle.php" method="post">
    <label for="uname">Username:</label><br>
    <input type="text" id="uname" name="uname" minlength="8"><br>

    <label for="password">Password:</label><br>
    <input type="text" id="password" name="password">
    <br><br>

    <input type="checkbox" id="logged" name="logged" value="Logged In">
    <label for="html">Keep Me Logged In?</label><br><br>

    <input type="submit" value="Submit">

</form>
This is what the output of the above snippet when wrapped in the HTML boilerplate looks like:
Form Data Processing and Validation:
There are primarily two methods to validate or process form data and they are listed as follows:
- Client-side: This method uses either built-in HTML attributes or Javascript embedded with HTML files to process or validate form data.
- Server-side: This method sends the form data to the server side script specified in the action attribute of form for further processing
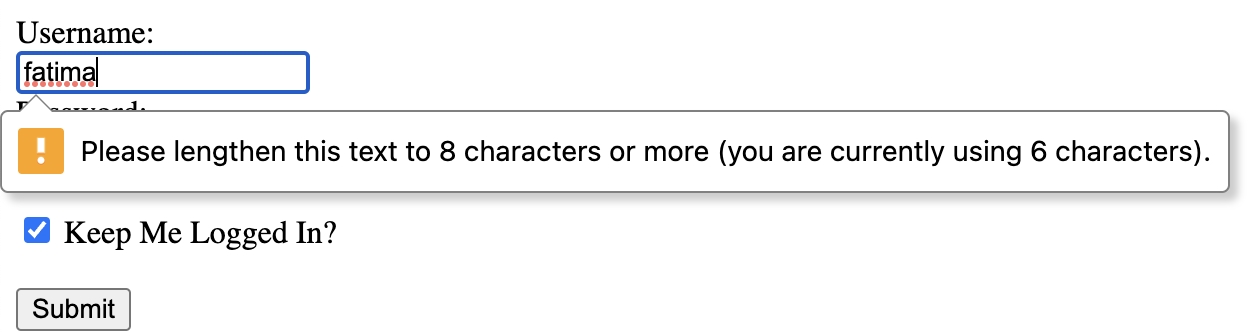
As shown above, the form tag contains a few attributes and encloses a set of fields. The action attribute determines the route or server-side file where the form data is to be sent and the method attribute defines the keyword for HTTP request method that is to be used. As mentioned earlier, its value can either be get or post. The <input> tag is used to define an input element meant to collect data and a <label> tag accompanies the input field whose name or id is mentioned in its for attribute. The function of the <label> tag is to provide a text label for an input field. In addition to that, the nature of the type of data that an input field collects is determined by its type attribute and the name attribute is used to index or lookup an input field during server-side processing. The simple form shown above contains two text fields, one checkbox and a submit button that is meant to sent the form data to the server-side file specified in the action attribute which is /handle.php in this case using the HTTP POST method as specified in the method attribute. The min-length attribute performs form validation on the client side and shows a tooltip on clicking a submit button as shown below:
Build web form with NextJS
Next JS is a React framework for production that includes all the features of React JS and provides a plethora of additional features that significantly simplify the development and deployment of a web application. Some of its most prominent features are support for Smart Bundling, Server Side Rendering, Static Side Generation, Route Prefetching and File system-based Routing. On top of that, it functions with minimal configuration. In addition to serving as a UI framework for building interfaces of web applications, it also eliminates the need of a backend by providing a custom server that may contain server side scripts or API routes. Before learning about form creation in Next JS, certain concepts regarding forms
Initialization
Creating a form with Next JS is quite similar to creating one in HTML as shown above and it takes it one step further by allowing form data processing and form validation on both client-side and server-side. In order to create a form with Next JS, you
will first have to set up a Next JS application using the create-next-app command. The name of the application is to be added after the command i.e., in order to create an application named formtutorial, type `npx create-next-app formtutorialif you havecreate-next-app` installed locally. This will create a Next JS application folder titled form_tutorial containing boilerplate code for the application.
Creating a Simple Form
As mentioned earlier, Next JS supports file system-based routing systems. This means that the router routes the .js, .ts, .jsx or .tsx file containing a React Component to their path relative to the pages directory and files named index to the root of the directory i.e.,
pages/index.js → /
pages/post.js → /post
First create a file named next-form.js in the pages directory and add a functional component named ServerSideForm containing the markup to display a form as shown below:
import React from 'react'

function ServerSideForm() {
  return (
    <div>
        <form method='POST' action='api/form'>

        <label htmlFor="name">Full Name: </label>
        <input type="text" id="name" name="name" /> <br/><br/>

        <label htmlFor="email">Email: </label>
        <input type="text" id="email" name="email" /> <br/><br/>

        <input type='submit' value='Submit' />

         </form>
    </div>
  )
}

export default ServerSideForm
This form will appear http://localhost:3000/next-form in your browser when you run it locally. The port number assigned might vary and should be checked through the terminal.
Server-side Processing
This method does not use any client-side validation or data processing and simply renders the markup on the webpage.
On clicking the submit button, the form data is collected and sent using HTTP POST method to the API handler located in a file named form.js the subdirectory called api of the pages directory. The api directory in Next JS is used to define API routes that are situated on the server-side. It also uses file-system based routing such that the route address is determined by the relative path of the file containing route handler file to the pages directory. The handler is defined in form.js file located in the api directory as shown below:
export default function handler(req, res) {
    const name = req.body.name
    const email = req.body.email

    /**
     * Form Data Processing Code
     */

    res.status(200).send("Thanks For Submitting your Data")
  }
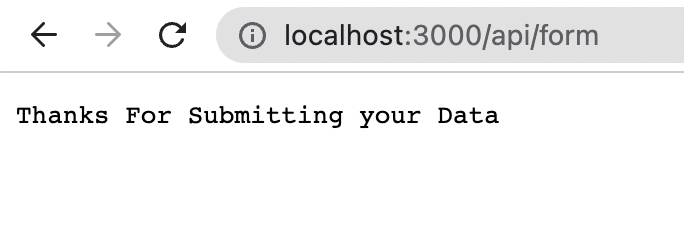
This API route handler which is present on the server-side recieves the form data in the body field of its req parameter and can further process it. It then sends a string based message as response to the POST request which is shown in the browser on clicking the submit button as shown below:
Client-side Processing
The above discussion showed how Next JS simplified server-side processing of forms. It also provides support for client side processing of form data using the onSubmit handler of forms. This method is not widely used since it might make your site prone to attacks since Javascript will have to be enabled in the browser and the client-side script to process the data will have to be fetched as well while fetching the webpage which can introduce bandwidth related issues. However, this method can be useful at times for client-side data validation which can provide a quicker response and no request is sent to the server. An example of this method is shown below:
import React from 'react'

function ServerSideForm() {
  const onSubmitHandler = async (event) => {

    event.preventDefault()

    const name = event.target.name.value
    alert(`Thanks ${name} for submitting your data!`)


  }

  return (
    <div >
        <form onSubmit={onSubmitHandler}>

        <label htmlFor="name">Full Name: </label>
        <input type="text" id="name" name="name" /> <br/><br/>

        <label htmlFor="email">Email: </label>
        <input type="text" id="email" name="email" required /> <br/><br/>

        <input type='submit' value='Submit' />

         </form>
    </div>
  )
}

export default ServerSideForm
This example includes a function called onSubmitHandler() that will be executed when the form is submitted. The function body first uses the preventDefault() method to prevent the default behavior that occurs on form submission which is a page reload. It then fetches the value entered in the name field and displays in an alert message as shown below:

Keep in mind that the form handler gets executed in the browser as a Javascript based script and nothing is fetched from the server. However, the form handler can be used for a variety of purposes including sending of asynchronous requests to the server.
NextJS forms with Formik
Formik is a popular form programming library in React JS and React Native which provides a set of Components and Hooks to simplify the process of initializing form values, validation of form data and handling form submission. Since Next JS is a React JS based framework, Formik is extensively used with it as well. Its most distinctive feature is that it helps us setup custom form validation in a way that is not painstaking at all.
In order to use Formik in your Next JS project, cd into the root directory of your project and type npm i formik or yarn add formik. We will also be using a library called yup in our project to complement formik in defining a validation schema or custom validation rules of the form fields. In order to add yup to your npm project, type npm i yup or yarn add yup.
Let's use the same boilerplate from the previous example. Create a file named next-formik.js in the pages directory and define a component called Formik Example. Let's add the code for a simple form for now as shown below:
import React from 'react'

function FormikExample() {
  return (
    <div>
        <form>
        <label htmlFor="name">Full Name: </label>
        <input type="text" id="name" name="name" /> <br/><br/>

        <label htmlFor="email">Email: </label>
        <input type="text" id="email" name="email" /> <br/><br/>

        <label htmlFor="phone">Phone Number: </label>
        <input type="number" id="phone" name="phone" /> <br/><br/>

        <input type='submit' value='Submit' />

        </form>
    </div>
  )
}

export default FormikExample
The above form has no form submission handler, form validation or field initialization. It is a plain component with a set of fields. Let us first define the initial values of the fields as shown below:
const initialFieldValues = {
    name: "",
    password: "",
    phone: ""
  };
It must be made sure that the name or key value refering to a field in the object defining initial values should be the same as the name of corresponding field in the HTML form. After that, let us define a submission handler as shown below:
const submissionHandler = (values) => {
    alert(`Thanks ${values.name} for submitting your details!`)
}
The function will take a values object as an input parameter and display an alert message on form submission. The values object will contain the form values that can be referenced by using the field name as the key. The next step is to define a validation schema using yup. It will be done as shown below:
const validationSchema = yup.object()({
    name: yup.string()
      .min(8, "Name length should be greater than or equal to 8")
      .max(40, "Name length should be lesser than or equal to 40")
      .required("Full Name is required"),

    email: yup.
    string().
    email().
    required("Email is required"),


    phone: yup.string()
      .matches(
  /^((\+92)?(0092)?(92)?(0)?)(3)([0-9]{9})$/gm,
        "Please enter a valid phone number!"
      ),

  });
The schema shown above specifies validation rules for each of the fields. The min and max functions accept the minimum and maximum string lengths
for the input, the string function specifies that the input is to interpreted as a string, the required function makes it mandatory to enter valid
data in a field, the email function makes sure that the string is an email and the matches function is used to validate input against a RegEx pattern.
Each of these functions also accept an error message which can be accessed using the formik object. We will now use the useFormik hooks to create a formik object by providing the initialFieldValues, validationSchema and submissionHandlers as the
function parameters. The final code will look like this:
import React from 'react'
import * as yup from 'yup';
import { useFormik } from 'formik';

function FormikExample() {
    const initialFieldValues = {
        name: "",
        password: "",
        phone: ""
      };

    const submissionHandler = (values) => {
        alert(`Thanks ${values.name} for submitting your details!`)
    }

    const validationSchema = yup.object({
        name: yup.string()
          .min(8, "Name length should be greater than or equal to 8")
          .max(40, "Name length should be lesser than or equal to 40")
          .required("Full Name is required"),

        email: yup.
        string().
        email().
        required("Email is required"),


        phone: yup.string()
          .matches(
      /^((\+92)?(0092)?(92)?(0)?)(3)([0-9]{9})$/gm,
            "Please enter a valid phone number!"
          ),

      });

      const formik = useFormik({
          initialValues: initialFieldValues,
          onSubmit: submissionHandler,
          validationSchema: validationSchema
      })
  return (
    <div>
        <form onSubmit={formik.handleSubmit}>
        <label htmlFor="name">Full Name: </label>
        <input type="text" id="name" name="name" value={formik.values.name} onChange={formik.handleChange} /> <br/><br/>

        <label htmlFor="email">Email: </label>
        <input type="text" id="email" name="email" value={formik.values.email} onChange={formik.handleChange} /> <br/><br/>

        <label htmlFor="phone">Phone Number: </label>
        <input type="number" id="phone" name="phone" value={formik.values.phone} onChange={formik.handleChange}  /> <br/><br/>

        <input type='submit' value='Submit' /> <br/><br/>

        </form>

       { formik.errors.name && (
      <div style={{
        "color": "red"
      }}>{formik.errors.name}</div>
    )}
    </div>
  )
}

export default FormikExample
The formik object returned by the useFormik is used to specify the submission handler for the form, change handlers for the fields
and initial values as well as shown above. The change handlers perform the field validation according the rules as the data in the input fields
changes. For instance, have a look at the given screenshot:
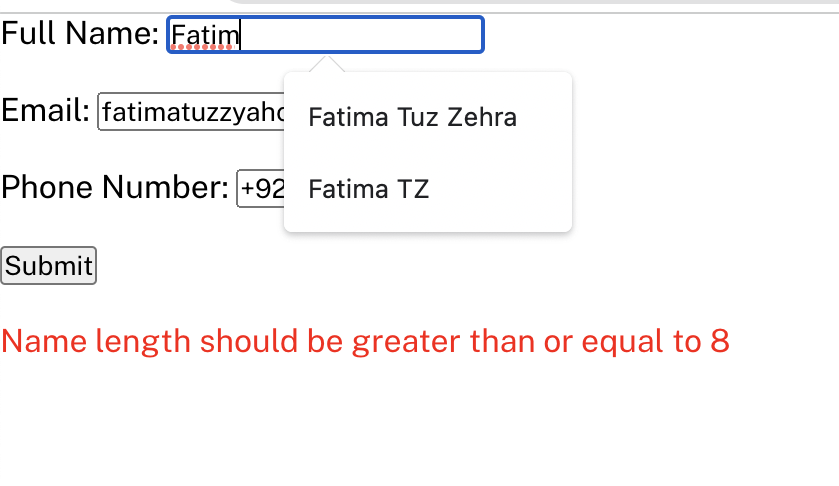
While the length of input in the name field is lesser than 8, an error message that had been supplied to validationSchema while specifying the rules will be shown. This does not even require the submit button to be pressed. The error message disappears when input in all the fields is valid. The screenshot attached below should what happens when submit button is clicked while the input fields have valid values:
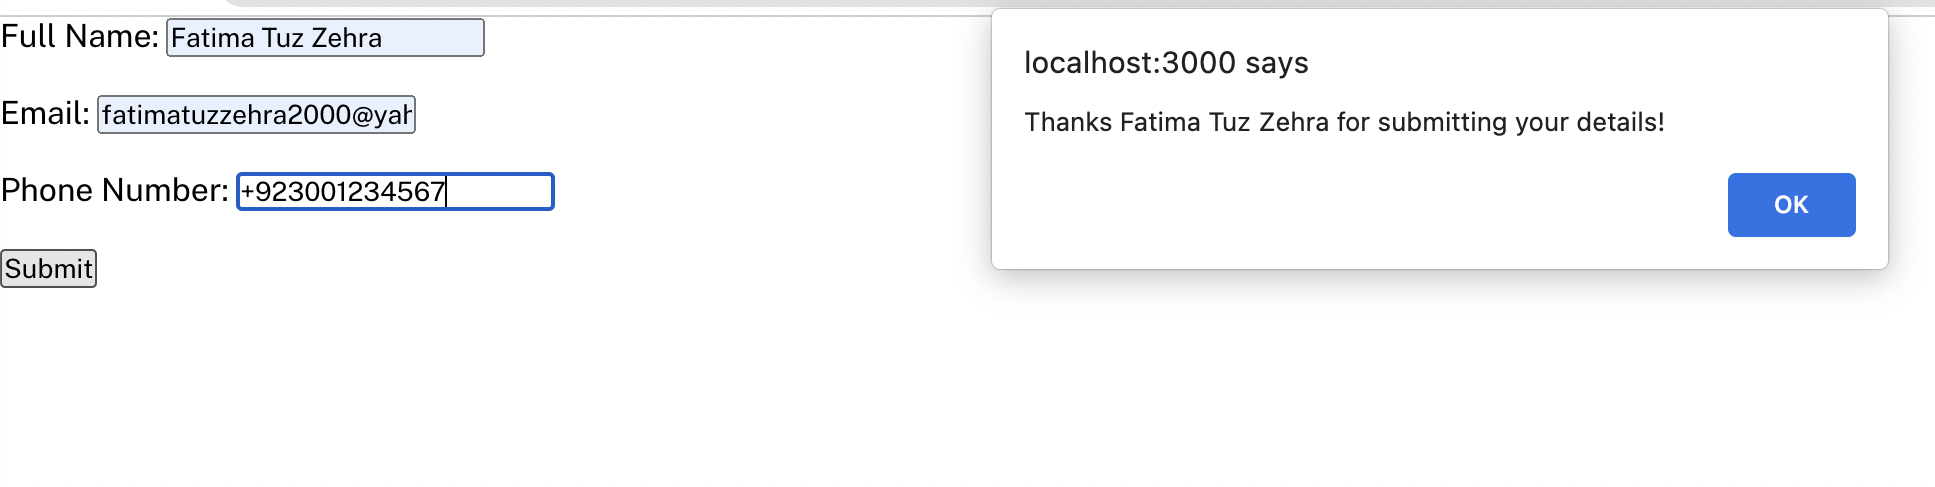
As we can see, the submission handler for the form is executed and the alert message is shown as a result.
Summary
Most of the people do not know what constitutes the rich websites that we interact with everyday. This blog gives an overview regarding HTML forms which are one of the most integral components of our web pages and play a key role in client server interaction. It builds upon the basic concepts of HTML forms and introduces intermediate concepts like form validation and form data processing by diving into their technicalities and helping the readers understand the difference between client-side and server-side form processing.
In addition to that, it introduces a modern and one of the most popular web frameworks called Next JS and explains how it deals with the task of form programming through code based examples. Lastly, the readers get to know about libraries called Formik and yup which abstract the details of
form definition and processing and make it highly intuitive. The usage of some of the integral components of these libraries has been demonstrated. Building such simple forms using Formik might seem like an overkill but we begin to reap its actual benefits as forms get more complex.
Recommend
About Joyk
Aggregate valuable and interesting links.
Joyk means Joy of geeK