

CentOS 7安装最新 PHP 7.2,MySQL 5.7和Nginx
source link: https://www.daguanren.cc/post/php_nginx_mysql_installation_guide.html
Go to the source link to view the article. You can view the picture content, updated content and better typesetting reading experience. If the link is broken, please click the button below to view the snapshot at that time.
CentOS 7安装最新 PHP 7.2,MySQL 5.7和Nginx
Step 1 — 在CentOS 7 安装 Nginx
Nginx没有内置在默认的CentOS repositories, 我们先安装EPEL repository,输入如下命令:
yum install epel-release -y
下面,开始安装 Nginx
yum install nginx -y安装完成后,启动nginx和让nginx在linux启动时自动运行:
systemctl start nginxsystemctl enable nginxStep 2 — 安装 MariaDB
当页面代理服务器安装完成后,我们开始安装MariaDB, MariaDB 是著名的 MySQL 的社区版的一个分支. 由于 MariaDB 内置在 CentOS repositories 里面,我们直接使用 Yum 就能安装(原版 MySQL Community 安装请参考 Centos 7安装MySQL Server5.7 这篇文章):
yum install mariadb-server mariadb -y安装完成后,我们同样启动服务和配置服务自启动:
systemctl start mariadbsystemctl enable mariadb然后, 运行初始化脚本,清除一些默认配置:
mysql_secure_installation这时,需要你提供 MariaDB 的密码, 但这是第一次登陆,没有密码,因此直接按回车;进入下个设置密码的窗口,按 Y 设置,该密码为 root 密码:
Enter current password for root (enter for none):OK, successfully used password, moving on...Setting the root password ensures that nobody can log into the MariaDBroot user without the proper authorization.New password: passwordRe-enter new password: passwordPassword updated successfully!Reloading privilege tables..... Success!routeros其他问题可以直接按回车 (ENTER)使用默认配置. 完成 MariaDB 的配置后,将进行PHP的配置。
Step 3 — 安装 PHP v7.2
首先,安装额外包括 PHP v7.2 的 CentOS repo :
wget http://rpms.remirepo.net/enterprise/remi-release-7.rpmrpm -Uvh remi-release-7.rpm使 php72 repository 生效(默认不生效):
yum install yum-utils -yyum-config-manager --enable remi-php72然后安装 PHP package:
yum --enablerepo=remi,remi-php72 install php-fpm php-common安装通用模块:
yum --enablerepo=remi,remi-php72 install php-opcache php-pecl-apcu php-cli php-pear php-pdo php-mysqlnd php-pgsql php-pecl-mongodb php-pecl-redis php-pecl-memcache php-pecl-memcached php-gd php-mbstring php-mcrypt php-xmlStep 4 — 配置 Nginx 和 PHP 7.2 匹配
安装 nano 文件编辑器:
yum install -y nano使用 nano 修改 /etc/nginx/conf.d/default.conf 这个文件:
nano /etc/nginx/conf.d/default.conf进行如下配置:
server { listen 80; server_name your_server_ip; # note that these lines are originally from the "location /" block root /usr/share/nginx/html; index index.php index.html index.htm; location / { #try_files $uri $uri/ =404; try_files $uri $uri/ /index.php?q=$uri&$args; error_page 404 /404.html; error_page 500 502 503 504 /50x.html; location = /50x.html { root /usr/share/nginx/html; location ~ \.php$ { try_files $uri =404; fastcgi_pass unix:/var/run/php-fpm/php-fpm.sock; fastcgi_index index.php; fastcgi_param SCRIPT_FILENAME $document_root$fastcgi_script_name; include fastcgi_params;nginxIMPORTANT! 替换 your_server_ip 为你的真实 server IP.
CTRL + O 保存修改的文件, CTRL + X (CMD + X Mac 用户) 退出编辑器.
配置完重启 Nginx 使修改生效:
systemctl restart nginx接着进行 PHP-FPM 的配置:
nano /etc/php-fpm.d/www.conf找到并替换如下几行:
user = apache to user = nginxgroup = apache to group = nginxlisten.owner = nobody to listen.owner = nginxlisten.group = nobody to listen.group = nginxrouteros最后在 ;listen = 127.0.0.1:9000 下面增加:
listen = /var/run/php-fpm/php-fpm.sock保存修改和退出编辑器. 最后, 启动 php-fpm 并让它自启动:
systemctl start php-fpm.servicesystemctl enable php-fpm.serviceStep 5 — 创建个 PHP 测试文件
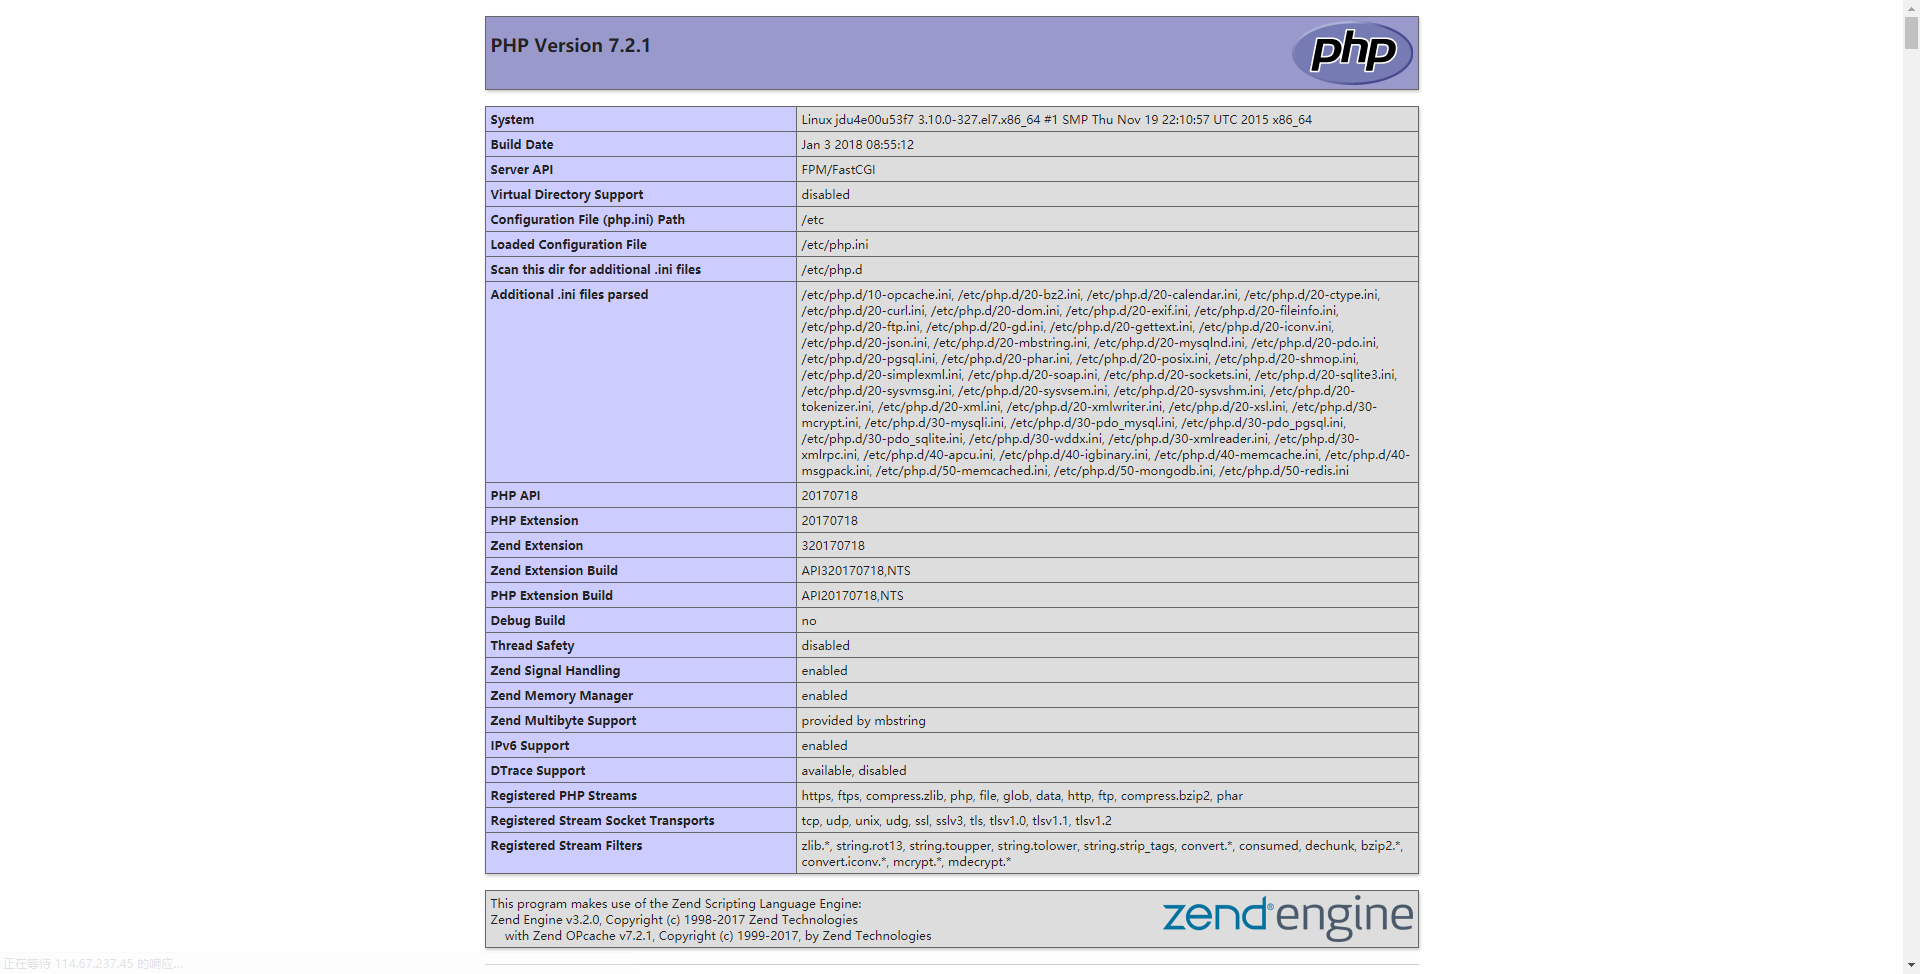
rm /usr/share/nginx/html/index.htmlecho "<?php phpinfo(); ?>" >> /usr/share/nginx/html/index.php访问你的 your_server_ip 查看是否配置成功,若成功,则显示如下页面:
若需要安装低版本的5.x版本的PHP,可以参考: https://www.jianshu.com/p/bc14ff0ab1c7
本文链接:https://www.daguanren.cc/post/php_nginx_mysql_installation_guide.html
-- EOF --
作者
daguanren
发表于 2017-12-20 13:10:37
,添加在分类
技术分享
下
,并被添加「
MySQL
」标签
,最后修改于 2020-10-10 14:08:36
版权归本网站的作者所有,转载请注明出处,谢谢大家。 问题咨询和商务合作请发送邮件至[email protected]。
Recommend
About Joyk
Aggregate valuable and interesting links.
Joyk means Joy of geeK