

Recoil for State Management in React | Keyhole Software
source link: https://keyholesoftware.com/2022/10/06/react-and-recoil-for-state-management/
Go to the source link to view the article. You can view the picture content, updated content and better typesetting reading experience. If the link is broken, please click the button below to view the snapshot at that time.
Recoil for State Management in React

One of the biggest challenges that developers face is the ability to pass data between components while still having access to the properties and functions they need without code redundancy.
Clever architecture and foresight is the best way to avoid issues when working with a hierarchy of components. Let’s be honest, though, how often have you been assigned to a project where there was seemingly no thought put into the hierarchy? Or how often has the client requested something completely out of left-field that there was no way to plan for? Probably often.
Is there any good way to avoid this pitfall? Of course there is! State Management. Harkening back to the Singleton coding pattern, a state is a singular object that houses data that can be accessed from essentially anywhere.
In this blog, I’ll focus on one tool you might use for State Management, Recoil. First, we’ll look at why State Management is an effective strategy in general. Then, we’ll turn our attention to Recoil, and finally, we’ll dive head first into a demo. By the end, you should have all the tools necessary to begin using Recoil on your own!
Why Adopt State Management?
Let’s look at State Management through the scope of React, one of the most popular frontend frameworks. Let’s say you have a button that toggles a “Hello world!” message in the header with a boolean value, but that button is in a sibling component, nested 5 components down.
We could pass the method all the way up five components and have the logic performed in the parent of both the header and button component’s parent then pass that down to the header component. However, we’ll end up adding a lot of unnecessary steps and code throughout our application.
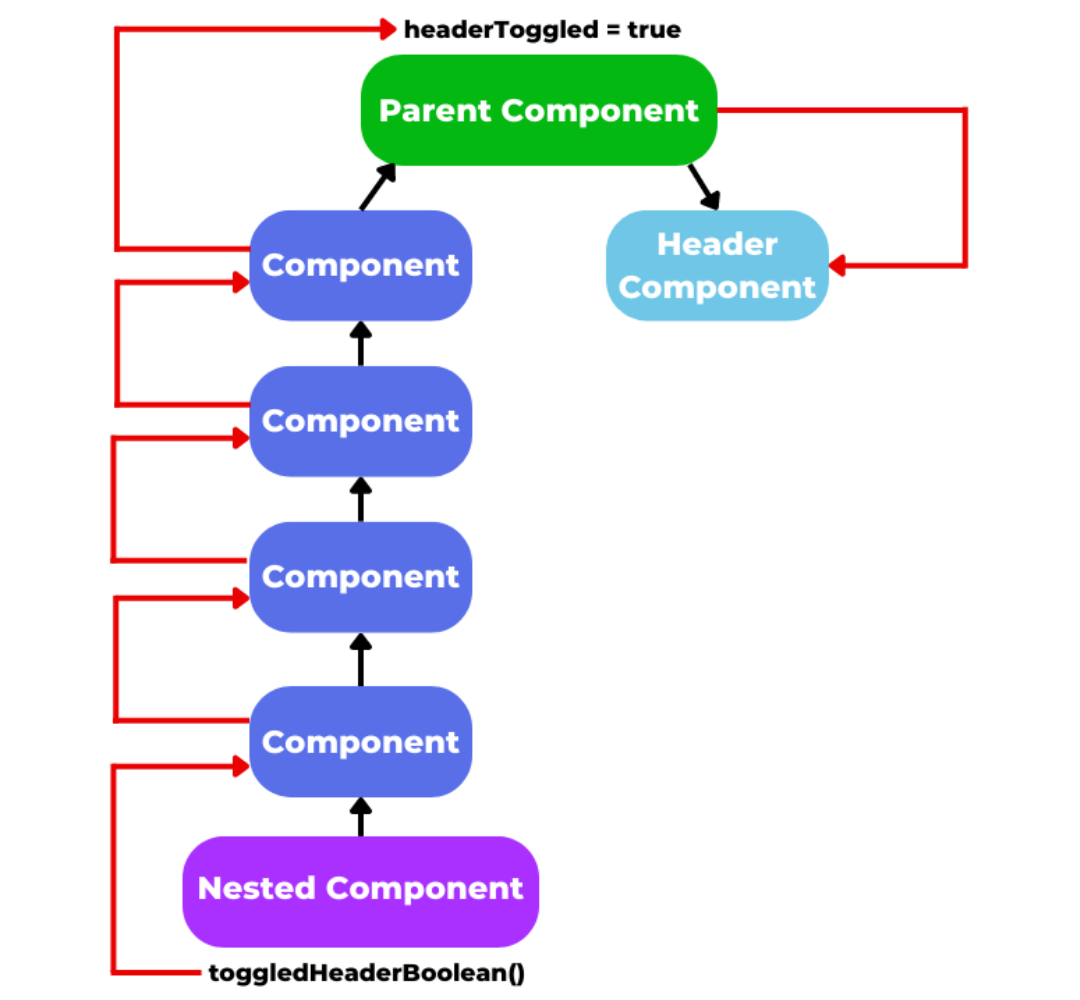
It’s over-complicated and messy, so let’s try this another way. Thanks to State Management, we can instead have the boolean dictating whether or not the header message is showing in the state, then toggle it directly in our nested component. Like this.

With State Management, we bypass the task of modifying five components for the sake of changing one boolean value. Much cleaner and more simple.
Why Use Recoil?
We’ve established why State Management is worth your time, and now it’s time to talk tools. There are a lot of different State-Management libraries out there… What makes Recoil special?
While most if not all State-Management Libraries will accomplish the same basic thing, Recoil stands out because it’s developed and maintained by the same company as React: Facebook. Most other State-Management libraries have been written with vanilla Javascript or with other frameworks in mind. Recoil, on the other hand, was created from the ground up with React in mind by the people who created React themselves. An additional benefit is that Recoil works very similarly to the existing Hooks and UseState methods built into React, so there isn’t a jarring learning curve for those who are already familiar with how React works.
So through the power of Recoil and its Atoms, we can create a property that can be both read and updated from any component. When updated, the property will automatically cause a rerender in all the components using the property. We can update the property in the component that’s nested five levels down and have it update data shown in the header component without having to hand the change all the way back to the top and to a sibling component.
The Demo
Alright, without further ado, let’s get started with our Recoil demo project.
Step 1: Installation
Open up your terminal of choice, and create a new React project.
npx create-react-app recoil-demo |
Next, we’ll install the recoil Node package.
cd recoil-demonpm install recoil |
Open up your IDE of choice in this directory. If you’re using VS Code, then type:
code . |
Step 2: File Setup
Let’s try to recreate our example in code form now! We’re going to create five components. In our working directory, let’s go ahead and create the following files and folders.

We want to make the components directory and the states directory in our src directory.
Inside the components directory add the following files:
HeaderComponent.jsFirstComponent.jsSecondComponent.jsThirdComponent.jsFourthComponent.jsFifthComponent.js
Inside the states directory add this file: atoms.js.
The name of atoms.js is not important, but we’re going to put some Atoms in there, so it’s a fitting name. In a practical project, this is a good opportunity to sort out your Atoms based on sections of the project. We’ll skip that step in our demo for the sake of brevity, though.
Step 3: App.js and Atom.js
Creating a React project with NPX create-react-app will give you App.js as an entry point for your application. We’re going to utilize that in our demo!
Open it up and import HeaderComponent and FirstComponent. It should look something like this.
import {RecoilRoot} from 'recoil';import HeaderComponent from "./components/HeaderComponent";import FirstComponent from './components/FirstComponent';function App() {return (<RecoilRoot><div className="App"><HeaderComponent /><FirstComponent /></div></RecoilRoot>);}export default App; |
It’s very important to also import RecoilRoot and surround your application with it. Surrounding the entry point for the application will give you access to Recoil throughout the entire application.
We’re going to take a look at atom.js first.
import {atom} from 'recoil';export const headerTextState = atom({key: 'headerTextState',default: 'hello world!'}) |
We have an Atom! Its name is headerTextState. It has a key and a default value. The key is for internal identification, and the default value is the value that will appear until otherwise changed. Default can also be an object instead of a single property.
export const headerTextState = atom({key: 'headerTextState',default: {text: 'hello world!',counter: 0}}) |
In case we want to add a counter property to our state, we can set it up similarly to above. It’s all about how you want to organize your application. If we want to access any of the properties, we’d access them just like we’d access any other object property.
<span>{headerText.counter}</span> |
Let’s keep it simple for now, though, and just use our first Atom example that only has our default property of “Hello World.”
Step 3B: HeaderComponent
Our HeaderComponent will be very simple. We really just want to display some text in there.
You can see that we have an h1 element displaying headerText. We’ve declared headerText as a const and set it to useRecoilState(headerTextState).
useRecoilState is a method built into Recoil that’s used in variable declarations. This will automatically subscribe to the Atom that we created, so when it changes, HeaderComponent will rerender to show the change.
We also have declared setHeaderText. Guess what that does? If you’ve worked with React’s useState before, this should be familiar to you. It’ll change headerText, and by extension, it’ll change headerTextState as well. You can use this from any component you import headerTextState to.
import React from 'react';import { useRecoilState } from 'recoil';import { headerTextState } from '../states/atoms';const HeaderComponent = (props) =>{const [headerText, setHeaderText] = useRecoilState(headerTextState);return (<div><h1>{headerText}</h1></div>)}export default HeaderComponent; |
Step 4: FirstComponent Through FourthComponent
Think our HeaderComponent is simple? Checkout our FirstComponent.
import React from 'react';import SecondComponent from './SecondComponent';const FirstComponent = (props) =>{return (<div><SecondComponent /></div>)}export default FirstComponent;You can probably guess what <code>SecondComponent</code> through <code>FourthComponent</code> will look like. We literally want to do the same thing, just change your component name, default, child component import, and element.import React from 'react';import ThirdComponent from './ThirdComponent';const SecondComponent = (props) =>{return (<div><ThirdComponent /></div>)}export default SecondComponent; |
It’s silly, but perfect to illustrate why Recoil is going to save us a headache.
Step 5: FifthComponent.js
Here’s where things change. Once we get to FifthComponent.js, the procedure is a little different.
import React from 'react';import { useRecoilState } from 'recoil';import { headerTextState } from '../states/atoms';const FifthComponent = (props) =>{const [headerText, setHeaderText] = useRecoilState(headerTextState);const handleClick = () => {setHeaderText("Clicked!");}return (<div><button onClick={handleClick}>Click Me</button></div>)}export default FifthComponent; |
We’ve got a bit more going on here. Similar to the HeaderComponent, we’re importing and declaring headerText and setting it to useRecoilState(headerTextState).
We also have a handleClick function that has one purpose: to set our headerText. We’ve tied it to a button, and guess what happens when we click it? You’ve guessed right, it changes our header.

becomes…

That wraps up our demo. It’s a simple example, but I’m hoping it demonstrated the importance of State Management and the benefits of using Recoil.
Wrapping Up
Again, this is a very simple example. It only changes one property, but as you can imagine how useful State Management is for maintaining organization and accessibility.
API calls can be called once and saved in the State. Then, the data from the call is shared across many different components without having to worry about hierarchy or passing data back and forth between the component that houses the response. You can build an incredibly complex form with many child components for different inputs and store all of those values in a single, easily accessible place.
Recoil is easy to implement for State Management into an existing project, and it’s super helpful in untangling some of those complicated components that pass 10,000 props across multiple levels. I hope you’ll give it a try in your own projects!
If you have any questions or comments, drop them below. If you liked this post, check out the many more we have on the Keyhole Dev Blog. You won’t regret it!
Recommend
About Joyk
Aggregate valuable and interesting links.
Joyk means Joy of geeK