
6

使用coverlet统计单元测试的代码覆盖率 - 崩坏的领航员
source link: https://www.cnblogs.com/CollapseNav/p/16726260.html
Go to the source link to view the article. You can view the picture content, updated content and better typesetting reading experience. If the link is broken, please click the button below to view the snapshot at that time.
使用coverlet统计单元测试的代码覆盖率
单元测试是个好东西, 可以在一定程度上兜底
虽然写单元测试这件事情非常麻烦
但是好的单元测试可以显著提高代码质量, 减少bug, 避免无意中的修改导致其他模块出错
写测试用例的过程中, 靠人力去确保所有代码都被覆盖是一件挺麻烦的事情
本文主要介绍如何在xunit下使用coverlet统计测试覆盖率
系统: wsl2
编辑器: vscode
插件: C# + Coverlet + Coverage Gutters
TestFunc.cs
public class TestFunc
{
    public static string Test1()
    {
        return "Test1";
    }
    public static string Test2()
    {
        return "Test2";
    }
}
测试代码:
[Fact]
public void Test1()
{
    Assert.True(TestFunc.Test1()=="Test1");
    Assert.False(TestFunc.Test1()=="Test2");
}
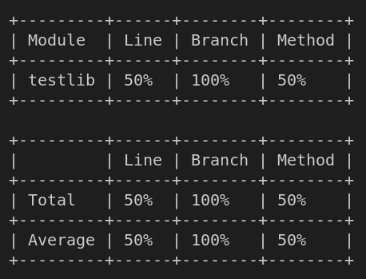
通过 dotnet test 运行后

只会显示多少通过, 多少失败, 并不知道哪些代码被覆盖到了
显示覆盖率
修改csproj
首先需要修改单元测试项目的 csproj 文件
在开头的 PropertyGroup 块中添加
<CollectCoverage>true</CollectCoverage>
<CoverletOutputFormat>cobertura</CoverletOutputFormat>
用于生成测试的覆盖报告 coverage.cobertura.xml
之后在 ItemGroup 中添加
<PackageReference Include="coverlet.msbuild" Version="3.1.0"/>
之后运行 dotnet test 测试
就会多显示一些覆盖率的内容
查看具体的覆盖情况
安装 Coverlet 和 Coverage Gutters 插件之后
进入被调用的文件内, 在vscode下方状态栏中会显示当前文件的覆盖率情况
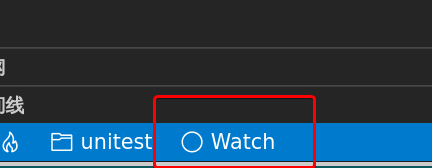
上图为初始状态
点击这个 Watch 之后会开始解析 coverage.cobertura.xml
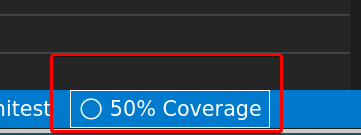
之后会显示当前文件覆盖率
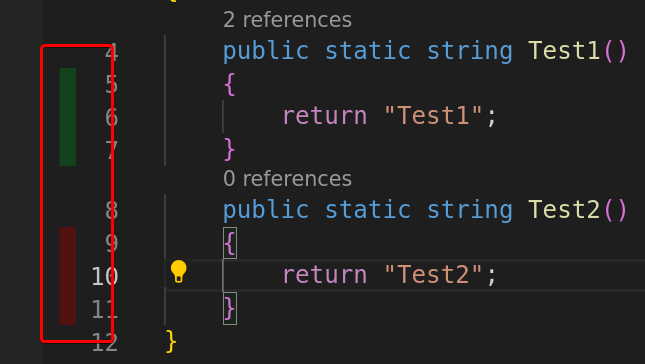
同时编辑器窗口中也会通过比较显眼的绿色(覆盖)红色(未覆盖)标记覆盖情况
Recommend
About Joyk
Aggregate valuable and interesting links.
Joyk means Joy of geeK