

编译效率快三倍,使用WSL2编译OpenHarmony嘎嘎得劲!
source link: https://www.51cto.com/article/719514.html
Go to the source link to view the article. You can view the picture content, updated content and better typesetting reading experience. If the link is broken, please click the button below to view the snapshot at that time.

编译效率快三倍,使用WSL2编译OpenHarmony嘎嘎得劲!

笔者发现使用wsl(Windows Subsystem for Linux,适用于 Linux 的 Windows 子系统)编译openharmony镜像比传统虚拟机快3倍以上。编译环境换成wsl后,编译ohos只需要传统虚拟机上三分之一的时间。下面分享使用经验如下:
为什么使用WSL2比传统虚拟机编译OpenHarmony快?
以下是微软官方给的解释:https://learn.microsoft.com/zh-cn/windows/wsl/about。
- Windows Subsystem for Linux(适用于 Linux 的 Windows 子系统)可让开发人员按原样运行 GNU/Linux 环境 - 包括大多数命令行工具、实用工具和应用程序 - 且不会产生传统虚拟机或双启动设置开销。
- WSL2使用最新、最强大的虚拟化技术在轻量级实用工具虚拟机 (VM) 中运行 Linux 内核。 但是,WSL2不是传统的 VM 体验。
- 传统的 VM 体验可能启动速度慢,是独立的,消耗大量资源,需要你花费时间进行管理。 WSL 2 没有这些属性。
以下是笔者的感受:
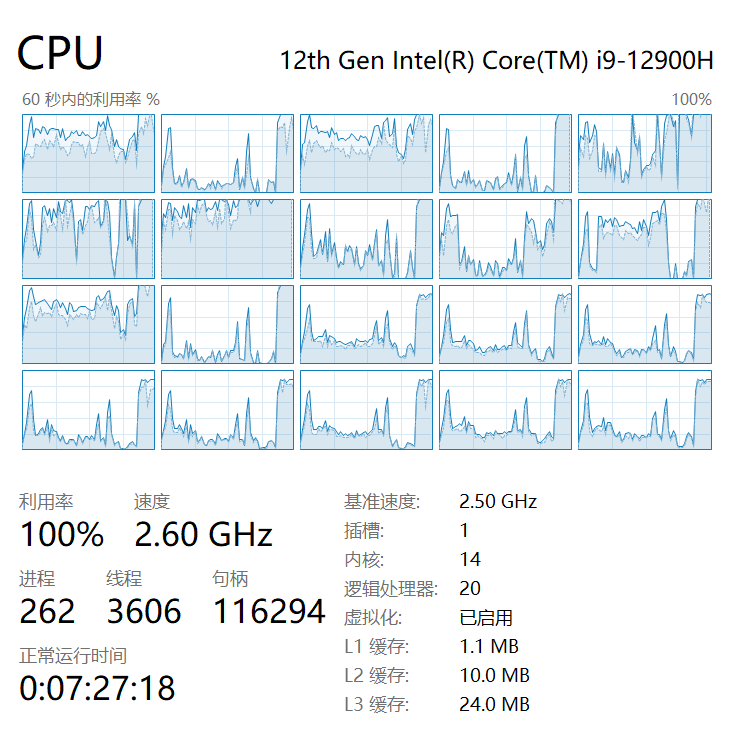
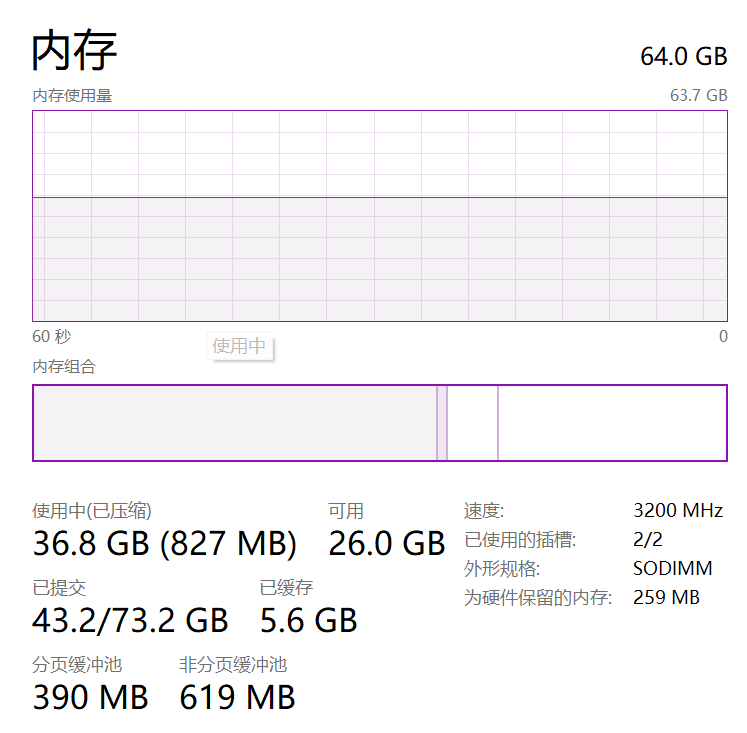
- 具体点说就是编译openharmony时cpu的利用率可以达到90%以上。而且编译直接占用的是电脑的内存,而不是给传统虚拟机上分配的内存。
- 而传统虚拟机还要设置虚拟机参数,性能是受到制约的。

配置WSL环境
检查运行 WSL 2 的要求
若要更新到 WSL 2,需要运行 Windows 10。
- 对于 x64 系统:版本 1903 或更高版本,内部版本为 18362 或更高版本。
- 对于 ARM64 系统:版本 2004 或更高版本,内部版本为 19041 或更高版本。
或 Windows 11。
若要检查 Windows 版本及内部版本号,选择 Windows 徽标键 + R,然后键入“winver”,选择“确定”。
安装 WSL 命令
现在,可以在管理员 PowerShell 或 Windows 命令提示符中输入此命令,然后重启计算机来安装运行适用于 Linux 的 Windows 子系统 (WSL) 所需的全部内容。
wsl --install启用适用于 Linux 的 Windows 子系统
需要先启用“适用于 Linux 的 Windows 子系统”可选功能,然后才能在 Windows 上安装 Linux 分发。
以管理员身份打开 PowerShell(“开始”菜单 >“PowerShell” >单击右键 >“以管理员身份运行”),然后输入以下命令:
dism.exe /online /enable-feature /featurename:Microsoft-Windows-Subsystem-Linux /all /norestart启用虚拟机功能
安装 WSL 2 之前,必须启用“虚拟机平台”可选功能。 计算机需要虚拟化功能才能使用此功能。
以管理员身份打开 PowerShell 并运行:
dism.exe /online /enable-feature /featurename:VirtualMachinePlatform /all /norestart按要求重启使设置生效。
下载 Linux 内核更新包
1.下载最新包:
适用于 x64 计算机的 WSL2 Linux 内核更新包。
2.运行上一步中下载的更新包。 (双击以运行 - 系统将提示你提供提升的权限,选择“是”以批准此安装。)
将 WSL 2 设置为默认版本
使用 wsl --install 命令安装的新 Linux 安装将默认设置为 WSL 2。
wsl --set-default-version 2安装所选的 Linux 分发
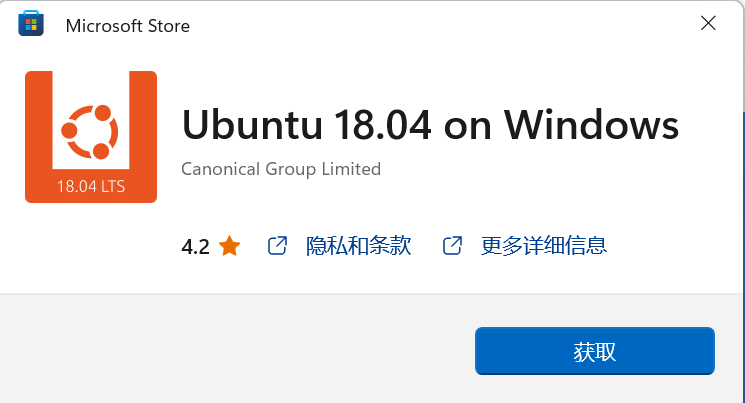
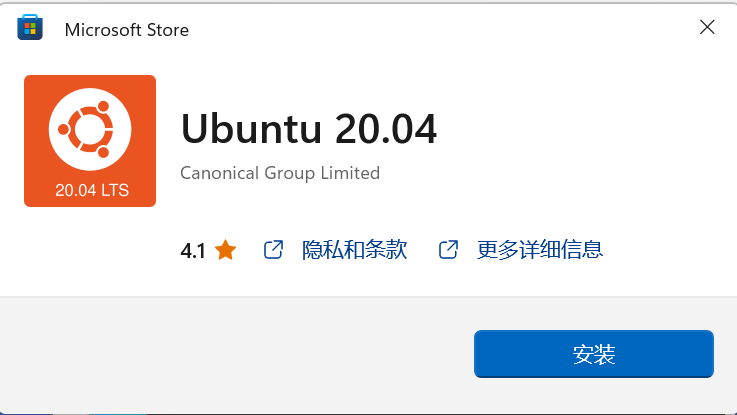
打开 Microsoft Store,并选择你偏好的 Linux 分发版。
编译openharmony只能安装Ubuntu 20.04和Ubuntu 18.04
首次启动新安装的 Linux 分发版时,将打开一个控制台窗口,系统会要求你等待一分钟或两分钟,以便文件解压缩并存储到电脑上。 未来的所有启动时间应不到一秒。
然后,需要为新的 Linux 分发版创建用户帐户。

- wsl2到底安装在windows系统的那个位置呢?
C:\Users\用户名\AppData\Local\Packages\CanonicalGroupLimited.Ubuntu18.04LTS_79rhkp1fndgsc\LocalState
在Linux终端输入命令:
sudo vim /etc/apt/sources.list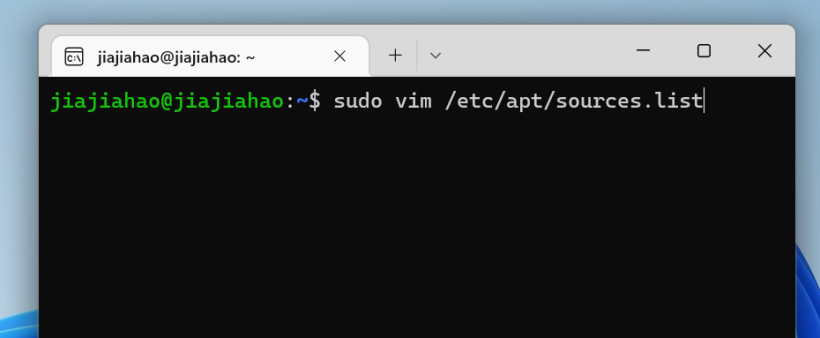
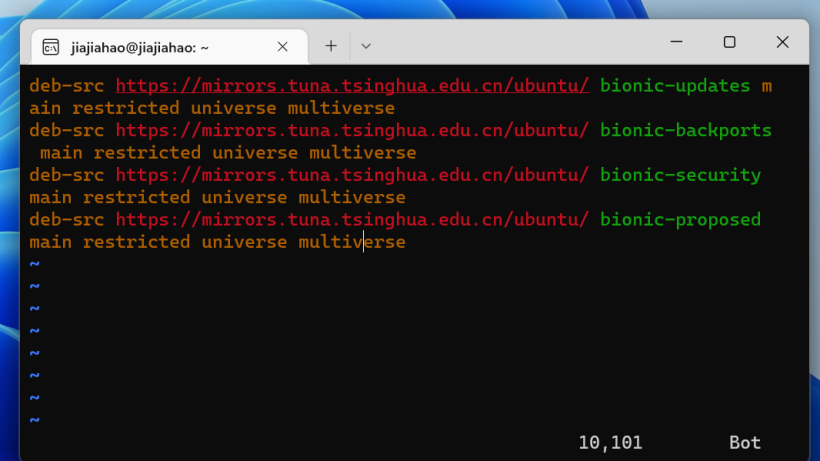
把etc/apt/sources.list文件内容清楚,换下述其中一个源。(以下是vim的使用)。
- 按一下字母「i」就可以进入「插入模式(Insert mode)」,就可以开始输入文字了。
- 编辑好后按ESC键退出。
- 最后键盘输入:wq,然后文件存盘并退出vim。
#163源
deb http://mirrors.163.com/ubuntu/ bionic main restricted universe multiverse
deb http://mirrors.163.com/ubuntu/ bionic-security main restricted universe multiverse
deb http://mirrors.163.com/ubuntu/ bionic-updates main restricted universe multiverse
deb http://mirrors.163.com/ubuntu/ bionic-proposed main restricted universe multiverse
deb http://mirrors.163.com/ubuntu/ bionic-backports main restricted universe multiverse
deb-src http://mirrors.163.com/ubuntu/ bionic main restricted universe multiverse
deb-src http://mirrors.163.com/ubuntu/ bionic-security main restricted universe multiverse
deb-src http://mirrors.163.com/ubuntu/ bionic-updates main restricted universe multiverse
deb-src http://mirrors.163.com/ubuntu/ bionic-proposed main restricted universe multiverse
deb-src http://mirrors.163.com/ubuntu/ bionic-backports main restricted universe multiverse
#中科大源
deb https://mirrors.ustc.edu.cn/ubuntu/ bionic main restricted universe multiverse
deb https://mirrors.ustc.edu.cn/ubuntu/ bionic-updates main restricted universe multiverse
deb https://mirrors.ustc.edu.cn/ubuntu/ bionic-backports main restricted universe multiverse
deb https://mirrors.ustc.edu.cn/ubuntu/ bionic-security main restricted universe multiverse
deb https://mirrors.ustc.edu.cn/ubuntu/ bionic-proposed main restricted universe multiverse
deb-src https://mirrors.ustc.edu.cn/ubuntu/ bionic main restricted universe multiverse
deb-src https://mirrors.ustc.edu.cn/ubuntu/ bionic-updates main restricted universe multiverse
deb-src https://mirrors.ustc.edu.cn/ubuntu/ bionic-backports main restricted universe multiverse
deb-src https://mirrors.ustc.edu.cn/ubuntu/ bionic-security main restricted universe multiverse
deb-src https://mirrors.ustc.edu.cn/ubuntu/ bionic-proposed main restricted universe multiverse
#阿里云源
deb http://mirrors.aliyun.com/ubuntu/ bionic main restricted universe multiverse
deb http://mirrors.aliyun.com/ubuntu/ bionic-security main restricted universe multiverse
deb http://mirrors.aliyun.com/ubuntu/ bionic-updates main restricted universe multiverse
deb http://mirrors.aliyun.com/ubuntu/ bionic-proposed main restricted universe multiverse
deb http://mirrors.aliyun.com/ubuntu/ bionic-backports main restricted universe multiverse
deb-src http://mirrors.aliyun.com/ubuntu/ bionic main restricted universe multiverse
deb-src http://mirrors.aliyun.com/ubuntu/ bionic-security main restricted universe multiverse
deb-src http://mirrors.aliyun.com/ubuntu/ bionic-updates main restricted universe multiverse
deb-src http://mirrors.aliyun.com/ubuntu/ bionic-proposed main restricted universe multiverse
deb-src http://mirrors.aliyun.com/ubuntu/ bionic-backports main restricted universe multiverse
#清华源
deb https://mirrors.tuna.tsinghua.edu.cn/ubuntu/ bionic main restricted universe multiverse
deb https://mirrors.tuna.tsinghua.edu.cn/ubuntu/ bionic-updates main restricted universe multiverse
deb https://mirrors.tuna.tsinghua.edu.cn/ubuntu/ bionic-backports main restricted universe multiverse
deb https://mirrors.tuna.tsinghua.edu.cn/ubuntu/ bionic-security main restricted universe multiverse
deb https://mirrors.tuna.tsinghua.edu.cn/ubuntu/ bionic-proposed main restricted universe multiverse
deb-src https://mirrors.tuna.tsinghua.edu.cn/ubuntu/ bionic main restricted universe multiverse
deb-src https://mirrors.tuna.tsinghua.edu.cn/ubuntu/ bionic-updates main restricted universe multiverse
deb-src https://mirrors.tuna.tsinghua.edu.cn/ubuntu/ bionic-backports main restricted universe multiverse
deb-src https://mirrors.tuna.tsinghua.edu.cn/ubuntu/ bionic-security main restricted universe multiverse
deb-src https://mirrors.tuna.tsinghua.edu.cn/ubuntu/ bionic-proposed main restricted universe multiverse
笔者换的是清华源。
最后更新源:
apt update
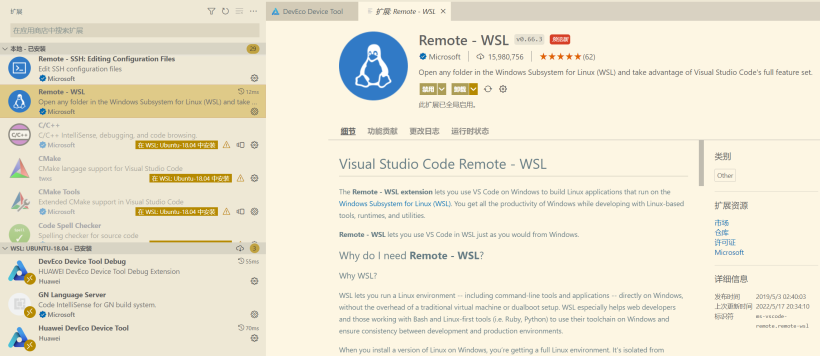
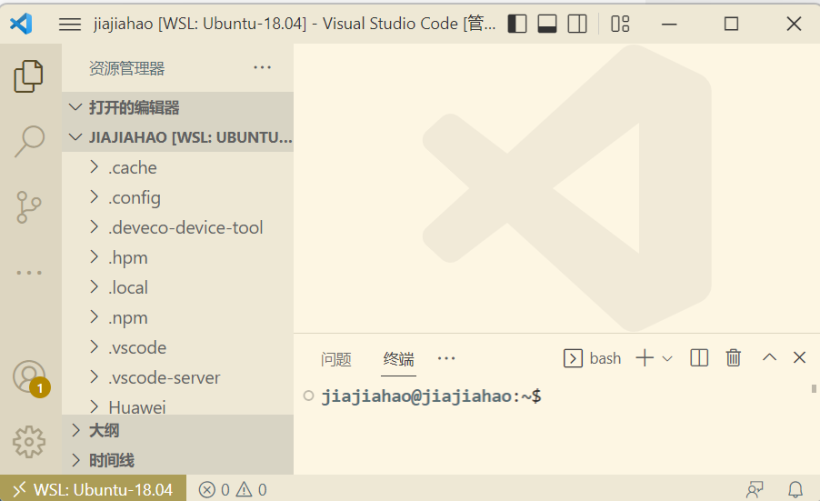
apt upgrade在windowsx下的vscode里面下载好remote - wsl拓展
还可以通过使用 VS Code 中的快捷方式 CTRL+SHIFT+P 调出命令面板,以访问更多 VS Code 远程选项。
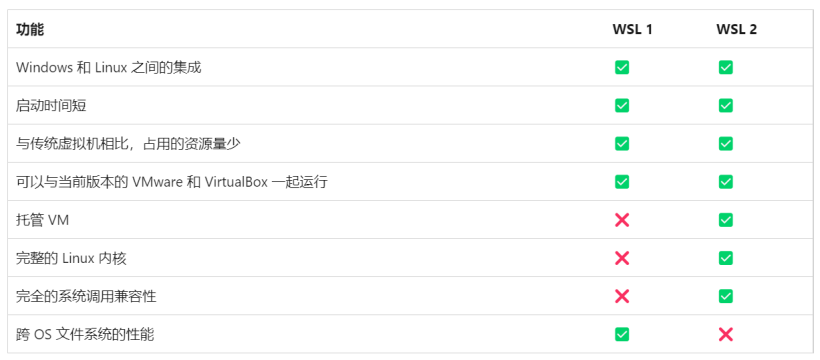
使用WSL1编译OpenHarmony可以吗?
编译不了,笔者已经踩过坑了。
比较 WSL 1 和 WSL 2:
使用wsl2编译openharmony镜像
源码获取和编译工具安装的部分不多作介绍了,社区有很多优秀的参考文章值得参考。

Recommend
-
7
使用ninja命令提高单模块编译效率 2018-02-09 14:16:53 +08 字数:3400 标签: Android
-
8
wsl2 无法使用terminalizer 渲染gif图片 wsl上使用terminizer需要通过xrdp远程登录使用,在使用的时候,可能会曝出下面的错误。 ERROR:buffer_manager.cc(488)] [.DisplayCompositor]GL ERROR :GL_INVALID_OPERATION : glBu...
-
8
在 Windows 下使用 WSL2 搭建 Kubernetes 集群-阳明的博客|Kubernetes|Istio|Prometheus|Python|Golang|云原生 Windows WSL2 本文我们将介绍如何在 Windows10 下使用 WSL2 和 KinD 来搭建一套 Kubernetes 集群。在过去...
-
10
OpenHarmony预置系统应用编译安装全流程记录 作者:拓维信息田怡婧 2022-02-21 14:49:26 SystemUI应用是OpenHarmony中预置的系统应用,为用户提供系统相关信息展示及交互界面,包括系统状态、系统提示、系...
-
5
想了解更多内容,请访问:
-
14
想了解更多关于开源的内容,请访问:51CTO 开源基础软件社区
-
4
wsl2使用宿主主机代理 作者: dreamfly 分类: linux 发布时间: 2022-05-05 15:28 在使用wsl2的时候,有些时候我们希望可以使用主机的代理来访问某些40...
-
6
饿了么X厦门气象服务中心:趁热入冬“嘎嘎”香 作者: ...
-
4
NMS.LanX .NET 大师,动态编译应用专家,微软最有价值专家(MVP) ...
-
5
效率提升三倍!亚马逊开始使用“AI”检测损坏货物Sorftime10万卖家都在用的智能分析与选品软件。12大站点数据实时更新,客户遍及45个国家和地区,40...
About Joyk
Aggregate valuable and interesting links.
Joyk means Joy of geeK