

Triggering Alarms Tutorial for Android: Getting Started [FREE]
source link: https://www.raywenderlich.com/33899169-triggering-alarms-tutorial-for-android-getting-started
Go to the source link to view the article. You can view the picture content, updated content and better typesetting reading experience. If the link is broken, please click the button below to view the snapshot at that time.

Triggering Alarms Tutorial for Android: Getting Started
Learn how to set up alarms in your Android apps using the AlarmManager API, and find out about the exact and inexact alarm types as well as best practices.
Version

When you hear the word “alarm”, it’s easy to immediately think about buzzing and ringing and that feeling when you’re comfy in bed, but it’s time to get up. But in Android, scheduling an alarm means scheduling your app to trigger at some point in the future. There are two important things you need to care about when defining an alarm: an action and a time in the future when that action should execute.
In this tutorial, you’ll play with a simple app called Studdy. Use it to schedule reminders to work or study, but also to take a break from those sessions. You’ll learn:
- What inexact and exact alarms are.
- How to schedule and cancel an alarm.
- What Doze mode is and how it affects scheduled alarms.
- How to preserve an alarm across device restart.
- Best practices when working with alarms.
For this tutorial, you need Android Studio and an Android device or emulator.
Getting Started
To start, download the materials using the Download Materials button at the top or bottom of this tutorial. Open the starter project in Android Studio. Once the project opens, let it build and sync, and you’re ready to go!
Run the app and check its features, but keep in mind this is a starter version of the app, so features aren’t complete:
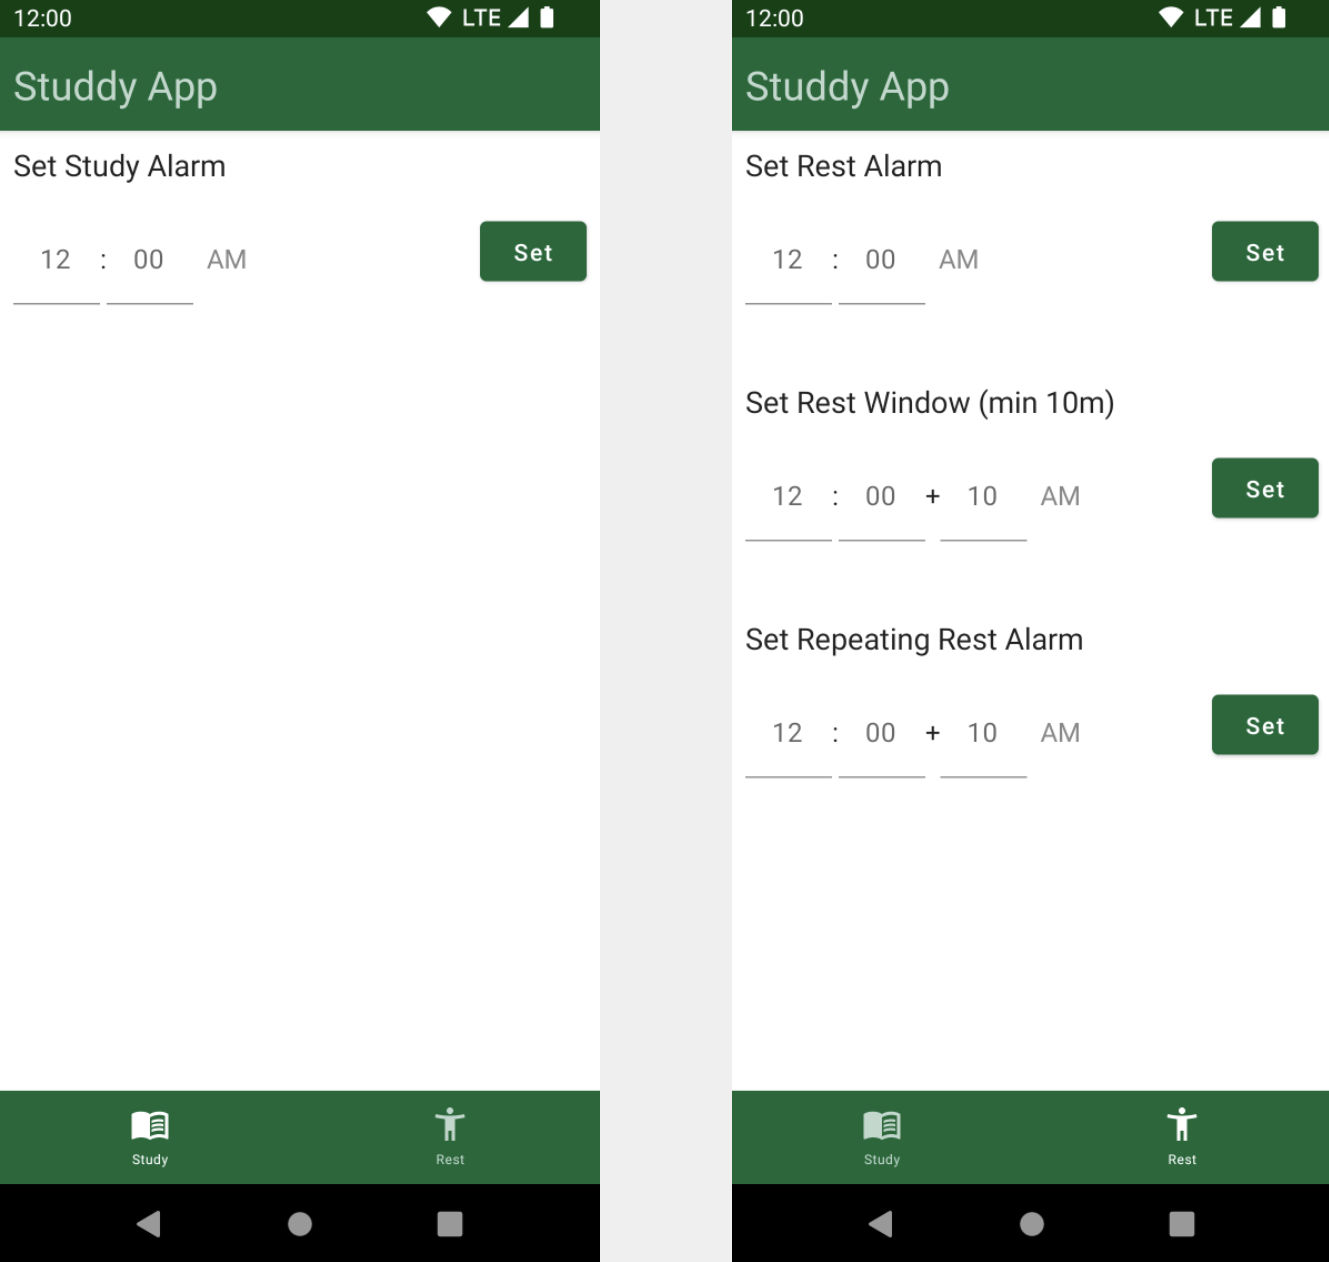
The complete app has two screens and the following features:
- Study screen: This allows you to set a reminder for a study time. The reminder is implemented as an exact alarm.
-
Rest screen: This allows you to schedule three different types of reminders to rest and stretch a bit during your session:
- Regular inexact alarm.
- Window alarm.
- Repeating alarm for longer sessions.
Once you schedule an alarm by tapping Set, the Clear button will appear. You’ll use it to cancel the scheduled alarm.
When specifying the time, choose between AM and PM options by tapping a button beside the time picker. This button is hidden if your device is set to the 24-hour format. To change it, check the Date & Time section in the device Settings.
When the alarm fires, you’ll see a notification and you’ll hear a ringtone. To stop the ringtone, dismiss the notification or tap it to open the app and cancel the ringtone from there.
Triggering an Exact Alarm
Triggering an exact alarm happens in a precise moment in the future when the device time is exactly the same as the alarm time.
With this definition in mind, you’ll start working on the app’s first feature: Study Reminder. It’s important that the study starts sharply on time, so it makes perfect sense to implement it with an exact alarm.
Defining an AlarmManager Instance
Open ExactAlarmsImpl.kt. On top of ExactAlarmsImpl, replace TODO (1) with:
private val alarmManager = context.getSystemService(Context.ALARM_SERVICE) as AlarmManager
This code line creates an alarmManager instance. To get the AlarmManager instance, you use getSystemService() with a specific tag.
AlarmManager provides access to the system alarm services instance, and you’ll use it to manage alarms in the app.
Declaring a Permission
Now, open AndroidManifest.xml. Above the application tag, you’ll find TODO (2). Replace it with this:
<uses-permission android:name="android.permission.SCHEDULE_EXACT_ALARM" />
This prepares your app for using exact alarm APIs. All apps that target Android 12 (API level 31) or higher have to obtain the Alarms & reminders special app access by declaring SCHEDULE_EXACT_ALARM permission. This behavior change encourages apps to preserve system resources. Scheduling an exact alarm without declaring this permission would produce a SecurityException error.
Checking Your App’s Permissions
Go back to ExactAlarmsImpl.kt, and look for canScheduleExactAlarms(). Replace the return statement with:
return if (Build.VERSION.SDK_INT >= Build.VERSION_CODES.S) {
  alarmManager.canScheduleExactAlarms()
} else {
  true
}
Keep in mind that before scheduling an exact alarm, you need to confirm the app still has the special app access when targeting Android 12 (API level 31) or higher. You do this by calling canScheduleExactAlarms(). For lower SDK versions, you don’t have to perform this check.
Opening the Alarms & Reminders Screen
Next, you’ll add code for starting the screen you’ll be interested in the most.
Go to MainActivity.kt and find openSettings(). Replace TODO (4) with the following code:
if (Build.VERSION.SDK_INT >= Build.VERSION_CODES.S) {
  startActivity(Intent(ACTION_REQUEST_SCHEDULE_EXACT_ALARM))
}
If the user has revoked the special app access and tries to schedule an exact alarm, this code opens the Alarms & reminders screen in the system settings to grant it again.
When you revoke Alarms & reminders special app access, the system stops your app and cancels all future exact alarms. When special app access is granted to your app, the system sends the ACTION_SCHEDULE_EXACT_ALARM_PERMISSION_STATE_CHANGED broadcast. This lets you reschedule any exact alarms your app needs. However, you won’t implement this functionality in this tutorial. You need to leave something for the next time. :]
Handling App Permission
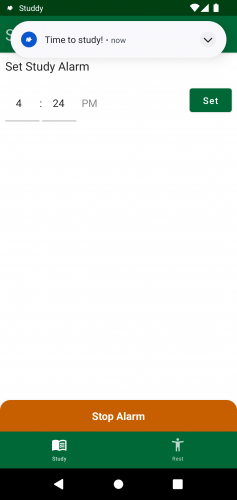
Run the app on a device or emulator with Android 12 (API level 31) or higher. On the main screen, enter a time in the future and tap Set. You’ll see something like this:

The app saved exact alarm data in SharedPreferences and updated the UI. You still haven’t implemented the code that’ll schedule an exact alarm with AlarmManager, but this demo confirms that you’ve successfully set the permission because canScheduleExactAlarms() returns true.
Next, revoke special app access to verify the app opens the Alarms & reminders screen. In the Studdy app’s App info screen, switch off the Allow setting alarms and reminders option.

Now, go back to the app and try to schedule an exact alarm with the same steps as before, and you’ll see this:

In this case, canScheduleExactAlarms() returned false and resulted in the app opening the Alarms & reminders screen. That happened because you didn’t allow scheduling alarms from the Studdy app.
Defining an Alarm Action
Now that all requirements for using exact alarm APIs are implemented, it’s time to implement an actual alarm.
In ExactAlarmBroadcastReceiver.kt, replace TODO (5) with:
class ExactAlarmBroadcastReceiver : BroadcastReceiver() {
  // 1
  override fun onReceive(context: Context, intent: Intent) {
    // 2
    showNotification(
        context,
        NOTIFICATION_CHANNEL_ID,
        NOTIFICATION_CHANNEL_NAME,
        NOTIFICATION_ID,
        "Time to study!"
    )
    (context.applicationContext as StuddyApplication).apply {
      exactAlarms.clearExactAlarm()
      alarmRingtoneState.value = playRingtone(context)
    }
  }
}
With this code:
- You defined the action that the app will execute once the alarm fires. You created a custom
BroadcastReceiverclass. It has only one method, which is necessary for eachBroadcastReceiver. - Once the
BroadcastReceiverreceives an event, it shows a notification, removes the running alarm, and starts playing the ringtone.
Next, open AndroidManifest.xml and find TODO (6) below the activity tag. Replace it with:
<receiver android:name="com.yourcompany.android.studdy.alarm.ExactAlarmBroadcastReceiver" />
Here, you declared your custom class as BrodcastReceiver to the system. The system must know this info to be able to respond appropriately.
Now, you need to define a method for PendingIntent needed to schedule an alarm.
Navigate to ExactAlarmsImpl.kt. At the bottom of the class, replace TODO (7) with:
private fun createExactAlarmIntent(): PendingIntent {
  // 1
  val intent = Intent(context, ExactAlarmBroadcastReceiver::class.java).
  // 2
  return PendingIntent.getBroadcast(
    context,
    EXACT_ALARM_INTENT_REQUEST_CODE,
    intent,
    PendingIntent.FLAG_IMMUTABLE
  )
}
Here’s a breakdown:
- You defined an
Intentwith theExactAlarmBroadcastReceiveryou created before. - The
returnstatement builds thePendingIntentneeded to schedule an alarm.PendingIntentreceivescontext, a private request code for the sender and the intent. The last argument isFLAG_IMMUTABLE, a flag indicating that the createdPendingIntentshould be immutable. In most cases for scheduling alarms, there’s no need to allow updatingPendingIntent.
Scheduling an Alarm
Your app now correctly handles special app access and defines the action that’s executed when the alarm is triggered. The next step is to write logic for scheduling exact alarms.
Before doing that, ensure you switch back on the Allow setting alarms and reminders option.
Go to ExactAlarmsImpl.kt and look for setExactAlarmSetAlarmClock(). Notice it contains TODO (8). Replace the TODO with the following code:
// 1
val pendingIntent = createExactAlarmIntent()
// 2
val alarmClockInfo = AlarmManager.AlarmClockInfo(triggerAtMillis, pendingIntent)
// 3
alarmManager.setAlarmClock(alarmClockInfo, pendingIntent)
Two things happened here:
- You used
createExactAlarmIntent()to create aPendingIntent, which defines the action the app executes when the alarm is triggered. - You created an
AlarmClockInfoobject that specifies what time to trigger the alarm. - Using
setAlarmClock()ofAlarmManager, you scheduled the alarm.
By scheduling an alarm this way, the system invokes an alarm at a precise time in the future. This kind of alarm is highly visible to users and, to ensure absolute precision, the system won’t modify the delivery time. The system will even leave low-power modes, if necessary, to deliver exact alarms.
Build and run the app. Enter a time in the future, and tap Set. The quickest way to test the alarm is to schedule it to trigger a minute or two from the current device time. Once the alarm is triggered, stop the ringtone by tapping Stop Alarm or by swiping off the notification.

But what if it’s not necessary to trigger the alarm immediately? Then, you should use setExact().
In setExactAlarmSetExact(), replace TODO (9) with the following code:
// 1
val pendingIntent = createExactAlarmIntent()
// 2
alarmManager.setExact(AlarmManager.RTC_WAKEUP, triggerAtMillis, pendingIntent)
With these lines:
- You also schedule an exact alarm. You use the same
createExactAlarmIntent()method to create aPendingIntent. - Instead of
setAlarmClock(), you usesetExact()to schedule an alarm.
By passingAlarmManager.RTC_WAKEUPfor an alarm type, you declared that the system should invoke an alarm at a nearly precise time in the future. The device will wake up and fire a pending intent. Keep in mind that if a device is in a low-power mode, the system won’t invoke an alarm.
If an action that you want to trigger isn’t time-critical, you should use this method to set exact alarms.
To test this, in scheduleExactAlarm() replace the setExactAlarmSetAlarmClock() call with this method:
setExactAlarmSetExact(exactAlarm.triggerAtMillis)
Handling Idle State
Surely you’re wondering how to ensure an alarm invokes on the device in low-power mode. The solution is using setExactAndAllowWhileIdle().
In setExactAlarmSetExactAndAllowWhileIdle(), replace TODO (10) with the following lines:
val pendingIntent = createExactAlarmIntent()
alarmManager.setExactAndAllowWhileIdle(AlarmManager.RTC_WAKEUP, triggerAtMillis, pendingIntent)
This code is very similar to the previous example, but instead of setExact(), you use setExactAndAllowWhileIdle(). Just like before, the system invokes an alarm at a moment very close to the specified time in the future, but this time, it invokes an alarm even if the system is in a low-battery mode.
Understanding Alarm Types
In the previous section, you used AlarmManager.RTC_WAKEUP for an alarm type when scheduling an exact alarm. There are four exact alarm types in total:
- ELAPSED_REALTIME: The system considers the time since your device booted in calculating when to fire a pending intent. The system doesn’t wake the device for this alarm. The time during which the device was asleep is also taken into account.
- ELAPSED_REALTIME_WAKEUP: This is similar to previous type, but the system wakes the device to fire the pending intent.
- RTC: Fires the pending intent at the specified time but doesn’t wake the device.
- RTC_WAKEUP: At the specified time, the system fires an alarm.
Canceling an Alarm
Now that you know how to schedule alarm, you’ll learn how to cancel one. In clearExactAlarm(), replace TODO (11) with:
// 1
val pendingIntent = createExactAlarmIntent()
alarmManager.cancel(pendingIntent)

// 2
sharedPreferences.clearExactAlarm()
exactAlarmState.value = ExactAlarm.NOT_SET
Here is an explanation:
- This code first creates a
PendingIntentthat you use to schedule an alarm. Then, it callscancel()on theAlarmManagerand passes thatPendingIntent.This action cancels the scheduled alarm. - You clear the alarm data from the shared preferences and update the
exactAlarmState.
Congrats! You learned a lot about exact alarms. Next, you’ll try out inexact alarms.
Triggering an Inexact Alarm
An inexact alarm is triggered at the most efficient time for the device’s battery. In other words, the system doesn’t promise the delivery of the alarm at an exact time in the future.
There are three types of inexact alarms:
- An alarm after a specific time.
- An alarm during a time window.
- A repeating alarm.
With this definition in mind, you’ll start working on the app’s second feature: Rest Reminder.
The first step is creating an AlarmManager instance. Open InexactAlarmsImpl.kt. On top of InexactAlarmsImpl replace TODO (12) with:
private val alarmManager = context.getSystemService(Context.ALARM_SERVICE) as AlarmManager
Just like before, with this code, you add an AlarmManager instance.
Defining Alarm Actions
Next, you need to define what will happen once the system triggers an alarm.
Go to InexactAlarmBroadcastReceiver.kt. Remove TODO (13) and add the following code:
class InexactAlarmBroadcastReceiver : BroadcastReceiver() {

  override fun onReceive(context: Context, intent: Intent) {
    Log.d(
        "InexactAlarmBroadcastReceiver",
        "Alarm with request code ${intent.getIntExtra(ALARM_REQUEST_CODE_EXTRA, -1)} triggered"
    )
    showNotification(
        context,
        NOTIFICATION_CHANNEL_ID,
        NOTIFICATION_CHANNEL_NAME,
        NOTIFICATION_ID,
        "Don't forget to stretch and rest a bit! :]"
    )
    (context.applicationContext as StuddyApplication).apply {
      when (intent.getIntExtra(ALARM_REQUEST_CODE_EXTRA, -1)) {
        INEXACT_ALARM_REQUEST_CODE -> inexactAlarms.clearInexactAlarm()
        INEXACT_ALARM_WINDOW_REQUEST_CODE -> inexactAlarms.clearWindowAlarm()
        INEXACT_REPEATING_ALARM_REQUEST_CODE -> {
          // Do nothing
        }
      }
      alarmRingtoneState.value = playRingtone(context)
    }
  }
}
With this code, you defined actions the app will execute once one of the alarms is triggered. The request code distinguishes alarms. You’ll use those same request codes when creating PendingIntents for alarms.
Next, open AndroidManifest.xml and replace TODO (14) with:
<receiver android:name="com.yourcompany.android.studdy.alarm.InexactAlarmBroadcastReceiver" />
Just as before, you need to explicitly tell the system about your new BroadcastReceiver.
Go back to InexactAlarmsImpl.kt. Scroll to the bottom of the file, and replace TODO (15) with the following code:
private fun createInexactAlarmIntent(alarmRequestCode: Int): PendingIntent {
  val intent = Intent(context, InexactAlarmBroadcastReceiver::class.java).apply {
    putExtra(ALARM_REQUEST_CODE_EXTRA, alarmRequestCode)
  }
  return PendingIntent.getBroadcast(
      context,
      alarmRequestCode,
      intent,
      PendingIntent.FLAG_IMMUTABLE
  )
}
Here, you defined a new method for creating PendingIntent needed to schedule any of the three alarms. You used alarmRequestCode to define the type of alarm you’re scheduling.
Scheduling an Alarm After a Specific Time
Move to scheduleInexactAlarm() and replace TODO (16) with:
// 1
val pendingIntent = createInexactAlarmIntent(INEXACT_ALARM_REQUEST_CODE)
// 2
alarmManager.set(AlarmManager.RTC_WAKEUP, inexactAlarm.triggerAtMillis, pendingIntent)
Here, you:
- Use
createInexactAlarmIntent()to create aPendingIntentthat defines the action the app will execute when the alarm is triggered. - Schedule an inexact alarm in the manager using
AlarmManager.set().
Starting from API 19, the trigger time passed to this method is treated as inexact — the alarm won’t be delivered before the set time but may be deferred and delivered some time later. If your app runs on a device with Android 12 or higher, the system will invoke the alarm within one hour of the supplied trigger time, but only if the device isn’t in low-battery mode. Those rare gems of apps with targetSdkVersion before API 19 will continue to get the previous alarm behavior — all scheduled alarms are treated as exact.
The system groups inexact alarms to minimize how often the device needs to wake, minimizing battery use. The rule of thumb is that the system won’t defer alarms scheduled in the near future as long as alarms scheduled far in the future.
Similar to exact alarms, setAndAllowWhileIdle() allows you to schedule inexact alarms that will trigger even if the system is in low-power idle, aka Doze mode.
To cancel this alarm, find clearInexactAlarm() and replace TODO (17) with following lines:
val pendingIntent = createInexactAlarmIntent(INEXACT_ALARM_REQUEST_CODE)
alarmManager.cancel(pendingIntent)

sharedPreferences.clearInexactAlarm()
inexactAlarmState.value = ExactAlarm.NOT_SET
Here, you create a PendingIntent, which should be canceled, and pass it to AlarmManager. Then, you clean up SharedPreferences and reset inexactAlarmState‘s state.
Build and run. Open the Rest tab, enter a time in the future for the Rest alarm and tap Set.


In the demo, the alarm was scheduled for 2:32:00 PM, but the logs show the alarm was triggered at 2:33:04 PM. The system decided that was a good moment to trigger it.
Scheduling an Alarm During a Time Window
You can also have a time window in which you want to trigger an alarm. In scheduleWindowAlarm(), replace TODO (18) with:
val pendingIntent = createInexactAlarmIntent(INEXACT_ALARM_WINDOW_REQUEST_CODE)
alarmManager.setWindow(
    AlarmManager.RTC_WAKEUP,
    windowAlarm.triggerAtMillis,
    windowAlarm.windowLengthMillis,
    pendingIntent
)
To schedule an alarm during a time window, you use setWindow(). The key difference from the previous methods you used is that you pass a window start time and a window length. The system will never trigger the alarm before the trigger time. If the device isn’t in low-battery mode, it delivers the alarm within the specified time window, starting from the given trigger time.
For apps targeting Android 12 (API level 31) or higher, the system can delay invoking an inexact alarm by at least 10 minutes. Because of that, be careful to pass more than 600000 (milliseconds) as the windowLengthMillis argument.
If your app requires a higher time precision, use exact alarms instead.
To cancel this alarm, in clearWindowAlarm(), replace TODO (19) with this:
val pendingIntent = createInexactAlarmIntent(INEXACT_ALARM_WINDOW_REQUEST_CODE)
alarmManager.cancel(pendingIntent)

sharedPreferences.clearWindowAlarm()
windowAlarmState.value = WindowAlarm.NOT_SET
The code is the same as the previous canceling, but more specified for the inexact alarm (different state names, different request code, etc.). The logic is the same.
Build and run. Open the Rest screen, enter a time in the future for the Rest Window, specify a window length of at least 10 minutes, and tap Set.
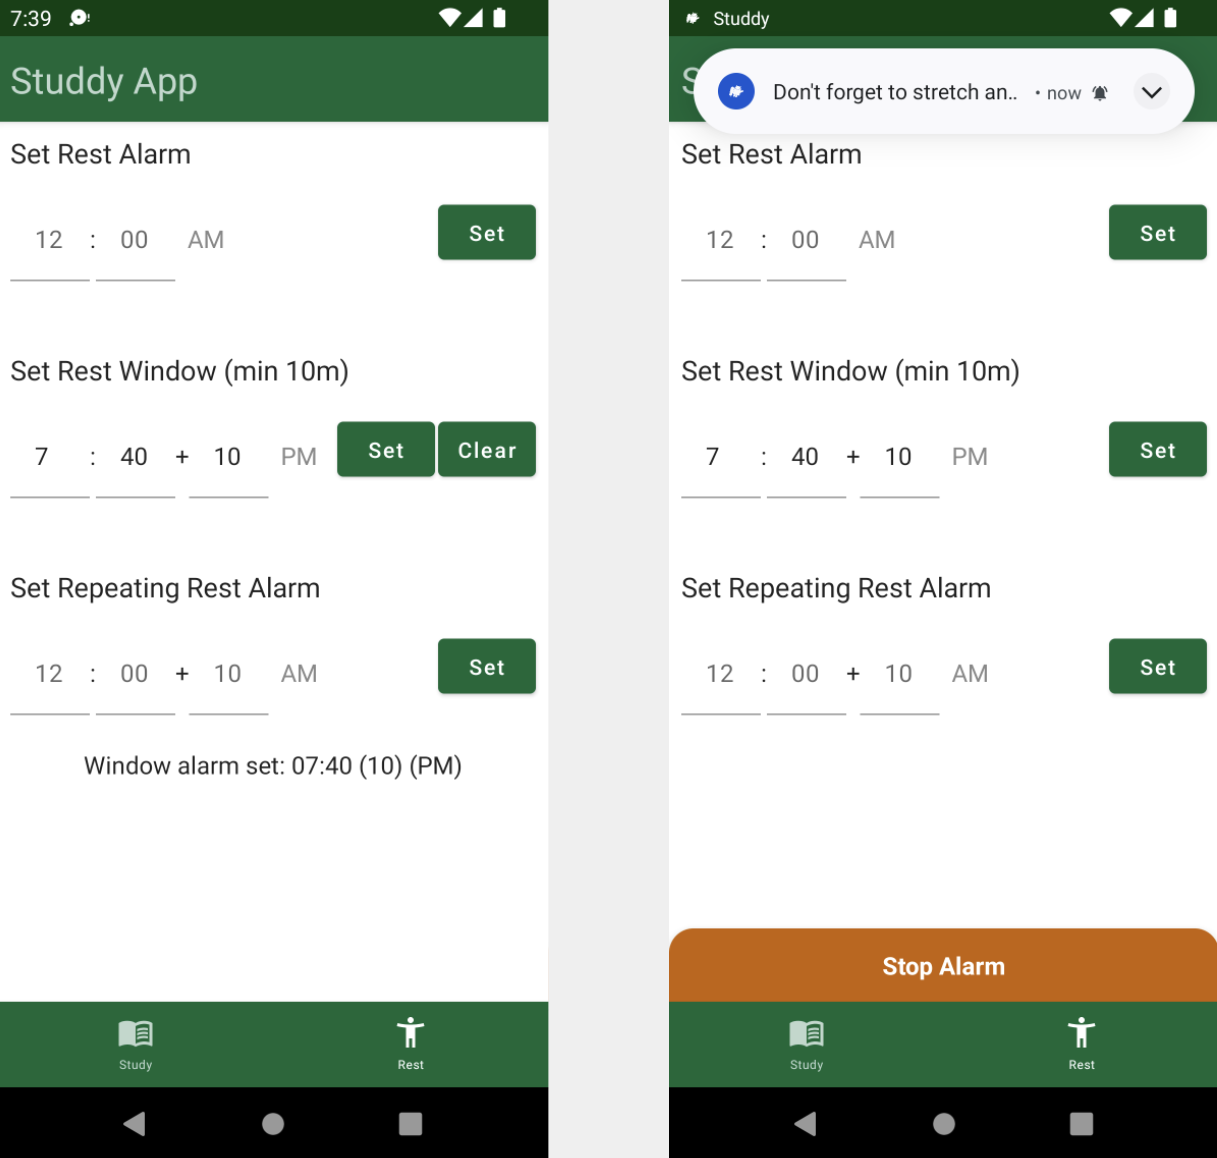

In the demo, the alarm was scheduled for 7:40:00 PM with a window of 10 minutes. The logs show the alarm was triggered at 7:42:19 PM.
Scheduling a Repeating Alarm
It’s also possible to schedule a repeating alarm, for example, every Saturday.
Move to scheduleRepeatingAlarm() and replace TODO (20) with:
val pendingIntent = createInexactAlarmIntent(INEXACT_REPEATING_ALARM_REQUEST_CODE)
alarmManager.setInexactRepeating(
    AlarmManager.RTC_WAKEUP,
    repeatingAlarm.triggerAtMillis,
    repeatingAlarm.intervalMillis,
    pendingIntent
)
To schedule a repeating alarm, you use setInexactRepeating(). The main difference from the previous methods you used is that you pass a trigger time and an interval. The first alarm is triggered within the specified time window, starting from the given trigger time. On average, the system triggers subsequent alarms after the specified time window elapses. But keep in mind that the time between two consecutive alarms might vary.
To cancel this alarm, in clearRepeatingAlarm(), replace TODO (21) with this:
val pendingIntent = createInexactAlarmIntent(INEXACT_REPEATING_ALARM_REQUEST_CODE)
alarmManager.cancel(pendingIntent)

sharedPreferences.clearRepeatingAlarm()
repeatingAlarmState.value = RepeatingAlarm.NOT_SET
Again, you’re using a similar code for canceling, just with a different request code and state. The logic stays the same as well.
Build and run. Open the Rest screen, enter a time in the future for the Repeating Alarm, specify interval length, and tap Set.


In the demo, the alarm was scheduled for 7:50:00 PM with an interval of five minutes. The logs show the first alarm was triggered at 7:51:39 PM and the second one at 7:56:19.
Rescheduling an Alarm When the Device Restarts
By default, the system cancels all alarms when a device shuts down. To prevent this, improve your app by rescheduling alarms when the user reboots the device.
Open AndroidManifest.xml, and replace TODO (22) with:
<uses-permission android:name="android.permission.RECEIVE_BOOT_COMPLETED" />
When the system finishes booting, it broadcasts ACTION_BOOT_COMPLETED. This allows your app to receive that event and react to it. Keep in mind that this only works if the user has already launched the app at least once.
Next, open RescheduleAlarmsBroadcastReceiver.kt, and replace TODO (23) with:
class RescheduleAlarmsBroadcastReceiver : BroadcastReceiver() {

  override fun onReceive(context: Context, intent: Intent) {
    val action = intent.action
    if (action != null) {
      if (action == Intent.ACTION_BOOT_COMPLETED) {
        (context.applicationContext as StuddyApplication).exactAlarms.rescheduleAlarm()
        (context.applicationContext as StuddyApplication).inexactAlarms.rescheduleAlarms()
      }
    }
  }
}
This adds a whole new BroadcastReceiver, which will react on ACTION_BOOT_COMPLETED events.
Finally, go back to AndroidManifest.xml. Replace TODO (24) with:
<receiver
    android:name="com.yourcompany.android.studdy.alarm.RescheduleAlarmsBroadcastReceiver"
    android:exported="true">
  <intent-filter>
    <action android:name="android.intent.action.BOOT_COMPLETED" />
  </intent-filter>
</receiver>
With this code, you define and register the BroadcastReceiver in the AndroidManifest.xml. It’ll reschedule your alarms after the system finishes booting.
Now, if you schedule any alarm, and restart the device, the alarms are still scheduled.
Exploring Best Practices
Now that you’ve completed the app, you’ll go over some of the best practices when working with alarms.
Considering System Resource Consumption
Triggering exact alarms is expensive. When the system triggers exact alarms, the device consumes a lot of resources, such as battery charge, especially if it’s in a power-saving mode. Furthermore, the system can’t easily batch these requests to use resources more efficiently. When creating an exact alarm, always consider using an inexact alarm instead.
Understanding Acceptable Use Cases For an Exact Alarm
Use exact alarms only when your app has user-facing functionalities that require a specific action to be invoked at a precise time. For example:
- An alarm clock app or a timer app.
- A calendar app that shows notifications for upcoming events.
Using Alarms For Network Requests
If you plan to trigger network requests depending on a repeating alarm, add some randomness to when they’re called. If every instance of your app on multiple devices pings the server at the same time, your server might not be able to handle the load.
Alarm Time Precision
When specifying the time for alarms, don’t make it any more precise than necessary. Always think about how precise your app needs to be when working on a specific use case.
Avoid Basing Your Alarm on Clock Time
Repeating alarms that are based on a precise trigger time don’t scale well. When possible, use ELAPSED_REALTIME instead.
Where to Go From Here?
Download the final project using the Download Materials button at the top or bottom of this tutorial.
Congrats! You learned how to use the AlarmManager API, and how to implement exact and inexact alarms — great job!
If you want to learn more about background processing on Android, make sure you check out the Android Background Processing video course that also covers scheduling work with AlarmManager. Check Scheduling Tasks With Android WorkManager as well to learn more about WorkManager.
If you have any questions or comments, please join the discussion below! :]
raywenderlich.com Weekly
The raywenderlich.com newsletter is the easiest way to stay up-to-date on everything you need to know as a mobile developer.
Recommend
-
9
Home iOS & Swift Tutorials AttributedString Tutorial for Swi...
-
5
Home iOS & Swift Tutorials Core Image Tutorial: Getting Star...
-
8
Update note: Matt Larson updated this tutorial for Unreal Engine 5. Tommy Tran wrote the original. Unreal Engine Unreal Engine is a collection of game development tools capable of producing 2D mobi...
-
10
Home Flutter & Dart Tutorials...
-
13
Home iOS & Swift Tutorials Re...
-
11
Home Android & Kotlin Tutorials...
-
15
Home Flutter & Dart Tutorials...
-
8
Home iOS & Swift Tutorials Do...
-
10
Home ... ...
-
3
Home ... ...
About Joyk
Aggregate valuable and interesting links.
Joyk means Joy of geeK