

How to add button to navigation bar in SwiftUI
source link: https://sarunw.com/posts/how-to-add-button-to-navigation-bar-in-swiftui/
Go to the source link to view the article. You can view the picture content, updated content and better typesetting reading experience. If the link is broken, please click the button below to view the snapshot at that time.

In SwiftUI, we can add a button to a navigation bar by putting them in toolbar() modifier.
There are many ways to do this. I will explain how to do it, starting from the basic one.
I group this into three categories.
Add a single button.
Add a button and control its location.
Add multiple buttons.
Add a single button to a navigation bar
If you only want to add just one button to a navigation bar, the quickest way is to simply put it in the toolbar() modifier.
struct ContentView: View {
    var body: some View {
        NavigationView {
            Text("Content")
                .navigationTitle("Navigation Title")
                .toolbar {
                    Button("Add") {}
                }
        }
    }
}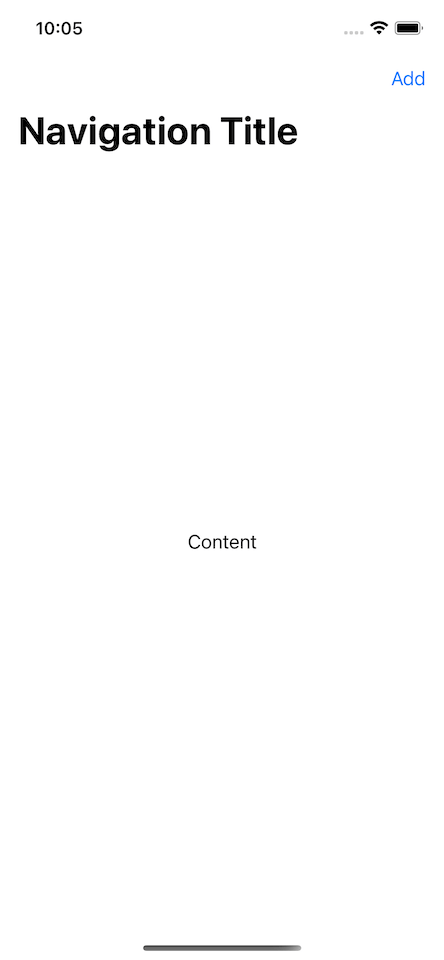
Add a button directly in the toolbar modifier.
Adding a button like this is quick and easy, but it has limitations.
- You can't control the button location. We leave this to SwiftUI decisions which vary based on the platform. The default position on iOS is the trailing edge of a navigation bar.
- You can't have multiple buttons.
If you try to puts multiple buttons this way, the only first one (the one on top) will show up.
struct ContentView: View {
    var body: some View {
        NavigationView {
            Text("Content")
                .navigationTitle("Navigation Title")
                .toolbar {
                    Button("Add 1") {}
                    Button("Add 2") {}
                    Button("Add 3") {}
                }
        }
    }
}
Only the first button would take effect if you specified more than one button in the toolbar modifier.
Control a location of a navigation bar button
There are two ways to control a navigation bar button.
- You wrap a button inside
ToolbarItem. - You wrap a button inside
ToolbarItemGroup.
ToolbarItem
ToolbarItem is a model that represents an item in a navigation bar. It has a placement property, which lets you specify the location for your buttons.
In this example, I place one button at the leading edge and another at the trailing edge.
struct ContentView: View {
    var body: some View {
        NavigationView {
            Text("Content")
                .navigationTitle("Navigation Title")
                .toolbar {
                    // 1
                    ToolbarItem(placement: .navigationBarTrailing) {
                        Button("Add") {}
                    }
                    // 2
                    ToolbarItem(placement: .navigationBarLeading) {
                        Button("Cancel") {}
                    }
                }
        }
    }
}
1 We place the add button at .navigationBarTrailing, which places the item at the trailing edge of the navigation bar.
2 We place the cancel button at .navigationBarLeading, which places the item at the leading edge of the navigation bar.
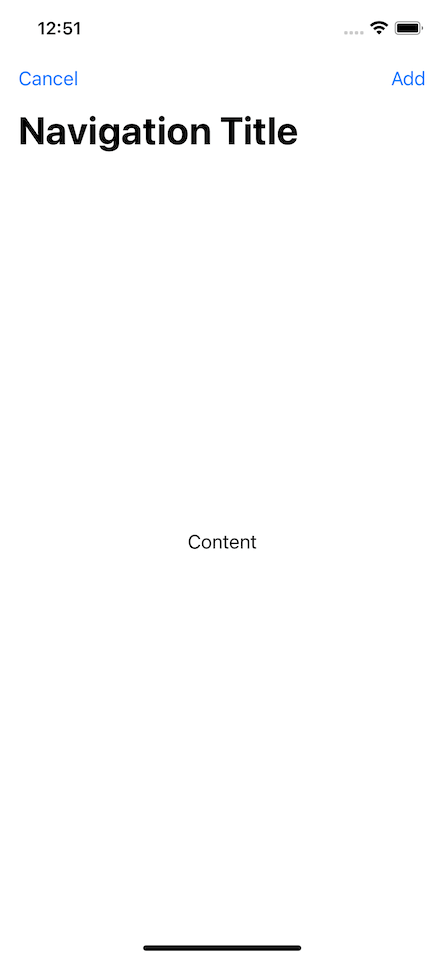
Specify a button location by specifying the placement parameter.
ToolbarItemGroup
ToolbarItemGroup is a model representing a group of items in a navigation bar. It also has a placement property which lets you specify the place for your buttons.
You can achieve the same result by replacing ToolbarItem with ToolbarItemGroup.
struct ContentView: View {
    var body: some View {
        NavigationView {
            Text("Content")
                .navigationTitle("Navigation Title")
                .toolbar {
                    // 1
                    ToolbarItemGroup(placement: .navigationBarTrailing) {
                        Button("Add") {}
                    }
                    // 2
                    ToolbarItemGroup(placement: .navigationBarLeading) {
                        Button("Cancel") {}
                    }
                }
        }
    }
}
Add multiple buttons to a navigation bar
As you can see in the previous example, we can put multiple buttons in a different location by specifying placement in either ToolbarItem or ToolbarItemGroup.
But you can also put multiple buttons in the same location. You can do that with both ToolbarItem and ToolbarItemGroup.
ToolbarItem
To put multiple buttons on the same location with ToolbarItem, you just place multiple ToolbarItem with the same placement. SwiftUI will group them together in the specified location.
In the following example, we put the buttons "Add 1" and "Add 2" on the same placement, .navigationBarTrailing.
struct ContentView: View {
    var body: some View {
        NavigationView {
            Text("Content")
                .navigationTitle("Navigation Title")
                .toolbar {
                    ToolbarItem(placement: .navigationBarTrailing) {
                        Button("Add 1") {}
                    }

ToolbarItemGroup(placement: .navigationBarLeading) {
                        Button("Cancel") {}
                    }

                    ToolbarItem(placement: .navigationBarTrailing) {
                        Button("Add 2") {}
                    }
                }
        }
    }
}
This will group both buttons together on the trailing edge of the navigation bar.

Multiple ToolbarItems with the same placement with be grouped together in that location.
ToolbarItemGroup
You can also put multiple buttons in the same location by putting them together on the same ToolbarItemGroup.
We put both "Add 1" and "Add 2" buttons together under the same ToolbarItemGroup.
struct ContentView: View {
    var body: some View {
        NavigationView {
            Text("Content")
                .navigationTitle("Navigation Title")
                .toolbar {
                    ToolbarItemGroup(placement: .navigationBarLeading) {
                        Button("Cancel") {}
                    }

                    ToolbarItemGroup(placement: .navigationBarTrailing) {
                        Button("Add 1") {}
                        Button("Add 2") {}
                    }
                }
        }
    }
}
The result is the same as using two ToolbarItem.
Group multiple buttons together by placing them in the same ToolbarItemGroup.
Recommend
About Joyk
Aggregate valuable and interesting links.
Joyk means Joy of geeK