

Netty 学习(二):服务端与客户端通信 - Grey Zeng
source link: https://www.cnblogs.com/greyzeng/p/16694353.html
Go to the source link to view the article. You can view the picture content, updated content and better typesetting reading experience. If the link is broken, please click the button below to view the snapshot at that time.

Netty 学习(二):服务端与客户端通信
作者: Grey
原文地址:
说明#
Netty 中服务端和客户端通信,包括两个方面,一个是 IO 处理逻辑的配置,一个是通信载体的设置。
IO 处理逻辑#
无论是客户端,还是服务端,都是通过 Bootstrap 的 handler()方法指定的。我们通过模拟一个简单的客户端发送消息给服务端,服务端回写消息给客户端的示例程序来说明
服务端代码如下(每个配置见注释说明)
package netty.v3;

import io.netty.bootstrap.ServerBootstrap;
import io.netty.buffer.ByteBuf;
import io.netty.channel.ChannelHandlerContext;
import io.netty.channel.ChannelInboundHandlerAdapter;
import io.netty.channel.ChannelInitializer;
import io.netty.channel.ChannelOption;
import io.netty.channel.nio.NioEventLoopGroup;
import io.netty.channel.socket.nio.NioServerSocketChannel;
import io.netty.channel.socket.nio.NioSocketChannel;
import io.netty.util.AttributeKey;

import java.nio.charset.StandardCharsets;
import java.util.Date;

/**
 * Netty 自动绑定递增端口,增加了IO处理逻辑
 *
 * @author <a href="mailto:[email protected]">Grey</a>
 * @date 2022/9/12
 * @since
 */
public class NettyServer {

    public static void main(String[] args) {
        // 引导服务端的启动
        ServerBootstrap serverBootstrap = new ServerBootstrap();
        // 用于监听端口,接收新连接的线程组
        NioEventLoopGroup boss = new NioEventLoopGroup();
        // 表示处理每一个连接的数据读写的线程组
        NioEventLoopGroup worker = new NioEventLoopGroup();
        serverBootstrap.group(boss, worker)
                // 指定IO模型为NIO
                .channel(NioServerSocketChannel.class)
                // 可以给服务端的Channel指定一些属性,非必须
                .attr(AttributeKey.newInstance("serverName"), "nettyServer")
                // 可以给每一个连接都指定自定义属性,非必须
                .childAttr(AttributeKey.newInstance("clientKey"), "clientValue")
                // 使用option方法可以定义服务端的一些TCP参数
                // 这个设置表示系统用于临时存放已经完成三次握手的请求的队列的最大长度,
                // 如果连接建立频繁,服务器创建新的连接比较慢,则可以适当调大这个参数
                .option(ChannelOption.SO_BACKLOG, 1024)
                // 以下两个配置用于设置每个连接的TCP参数
                // SO_KEEPALIVE: 表示是否开启TCP底层心跳机制,true表示开启
                .childOption(ChannelOption.SO_KEEPALIVE, true)
                // TCP_NODELAY:表示是否开启Nagle算法,true表示关闭,false表示开启
                // 如果要求高实时性,有数据发送时就马上发送,就设置为关闭;
                // 如果需要减少发送次数,减少网络交互,就设置为开启。
                .childOption(ChannelOption.TCP_NODELAY, true)
                // 定义后面每一个连接的数据读写
                .childHandler(new ChannelInitializer<NioSocketChannel>() {
                    @Override
                    protected void initChannel(NioSocketChannel ch) {
                        ch.pipeline().addLast(new ChannelInboundHandlerAdapter() {
                            // 不管服务端还是客户端,收到数据后都会调用channelRead()方法
                            @Override
                            public void channelRead(ChannelHandlerContext ctx, Object msg) {
                                ByteBuf byteBuf = (ByteBuf) msg;
                                System.out.println(new Date() + ": 服务端读到数据 -> " + byteBuf.toString(StandardCharsets.UTF_8));
                                // 服务端将读到的数据返回客户端
                                System.out.println(new Date() + ": 服务端写出数据");
                                ctx.channel().writeAndFlush(getByteBuf(ctx));
                            }
                            private ByteBuf getByteBuf(ChannelHandlerContext ctx) {
                                byte[] bytes = "hello world from server!".getBytes(StandardCharsets.UTF_8);
                                ByteBuf buffer = ctx.alloc().buffer();
                                buffer.writeBytes(bytes);
                                return buffer;
                            }
                        });
                    }
                });
        // 本地绑定一个8000端口启动服务
        bind(serverBootstrap, 8000);
    }

    public static void bind(final ServerBootstrap serverBootstrap, final int port) {
        serverBootstrap.bind(port).addListener(future -> {
            if (future.isSuccess()) {
                System.out.println("端口[" + port + "]绑定成功");
            } else {
                System.err.println("端口[" + port + "]绑定失败");
                bind(serverBootstrap, port + 1);
            }
        });
    }
}
客户端代码如下(关于每个配置的说明见注释)
package netty.v3;

import io.netty.bootstrap.Bootstrap;
import io.netty.buffer.ByteBuf;
import io.netty.channel.Channel;
import io.netty.channel.ChannelHandlerContext;
import io.netty.channel.ChannelInboundHandlerAdapter;
import io.netty.channel.ChannelInitializer;
import io.netty.channel.ChannelOption;
import io.netty.channel.nio.NioEventLoopGroup;
import io.netty.channel.socket.nio.NioSocketChannel;
import io.netty.util.AttributeKey;

import java.nio.charset.Charset;
import java.nio.charset.StandardCharsets;
import java.util.Date;
import java.util.concurrent.TimeUnit;

/**
 * Netty 可自动重连的客户端,增加了IO处理逻辑
 *
 * @author <a href="mailto:[email protected]">Grey</a>
 * @date 2022/9/12
 * @since
 */
public class NettyClient {
    static final int MAX_RETRY = 6;
    static final String HOST = "localhost";
    static final int PORT = 8000;

    public static void main(String[] args) throws InterruptedException {
        Bootstrap bootstrap = new Bootstrap();

        NioEventLoopGroup group = new NioEventLoopGroup();
        bootstrap
                // 指定线程模型
                .group(group)
                // 指定IO类型为NIO
                .channel(NioSocketChannel.class)
                // attr可以为客户端Channel绑定自定义属性
                .attr(AttributeKey.newInstance("clientName"), "nettyClient")
                // 连接的超时时间,如果超过这个时间,仍未连接到服务端,则表示连接失败
                .option(ChannelOption.CONNECT_TIMEOUT_MILLIS, 5000)
                // 表示是否开启TCP底层心跳机制,true表示开启
                .option(ChannelOption.SO_KEEPALIVE, true)
                // 是否开启Nagle算法,如果要求高实时性,有数据就马上发送,则为true
                // 如果需要减少发送次数,减少网络交互,就设置为false
                .option(ChannelOption.TCP_NODELAY, true)
                // IO处理逻辑
                .handler(new ChannelInitializer<>() {
                    @Override
                    protected void initChannel(Channel ch) {
                        ch.pipeline().addLast(new ChannelInboundHandlerAdapter() {
                            // 这个方法会在客户端连接建立成功之后被调用
                            @Override
                            public void channelActive(ChannelHandlerContext ctx) {
                                System.out.println(new Date() + ": 客户端写出数据");
                                // 包装成ByteBuf并发送到服务端
                                // 注:Netty中的数据是以 ByteBuf 为单位的。
                                ctx.channel().writeAndFlush(getByteBuf(ctx));
                            }

                            @Override
                            public void channelRead(ChannelHandlerContext ctx, Object msg) {
                                ByteBuf byteBuf = (ByteBuf) msg;
                                System.out.println(new Date() + ": 客户端读取到的数据 -> " + byteBuf.toString(StandardCharsets.UTF_8));
                            }

                            private ByteBuf getByteBuf(ChannelHandlerContext ctx) {
                                ByteBuf buffer = ctx.alloc().buffer();
                                byte[] bytes = "hello world".getBytes(StandardCharsets.UTF_8);
                                buffer.writeBytes(bytes);
                                return buffer;
                            }
                        });
                    }
                });
        connect(bootstrap, HOST, PORT, MAX_RETRY);
    }

    private static void connect(final Bootstrap bootstrap, final String host, final int port, int retry) {
        bootstrap.connect(host, port).addListener(future -> {
            if (future.isSuccess()) {
                System.out.println("连接成功!");
            } else if (retry == 0) {
                System.err.println("重试次数已经使用完毕");
            } else {
                // 第几次重试
                int order = (MAX_RETRY - retry) + 1;
                // 本次的重试间隔
                int delay = 1 << order;
                System.out.println(new Date() + ": 连接失败,第" + order + "次重连...");
                bootstrap.config().group().schedule(() -> connect(bootstrap, host, port, retry - 1), delay, TimeUnit.SECONDS);
            }
        });
    }

}
代码说明:
无论是服务端还是客户端
channelActive方法会在客户端连接建立成功之后被调用。
channelRead方法在收到数据后都会调用
先运行服务端,控制台输出
端口[8000]绑定成功
然后运行客户端,客户端打印
连接成功!
Wed Sep 14 19:58:50 CST 2022: 客户端写出数据
Wed Sep 14 19:58:50 CST 2022: 客户端读取到的数据 -> hello world from server!
服务端打印
端口[8000]绑定成功
Wed Sep 14 19:58:50 CST 2022: 服务端读到数据 -> hello world
Wed Sep 14 19:58:50 CST 2022: 服务端写出数据
数据载体#
Netty 中的数据载体是 ByteBuf,ByteBuf 的结构如下
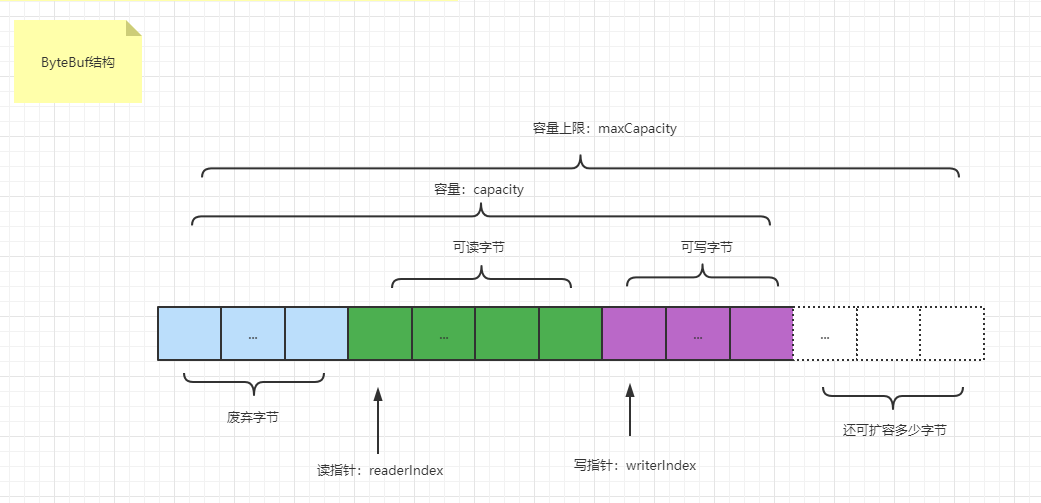
ByteBuf 和 java.nio.ByteBuffer 类似,但是提供了比 java.nio.ByteBuffer更方便使用的 API。
关于 Java 的java.nio.ByteBuffer的使用,参考:Java IO学习笔记二:DirectByteBuffer与HeapByteBuffer
接下来使用一个示例来说明 ByteBuf 的使用
代码如下:
package bytebuf;
import io.netty.buffer.ByteBuf;
import io.netty.buffer.ByteBufAllocator;
/**
* ByteBuf 示例
* @author <a href="mailto:[email protected]">Grey</a>
* @date 2022/9/14
* @since
*/
public class ByteBufTest {
public static void main(String[] args) {
ByteBuf buffer = ByteBufAllocator.DEFAULT.buffer(9, 100);
print("allocate ByteBuf(9, 100)", buffer);
// write 方法改变写指针,写完之后写指针未到 capacity 的时候,buffer 仍然可写
buffer.writeBytes(new byte[]{1, 2, 3, 4});
print("writeBytes(1,2,3,4)", buffer);
// write 方法改变写指针,写完之后写指针未到 capacity 的时候,buffer 仍然可写, 写完 int 类型之后,写指针增加4
buffer.writeInt(12);
print("writeInt(12)", buffer);
// write 方法改变写指针, 写完之后写指针等于 capacity 的时候,buffer 不可写
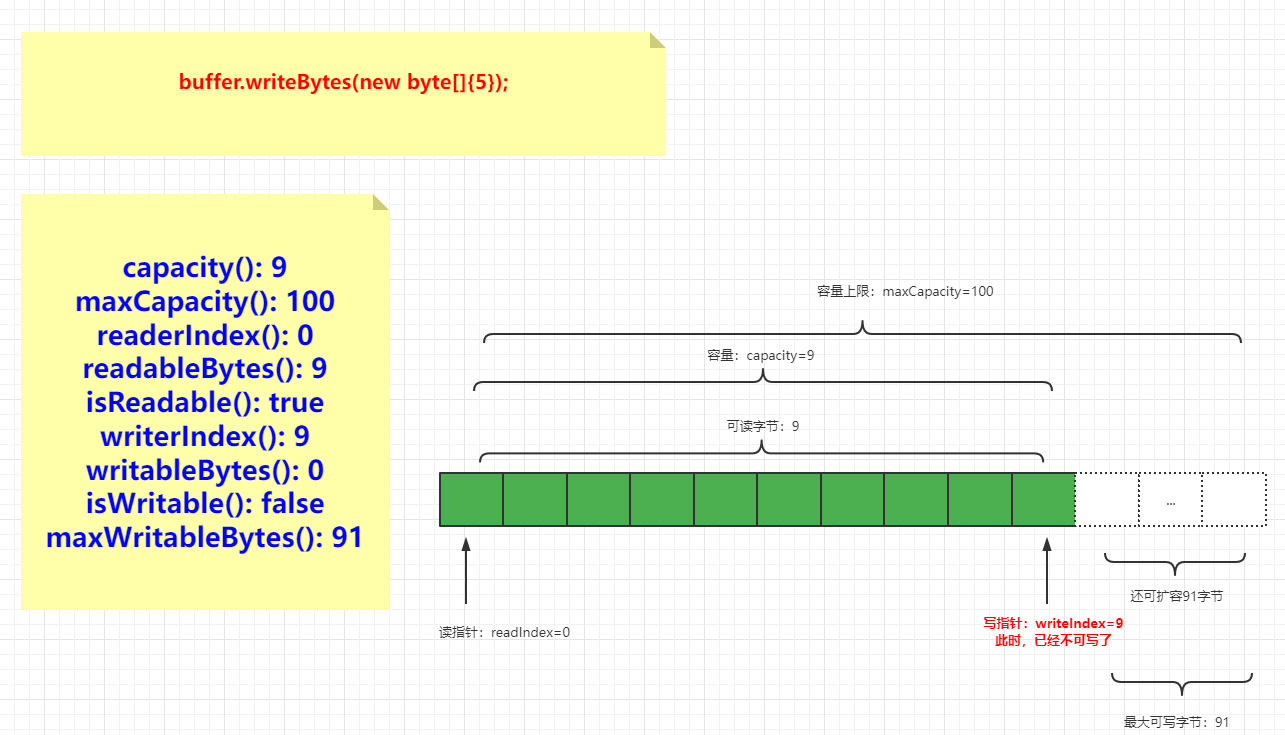
buffer.writeBytes(new byte[]{5});
print("writeBytes(5)", buffer);
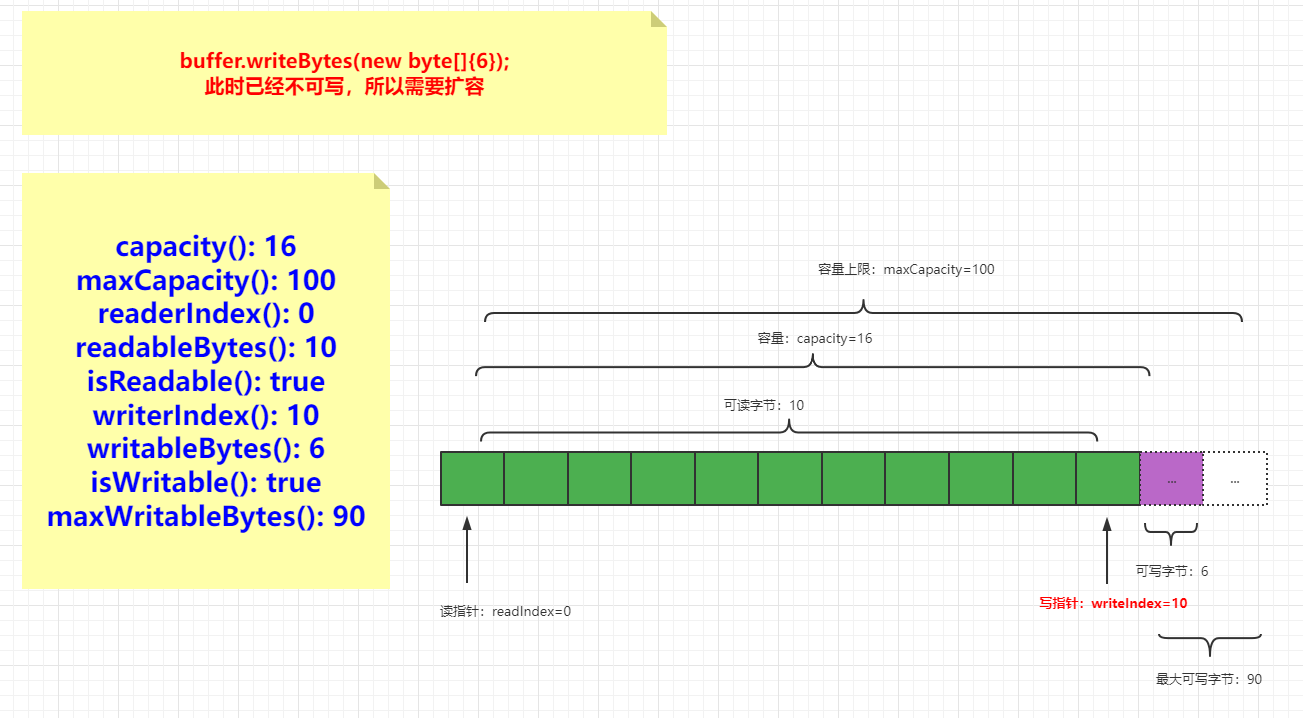
// write 方法改变写指针,写的时候发现 buffer 不可写则开始扩容,扩容之后 capacity 随即改变
buffer.writeBytes(new byte[]{6});
print("writeBytes(6)", buffer);
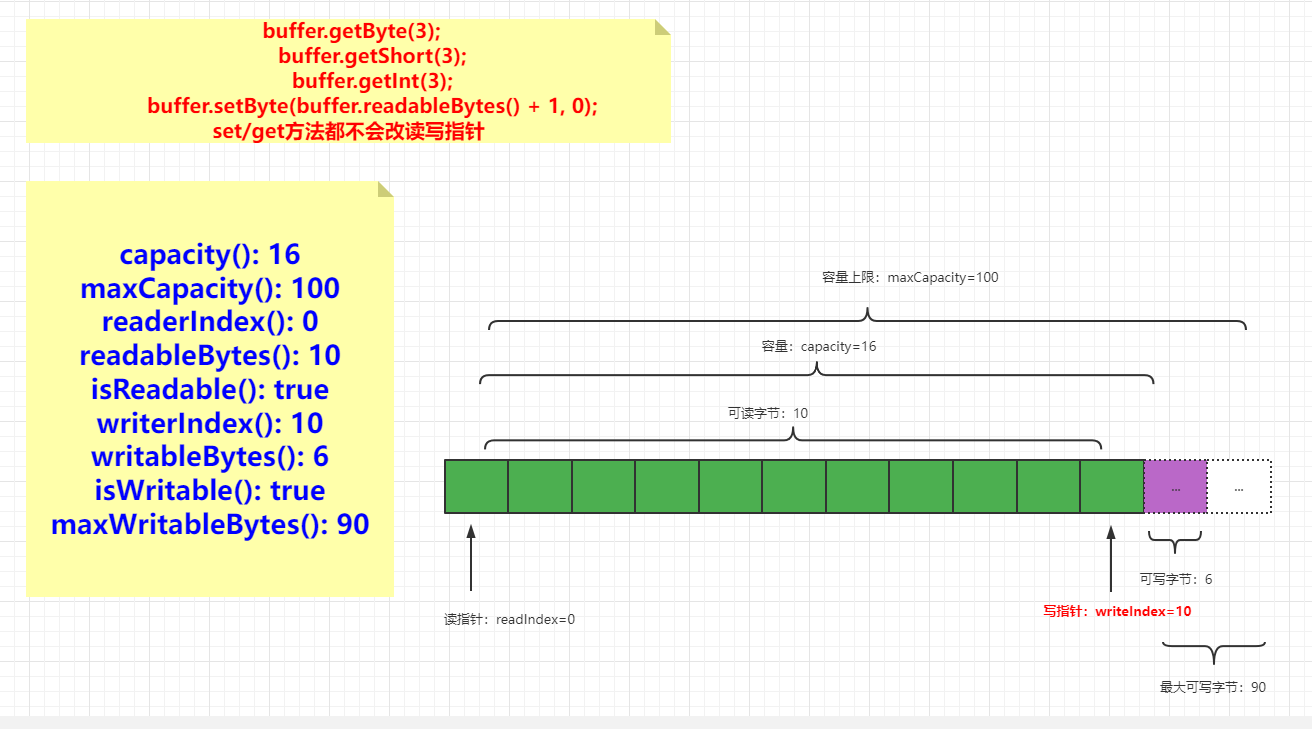
// get 方法不改变读写指针
System.out.println("getByte(3) return: " + buffer.getByte(3));
System.out.println("getShort(3) return: " + buffer.getShort(3));
System.out.println("getInt(3) return: " + buffer.getInt(3));
print("getByte()", buffer);
// set 方法不改变读写指针
buffer.setByte(buffer.readableBytes() + 1, 0);
print("setByte()", buffer);
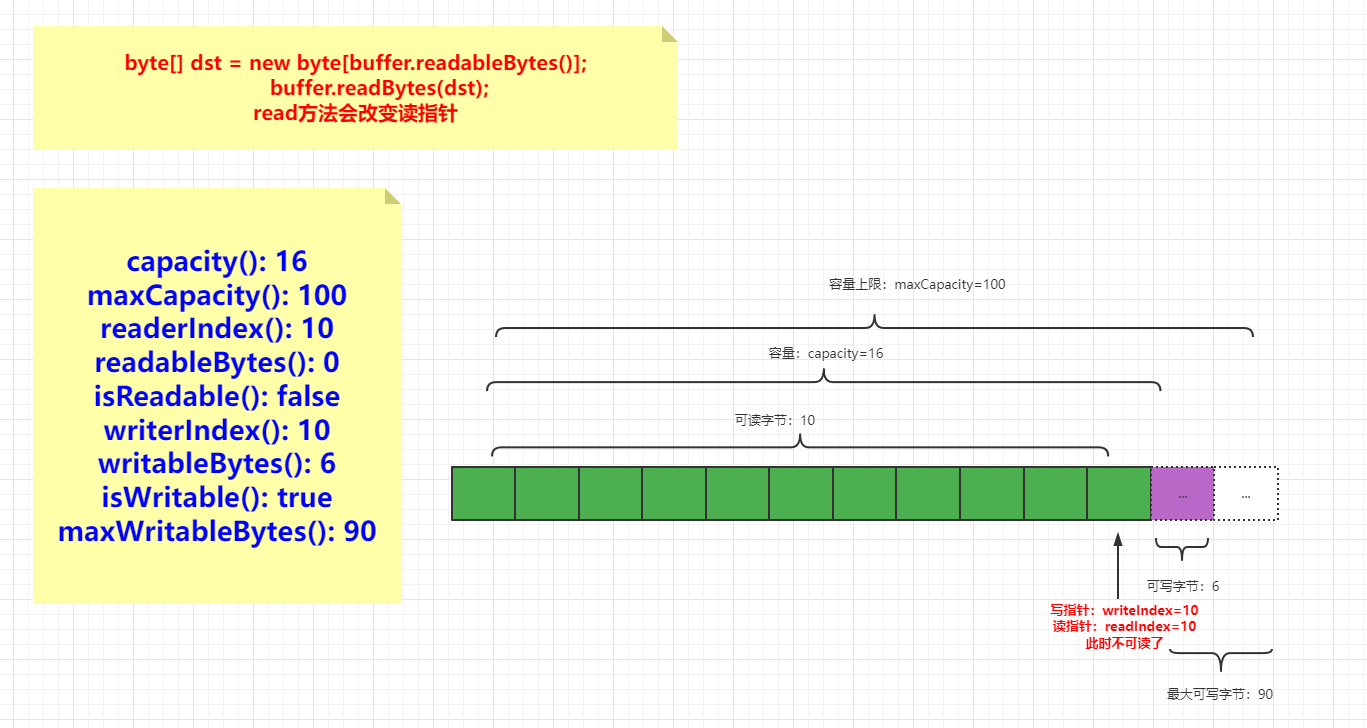
// read 方法改变读指针
byte[] dst = new byte[buffer.readableBytes()];
buffer.readBytes(dst);
print("readBytes(" + dst.length + ")", buffer);
}
private static void print(String action, ByteBuf buffer) {
System.out.println("after ===========" + action + "============");
System.out.println("capacity(): " + buffer.capacity());
System.out.println("maxCapacity(): " + buffer.maxCapacity());
System.out.println("readerIndex(): " + buffer.readerIndex());
System.out.println("readableBytes(): " + buffer.readableBytes());
System.out.println("isReadable(): " + buffer.isReadable());
System.out.println("writerIndex(): " + buffer.writerIndex());
System.out.println("writableBytes(): " + buffer.writableBytes());
System.out.println("isWritable(): " + buffer.isWritable());
System.out.println("maxWritableBytes(): " + buffer.maxWritableBytes());
System.out.println();
}
}
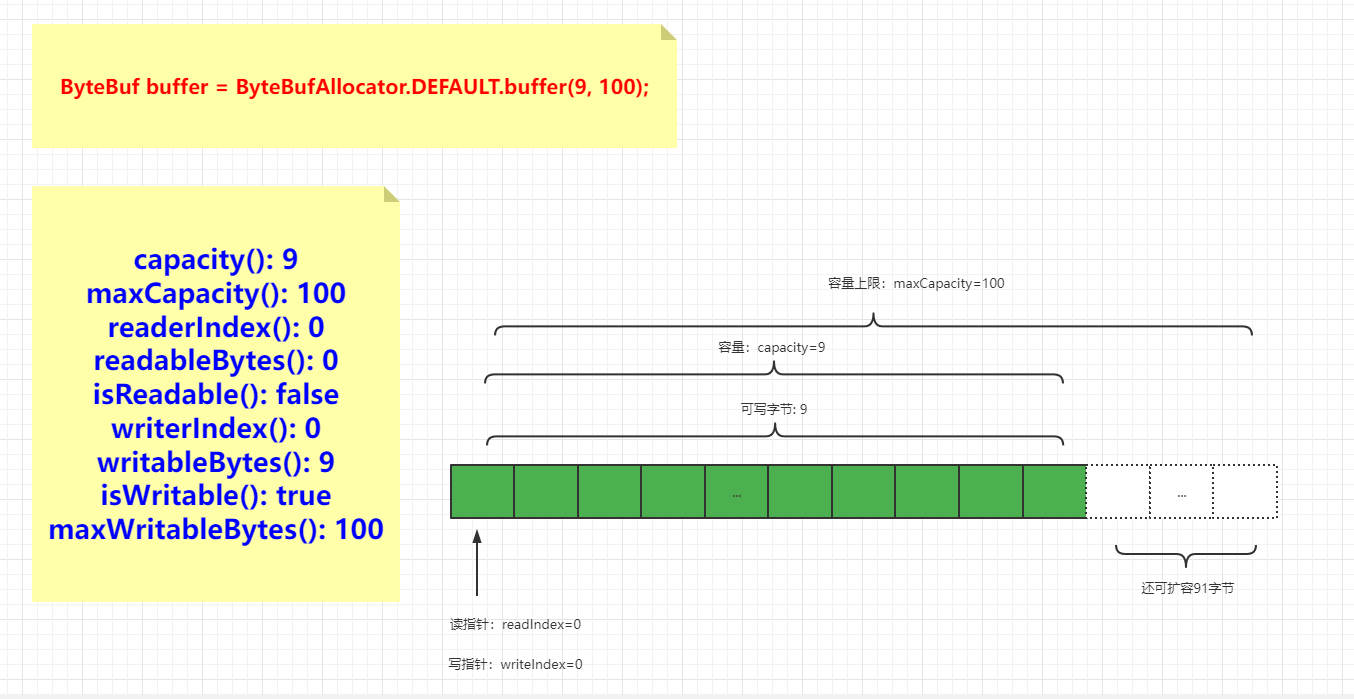
ByteBuf buffer = ByteBufAllocator.DEFAULT.buffer(9, 100);
表示分配了一块ByteBuf。相关的参数值如下图
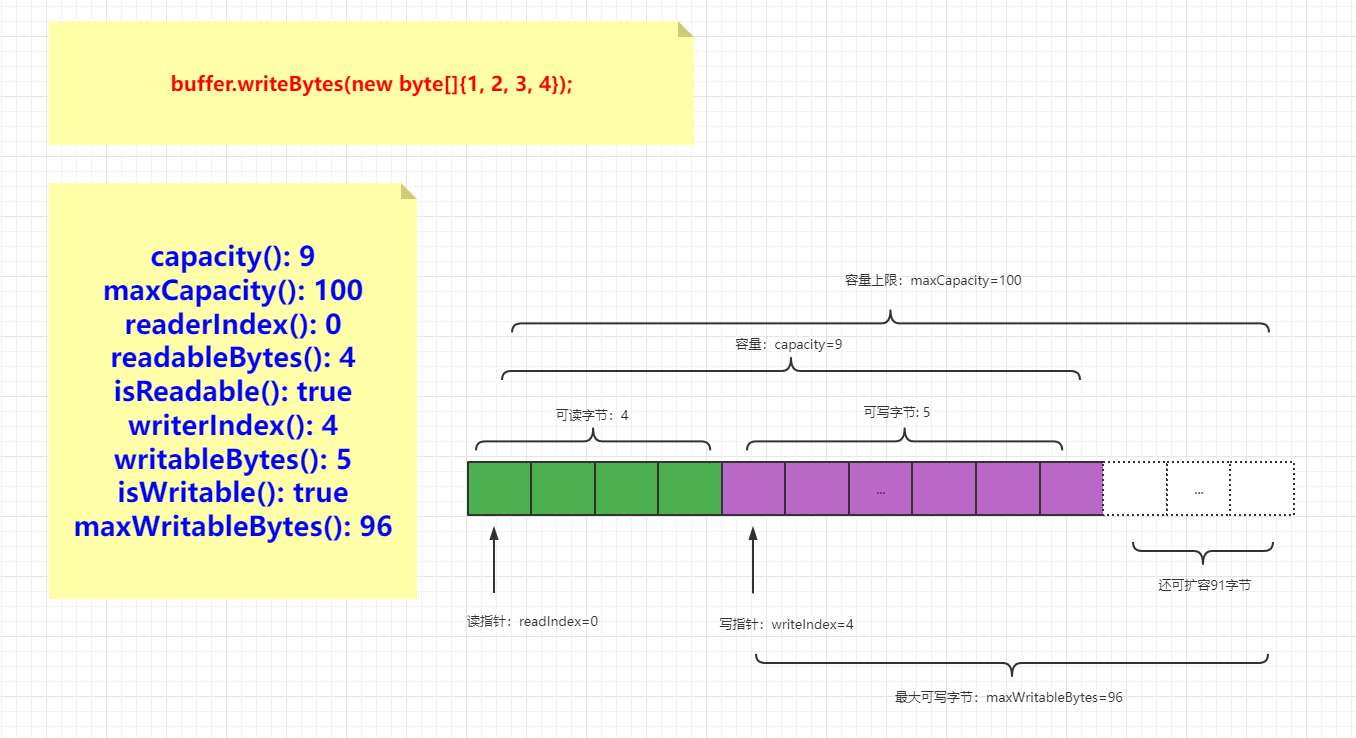
buffer.writeBytes(new byte[]{1, 2, 3, 4});
写入四个 byte 类型的数据,ByteBuf变化如下
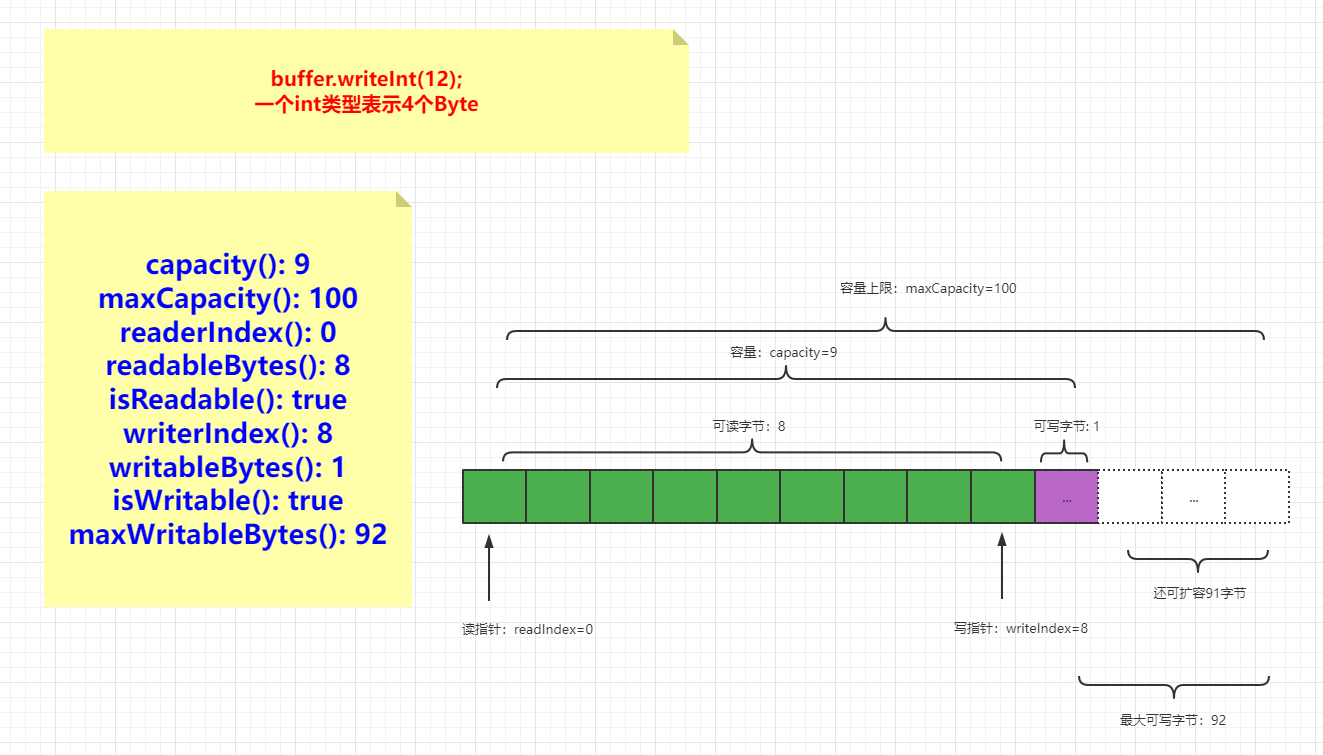
buffer.writeInt(12);
由于int类型是4个Byte,所以,写入后,buffer变化如下
buffer.writeBytes(new byte[]{5});
写入一个byte类型的数据,此时,写空间已经满了。如下图
buffer.writeBytes(new byte[]{6});
继续写入,由于写空间已经满了,所以要进行扩容,扩容后的结构如下
buffer.getByte(3);
buffer.getShort(3);
buffer.getInt(3);
buffer.setByte(buffer.readableBytes() + 1, 0);
由于get/set操作不改变读写指针,所以buffer还是保持原样
byte[] dst = new byte[buffer.readableBytes()];
buffer.readBytes(dst);
read方法会改变读指针,改变后结构如下
图例#
本文所有图例见:processon: Netty学习笔记
代码#
更多内容见:Netty专栏
参考资料#
Recommend
About Joyk
Aggregate valuable and interesting links.
Joyk means Joy of geeK