

啃论文俱乐部—移植speexdsp到OpenHarmony标准系统(二)
source link: https://www.51cto.com/article/718257.html
Go to the source link to view the article. You can view the picture content, updated content and better typesetting reading experience. If the link is broken, please click the button below to view the snapshot at that time.

啃论文俱乐部—移植speexdsp到OpenHarmony标准系统(二)

大家好!我来自南京,在OpenHarmony成长计划啃论文俱乐部,与华为、软通动力、润和软件、拓维信息、深开鸿等公司一起,学习和研究操作系统技术,从今年1月11日加入OpenHarmony俱乐部已经有接近8个月时间了。笔者一直在思考啃论文给我带来了些什么,通过啃论文能为OpenHarmony做些什么。笔者利用大二升大三暑假两个月时间移植了Speexdsp这个三方库到OpenHarmony标准系统,而关于前面的问题我似乎找到了答案,现将啃论文和三方库移植分享经验如下:
在linux上生成speexdsp的so动态链接库和.a静态链接库。
make和make install后会生成speexdsp的.so动态链接库和.a静态链接库。
make
make install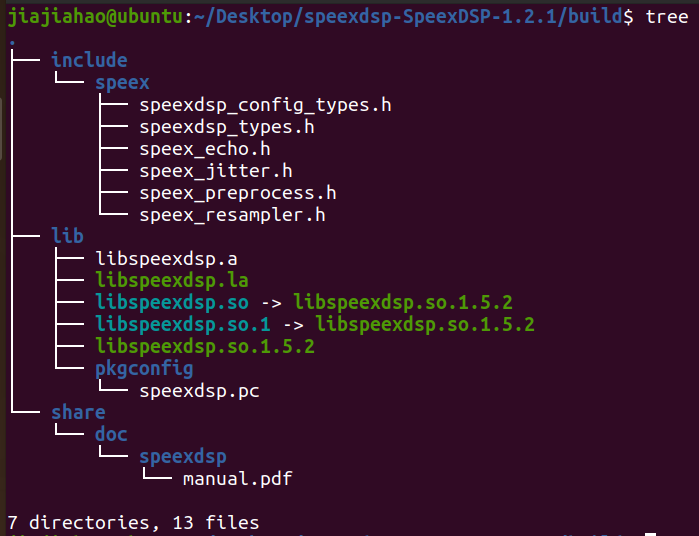
其中build/lib目录下:
├── libspeexdsp.a                              /*静态库*/
├── libspeexdsp.la                             /*记录同名动态库和静态库相关信息的la文本文件*/
├── libspeexdsp.so -> libspeexdsp.so.1.5.2
├── libspeexdsp.so.1 -> libspeexdsp.so.1.5.2   /*符号链接*/
├── libspeexdsp.so.1.5.2                       /*动态库*/
└── pkgconfig                                  /*pkgconfig 的 *.pc文件*/
    └── speexdsp.pc
linux下的so、o、lo、a、la文件
- o: 编译的目标文件。
- a: 静态库,其实就是把若干o文件打了个包。
- so: 动态链接库(共享库) 动态库文件必须以lib开头,以.so结尾。
- lo: 使用libtool编译出的目标文件,其实就是在o文件中添加了一些信息。
- la: 使用libtool编译出的库文件,其实是个文本文件,记录同名动态库和静态库的相关信息。
知识拓展:
- 函数库分为静态库*a和动态库*.so两种:
①静态库在程序编译时会被连接到目标代码中,程序运行时将不再需要该静态库。
②动态库在程序编译时并不会被连接到目标代码中,而是在程序运行是才被载入,因此在程序运行时还需要动态库存在。
- 符号链接(symbolic link)是 Linux 系统中的一种文件,它指向系统中的另一个文件或目录。符号链接类似于 Windows 系统中的快捷方式。
- 在linux中,*.la是记录同名动态库和静态库相关信息的文本文件。
三、分析speexdsp在标准Linux系统的编译过程文件
分析speexdsp在标准Linux系统的编译过程文件,找到生成so库和测试用的可执行文件所需的.c源代码,头文件路径,cflags编译器标志,所依赖的库。
对比编译前后的speexdsp原生库结构
- tree工具能以树形的方式显示指定目录的层级结构。
非绿色字体是编译后生成的文件。
├──
├── #speexdsp项目作者信息
├── #autogen.sh脚本配置文件
├── aclocal.m4 #运行aclocal后生成的aclocal.m4文件和一个缓冲文件夹autom4te.cache
├── autom4te.cache
│ ├── output.0
│ ├── output.1
│ ├── output.2
│ ├── requests
│ ├── traces.0
│ ├── traces.1
│ └── traces.2
├── build
│ ├── include
│ │ └── speex
│ │ ├── speexdsp_config_types.h
│ │ ├── speexdsp_types.h
│ │ ├── speex_echo.h
│ │ ├── speex_jitter.h
│ │ ├── speex_preprocess.h
│ │ └── speex_resampler.h
│ ├── lib
│ │ ├── libspeexdsp.a
│ │ ├── libspeexdsp.la
│ │ ├── libspeexdsp.so -> libspeexdsp.so.1.5.2
│ │ ├── libspeexdsp.so.1 -> libspeexdsp.so.1.5.2
│ │ ├── libspeexdsp.so.1.5.2
│ │ └── pkgconfig
│ │ └── speexdsp.pc
│ └── share
│ └── doc
│ └── speexdsp
│ └── manual.pdf
├── #spexxds原生库更新日志(和本次移植无关信息)
├──
├── #这个是在构建环境上运行的一个脚本,它用来猜测构建机的配置环境,因为这个脚本是在构建机上运行,所以它可以动态执行uname等命令来获得构建机的环境,所以我们一般不要指定这个变量,从而让脚本自动获得。
├── config.h#Config.h是自动生成的头文件,是根据配置文件Config.h.in生成的。config.h主要用于代码移植,产生可移植代码。
├── config.h.in#autoheader后形成config.h.in
├── config.log#该文件在执行configure文件时动态生成,包含了一些行号信息,表示一个文件在哪一行执行,以及执行的什么命令,因此可以知道测试是在哪个位置中完成。
├── #这是脚本文件,运行该脚本可以生成一个当前相同的配置,从而避免再次执行configure这个比较庞大的代码。也就是config.log生成的是文本文件,而config.status生成的则是命令脚本文件。
├── #这个是将host target build变量正则化的一个脚本,它的sub就是substitute的缩写。因为用户提供的build可能并不符合脚本正规的四元组或者三元组的结构,所以这个脚本将它转换为标准的格式,从而可以进行格式化处理。
├── #这个是我们需要监测环境的主要入口文件,使用该文件可以生成Makefile文件,它会替换Makefile中需要替换的变量。
├── #该文件为autoconfigure文件使用的一个文件,该文件用来生成configure文件,这个文件一般是开发者维护,我们安装该软件的时候只需要执行configure就可以,这个configure.ac我们一般不用理会
├──
├── #automake --add-missing命令生成install-sh, missing, depcomp文件
├──
│ ├──
│ ├──
│ ├──
│ ├──
│ ├──
│ ├──
│ ├── Makefile
│ ├──
│ ├── Makefile.in
│ ├──
│ ├──
│ ├──
│ ├──
│ ├──
│ ├──
│ ├──
│ ├──
│ ├──
│ └──
├──
├──
│ ├──
│ ├──
│ └──
├──
│ ├── Makefile
│ ├──
│ ├── Makefile.in
│ └──
│ ├── Makefile
│ ├──
│ ├── Makefile.in
│ ├──
│ ├── speexdsp_config_types.h
│ ├──
│ ├──
│ ├──
│ ├──
│ ├──
│ └──
├──
├── #automake --add-missing命令生成install-sh, missing, depcomp文件
├──
│ ├──
│ ├──
│ ├──
│ ├── buffer.lo
│ ├── buffer.o
│ ├──
│ ├──
│ ├──
│ ├── fftwrap.lo
│ ├── fftwrap.o
│ ├──
│ ├──
│ ├── filterbank.lo
│ ├── filterbank.o
│ ├──
│ ├──
│ ├──
│ ├──
│ ├──
│ ├──
│ ├── jitter.lo
│ ├── jitter.o
│ ├──
│ ├──
│ ├──
│ ├──
│ ├──
│ ├── libspeexdsp.la
│ ├── Makefile
│ ├──
│ ├── Makefile.in
│ ├──
│ ├──
│ ├── mdf.lo
│ ├── mdf.o
│ ├──
│ ├──
│ ├──
│ ├── preprocess.lo
│ ├── preprocess.o
│ ├──
│ ├──
│ ├── resample.lo
│ ├──
│ ├── resample.o
│ ├──
│ ├──
│ ├── scal.lo
│ ├── scal.o
│ ├──
│ ├──
│ ├── smallft.lo
│ ├── smallft.o
│ ├──
│ ├── #测试噪音抑制的文件
│ ├── testdenoise.o
│ ├──
│ ├── #测试声学回音消除的文件
│ ├── testecho.o
│ ├── # 测试抖动的文件
│ ├──
│ ├── testjitter.o
│ ├──
│ ├──
│ ├── #测试重采样的文件
│ ├── testresample2.o
│ ├── #测试重采样的文件
│ ├── testresample.o
│ └──
├──
├── ltmain.sh
├── m4
│ ├── libtool.m4
│ ├── lt~obsolete.m4
│ ├── ltoptions.m4
│ ├── ltsugar.m4
│ └── ltversion.m4
├──
│ ├──
│ │ └──
│ ├──
│ ├──
│ ├──
│ │ └──
│ └──
│ └──
├── Makefile
├──
├── Makefile.in
├── #automake --add-missing命令生成install-sh, missing, depcomp文件
├──
├──
├── #汇聚式处理器Blackfin是由ADI和Intel公司联合开发的微信号架构(MSA)
├── #Trimedia 是由Philips公司1996年推出的新一代媒体处理器(Media Processor)芯片。
├── #Win32是指Microsoft Windows操作系统的32位环境
├──
│ └──
├──
├──
├── speexdsp.pc
├──
├── SpeexDSP.spec
├──
├── stamp-h1
├──
│ ├──
│ ├──
│ ├── Makefile
│ ├──
│ ├── Makefile.in
│ └──
├── #TI公司DSP芯片
│ ├──
│ ├── Makefile
│ ├──
│ ├── Makefile.in
│ ├──
│ ├──
│ │ ├── Makefile
│ │ ├──
│ │ ├── Makefile.in
│ │ ├──
│ │ └──
│ ├──
│ │ ├── Makefile
│ │ ├──
│ │ ├── Makefile.in
│ │ ├──
│ │ └──
│ └──
│ ├── Makefile
│ ├──
│ ├── Makefile.in
│ ├──
│ └──
├──
│ ├──
│ ├──
│ ├──
│ ├──
│ ├──
│ ├──
│ ├──
│ ├──
│ ├──
│ ├──
│ ├──
│ └──
├──
└──
├──
├──
│ ├──
│ ├──
│ ├──
│ ├── Makefile
│ ├──
│ └── Makefile.in
├──
├── Makefile
├──
├── Makefile.in
├──
├──
│ ├──
│ │ ├──
│ │ ├── Makefile
│ │ ├──
│ │ └── Makefile.in
│ ├──
│ ├── Makefile
│ ├──
│ ├── Makefile.in
│ └──
│ ├── Makefile
│ ├──
│ ├── Makefile.in
│ ├──
│ ├──
│ └──
├──
│ ├──
│ │ ├──
│ │ ├── Makefile
│ │ ├──
│ │ └── Makefile.in
│ ├──
│ ├── Makefile
│ ├──
│ ├── Makefile.in
│ └──
│ ├── Makefile
│ ├──
│ ├── Makefile.in
│ ├──
│ ├──
│ └──
└──
├──
│ ├──
│ ├── Makefile
│ ├──
│ └── Makefile.in
├──
├── Makefile
├──
├── Makefile.in
└──
├── Makefile
├──
├── Makefile.in
├──
├──
└──
分析原生库下make.am文件
make.am是一种比Makefile文件抽象程序更高的编译规则文件。 在里面可以指定生成目录,编译用的源码,编译的时候依赖哪些库,要安装到什么目录。
原生库根目录下的make.am如下
## Process this file with automake to produce Makefile.in. -*-Makefile-*-
# To disable automatic dependency tracking if using other tools than
# gcc and gmake, add the option 'no-dependencies'
AUTOMAKE_OPTIONS = 1.8
ACLOCAL_AMFLAGS = -I m4
pkgconfigdir = $(libdir)/pkgconfig
pkgconfig_DATA = speexdsp.pc
EXTRA_DIST = SpeexDSP.spec SpeexDSP.spec.in SpeexDSP.kdevelop speexdsp.pc.in README.blackfin
#Fools KDevelop into including all files
SUBDIRS = libspeexdsp include doc win32 symbian ti
DIST_SUBDIRS = libspeexdsp include doc win32 symbian ti
rpm: dist
  rpmbuild -ta ${PACKAGE}-${VERSION}.tar.gz
父目录需要包含子目录,在父目录下的Makefile.am中需要添加: SUBDIRS = 子目录。可知speexdsp子目录为libspeexdsp include doc win32 symbian ti 。再逐步查看各个文件夹源码可知只有libspeexdsp include文件夹与本次移植有关。所以接下来查看libspeexdsp目录下的make.am文件。
子目录libspeexdsp下的make.am
# Disable automatic dependency tracking if using other tools than gcc and gmake
#AUTOMAKE_OPTIONS = no-dependencies
EXTRA_DIST=echo_diagnostic.m
AM_CPPFLAGS = -I$(top_srcdir)/include -I$(top_builddir)/include/speex -I$(top_builddir) @FFT_CFLAGS@
/*top_srcdir工程最顶层目录*/
/*top_builddir定义生成目标文件的最上层目录*/
lib_LTLIBRARIES = libspeexdsp.la
# Sources for compilation in the library
if BUILD_KISS_FFT
  FFTSRC=kiss_fft.c _kiss_fft_guts.h kiss_fft.h kiss_fftr.c kiss_fftr.h
else
if BUILD_SMALLFT
  FFTSRC=smallft.c
else
  FFTSRC=
endif
endif
libspeexdsp_la_SOURCES = preprocess.c jitter.c mdf.c fftwrap.c filterbank.c resample.c buffer.c
scal.c $(FFTSRC)/*编译libspeexdsp.so需要preprocess.c jitter.c mdf.c fftwrap.c filterbank.c resample.c
buffer.c scal.c、smallft.c源文件(特别需要注意$(FFTSRC)的存在,因为FFTSRC=smallft.c)*/

/*noinst_HEADERS:这个表示该头文件只是参加可执行文件的编译,而不用安装到安装目录下
。如果需要安装到系统中,可以用 include_HEADERS来代替。*/
noinst_HEADERS =  arch.h  bfin.h \
    fixed_arm4.h \
    fixed_arm5e.h   fixed_bfin.h  fixed_debug.h   \
    math_approx.h     misc_bfin.h   \
    fftwrap.h \
  filterbank.h fixed_generic.h os_support.h \
  pseudofloat.h smallft.h vorbis_psy.h resample_sse.h resample_neon.h
libspeexdsp_la_LDFLAGS = -no-undefined -version-info/*LDFLAGS:编译时的选项*/ @SPEEXDSP_LT_CURRENT@:@SPEEXDSP_LT_REVISION@:@SPEEXDSP_LT_AGE@
libspeexdsp_la_LIBADD = $(LIBM)
if BUILD_EXAMPLES /*编译测试文件*/
noinst_PROGRAMS = testdenoise testecho testjitter testresample testresample2
testdenoise_SOURCES = testdenoise.c
testdenoise_LDADD = libspeexdsp.la@FFT_LIBS@ /*链接需要libspeexdsp.la库文件*/
testecho_SOURCES = testecho.c /*需要的
testecho_LDADD = libspeexdsp.la @FFT_LIBS@ /*链接需要libspeexdsp.la库文件*/
testjitter_SOURCES = testjitter.c
testjitter_LDADD = libspeexdsp.la @FFT_LIBS@ /*链接需要libspeexdsp.la库文件*/
testresample_SOURCES = testresample.c
testresample_LDADD = libspeexdsp.la @FFT_LIBS@ @LIBM@ /*链接需要libspeexdsp.la库文件*/
testresample2_SOURCES = testresample2.c
testresample2_LDADD = libspeexdsp.la @FFT_LIBS@ @LIBM@ /*链接需要libspeexdsp.la库文件*/
endif
通过分析libspeexdsp下的make.am可以知道:
- 编译出so库需要的.c源文件有preprocess.c jitter.c mdf.c fftwrap.c filterbank.c resample.c
buffer.c scal.c、smallft.c。 - 编译出so库需要的.h源文件有arch.h bfin.h fixed_arm4.h fixed_arm5e.h fixed_bfin.h fixed_debug.h math_approx.h misc_bfin.h fftwrap.h filterbank.h fixed_generic.h os_support.h pseudofloat.h smallft.h vorbis_psy.h resample_sse.h resample_neon.h。
- 编译出测试用的testdenoise testecho testjitter testresample testresample2可执行文件需要的.c源文件有testdenoise.c testec.c hotestjitter.c testresample.c testresample2.c。
分析原生库下Makefile文件
Makefile里有什么?Makefile里主要包含了五个东西:显式规则、隐晦规则、变量定义、文件指示和注释。
- 显式规则。显式规则说明了如何生成一个或多个目标文件。这是由Makefile的书写者明显指出要生成的文件、文件的依赖文件和生成的命令。
- 隐晦规则。由于我们的make有自动推导的功能,所以隐晦的规则可以让我们比较简略地书写 Makefile,这是由make所支持的。
- 变量的定义。在Makefile中我们要定义一系列的变量,变量一般都是字符串,这个有点像你C语言中的宏,当Makefile被执行时,其中的变量都会被扩展到相应的引用位置上。
- 文件指示。其包括了三个部分,一个是在一个Makefile中引用另一个Makefile,就像C语言中的include一样;另一个是指根据某些情况指定Makefile中的有效部分,就像C语言中的预编译#if一样;还有就是定义一个多行的命令。有关这一部分的内容,我会在后续的部分中讲述。
- 注释。Makefile中只有行注释,和UNIX的Shell脚本一样,其注释是用 # 字符,这个就像C/C++中的 // 一样。如果你要在你的Makefile中使用 # 字符,可以用反斜杠进行转义,如: # 。
笔者在speexdsp根目录下的makefile(最基本的Makefile)文件中。
搜索关键字CFLAGS找到CFLAGS = -g -O2 -fvisibility=hidden这条语句。

分析“make”过程log
以下是执行make命令后在终端显示的部分log,通过分析也可以知道编译so库需要的.c文件均位于libspeexdsp目录。
jiajiahao@ubuntu:~/Desktop/speexdsp-SpeexDSP-1.2.1$ make
make  all-recursive
make[1]: 进入目录“/home/jiajiahao/Desktop/speexdsp-SpeexDSP-1.2.1”
Making all in libspeexdsp
make[2]: 进入目录“/home/jiajiahao/Desktop/speexdsp-SpeexDSP-1.2.1/libspeexdsp”
  CC       preprocess.lo
  CC       jitter.lo
  CC       mdf.lo
  CC       fftwrap.lo
  CC       filterbank.lo
  CC       resample.lo
  CC       buffer.lo
  CC       scal.lo
  CC       smallft.lo
  CCLD     libspeexdsp.la
make[2]: 离开目录“/home/jiajiahao/Desktop/speexdsp-SpeexDSP-1.2.1/libspeexdsp”
分析build安装目录下生成的.pc文件
下图为build/lib/pkgconfig目录的speexdsp.pc文件。
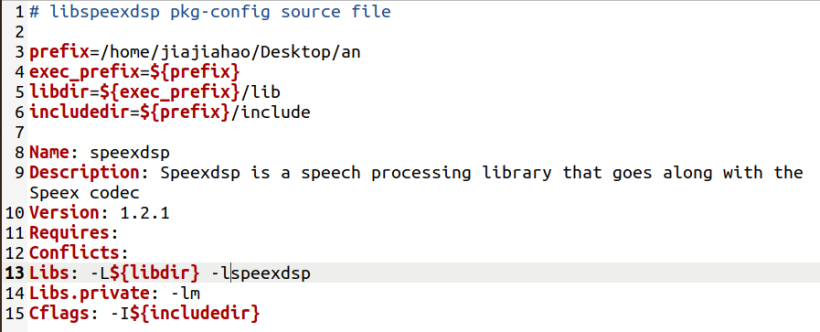
*.pc文件的所有参数:
Name: 该模块的名字,比如你的pc名字是xxxx.pc,那么名字最好也是xxxx。
Description: 模块的简单描述。上文pkg-config –list-all命令出来的结果,每个名字后面就是description。
URL: 用户可以通过该URL获得更多信息,或者下载信息。也是辅助的,可要可不要。
Version: 版本号。
Requires: 该模块有木有依赖于其他模块。一般没有。
Requires.private: 该模块有木有依赖于其他模块,并且还不需要第三方知道的。一般也没有。
Conflicts: 有没有和别的模块冲突。常用于版本冲突。比如,Conflicts: bar < 1.2.3,表示和bar模块的1.2.3以下的版本有冲突。
Cflags: 这个就很重要了。pkg-config的参数–cflags就指向这里。主要用于写本模块的头文件的路径。
Libs: 也很重要,pkg-config的参数–libs就指向这里。主要用于写本模块的库/依赖库的路径。
Libs.private: 本模块依赖的库,但不需要第三方知道。
在文件中的第14行中清楚的指出speexdsp依赖-lm这个库。
分析运行configure命令后生成的config.log
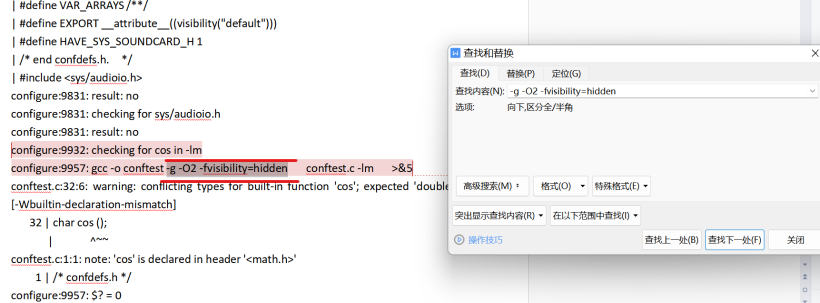
从中也可以分析出speexdsp依赖的库-lm 和编译器需要添加的C_FLAGS标记-g -O2 -fvisibility=hidden。
configure:9932: checking for cos in -lm
configure:9957: gcc -o conftest -g -O2 -fvisibility=hidden conftest.c -lm >&5- speexdsp依赖的库为-lm。
- 编译出speexdsp动态链接库需要的.c源文件为preprocess.c jitter.c mdf.c fftwrap.c filterbank.c resample.c buffer.c scal.c、smallft.c。
- 编译出speexdsp动态链接库需要的.h源文件目录为libspeexdsp。
- 编译出测试用的testdenoise testecho testjitter testresample testresample2可执行文件需要的.c源文件有testdenoise.c testec.c hotestjitter.c testresample.c testresample2.c。
- 编译出测试用的testdenoise testecho testjitter testresample testresample2可执行文件需要的.h源文件目录为根目录下include。
- 编译时需要添加的cflags编译器标志为-o-g-O2-fvisibility=hidden。
</article
Recommend
About Joyk
Aggregate valuable and interesting links.
Joyk means Joy of geeK