

关于Spring-Boot配置加载顺序解读
source link: https://www.51cto.com/article/717805.html
Go to the source link to view the article. You can view the picture content, updated content and better typesetting reading experience. If the link is broken, please click the button below to view the snapshot at that time.
关于Spring-Boot配置加载顺序解读

一、配置加载现象
- 加载场景说明。
- 假设有一个特殊的场景的配置文件如下表,那么配置文件是如何生效,以及加载的顺序是怎么样的呢?有多个地方均配置了相同的参数,到底是哪一个参数项在应用中生效的呢?
application.yaml | xxx: |
application-dev.yaml | xxx: |
bootstrap.yaml | xxx: |
config-server | xxx: |
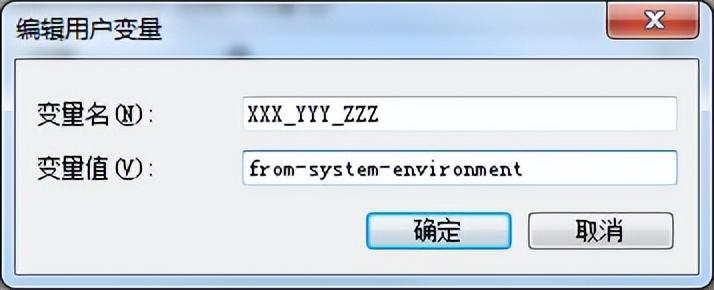
系统环境变量 | XXX_YYY_ZZZ=from-system-environment |
jvm启动参数 | -Dxxx.yyy.zzz=from-jvm-args |
若使用了配置中心,需增加spring-cloud配置中心配置。
二、示例代码演示
spring-boot | 2.6.2 |
spring-cloud | 2021.0.0 |
1、建立一个配置中心config-server,先申请好gitee,方便演示配置中心从git上获取配置项。
(1) pom.xml如下:
<?xml version="1.0" encoding="UTF-8"?>
<project xmlns="http://maven.apache.org/POM/4.0.0" xmlns:xsi="http://www.w3.org/2001/XMLSchema-instance"
  xsi:schemaLocation="http://maven.apache.org/POM/4.0.0 https://maven.apache.org/xsd/maven-4.0.0.xsd">
  <modelVersion>4.0.0</modelVersion>
  <parent>
    <groupId>org.springframework.boot</groupId>
    <artifactId>spring-boot-starter-parent</artifactId>
    <version>2.6.2</version>
    <relativePath/> <!-- lookup parent from repository -->
  </parent>
  <groupId>com.mixfate</groupId>
  <artifactId>config-server</artifactId>
  <version>0.0.1-SNAPSHOT</version>
  <name>config-server</name>
  <properties>
    <java.version>1.8</java.version>
    <spring-cloud.version>2021.0.0</spring-cloud.version>
  </properties>
  <dependencies>
    <dependency>
      <groupId>org.springframework.cloud</groupId>
      <artifactId>spring-cloud-config-server</artifactId>
    </dependency>

    <dependency>
      <groupId>org.springframework.boot</groupId>
      <artifactId>spring-boot-starter-test</artifactId>
      <scope>test</scope>
    </dependency>
  </dependencies>
  <dependencyManagement>
    <dependencies>
      <dependency>
        <groupId>org.springframework.cloud</groupId>
        <artifactId>spring-cloud-dependencies</artifactId>
        <version>${spring-cloud.version}</version>
        <type>pom</type>
        <scope>import</scope>
      </dependency>
    </dependencies>
  </dependencyManagement>

  <build>
    <plugins>
      <plugin>
        <groupId>org.springframework.boot</groupId>
        <artifactId>spring-boot-maven-plugin</artifactId>
      </plugin>
    </plugins>
  </build>

</project>
(2)ConfigServerApplication.java如下:
package com.mixfate;
import org.springframework.boot.SpringApplication;
import org.springframework.boot.autoconfigure.SpringBootApplication;
import org.springframework.cloud.config.server.EnableConfigServer;
@EnableConfigServer
@SpringBootApplication
public class ConfigServerApplication {
  public static void main(String[] args) {
    SpringApplication.run(ConfigServerApplication.class, args);
  }

}
(3) application.yaml如下:
spring:
  cloud:
    config:
      server:
        git:
          uri: https://gitee.com/xxx/spring-cloud-config
          username: xxx
          password: 123456
          default-label: master
server:
  port: 8082
logging:
  level:
    root: info
    org.springframework.cloud: debug
需在gitee上创建一个仓库spring-cloud-config(名字可随意取),default-label: master表示使用master分支。
2、创建一个演示项目config-order,演示配置文件的加载顺序。
(1) pom.xml如下:
<?xml version="1.0" encoding="UTF-8"?>
<project xmlns="http://maven.apache.org/POM/4.0.0" xmlns:xsi="http://www.w3.org/2001/XMLSchema-instance"
         xsi:schemaLocation="http://maven.apache.org/POM/4.0.0 https://maven.apache.org/xsd/maven-4.0.0.xsd">
    <modelVersion>4.0.0</modelVersion>
    <parent>
        <groupId>org.springframework.boot</groupId>
        <artifactId>spring-boot-starter-parent</artifactId>
        <version>2.6.2</version>
        <relativePath/> <!-- lookup parent from repository -->
    </parent>
    <groupId>com.mixfate</groupId>
    <artifactId>config-order</artifactId>
    <version>0.0.1-SNAPSHOT</version>
    <name>config-order</name>
    <properties>
        <java.version>1.8</java.version>
        <spring-cloud.version>2021.0.0</spring-cloud.version>
    </properties>
    <dependencies>
        <dependency>
            <groupId>org.springframework.cloud</groupId>
            <artifactId>spring-cloud-starter-config</artifactId>
        </dependency>
        <dependency>
            <groupId>org.springframework.cloud</groupId>
            <artifactId>spring-cloud-starter-bootstrap</artifactId>
        </dependency>
        <dependency>
            <groupId>org.springframework.boot</groupId>
            <artifactId>spring-boot-starter-test</artifactId>
            <scope>test</scope>
        </dependency>
    </dependencies>
    <dependencyManagement>
        <dependencies>
            <dependency>
                <groupId>org.springframework.cloud</groupId>
                <artifactId>spring-cloud-dependencies</artifactId>
                <version>${spring-cloud.version}</version>
                <type>pom</type>
                <scope>import</scope>
            </dependency>
        </dependencies>
    </dependencyManagement>
    <build>
        <plugins>
            <plugin>
                <groupId>org.springframework.boot</groupId>
                <artifactId>spring-boot-maven-plugin</artifactId>
            </plugin>
        </plugins>
    </build>

</project>
(2)ConfigOrderApplication.java如下:
package com.mixfate;

import org.springframework.beans.factory.annotation.Value;
import org.springframework.boot.ApplicationArguments;
import org.springframework.boot.ApplicationRunner;
import org.springframework.boot.SpringApplication;
import org.springframework.boot.autoconfigure.SpringBootApplication;
import org.springframework.stereotype.Component;
@SpringBootApplication
public class ConfigOrderApplication {
    public static void main(String[] args) {
        SpringApplication.run(ConfigOrderApplication.class, args);
    }
}
@Component
class InitRunner implements ApplicationRunner {
    @Value("${xxx.yyy.zzz}")
    private String name;

    @Override
    public void run(ApplicationArguments args) throws Exception {
        System.out.println("xxx.yyy.zzz is " + name);
    }
}
使用了InitRunner演示应用初始化时输出参数的值。
(3) yaml配置文件如下:
bootstrap.yaml配置
spring:
  cloud:
    config:
      uri: http://localhost:8082
  application:
    name: config-order
  profiles:
    active: dev
xxx:
  yyy:
    zzz: from-bootstrap.yaml
application.yaml配置
server:
  port: 8085
logging:
  level:
    root: info
xxx:
  yyy:
    zzz: from-application.yaml

application-dev.yaml配置
xxx:
  yyy:
    zzz: from-applicatoin-dev.yaml
需注册在gitee上的仓库spring-cloud-config中需要建立config-order.yaml,即与此应用同名,启动配置中心后可使用http://localhost:8082/config-order.yaml访问,查看配置信息。
3、演示案例
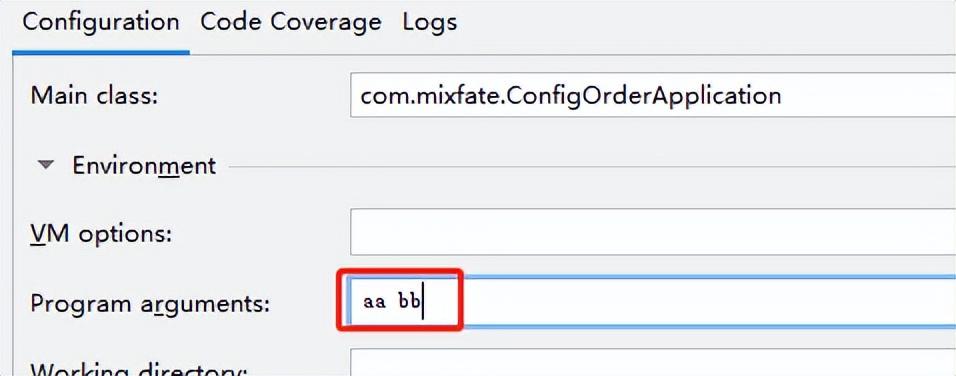
配置环境好环境变量以及jvm启动参数。

运行程序可以看到以下结果xxx.yyy.zzz is from-config-order.yaml,说明从配置中心获取到了配置项。
接着将配置中心的配置项改掉,表示配置中心无对应的配置项,如下:
config-order.yaml:
xxx:
yyy:
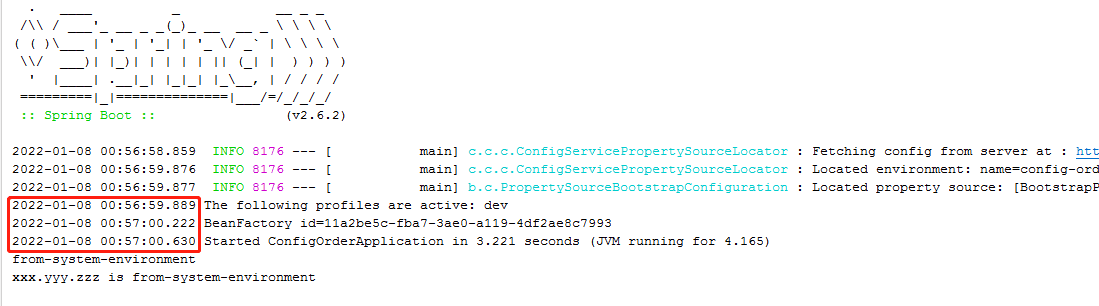
zzz000: from-config-order.yaml再次运行程序可以看到结果xxx.yyy.zzz is from-jvm-args,说明从jvm启动参数中获取到了,若将jvm参数去掉,则结果变为xxx.yyy.zzz is from-system-environment,说明从系统环境变量中获取到了。可以看到这个配置加载是有顺序的,可以继续尝试修改剩下的配置文件中的参数查看结果。
三、配置源码解析
idea 中运行调试逐步查看源码。
从SpringApplication.run(ConfigOrderApplication.class, args);开始debug,一直调试进入到SpringApplication类的方法ConfigurableApplicationContext run(String... args)中,直到configureIgnoreBeanInfo(environment);这一行,查看一下变量environment,如下图:
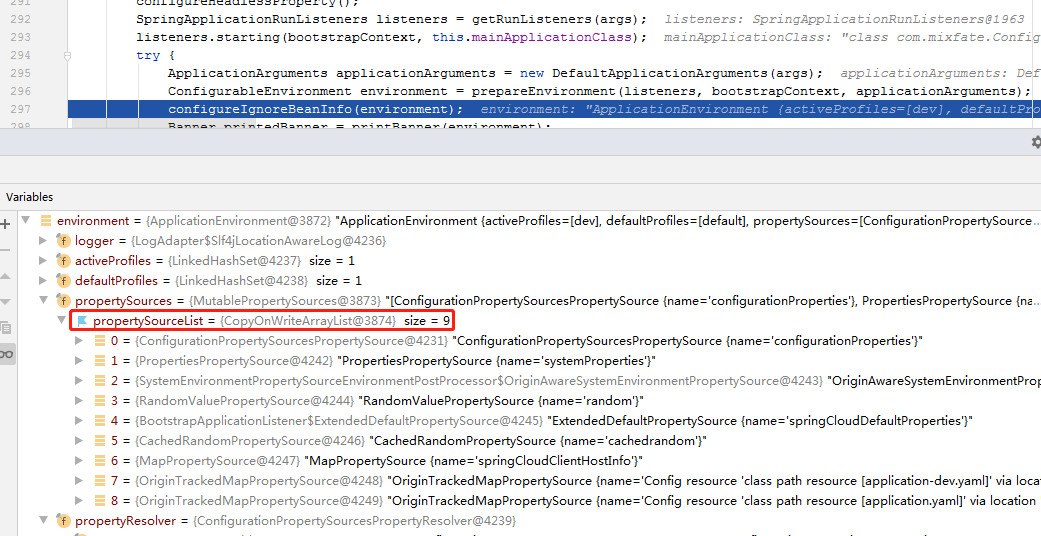
查看关键属性environment中propertySources的propertySourceList,可以看到这个List中初始化了9个属性来源,当然可以还有其他的,不过在此演示一些关键的配置项。同时可以看到关键属性propertyResolver,即属性解析器。
上面截图的List中要以看到配置文件的顺序是configurationProperties -> systemProperties -> systemEnvironment -> ... -> bootstrap.yaml -> ... -> appplication-dev.yaml -> application.yaml:
接下来看看这个PropertySourceList是怎么拼装起来的,跟踪到方法 ConfigurableEnvironment prepareEnvironment中,查看变量environment的值,如下图:
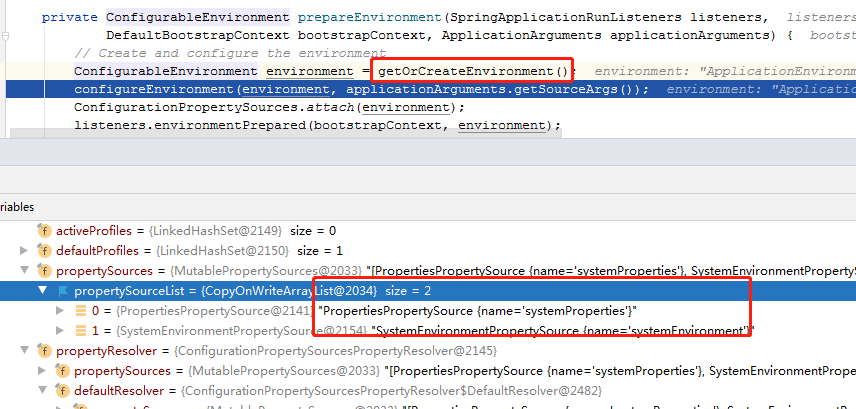
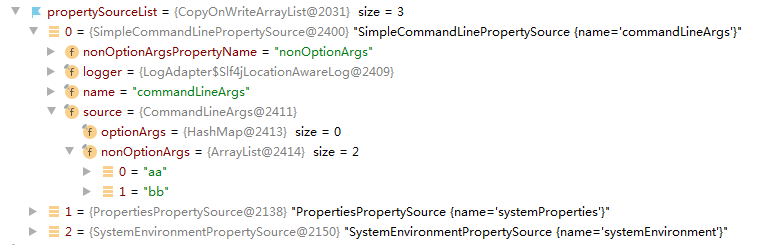
可以看到getOrCreateEnvironment()方法创建完成后按顺序有两个值systemProperties和systemEnvironment,接着继续configureEnvironment(environment,applicationArguments.getSourceArgs());此方法后查看变量,根据变量名可以猜想到应该是属于args参数,于是配置上参数观察如下,其为commandLineArgs,且加到了第一位置。
跟踪方法configurePropertySources可以看到sources.addFirst将其添加到了第一位。
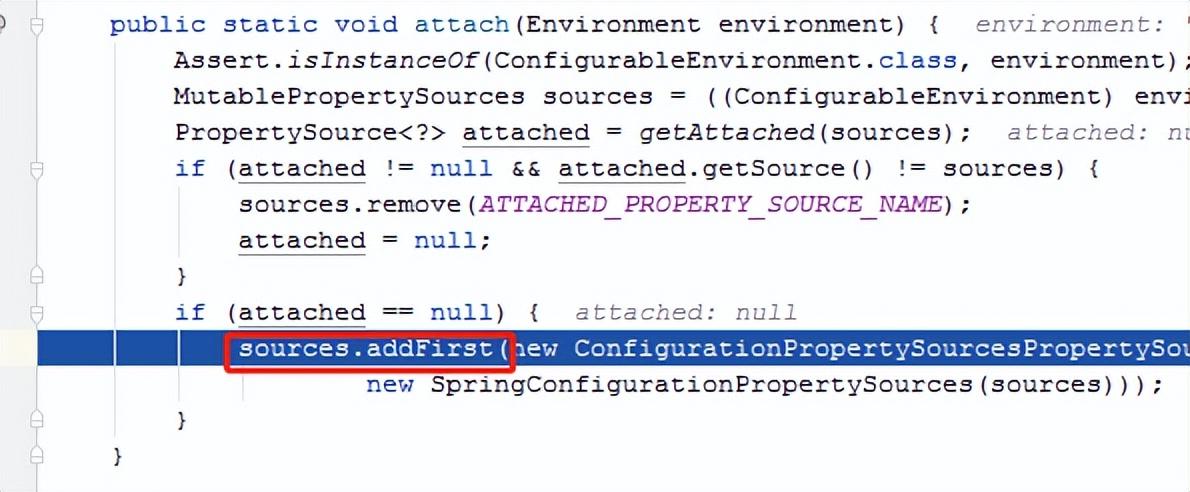
接下来是到ConfigurationPropertySources.attach(environment);,进到方法attach方法后可以跟踪到又有一个sources.addFirst,将其放到第一的位置。
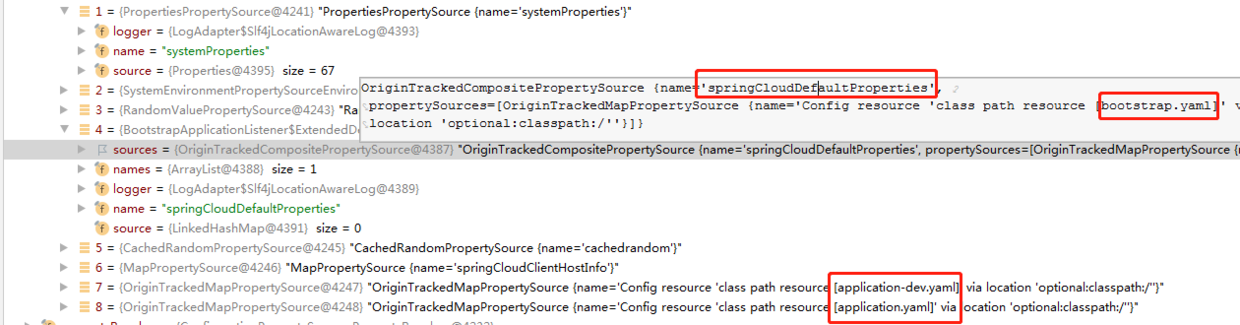
接着跑完listeners.environmentPrepared(bootstrapContext, environment);后可以观察到加了几项配置,在prepareEnvironment方法完成后完成了基础的准备,接着是关键方法prepareContext中完成初始化的过程。最后的结果如下:
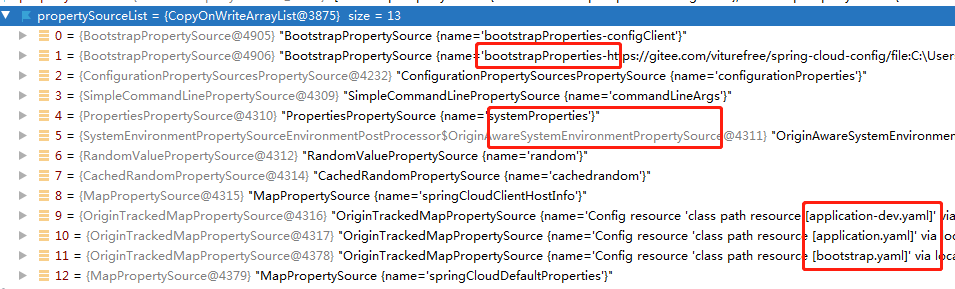
其中bootstrap.yaml配置是通过BootstrapApplicationListener的方法initialize中调用reorderSources完成的,可以看到是addLast;而bootstrapProperties即配置中心是通过PropertySourceBootstrapConfiguration的方法initialize中最后调用insertPropertySources完成的,其中的incoming.addFirst(p);将配置中心放到了最前面。
属性读取的过程。
前面跟着调试的代码大概了解了propertySourceList的拼装过程,下面看看PropertiesResolver是怎么解析的,同样是写一段演示代码如下,并跟踪其执行过程。

一路调试跟踪到ConfigurationPropertySourcesPropertyResolver类中的方法findPropertyValue,再跟进到attached.findConfigurationProperty(name),可以方法里面的for循环里面getSource(),打开Evaluate录入可以看到getSource() 里面的即是前一步的propertySourceList,如下图:
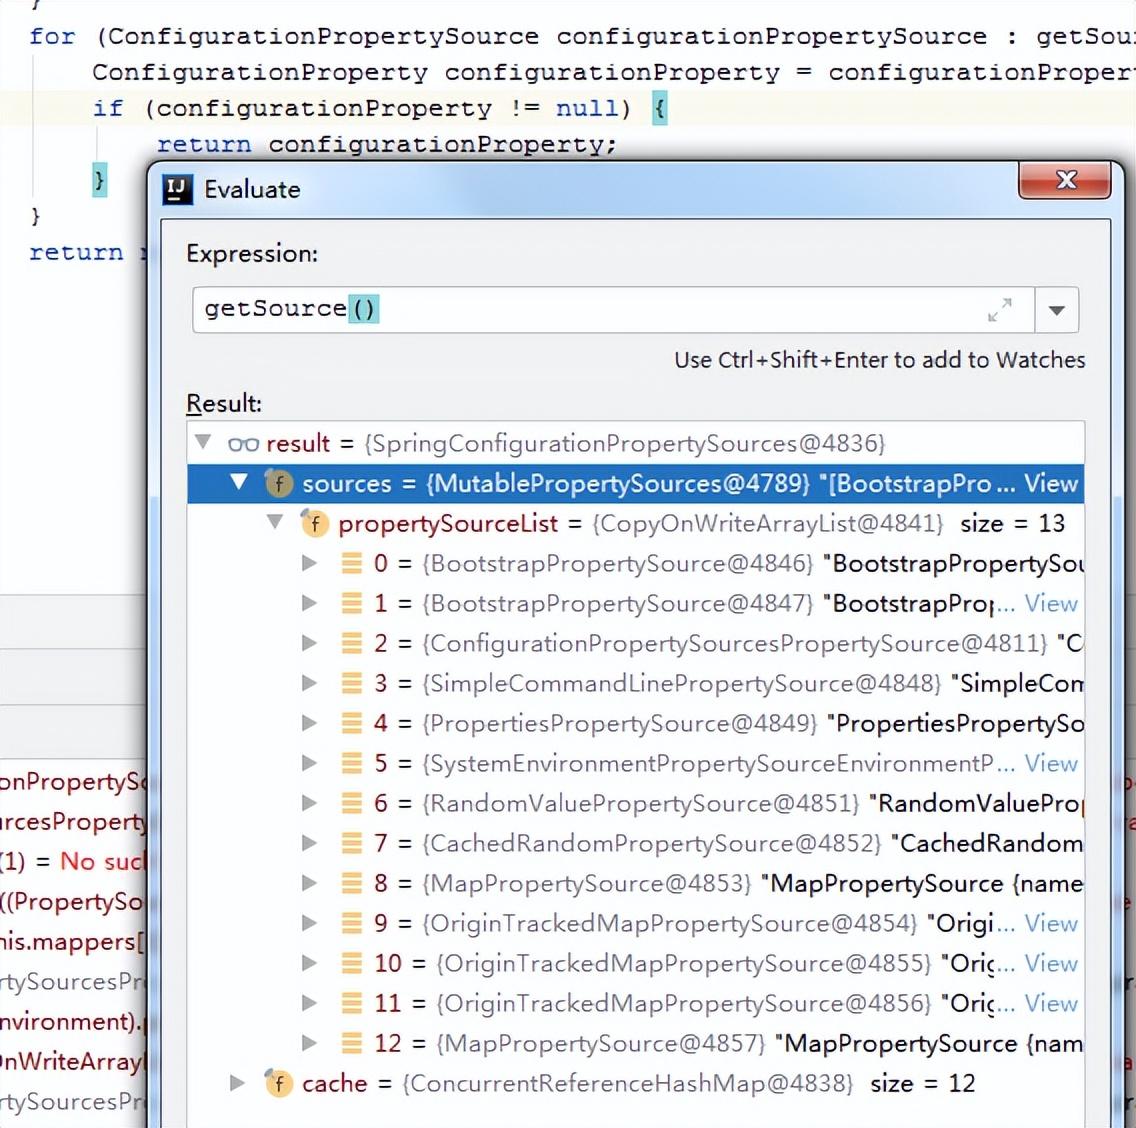
从这里就可以看出关键的点,属性是从propertySourceList逐个去解析的,若前面已经获取到对应的值,则后面配置的值就不会再解析了,所以这是个优先级的问题,并不是不同配置文件之间参数覆盖的过程。
前面还注意到一个点,在配置系统环境变量的时候,配置的环境变量参数为XXX_YYY_ZZZ而并不是xxx.yyy.zzz,为什么同样可以解析到呢?这个其实是一个约定的解析方法。同样是跟踪获取配置项的方法一直进入到SpringConfigurationPropertySource的方法getConfigurationProperty中,如下:
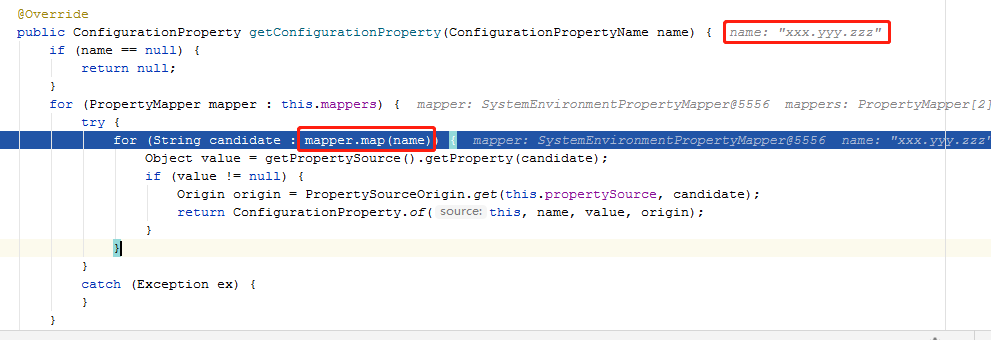
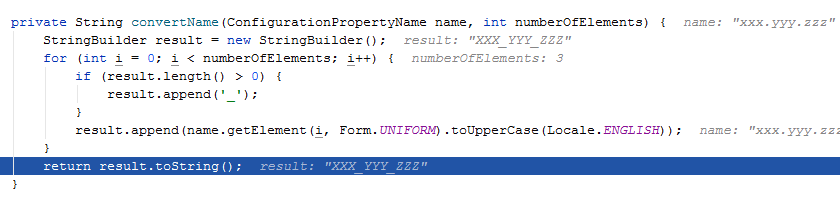
可以看到name=xxx.yyy.zzz,其中有个mapper.map(name),注意看mapper为SystemEnvironmentPropertyMapper,继续跟踪到里面即可发现有个转换的过程convertName,即如下图,将xxx.yyy.zzz转换为XXX_YYY_ZZZ,所以也是可以的。
配置加载时间先后顺序的问题。
前面可以看到配置文件的加载中,若从配置中心获取到配置则需要启动到prepareContext时才能从配置中心读取到配置项,如果是在配置中心配置了不同的日志格式呢?是不是得在加载到配置中心后才开始使用新的日志格式呢?可以实践得到结果的确是的,如配置中心定义日志格式为console: "%clr(%d{yyyy-MM-dd HH:mm:ss.SSS}){faint} %m%n",启动日志如下:
可以看到控制台日志格式的一个变化过程。
经过上面的分析可以得出常用配置文件中读取配置的结论:config配置中心 => jvm参数 => 系统环境变量 => 项目内的application-xxx.yaml => 项目内的application.yaml => bootstrap.yaml。
spring-boot 项目可以有多种灵活的方式设置配置项,一般来说项目内的application.yaml是一个默认配置项,再通过基本配置项对参数进行不同的赋值。
Recommend
About Joyk
Aggregate valuable and interesting links.
Joyk means Joy of geeK