

[WPF] 使用 HandyControl 的 CirclePanel 画出表盘刻度
source link: https://www.cnblogs.com/dino623/p/16471012.html
Go to the source link to view the article. You can view the picture content, updated content and better typesetting reading experience. If the link is broken, please click the button below to view the snapshot at that time.

1. 前言#
最近需要一个 WPF 的表盘控件,之前 Cyril-hcj 写过一篇不错的博客 《WPF在圆上画出刻度线》,里面介绍了一些原理及详细实现的代码:
double radius = BackEllipse.Width / 2;
double min = 0; double max = 100;
double step = 360.0 / (max - min);
for (int i = 0; i < max - min; i++)
{
    Line lineScale = new Line
    {
        X1 = ((radius - 20) * Math.Cos(i * step * Math.PI / 180)) + radius,
        Y1 = ((radius - 20) * Math.Sin(i * step * Math.PI / 180)) + radius,
        X2 = (radius * Math.Cos(i * step * Math.PI / 180)) + radius,
        Y2 = (radius * Math.Sin(i * step * Math.PI / 180)) + radius,
        Stroke = Brushes.Red,
        StrokeThickness = 2
    };

    MainCanvas.Children.Add(lineScale);
}
我本来想直接参考这篇文章的代码封装成一个控件,但我用得不多封装起来又麻烦,索性考虑用 ItemsControl 实现还比较方便些。
2. 使用 CirclePanel 实现#
既然要用 ItemsControl,那首先要有个集合作为它的 ItemsSource。在 XAML 中可以用以下方式创建一个集合:
<x:Array x:Key="AuthorList" Type="{x:Type sys:String}">
    <sys:String>Mahesh Chand</sys:String>
    <sys:String>Praveen Kumar</sys:String>
    <sys:String>Raj Beniwal</sys:String>
    <sys:String>Neel Beniwal</sys:String>
    <sys:String>Sam Hobbs</sys:String>
</x:Array>
不过也可以不这么大费周章,在 .NET 中 string 也是一个集合,
可以用作 ItemsControl 的 ItemsSource。但在 Xaml 上直接写 ItemsSource="somestring"` 会报错,可以用 ContentControl 包装一下,写成这样:
<ContentControl Content="111111111111">
    <ContentControl.ContentTemplate>
        <DataTemplate>
            <ItemsControl ItemsSource="{Binding}">
                <ItemsControl.ItemTemplate>
                    <DataTemplate>
                        <Rectangle Width="10"
                                   Height="3"
                                   Fill="#383838" />
                    </DataTemplate>
                </ItemsControl.ItemTemplate>
            </ItemsControl>
        </DataTemplate>
    </ContentControl.ContentTemplate>
</ContentControl>
这样 UI 上就会重复创建 12 个 Rectangle,然后设置 ItemsControl 的 ItemsPanel,让这些 Rectangle 按着圆形布局。这里我使用了 HandyControl 的 CirclePanel,这个 Panel 用起来十分简单,它会自动将 Children 在圆形上等距分布:
<ItemsControl.ItemsPanel>
    <ItemsPanelTemplate>
        <hc:CirclePanel Diameter="310" />
    </ItemsPanelTemplate>
</ItemsControl.ItemsPanel>
顺便一提,HandyControl 的 Nuget 地址为:https://www.nuget.org/packages/HandyControl/3.3.0?_src=template
最后再添加一些边框和内阴影,一个简单的表盘就完成了。
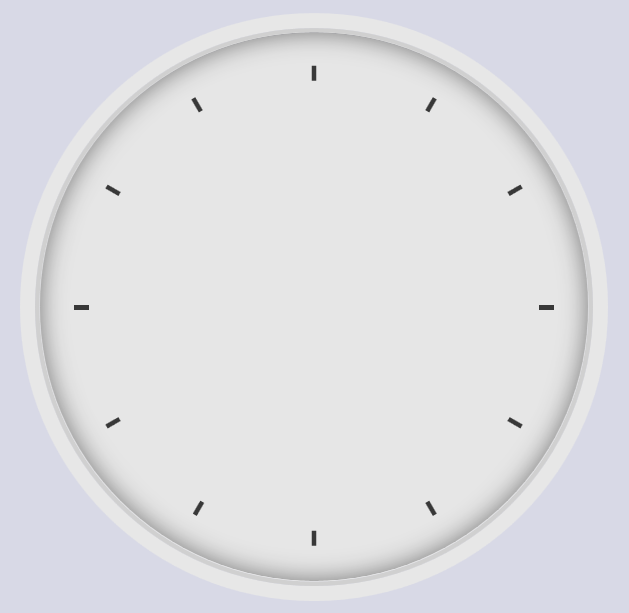
3. 用 DataTrigger 实现不同的指针#
上面的表盘还是做得太朴素了,我们可以用 DataTrigger 让它变得更复杂些。首先改变 ItemsSource 的内容,让它变成 60 个指针。反正只是 60 个,也没多复杂,复制粘贴几次就有了:
<ContentControl Content="100001000010000100001000010000100001000010000100001000010000">
然后设置 DataTrigger,在 Item 的内容等于 1 时指针变粗些:
<DataTemplate>
    <Rectangle x:Name="Tick"
               Width="10"
               Height="2"
               Fill="#383838" />
    <DataTemplate.Triggers>
        <DataTrigger Binding="{Binding}" Value="1">
            <Setter TargetName="Tick" Property="Height" Value="5" />
            <Setter TargetName="Tick" Property="Width" Value="16" />
            <Setter TargetName="Tick" Property="Margin" Value="0,0,3,0" />
        </DataTrigger>
    </DataTemplate.Triggers>
</DataTemplate>

这样看起来就和真的表盘差不多了。
4. 用 OpacityMask 实现方形表盘#
这次更进一步实现一个方形的表盘,首先将 CirclePanel 的尺寸变大,然后加长刻度线:
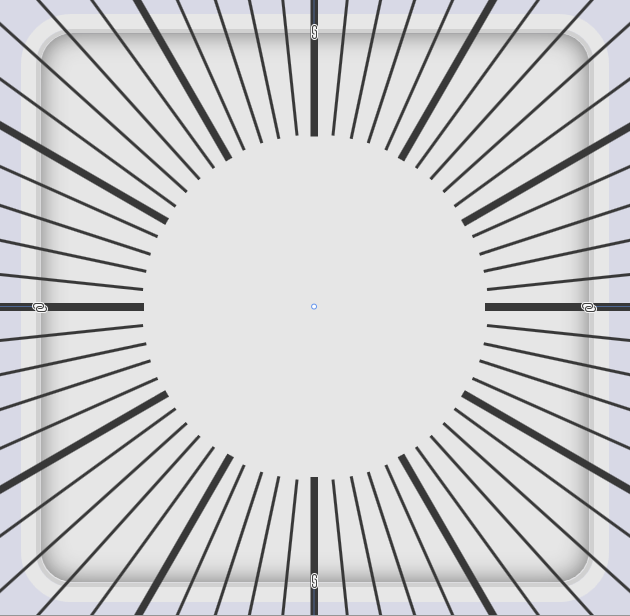
然后在它的背后藏一个 Border,用它作为刻度线的 OpacityMask,这样就完成了一个方形表盘:
<Border x:Name="Border"
        Width="340"
        Height="340"
        BorderBrush="White"
        BorderThickness="16" />
<ContentControl Style="{StaticResource ClockControl2}">
    <ContentControl Margin="-100" Content="100001000010000100001000010000100001000010000100001000010000">
        <ContentControl.OpacityMask>
            <VisualBrush Stretch="None" Visual="{Binding ElementName=Border}" />
        </ContentControl.OpacityMask>

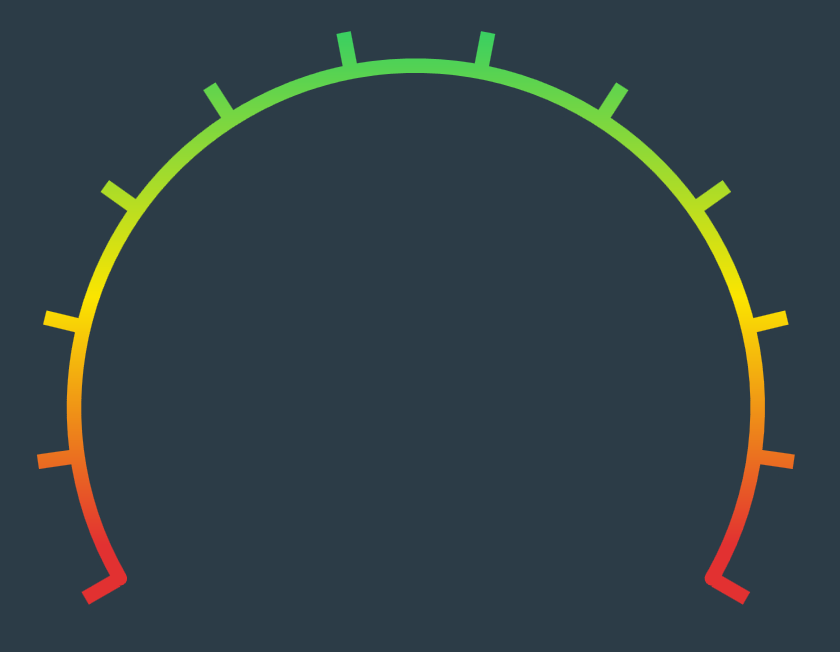
5. 用 ArcPanel 实现仪表盘#
CirclePanel 虽然很好用,可惜的是不能实现弧形布局,于是我又另外找了 HeBianGu 的 ArcPanel 来实现仪表板,用它替换掉 CirclePanel 即可实现弧形布局的刻度线:
<ItemsControl.ItemsPanel>
    <ItemsPanelTemplate>
        <h:ArcPanel Width="200"
                    Height="200"
                    AngleToCenter="True"
                    EndAngle="-30"
                    StartAngle="210" />
    </ItemsPanelTemplate>
</ItemsControl.ItemsPanel>
5. 最后#
这篇文章介绍了如何实现表盘刻度,基本都是用别人的 Panel 实现布局,我自己反而没出什么力,感谢两位大佬实现的优秀 Panel。
顺便一提,也可以用 Ellipe 配合 StrokeDashArray 简单做出这种效果,只是如果太粗的指针会看得出来是个扇形,不是矩形,而且还不够灵活。

Recommend
-
8
“这些极简的时钟不仅没有数字,连刻度也懒得做了!” 极简的时钟 时间:2022-02-21 09:36 | 阅读: 40...
-
12
Cartopy 中的 Plate Carrée 投影使用方便,但在展示中国地图时会使中国的形状显得很瘪,与之相比,Lambert 投影的效果会更加美观,下图显示了两种投影的差异 ...
-
6
某日,群里有这样一个问题,如何实现这样的表盘刻度: 这其实是个挺有意思的问题,方法也有很多。 单标签,使用 conic-gradient 实现表盘刻度 最简单便捷的方式,就是利用角向渐变的方式 ...
-
21
声学感知刻度(mel scale、Bark scale、ERB)与声学特征提取(MFCC、BFCC、GFCC) ...
-
8
会员Open Day | 刻度心灵实验室寻求合伙人和K12家长生源合作 作者:芥末堆会客厅 发布时间: 2022-09-22 10:27
-
7
WPF常用UI库和图表库(MahApps、HandyControl、LiveCharts) 精选 原创 步_步_为营
-
6
Matplotlib 系列:手动设置时间序列折线图的刻度 2023-02-11 1920 words
-
9
Matplotlib中刻度是用于在绘图中表示数据大小的工具。 刻度是坐标轴上的数字或标签,用于指示数据的大小或值,通常以整数或小数表示,具体取决于坐标轴的类型和限制。 1. 主次刻度 默认...
-
9
我们在WPF应用端的界面中,使用lepoco/wpfui 来做主要的入口框架,这个项目它的菜单内置了不少图标,我们需要在动态菜单的配置中,使用它作为图标的展示处理,本篇随笔介绍如何基于图标枚举集合进行图标的展示和选择处理。并扩展到Font-Awesome-WPF的处理进行展示和...
-
13
在我们WPF应用端的时候,和WInform开发或者Vue前端开发一样,有时候也需要对内容进行转义处理,如把一些0,1数值转换为具体含义的文本信息,或者把一些布尔变量转换为是否等,都是常见的转换处理,本篇随笔介绍在WPF应用端对内容使用Converter类实现内容的转义处理的...
About Joyk
Aggregate valuable and interesting links.
Joyk means Joy of geeK