

基于 .NET 6 的轻量级 Webapi 框架 FastEndpoints - SpringLeee
source link: https://www.cnblogs.com/myshowtime/p/16618524.html
Go to the source link to view the article. You can view the picture content, updated content and better typesetting reading experience. If the link is broken, please click the button below to view the snapshot at that time.
基于 .NET 6 的轻量级 Webapi 框架 FastEndpoints
大家好,我是等天黑。
FastEndpoints 是一个基于 .NET 6 开发的开源 webapi 框架,它可以很好地替代 .NET Minimal APIs 和 MVC ,专门为开发效率而生,带来了全新的开发模式和编码体验。
另外对于 .NET 的中间件、认证、授权、日志,依赖注入这些也都是支持的,甚至有些还进行了加强,所以你很快就可以上手它。
接下来,我将用 FastEndpoints 创建一个 webapi 应用,展示它是如何使用的,真的非常简单。
创建一个新项目
dotnet new web -n MyWebApp
进入项目
cd MyWebApp
安装 Nuget 包
dotnet add package FastEndpoints
更新 Program.cs
global using FastEndpoints;

var builder = WebApplication.CreateBuilder();
builder.Services.AddFastEndpoints();

var app = builder.Build();
app.UseAuthorization();
app.UseFastEndpoints();
app.Run();
添加一个 Request DTO
public class MyRequest
{
    public int Age { get; set; }

    public string Name { get; set; }
}
添加一个 Response DTO
public class MyResponse
{
    public int Id { get; set; }
    public int Age { get; set; }

    public string Name { get; set; }

    public DateTime CreateTime { get; set; }
}
添加一个 Endpoint Class
然后添加下面的代码, 这是处理业务逻辑的地方
public class MyEndpoint : Endpoint<MyRequest>
{
    public override void Configure()
    {
        Post("/api/user/create");
        AllowAnonymous();
    }

    public override async Task HandleAsync(MyRequest req, CancellationToken ct)
    {
        var response = new MyResponse()
        {
            Id = 1,
            Age = req.Age,
            Name = req.Name,
            CreateTime = DateTime.Now

        };

        await SendAsync(response);
    }
}
准备工作都好了,直接启动我们的 webapi 项目。
然后用 Postman 或者其他工具,向 /api/user/create 端点发送 POST 请求。
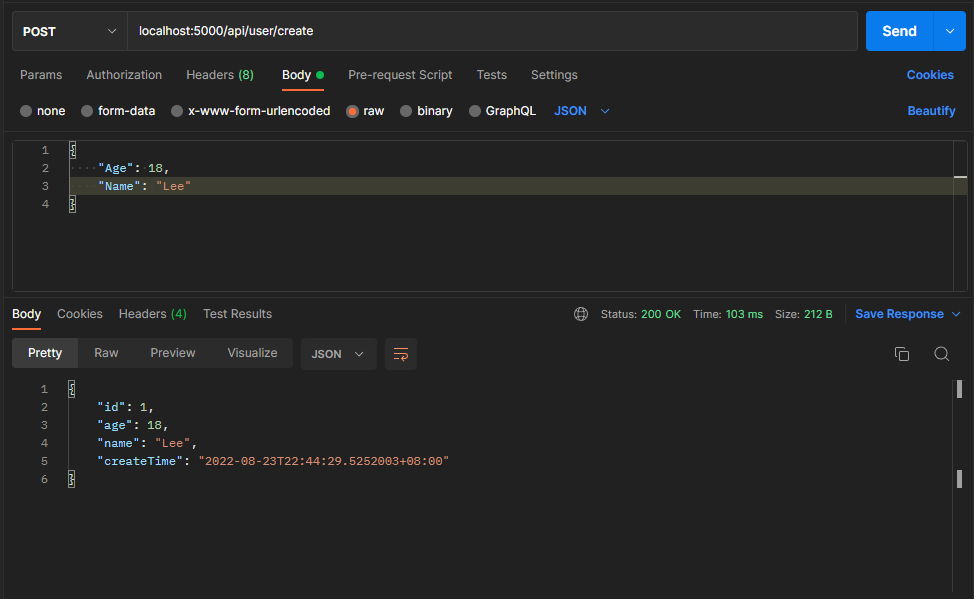
创建了一个用户,并返回了用户信息,就是这么简洁,这就是 FastEndpoints。
你可能注意到了上面的 Configure()方法,指定了 Http 动词和端点。 当然,你也可以使用 .NET 原生的特性的方式,这也是支持的。
[HttpPost("/my-endpoint")]
[Authorize(Roles = "Admin,Manager")]
public class UpdateAddress : Endpoint<MyRequest, MyResponse>
{
    public override async Task HandleAsync(MyRequest req, CancellationToken ct)
    {
        await SendAsync(new MyResponse { });
    }
}
在 FastEndpoints 中,可以使用三种方式来访问 IOC 容器中注册的服务。
假设我们有一个 HelloWorldService 。
public interface IHelloWorldService
{
    string SayHello();
}

public class HelloWorldService : IHelloWorldService
{
    public string SayHello() => "hello world!";
}
并且注册到 IOC 容器中。
builder.Services.AddScoped<IHelloWorldService, HelloWorldService>();
1. 构造函数注入
这是我们最熟悉的也是使用最多的方式。
public class MyEndpoint : EndpointWithoutRequest
{
    private IHelloWorldService _helloService;

    public MyEndpoint(IHelloWorldService helloScv)
    {
        _helloService = helloScv;
    }

    public override void Configure()
    {
        Get("/api/hello-world");
    }

    public override async Task HandleAsync(CancellationToken ct)
    {
        await SendAsync(_helloService.SayHello());
    }
}
2. 属性注入
服务实例可以通过属性的方式进行自动注入。
public class MyEndpoint : EndpointWithoutRequest
{
    public IHelloWorldService HelloService { get; set; }

    public override void Configure()
    {
        Get("/api/hello-world");
    }

    public override async Task HandleAsync(CancellationToken ct)
    {
        await SendAsync(HelloService.SayHello());
    }
}
3. 手动解析
也可以像下面这样,直接手动获取服务。
使用 TryResolve 或 Resolve() 方法。
public override async Task HandleAsync(CancellationToken ct)
{
    IHelloWorldService? helloSvc = TryResolve<IHelloWorldService>();

    if (helloSvc is null)
        ThrowError("service not resolved!");

    var logger = Resolve<ILogger<MyEndpoint>>();

    logger.LogInformation("hello service is resolved...");

    await SendAsync(helloSvc.SayHello());
}
预先解析的服务
下面的三个服务已经预先解析过,我们可以直接在处理程序中使用。
property: Config
service : IConfiguration

property: Env
service : IWebHostEnvironment

property: Logger
service : ILogger
非常方便地使用它们。
public override async Task HandleAsync(CancellationToken ct)
{
    Logger.LogInformation("this is a log message");
    var isProduction = Env.IsProduction();
    var smtpServer = Config["SMTP:HostName"];
    ...
}
如果你写过 Go Web,你会发现这是何等的相似。
package main

import (
    "fmt"
    "net/http"
)

func main() {
    http.HandleFunc("/", func(w http.ResponseWriter, r *http.Request) {
        fmt.Fprintf(w, "Hello, you've requested: %s\n", r.URL.Path)
    })

    http.ListenAndServe(":80", nil)
}
FastEndpoints 遵循了 REPR 设计 (Request-Endpoint-Response),这和我们常说的 MVC 模式是不一样的。
思考一下,如果后端只是一个 webapi 应用,没有 View, 那它就变成了 MC 架构 。是不是很奇怪,那为什么不用 REPR 模式呢?
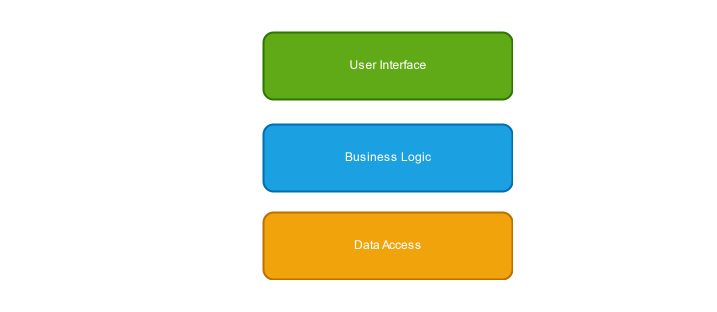
从另外一个角度上说,“分层架构” 是我们很熟悉和经常使用的,代码被分成不同的层。
这样的好处也是显而易见的。它们以解耦的方式组合在一起,在需要时,我们可以很方便的替换其中的层。
还有一种架构称为 “垂直切片架构", 系统的每个组件都是单独的一块,彼此并不影响,就像微服务那样。
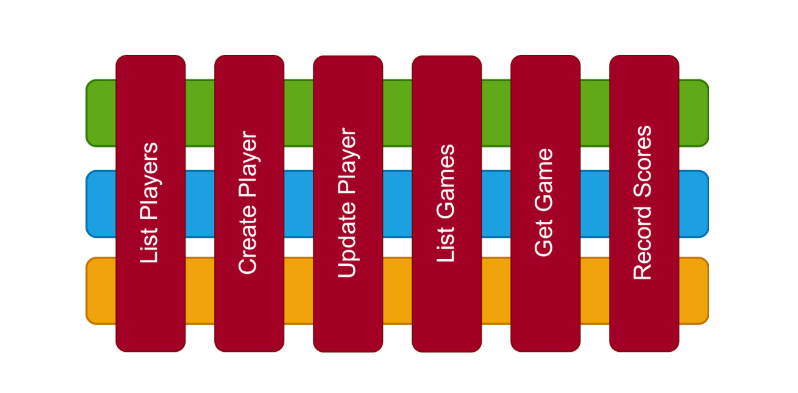
而 FastEndpoints 正是使用了下面的 “垂直切片架构"。
如您所见,FastEndpoints 是一个灵活高效的 webapi 框架。另外它还有其他的功能,比如异常处理,集成和单元测试,限流,API 版本控制等等。
扫码关注【半栈程序员】,获取最新文章。

文档: https://fast-endpoints.com/
Github: https://github.com/FastEndpoints
Recommend
About Joyk
Aggregate valuable and interesting links.
Joyk means Joy of geeK