

Challenge 010–Testimonials grid section🚀
source link: https://uxplanet.org/challenge-010-testimonials-grid-section-9067105b9ff
Go to the source link to view the article. You can view the picture content, updated content and better typesetting reading experience. If the link is broken, please click the button below to view the snapshot at that time.

Roll up your sleeves Get Your Ice Coffee Ready, It’s time to get into the best part of the Tutorial / Challenge👊
Earlier we have done the blueprint ( HTML ) & Interior Decorating (CSS) separately. As for today, we will do it differently.
- Step 01:- First, we start with designing each testimonial card
- Step 02:- Then, once all done we wrap them in a parent view
- Step 03:- Finally, we’ll make the card responsive according to the design
- Wait!!! The small announcement, we will do this in a mobile First Approach as well
STEP 01— Designing the Testimonial Cards🚀
1.1 Let Us Begin with the blueprint of the testimonial cards
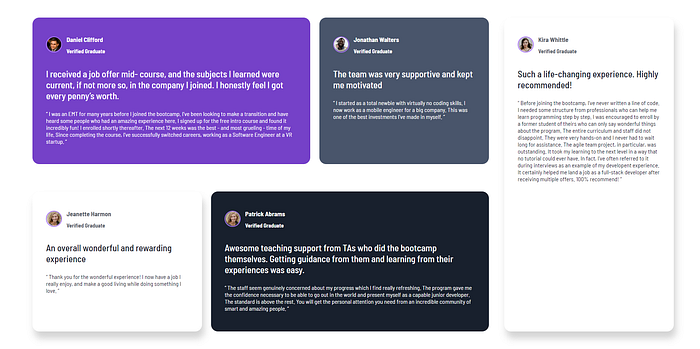
01) Testimonial Card for Daniell
<div class="daniell-tetionial-wrapper"> <div class="quote-icon">
   <img src="./images/bg-pattern-quotation.png" alt="quotation  icon">
</div><div class="info-details">  <div class="person-image">
    <img src="./images/image-daniel.png" alt="daniel">
  </div> <div class="info">
   <h1> Daniel Clifford </h1>
   <h2>  Verified Graduate </h2>
 </div></div><div class="description">
  <p>
   I received a job offer mid-course, and the subjects I
   learned were current, if not more so, in the company I joined. I
   honestly feel I got every penny’s worth.
  </p>
</div><div class="quote">
  <p>
   “ I was an EMT for many years before I joined the bootcamp. I’ve
     been looking to make a transition and have heard some people
     who had an amazing experience here. I signed up for the free
     intro course and found it incredibly fun! I enrolled shortly
     thereafter.  The next 12 weeks was the best - and most grueling
     - time of my life. Since completing the course, I’ve
     successfully switched careers, working as a Software Engineer
     at a VR startup. ”
  </p>
</div></div>
02) Testimonial Card for Jonathan
<div class="jonathan-tetionial-wrapper"><div class="info-details">  <div class="person-image">
    <img src="./images/image-jonathan.png" alt="jonathan">
  </div>  <div class="info">
    <h1> Jonathan Walters </h1>
    <h2>   Verified Graduate </h2>
  </div></div><div class="description">
    <p>
     The team was very supportive and kept me motivated
    </p>
</div><div class="quote">
    <p>
     “ I started as a total newbie with virtually no coding skills.
     I now work as a mobile engineer for a big company. This was one
     of the best investments I’ve made in myself. ”
    </p>
</div></div>
03) Testimonial Card for Janette
<div class="janette-tetionial-wrapper"><div class="info-details">   <div class="person-image">
    <img src="./images/image-jeanette.png" alt="jonathan">
   </div>   <div class="info">
    <h1> Jeanette Harmon </h1>
    <h2> Verified Graduate </h2>
   </div></div><div class="description">
    <p class="des">
     An overall wonderful and rewarding experience
    </p>
</div><div class="quote">
    <p class="qt">
     “ Thank you for the wonderful experience! I now have a job I
      really enjoy, and make a good living while doing something I
      love. ”
    </p>
</div></div>
04) Testimonial Card for Patrick
<div class="patrick-tetionial-wrapper"><div class="info-details">    <div class="person-image">
      <img src="./images/image-jeanette.png" alt="jonathan">
    </div>    <div class="info">
      <h1> Patrick Abrams </h1>
      <h2> Verified Graduate </h2>
    </div></div><div class="description">
     <p>
      Awesome teaching support from TAs who did the bootcamp
      themselves. Getting guidance from them and
      learning from their experiences was easy.
     </p>
</div><div class="quote">
    <p>
     “ The staff seem genuinely concerned about my progress which I
       find really refreshing. The program gave me the confidence
       necessary to be able to go out in the world and present
       myself as a capable junior developer. The standard is above
       the rest. You will get the personal attention you need from
       an incredible community of smart and amazing people. ”
    </p>
</div></div>
05) Testimonial Card for Kira
<div class="kira-tetionial-wrapper"><div class="info-details">   <div class="person-image">
    <img src="./images/image-kira.png" alt="jonathan">
   </div>   <div class="info">
    <h1> Kira Whittle </h1>
    <h2> Verified Graduate </h2>
   </div></div><div class="description">
    <p class="des">
     Such a life-changing experience. Highly recommended!
    </p>
</div><div class="quote">
    <p class="qt">
     “ Before joining the bootcamp, I’ve never written a line of
       code. I needed some structure from professionals who can help
       me learn programming step by step. I was encouraged to enroll
       by a former student of theirs who can only say wonderful
       things about the program. The entire curriculum and staff
       did not disappoint. They were very hands-on and I never had
       to wait long for assistance. The agile team
       project, in particular, was outstanding. It took my learning
       to the next level in a way that no tutorial
       could ever have. In fact, I’ve often referred to it during
       interviews as an example of my developent
       experience. It certainly helped me land a job as a full-stack
       developer after receiving multiple offers.
       100% recommend! ”
    </p>
</div></div>
1.2 Now let us do the styling for the testimonial cards
01) import fonts
We have used a font called ‘Barlow Semi Condensed’throughout the design. Therefore what we can first do is, go to google font, search for ‘Barlow Semi Condensed’ font, click on the relevant font weights we need, and then get the import link.
@import url('https://fonts.googleapis.com/css2?family=Barlow+Semi+Condensed:wght@400;500;600;700&display=swap');
02) Use root: to declare colours
:root {
   --white: #ffffff;
   --purple: #7541c8;
   --lighpurple: #A775F1;
   --grey: #49556B;
   --balckishblue: #18202D;
   --lightgrey: #A7ABAE;
   --darkgrey: #5A636C;}
03) Including the styles for the universal selector
* {  font-family: 'Barlow Semi Condensed', sans-serif;
  font-size: 12px;
  color: var(--white);}
04) Common Styling
p, h1 {
  color: var(--white)
}.daniell-tetionial-wrapper {
  border-radius: 15px;
  background-color: var(--purple);
  width: 312px;
  padding: 30px;
}.info {
  margin: 0px;
}.quote-icon {
  position: absolute;
  right: 20px;
  top: 8px;
}.quote-icon img {
  height: 102px;
  width: 104px;
}.info-details {
  align-items: center;
  display: flex;
  flex-direction: row;
}.person-image {
  border-radius: 100%;
  padding-right: 10px;
}.person-image img {
  border: 2px solid var(--lighpurple);
  width: 31px;
  height: 31px;
  border-radius: 100%;
}.description p {
  color: var(--white);
  font-size: 20px;
  font-weight: 500;
}.quote p {
  color: var(--white);
  font-size: 13px;
}.black-text {
  color: var(--darkgrey);
}.each-wrapper {
  margin-top:30px;
  margin-bottom: 30px;
  margin-left: 10px;
  margin-right: 10px;
}
05) Specific Styling
.jonathan-tetionial-wrapper {
  border-radius: 15px;
  background-color: var(--grey);
  max-width: 312px;
  padding: 30px;
}.janette-tetionial-wrapper,
.kira-tetionial-wrapper {
  border-radius: 15px;
  background-color: var(--white);
  box-shadow: 5px 15px 15px rgba(0, 0, 0, 0.17);
  max-width: 312px;
  padding: 30px;
}.description .des {
  color: var(--balckishblue);
  font-size: 20px;
  font-weight: 500;
}.quote .qt {
  color: var(--balckishblue);
  font-size: 13px;
}.patrick-tetionial-wrapper {
  border-radius: 15px;
  background-color: var(--balckishblue);
  max-width: 312px;
  padding: 30px;
}
STEP 02 — Wrapping With Parent View
2.1 Let Us Begin with the blueprint of the parent wrapper
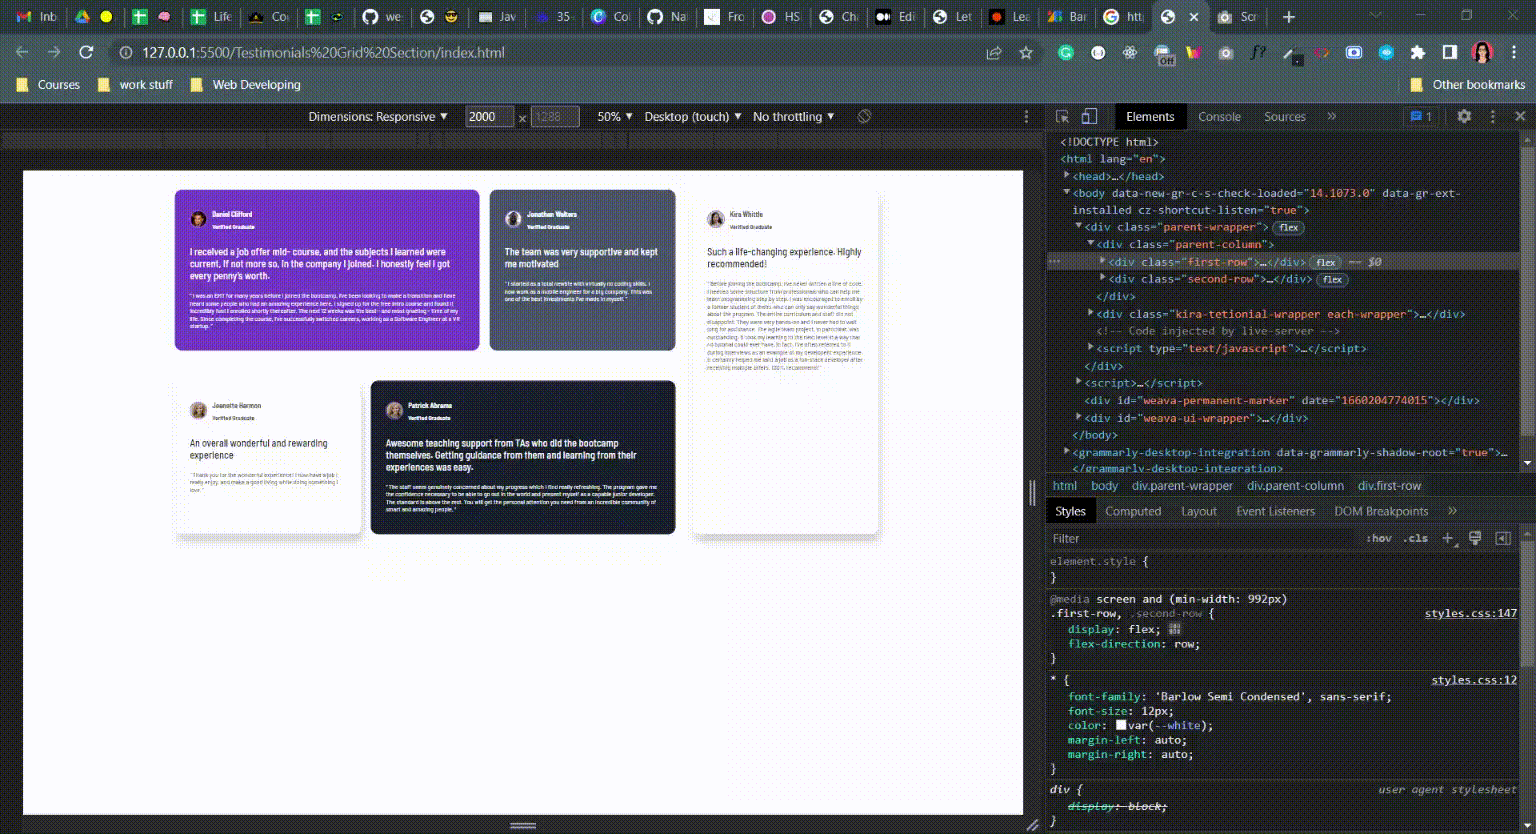
<div class="parent-wrapper">  <div class="parent-column">
    <div class="first-row">
      <div class="daniell-tetionial-wrapper each-wrapper">
      </div>
      <div class="jonathan-tetionial-wrapper each-wrapper">
      </div>
    </div>   <div class="second-row">
      <div class="janette-tetionial-wrapper each-wrapper">
      </div>
      <div class="patric-tetionial-wrapper each-wrapper">
      </div>
    </div>      <div class="kira-tetionial-wrapper each-wrapper">
      </div></div>
2.2 Now let us do the styling for the parent wrapper
.parent-wrapper {
  display: flex;
  flex-direction: column;
  max-width: 1440px
  align-items:center
}
BEFORE MOVING TO THE RESPONSIVE PART LET US CHECK THE OUTCOME IN MOBILE VIEW👇

STEP 03 — It Is Time To Make It Responsive🚀
@media screen and (min-width: 992px){.parent-wrapper {
  display: flex;
  flex-direction: row;
  align-items:stretch;
}.first-row,
.second-row {
  display: flex;
  flex-direction: row;
}.patrick-tetionial-wrapper {
  max-width: 250
}.daniell-tetionial-wrapper,
.patrick-tetionial-wrapper{
  max-width: 550px;
  width:550px
}.quote-icon {
  left: 700px
}}
Recommend
-
18
Enterprise Mobility and Enterprise Client Management Blog
-
14
Introduction I subscribe to Adafruit's AdaBox and I get a fun project every 3 months mailed to me. A little while back I received AdaBox 01...
-
15
[Release News] Fable 3.0.0-nagareyama-rc-010 released!Welcome to Devtalk - the brand new platform for developers! If you’ve been looking for...
-
13
Working Code Podcast - Episode 010: Scaling By Ben Nadel on February 17, 2021 Tags:
-
7
Massively Multiplayer Online Games by Wisdom with FriendsWith your consent, we would like to use cookies and similar technologies to enhance your experience with our service, for analytics, and for advertising purposes. You can...
-
13
JZ-010-矩形覆盖我们可以用21的小矩形横着或者竖着去覆盖更大的矩形。请问用n个21的小矩形无重叠地覆盖一个2*n的大矩形,总共有多少种方法?题目链接...
-
7
规模化敏捷大对决 The Scaling Agile Showdown 在底特律一个隐秘的地点,准备下去啦 规模化敏捷大对决。 Alarmin’ Craig (LeSS) vs. Don Leff (SAFe) 哟,是Don Leff,我会让匆忙的人变得脆弱。(猜一猜谁创建了最流行的规模...
-
8
Unexplored Territory #010: Terraform and declarative automation with Kyle Ruddy Duncan Epping · Feb 22, 2022 ·
-
6
以太坊核心开发者会议更新 010⛓合并的最新重点工作在测试,上海升级计划包括 EVM 升级、信标链提款、L2 费用减少等Tim Beiko 2022-03-28来源 |
-
2
自行坦荡,光芒万丈内容不一定精彩,知识不一定你可以用得上,观点不一定准确,还望观者觉得有缺陷欢迎指正,觉得还好的感谢鼓励点赞。 10.1 stat 查看文件详细信息主要参数:
About Joyk
Aggregate valuable and interesting links.
Joyk means Joy of geeK