

从零搭建云原生技术kubernetes(K8S)环境-通过kubesPhere的AllInOne方式 - 奇想派
source link: https://www.cnblogs.com/zhbeier/p/16596486.html
Go to the source link to view the article. You can view the picture content, updated content and better typesetting reading experience. If the link is broken, please click the button below to view the snapshot at that time.
k8s云原生搭建,步骤有点多,但通过kubesphere,可以快速搭建k8s环境,同时有一个以 Kubernetes 为内核的云原生分布式操作系统-kubesphere,本文将从零开始进行kubePhere3.1.1的安装搭建,采用了KubeKey,KubeKeyKubeKey 可以将 Kubernetes 和 KubeSphere 一同安装,其他版本大同小异,只是改个版本号而已。
| 服务器 | 账号 | 密码 |
|---|---|---|
| 139.198.22.13 | root | **** |
参考官方文档
在 Linux 上以 All-in-One 模式安装 KubeSphere
通过kubekey安装KubeSphere,具体参考 官方配置/README_zh-CN.md
安装前准备
## 关闭防火墙
systemctl stop firewalld
systemctl disable firewalld
systemctl status firewalld
## 查看并关闭swap分区
swapoff -a
echo "vm.swappiness=0" >> /etc/sysctl.conf
sysctl -p /etc/sysctl.conf
sed -i 's$/dev/mapper/centos-swap$#/dev/mapper/centos-swap$g' /etc/fstab
## 查看Selinux状态
getenforce
## 安装依赖组件
yum install -y ebtables socat ipset conntrack
## 安装docker
yum install -y yum-utils
yum-config-manager --add-repo http://mirrors.aliyun.com/docker-ce/linux/centos/docker-ce.repo
#yum-config-manager --add-repo https://download.docker.com/linux/centos/docker-ce.repo
yum makecache fast
yum -y install docker-ce docker-ce-cli
## 启动docker
systemctl enable docker && systemctl start docker
## 设置docker镜像加速器
cat > /etc/docker/daemon.json <<EOF
{
"insecure-registries":["10.8.104.247:5000","git.xcc.com:5000"],
"registry-mirrors": ["https://dzhtyzgo.mirror.aliyuncs.com"],
"exec-opts": ["native.cgroupdriver=systemd"],
"log-driver": "json-file",
"log-opts": {
"max-size": "100m"
},
"storage-driver": "overlay2",
"storage-opts": [
"overlay2.override_kernel_check=true"
]
}
EOF
## 重启docker使配置生效
#重载配置
systemctl daemon-reload
systemctl restart docker
systemctl status docker
docker info | grep "Registry Mirrors" -A 1
## 检查DNS设置
cat /etc/resolv.conf
```shell script
#需要时可改为下面dns配置
nameserver 114.114.114.114
nameserver 8.8.8.8
设置kubernetes仓库
cat <<EOF > /etc/yum.repos.d/kubernetes.repo
[kubernetes]
name = Kubernetes
baseurl = http://mirrors.aliyun.com/kubernetes/yum/repos/kubernetes-el7-x86_64
enabled = 1
gpgcheck = 0
repo_gpgcheck = 0
gpgkey = http://mirrors.aliyun.com/kubernetes/yum/doc/yum-key.gpg
        http://mirrors.aliyun.com/kubernetes/yum/doc/rpm-package-key.gpg
EOF
yum makecache fast
#0、放在目录里
mkdir -vp /data/kubesphere
cd /data/kubesphere

#1、下载KubeKey
curl -sfL https://get-kk.kubesphere.io | VERSION=v1.1.1 sh -

#2、添加可执行权限
chmod +x kk

#3、开始安装
#安装 KubeSphere v3.1.1 的建议 Kubernetes 版本:v1.17.9,v1.18.8,v1.19.8 以及 v1.20.4。如果不指定 Kubernetes 版本,KubeKey 将默认安装 Kubernetes v1.19.8。
#案例
#    ./kk create cluster [--with-kubernetes version] [--with-kubesphere version]
#若要同时安装 Kubernetes 和 KubeSphere,可参考以下示例命令:
#    ./kk create cluster --with-kubernetes v1.20.4 --with-kubesphere v3.1.1

./kk create cluster --with-kubernetes v1.18.8 --with-kubesphere v3.1.1

#验证安装结果
#输出信息会显示 Web 控制台的 IP 地址和端口号,默认的 NodePort 是 30880。现在,您可以使用默认的帐户和密码 (admin/P@88w0rd) 通过 <NodeIP>:30880 访问控制台。
kubectl logs -n kubesphere-system $(kubectl get pod -n kubesphere-system -l app=ks-install -o jsonpath='{.items[0].metadata.name}') -f
输出信息会显示 Web 控制台的 IP 地址和端口号,默认的 NodePort 是 30880。现在,您可以使用默认的帐户和密码 (admin/P@88w0rd) 通过 <NodeIP>:30880 访问控制台。
#####################################################
###              Welcome to KubeSphere!           ###
#####################################################

Console: http://192.168.0.2:30880
Account: admin
Password: P@88w0rd

NOTES:
  1. After you log into the console, please check the
     monitoring status of service components in
     "Cluster Management". If any service is not
     ready, please wait patiently until all components
     are up and running.
  2. Please change the default password after login.

#####################################################
https://kubesphere.io             20xx-xx-xx xx:xx:xx
#####################################################
删除kubesphere
* 如果您以快速入门(all-in-one)开始:
```shell script
./kk delete cluster
```
* 如果从高级安装开始(使用配置文件创建的集群):
```shell script
./kk delete cluster [-f config-sample.yaml]
```
启用多集群
参考文档:community/README_zh.md at master · kubesphere/community · GitHub
member要最小化安装,参考文档:在 Kubernetes 上最小化安装 KubeSphere
## 先安装helm

## 然后执行下面命令

kubectl apply -f https://github.com/kubesphere/ks-installer/releases/download/v3.1.1/kubesphere-installer.yaml

kubectl apply -f https://github.com/kubesphere/ks-installer/releases/download/v3.1.1/cluster-configuration.yaml

kubectl logs -n kubesphere-system $(kubectl get pod -n kubesphere-system -l app=ks-install -o jsonpath='{.items[0].metadata.name}') -f
多集群功能涉及到多个集群之间的网络连通,了解集群之前的网络拓扑有助于减少接下来的工作量。
多集群功能需要创建一个 Host Cluster,实际即是一个开启了多集群功能的 KubeSphere 集群,简称 H 集群。H 集群管理的所有集群称之为 Member Cluster,即是一个普通的未开启多集群功能的 KubeSphere 集群,简称 M 集群。H 集群只能有一个,M 集群可以有多个。在多集群架构中,要求 H 集群和 M 集群网络可以直连或者通过代理连通,M 集群之间的网络可以是处在完全隔离的环境中。
2. 直接连接
如果 M 集群 kube-apiserver 地址可以在 H 集群上的任一节点上都能访问,即可以使用直接连接的方式。直接连接方式适用于 M 集群可以暴露 kube-apiserver 地址或者 H 和 M 集群处在同一个私网环境中。
2.1. 安装 Host Cluster 集群
-
安装 Host Cluster 与安装 KubeSphere 没有大的区别,唯一的区别在于安装时确保 installer 的配置文件 ClusterConfiguration 中 multicluster 项如下配置。
-
none改成host
multicluster:
  clusterRole: host
如果你已经有一个安装好的 KubeSphere 集群,也可以通过修改 cluster configuration 的方式改变集群的角色,然后等待配置生效。
kubectl edit cc ks-installer -n kubesphere-system

kubectl logs -n kubesphere-system $(kubectl get pod -n kubesphere-system -l app=ks-install -o jsonpath='{.items[0].metadata.name}') -f
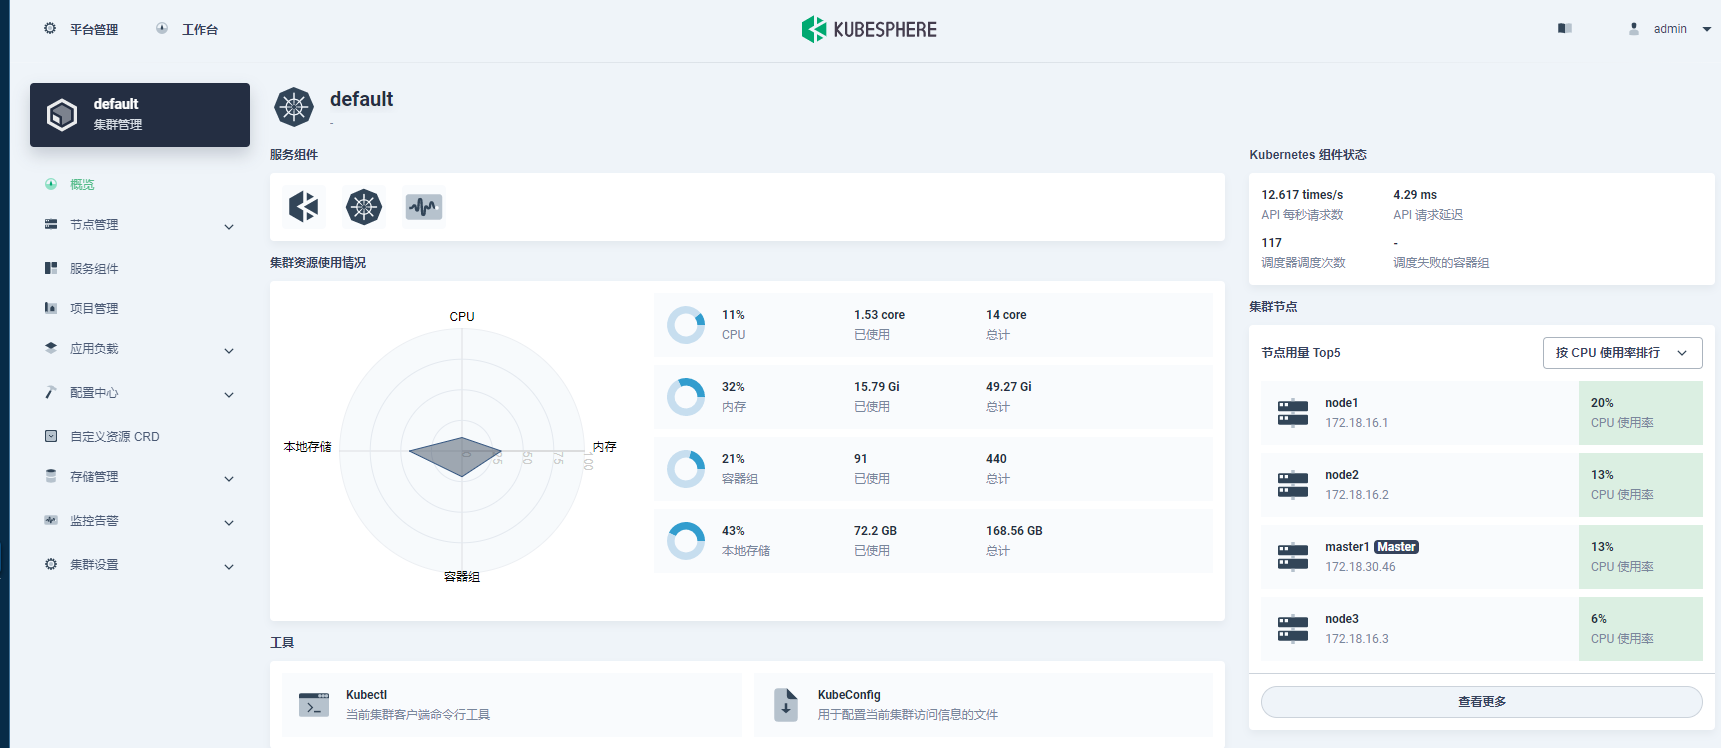
直到显示出
#####################################################
###              Welcome to KubeSphere!           ###
#####################################################

Console: http://192.168.1.100:30880
Account: admin
Password: P@88w0rd

NOTES:
  1. After you log into the console, please check the
     monitoring status of service components in
     "Cluster Management". If any service is not
     ready, please wait patiently until all components
     are up and running.
  2. Please change the default password after login.

#####################################################
https://kubesphere.io             2022-02-09 15:35:57
#####################################################
2.2. 安装 Member Cluster 集群
-
为了能够使 host 集群直接管理 member 集群,需要将 member 集群的 jwtSecret 设置与 host 相同。 首先在 host 集群上执行下列命令获取到 host 集群的 jwtSecret。
$ kubectl -n kubesphere-system get cm kubesphere-config -o yaml | grep -v "apiVersion" | grep jwtSecret jwtSecret: "hFsuNkESfUVBiaP9VdFW1kSPTGvvDOUX" -
安装 Member Cluster 和安装普通的未开启多集群功能的集群没有任何区别。确保安装时 installer 的 ClusterConfiguration 中 multicluster 项设置角色,同时填入上面获取的 host 的 jwtSecret。
authentication:
  jwtSecret: hFsuNkESfUVBiaP9VdFW1kSPTGvvDOUX

multicluster:
  clusterRole: member
配置完成后,执行安装。如果你已经有一个安装好的 KubeSphere 集群,也可以通过修改 cluster configuration 的方式改变集群的角色和 jwtSecret,然后等待配置生效。
kubectl edit cc ks-installer -n kubesphere-system


kubectl logs -n kubesphere-system $(kubectl get pod -n kubesphere-system -l app=ks-install -o jsonpath='{.items[0].metadata.name}') -f
2.3. 导入集群
-
打开 H 集群 dashboard,点击添加集群,输入集群基本信息后点击下一步。
-
连接方式选择
直接连接 KubeSphere 集群, 将 Member 集群的 kubeconfig 内容粘贴到输入框中。确保 kubeconfig 中的server地址在 H 集群中的任一节点都可以访问。KubeSphere API Server地址填写 KubeSphere APIServer 的地址,也可以不填。[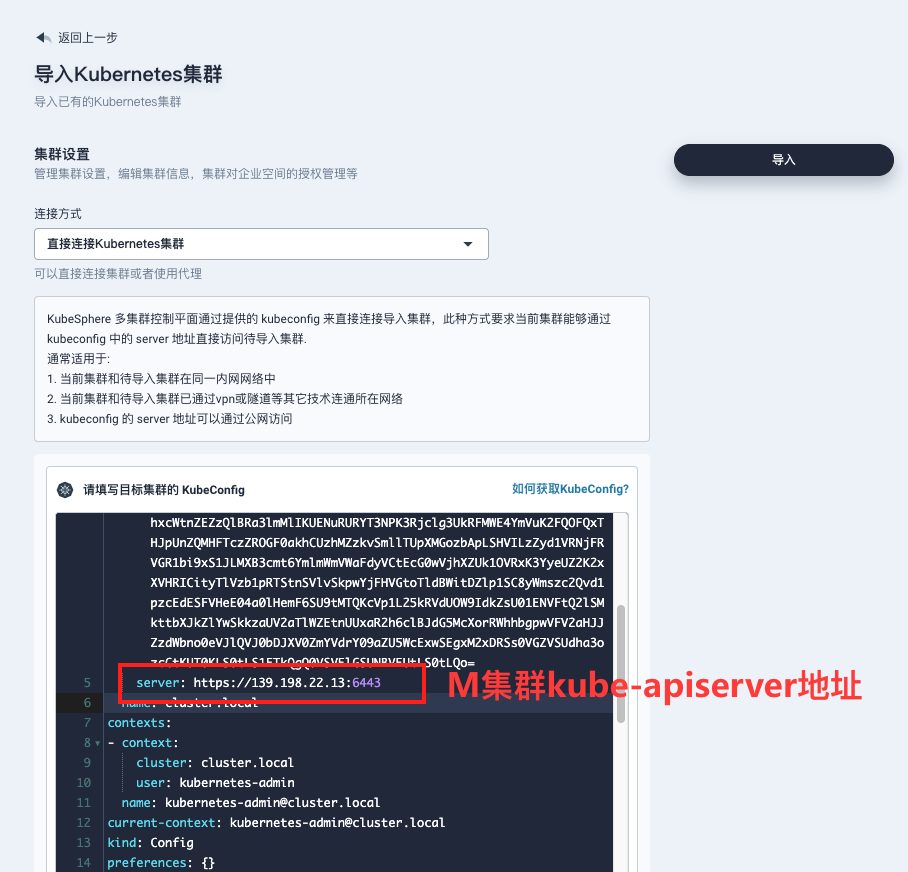
-
点击导入,等待集群初始化完成即可
3. 代理连接
代理连接使用了 KubeSphere 的 Tower 组件,Tower 是一个可以在集群间通过代理方式创建网络连接的工具。如果 H 集群不能直接访问 M 集群,可以通过暴露 H 集群代理服务地址,M 集群通过代理来创建和 H 集群的网络连接。代理连接的方式适用于 M 集群处在非公开的 IDC 机房等私有环境,而 H 集群有能力暴露代理服务的场景。
3.1. 安装 Host Cluster
-
安装 Host Cluster 与安装 KubeSphere 没有大的区别,唯一的区别在于安装时确保 installer 的配置文件 ClusterConfiguration 中 multicluster 项如下配置 。
multicluster:
  clusterRole: host
如果你已经有一个安装好的 KubeSphere 集群,也可以通过修改 cluster configuration 的方式改变集群的角色,然后等待配置生效。
kubectl edit cc ks-installer -n kubesphere-system -
设置代理服务地址
Host Cluster 安装成功后,
kubesphere-system项目下会创建一个名称为 tower,type 为 LoadBalancer 的代理服务。-
如果集群有可以使用的 LoadBalancer 插件,可以看到
EXTERNAL-IP栏目有对应的地址显示,KubeSphere 会自动获取这个地址,我们可以跳过接下来的设置代理的步骤。$ kubectl -n kubesphere-system get svc NAME TYPE CLUSTER-IP EXTERNAL-IP PORT(S) AGE tower LoadBalancer 10.233.63.191 139.198.110.23 8080:30721/TCP 16h -
如果一直没有对应的地址显示,则需要手动设置下代理地址。假设现在有可以对外的公网 IP 地址 139.198.120.120,已经通过端口转发的方式将此 IP 地址的 8080 端口转发到集群节点的 30721 端口 (请根据您具体的端口号转发)。
$ kubectl -n kubesphere-system get svc NAME TYPE CLUSTER-IP EXTERNAL-IP PORT(S) AGE tower LoadBalancer 10.233.63.191 <pending> 8080:30721/TCP 16h -
修改配置文件,填入之前设置的地址
$ kubectl -n kubesphere-system edit clusterconfiguration ks-installer multicluster: clusterRole: host proxyPublishAddress: http://139.198.120.120:8080 # 增加这一行,设置 tower 服务的访问地址,填入上面设置的 IP 地址 -
保存设置,并且重启 ks-apiserver
kubectl -n kubesphere-system rollout restart deployment ks-apiserver
-
3.2. 安装 Member Cluster
-
为了能够使 host 集群直接管理 member 集群,需要将 member 集群的 jwtSecret 设置与 host 相同。 在 host 集群上执行下列命令获取到 host 集群的 jwtSecret。
$ kubectl -n kubesphere-system get cm kubesphere-config -o yaml | grep -v "apiVersion" | grep jwtSecret jwtSecret: "gfIwilcc0WjNGKJ5DLeksf2JKfcLgTZU" -
安装 Member Cluster 和安装普通的未开启多集群功能的集群没有任何区别。确保安装时 installer 的 ClusterConfiguration 中 multicluster 项如下配置,同时填入上面获取的 host 的 jwtSecret。
authentication:
  jwtSecret: gfIwilcc0WjNGKJ5DLeksf2JKfcLgTZU

multicluster:
  clusterRole: member
配置完成后,执行安装。如果你已经有一个安装好的 KubeSphere 集群,也可以通过修改 cluster configuration 的方式改变集群的角色和 jwtSecret,然后等待配置生效。
kubectl edit cc ks-installer -n kubesphere-system
3.3. 导入集群
-
打开 H 集群 dashboard,点击添加集群,输入集群基本信息后点击下一步。
-
连接方式选择
集群连接代理,点击导入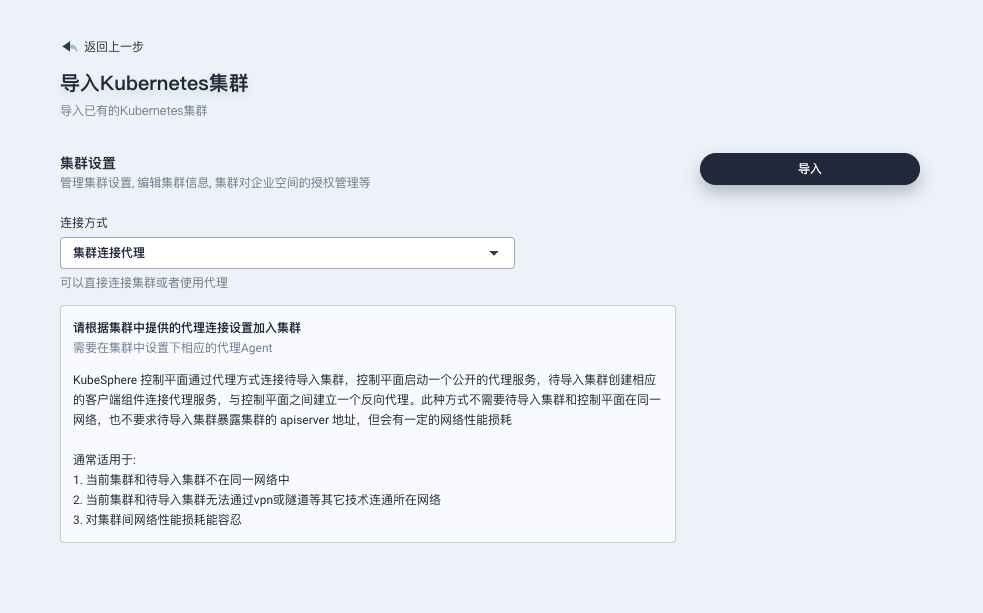
-
根据提示在 M 集群中,创建一个
agent.yaml文件,并将生成的部署粘贴到文件中,在节点上执行kubectl create -f agent.yaml,等待 agent 运行正常。确保 M 集群上可以访问 H 集群的代理地址。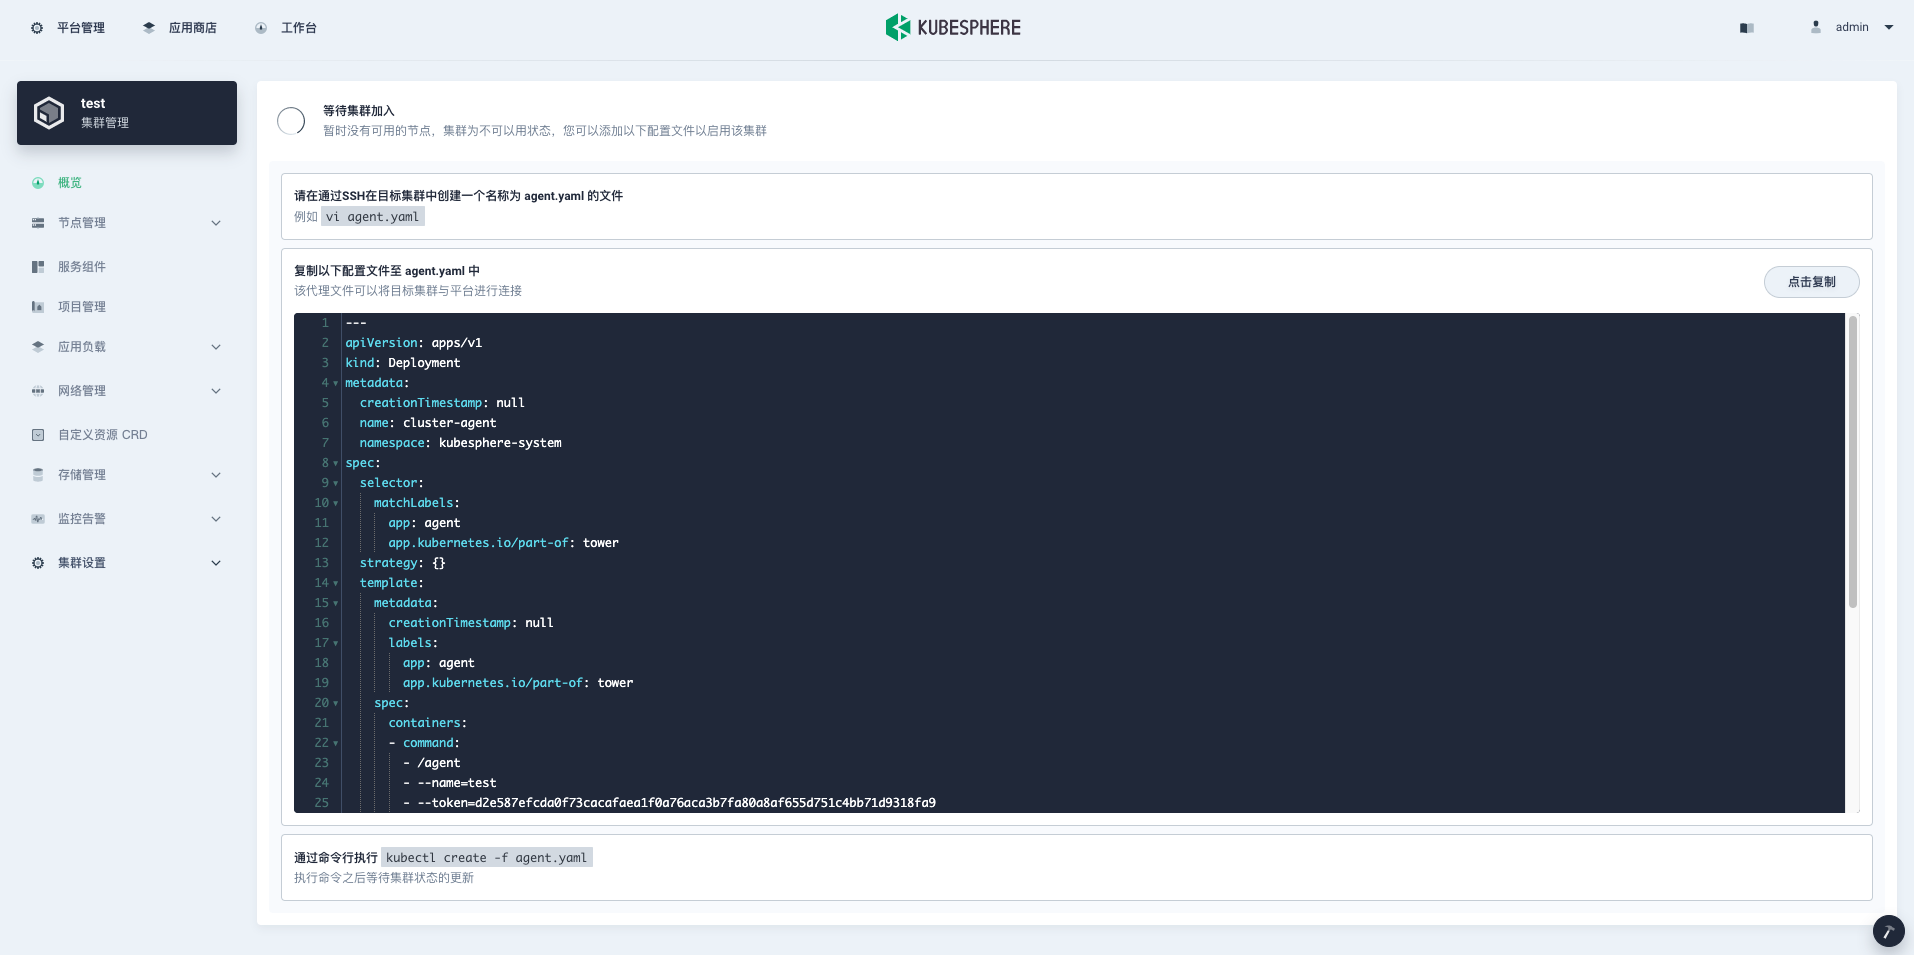
-
集群代理运行正常后即可在 H 集群上看到导入的集群
kubekey其他命令
添加新节点参考文档: 添加新节点 (kubesphere.io)
本文原创作者:奇想派、一名程序员。
文章首发平台:微信公众号【编程达人】

原创不易!各位小伙伴觉得文章不错的话,不妨关注公众号,进行点赞(在看)、转发三连走起!谢谢大家!
Recommend
About Joyk
Aggregate valuable and interesting links.
Joyk means Joy of geeK