

How to deploy MicroShift on your laptop quickly
source link: https://www.redhat.com/sysadmin/deploy-microshift-laptop
Go to the source link to view the article. You can view the picture content, updated content and better typesetting reading experience. If the link is broken, please click the button below to view the snapshot at that time.
How to deploy MicroShift on your laptop quickly
Posted: August 16, 2022 | %t min read | by Jose Antonio Gonzalez Prada (Red Hat)

In previous articles, I explained how to generate a Red Hat Enterprise Linux 9 image with MicroShift. I relied on AWS services and a somewhat complicated process for those articles.
MicroShift is a project exploring how to optimize OpenShift (Red Hat's Kubernetes) for small form factor and edge computing. MicroShift's goal is to tailor OpenShift for field-deployed device use cases, providing a consistent development and management experience across all footprints.
Since many people are interested in trying MicroShift, I thought it would be helpful to explain how to deploy MicroShift on your own laptop. Since I am relying on virtualization, I will also introduce you to a magical tool (courtesy of my colleague Karim Boumedhel) called kcli.
Project requirements
There are specific system and tool requirements for this project. Please check the following list before continuing.
System requirements
To run MicroShift, you need a Linux machine with at least:
- 2 CPU cores
- 2GB RAM
- 1GB of free storage space for MicroShift
These system requirements also include resources for the operating system unless explicitly mentioned otherwise.
Since this project focuses on a local deployment (a laptop) and virtualization, you must have virtualization enabled and the relevant software on your system to follow along with the steps.

My configuration is:
- Fedora 35 (or latest): You must take Fedora's minimum requirements into account and satisfy the MicroShift requirements above.
- Libvirt: Follow the kcli documentation to configure it using Libvirt's hypervisor requisites or use Fedora's official documentation on installing libvirt and virt-install on Fedora Linux (for a fine-grained configuration).
WARNING: The MicroShift system requirements state that the supported operating system is RHEL 8.6+, but if for some reason you cannot have a RHEL image, you can use a CentOS or Fedora image instead (tested with CentOS 8 Stream and Fedora 35).
Kubernetes/OpenShift tools
You need a Kubernetes command-line interface (CLI) such as kubectl (for Kubernetes) or oc (OpenShift) to start playing with your MicroShift deployment.
[ Learn the basics of using Kubernetes in this cheat sheet. ]
The magical tool: kcli
And the jewel in the crown: kcli.
This tool interacts with virtualization providers (libvirt, KubeVirt, oVirt, OpenStack, GCP, AWS, and more) to deploy and customize virtual machines (VMs) from cloud images easily.
Thanks to this tool and the ability to create deployment plans, you can deploy VM clusters, Kubernetes/OpenShift clusters, and much more.
I will focus on its ability to help you deploy MicroShift quickly and easily.
The tool offers a variety of installation methods. I chose Fedora's approach.
Deploy MicroShift using kcli
If you don't have an operating system image stored in your local system yet, don't worry, kcli offers the command kcli download image fedora35 to help you.
TIP: The kcli download image -h command displays the complete list of operating system images you can download.
[ Get this guide to installing applications on Linux. ]
The next step is to deploy MicroShift.
1. Create the parameter file
Create the file microshift-params.yaml in a YAML document, like this:
cluster: microshift
domain: pradalabs.com
image: fedora35
memory: 4096
network: default
nightly: False
nodes: 1
noname: False
numcpus: 4
podman: False
pull_secret: None
register_acm: False
sslip: True
2. Deploy MicroShift
Next, deploy MicroShift using the following command, where testmicro is the name you are setting for the current parameter file:
# kcli create cluster microshift --paramfile microshift-params.yaml testmicro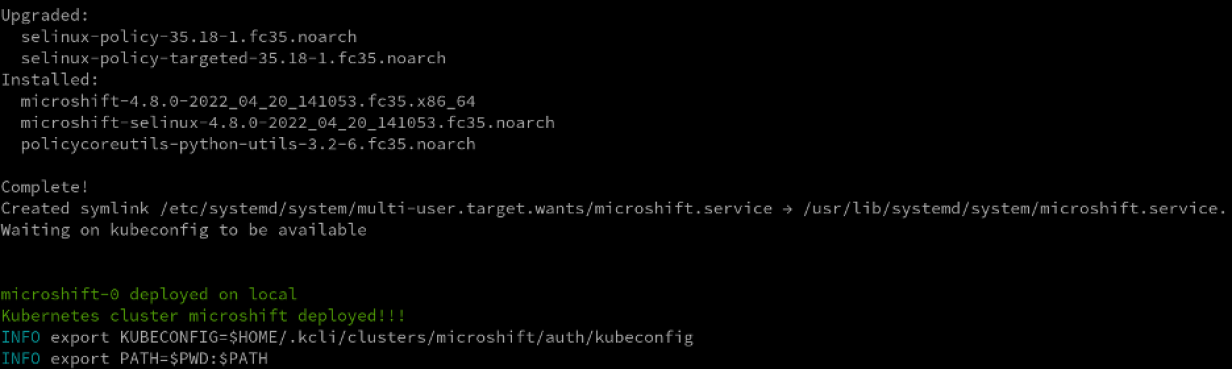
Click image for larger view (Jose Antonio Gonzalez Prada, CC BY-SA 4.0)
3. Export the variable
After a successful deployment, you only have to export the env variable KUBECONFIG.

Click image for larger view (Jose Antonio Gonzalez Prada, CC BY-SA 4.0)
Your MicroShift deployment is now up and running. You did it!
[ Download now: Advanced Linux commands cheat sheet. ]
Here are a few other useful kcli commands to manage your deployment:
-
kcli list plan: List all the plans. kcli list vms: List all the VMs deployed in your system.kcli stop plan testmicro: Stop the testmicro plan (in this case, the Microshift VM).kcli start plan testmicro: Start the testmicro plan.kcli delete plan testmicro: Remove the plan and its related objects (in this case, the MicroShift VM).kcli list images: List all the images in the system in table format.kcli list available-images: Works similarly tokcli download image -hbut is more intuitive and with improved output.
If you need them, you can find step-by-step instructions for how to deploy an application in Using OpenShift routes with MicroShift.
Wrap up
If, after testing MicroShift in your local environment, you would like to do it at scale, you can check my previous articles and learn how to generate your RHEL 9 golden image with MicroShift to help you in your deployments at scale. Also, you can consult this MicroShift end-to-end provisioning demo.
Recommend
About Joyk
Aggregate valuable and interesting links.
Joyk means Joy of geeK