

Luoh Ren-Shan (LCamel)
source link: https://medium.com/taipei-ethereum-meetup/init-f35c7d6aa7a0
Go to the source link to view the article. You can view the picture content, updated content and better typesetting reading experience. If the link is broken, please click the button below to view the snapshot at that time.

Init. Ethereum 有三種方式建立 contract:
Ethereum 有三種方式建立 contract:
- 發送 contract creation transaction, 也就是 “to” address 為 0 的 transaction
- 呼叫 opcode CREATE
- 呼叫 opcode CREATE2
這三種方式都能給定一段要在新的 contract address 執行的, 只跑唯一一次的初始化 code, 也就是 init. Contract creation transaction 會把整個 “data” 當成 init, 而 CREATE / CREATE2 則是用參數指定 init.
Yellow paper 這樣說:
init is an EVM-code fragment; it returns the body, a second fragment of code that executes each time the account receives a message call
Init code 就像傳統 OS 的應用程式 installer 一樣, 負責安裝和初始化. 不過 init 不是把程式寫到硬碟裡, 而是把要裝的 body 寫到 memory 中, 再透過 RETURN opcode 指給 EVM 看. EVM 會在 init return 後把這段被指的 memory 寫成將來每次跑的 contract body.
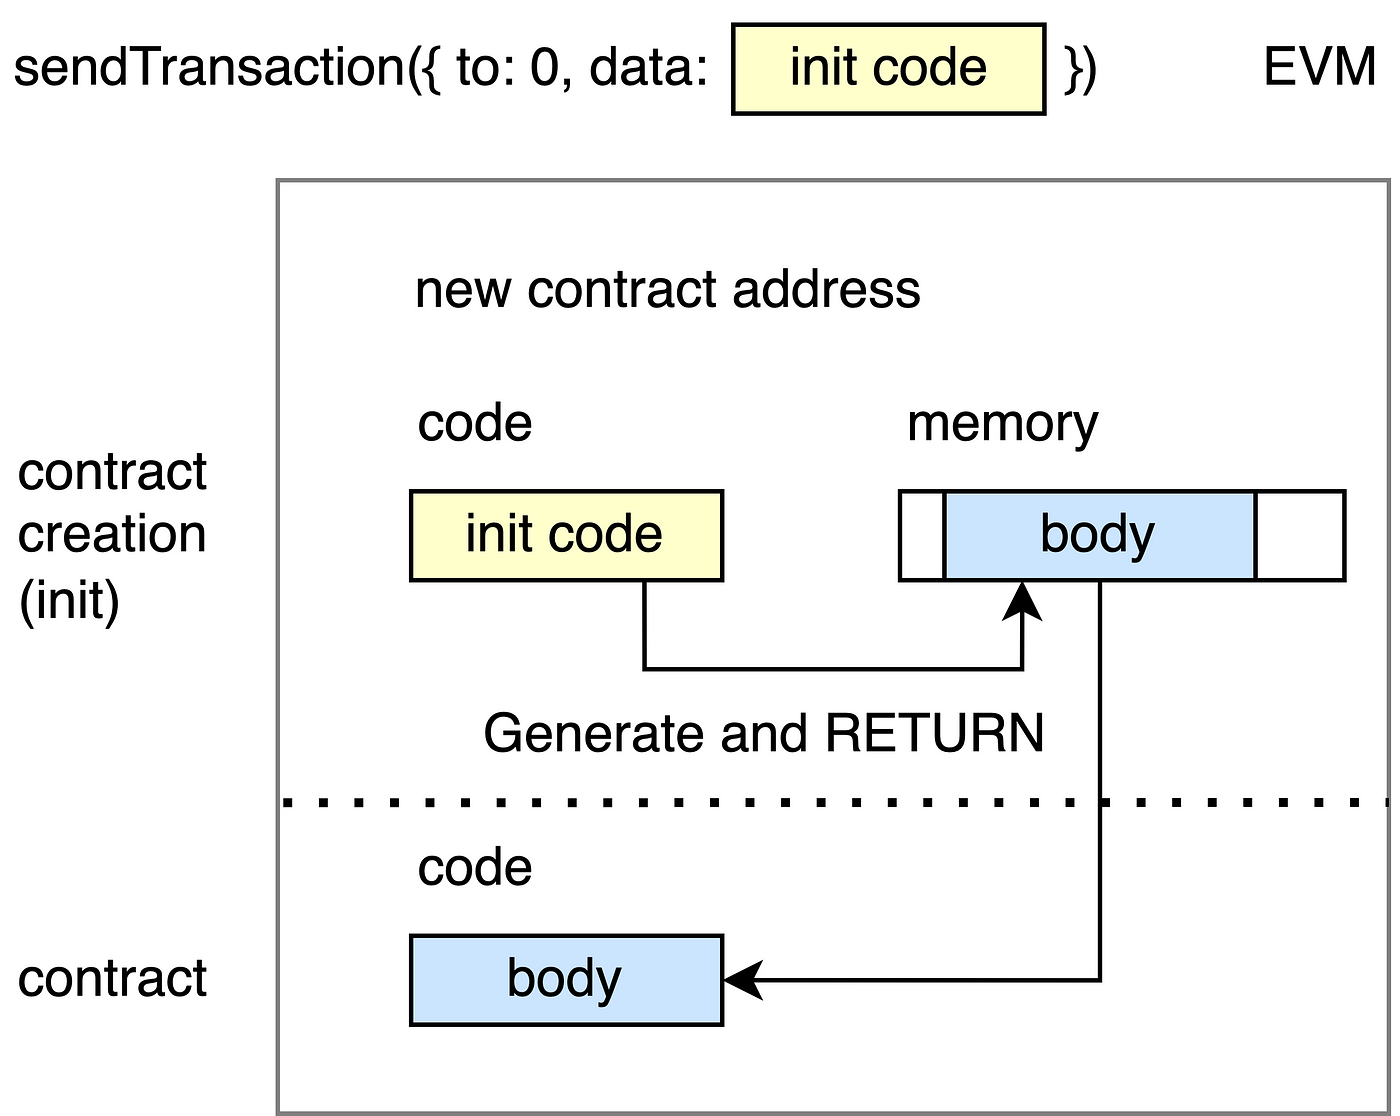
Generate and RETURN
我們來寫一段產生 contract body 只有一個 byte 0x42 的 init code:
寫一個非常陽春的, 可嵌入在 JavaScript 中的 assembler 來轉上面的 code:
asm(`PUSH1 42 …`) 出來的 bytecode 會是 “604260005360016000F3” .
如果有裝 geth, geth 有送一個 command line 版的 evm, 可以把上面的 bytecode 丟進去測:
看起來沒問題. 用 sendTransaction 的 data 發送看看:
執行結果:
getCode() 回來的確是 0x42, 成功了! (goerli)
CODECOPY
上面的範例只 deploy 了一個 byte 0x42. 如果想要 deploy 更長的 code, 常見的做法是: 寫一段 deployer, 把 body 黏在後面, deployer 用 opcode CODECOPY 把整段 body 複製進 memory 中, 再用 RETURN 指給 EVM 看.

CODECOPY and RETURN
舉例來說, deploy 一份 4 bytes 的 body “0xCafeBabe” 可以這樣做:
Solidity compiler 也是用 CODECOPY 這個做法:
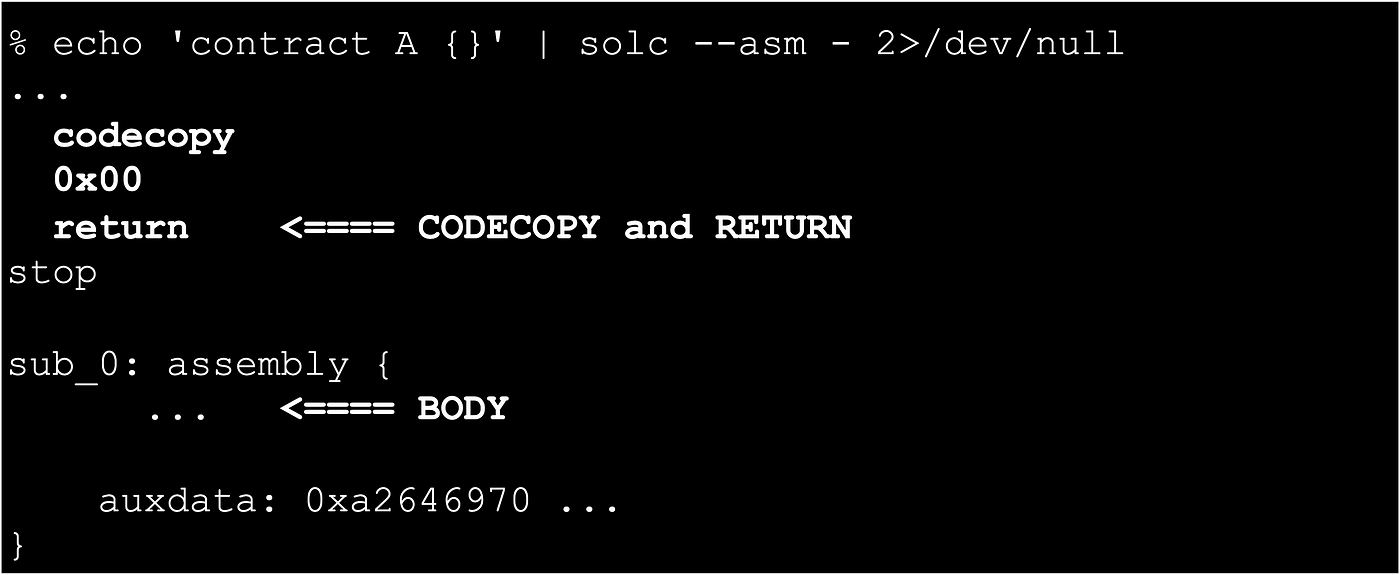
CODECOPY and RETURN: solc — asm
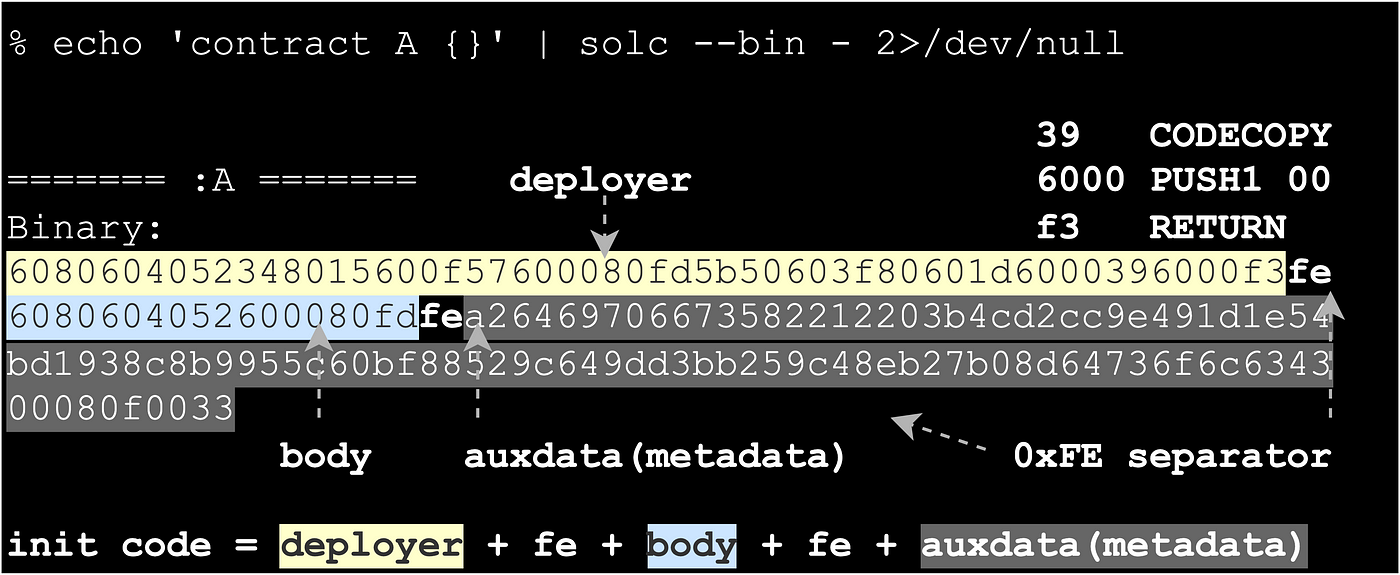
CODECOPY and RETURN: solc — bin
一個便於實驗的 deployer
上面我們的 deployer 寫死了 body 4 這個長度. 如果不想每次改 body 就手動改長度的話, 可以用 CODESIZE =deployer + body 減去固定的 deployer 長度, 來得到接在後面的變動的 body 長度:
我們常常需要用 PUSH1 00 來 push 一個 0 到 stack 上. 為了榨取一點 gas, 只要還沒 CALL 其他的 contract, 我們就可以用 opcode RETURNDATASIZE (0x3D) 來達成 push 0 的效果. 細心的你可能已經發現到, 在上面的 assembler 中我們定義了 “_MYZERO_” , 一樣是對應到 0x3D, 但取個名字讓放 0 的意圖更明顯.
有了這段 deployer, 我們就可以直接在後面黏上任何長度的 body, 這樣做各種實驗都會方便許多:
var deployer = "600B380380600B3D393DF3";deploy(deployer + “CafeBabe”);
deploy(deployer + “000000000000DeadBeef”);
Init code 像是 installer 一樣, 不論是用動態生成的還是用 copy 的, 只要能把 memory 填好 RETURN 給 EVM, 就能 deploy 成 contract body.
下一篇, 我們將實驗如何用 CREATE2 原地換 code.
(感謝
的審閱與建議)
Recommend
-
12
Price$0.97966724 Hour % Change1.99%Market Cap$979.67M
-
7
跨链协议Ren Protocol总铸币量超过50亿美元 2021-05-13 16:35 0 7,860...
-
8
Creator & Artist Stories Renée Chow aka Gothamista on the beauty of agi...
-
12
shan-shui-inf是一款有趣的开源程序,可以无限生成中国山水画。全部基于Javascript编写,遵守MIT开源协议。使用了噪音和数学函数从头开始建模山峰和树木,并输出可缩放矢量图形(SVG)格式。
-
4
This site can’t be reached The connection was reset.
-
5
Grok {Shan, Shui}*: Advent of understanding the generative art Dec 28, 2021 I spent 24 days digging into the code of {Shan, Shui}* Chinese pa...
-
10
...
-
3
Ligapremiären blev visserligen uppskjuten alicesandra posted @ 2022年9月18日 21:26 in 未分类
-
5
Support is great. Feedback is even better."Thanks for checking out REN! If you have any feedback, please do share it. We're obviously working on getting more job postings, but is there anything else you want to see? More guides? Blog...
About Joyk
Aggregate valuable and interesting links.
Joyk means Joy of geeK