

forRoot, Jest, Cypress, and Storybook
source link: https://devm.io/angular/forroot-jest-cypress-and-storybook
Go to the source link to view the article. You can view the picture content, updated content and better typesetting reading experience. If the link is broken, please click the button below to view the snapshot at that time.
04. Aug 2022
Libraries can be configured and customised with the forRoot pattern. Jest and Cypress are modern solutions for test automation, and Storybook provides interactive documentation.
Several tools are now required for deploying professional Angular libraries. These are responsible for automating tests, providing interactive documentation, and creating change logs. You should also become acquainted with the common patterns that consumers expect in the Angular world. This includes providing a forRoot method to configure the library.
This article series addresses these aspects. Two examples are used for this purpose, each of which can be found in its own library. The first example is a tabbed pane (Fig. 1), and the second is a simple logger (Fig. 2).
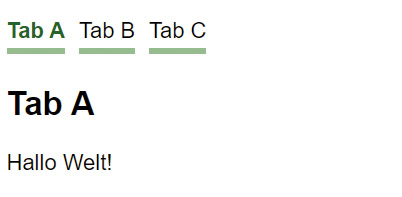
Fig. 1: tabbed pane
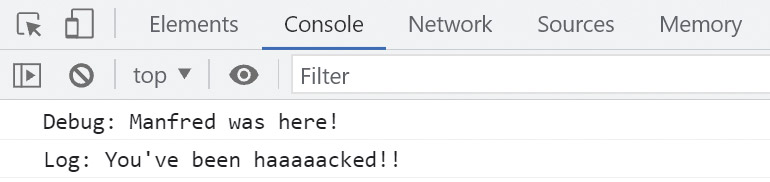
Fig. 2: logger
These two examples are deliberately simplified, especially since the focus is on illustrating the mentioned aspects rather than on implementation. I make the source code available through my GitHub account [1].
Generating workspace
The popular CLI extension Nx [2] is used as the basis for the examples described here. Since it supports modern tools such as Jest, Cypress, or Storybook out of the box, it can be used to drastically simplify project setup. First, an Nx workspace must be created, which can be subdivided into applications and libraries:
npm init nx-workspace my-project
The libraries for the two examples can then be generated with ng generate (ng g):
cd my-project
ng g lib tabbed-pane
ng g lib logger
Making logger configurable with DI and the open/closed principle
The logger library receives a LoggerService that offers only the debug and log methods for simplicity (Listing 1).
Listing 1
@Injectable()
export class LoggerService {

  constructor(
    private config: LoggerConfig,
    private formatter: LogFormatter,
    private appender: LogAppender) {
  }

  debug(message: string): void {
    if (!this.config.enableDebug) return;
    message = this.formatter.format(message);
    this.appender.append('DEBUG', message);
  }

  log(message: string): void {
    message = this.formatter.format(message);
    this.appender.append('LOG', message);
  }
}
Whether debug messages are logged depends on a setting in the injected LoggerConfig. Through this setting, but also with the injected LogFormatter and LogAppender, the caller can customise the behaviour of the logger (Fig. 3).
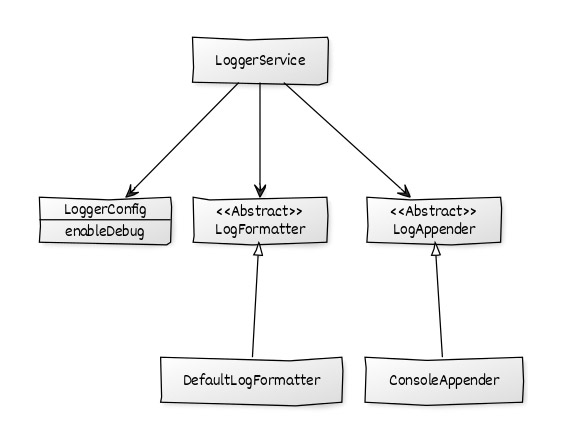
Fig. 3: structure of LoggerService
The LogFormatter is a service that formats the messages before they are output. For example, it could add current context information such as the time. The DefaultLogFormatter supplied by the library is a null object and returns the passed message without any changes.
The LogAppender is also a service. It determines how the logger logs the messages. With the default ConsoleAppender, the name says it all: it writes the messages to the JavaScript console found in the browser's developer tools. These constructs allow customising the behaviour without having to change the implementation of the logger. This is in line with the idea of the open/closed principle: open to extension but closed to modification. To make use of this, the consumer only has to provide appropriate services:
providers: [
  { provide: LogFormatter, useClass: CustomLogFormatter },
  { provide: LoggerConfig, useValue: { enableDebug: true } }
],
However, this approach also has disadvantages. Consumers need to know exactly which services can be exchanged, and the type system currently does not provide any assistance in avoiding errors. In addition, long provider lists can quickly become confusing. These disadvantages can be compensated for by combining all extension points in a configuration class:
export abstract class LoggerConfig {
  abstract enableDebug: boolean;
  abstract formatter?: Type<LogFormatter>;
  abstract appender?: Type<LogAppender>;
}
This parameterizes a static forRoot method in the library's module (Listing 2).
Listing 2
@NgModule([...])
export class LoggerModule {

 // Set-up
  static forRoot(config: LoggerConfig): ModuleWithProviders<LoggerModule> {
    return {
      ngModule: LoggerModule,
      providers: [
        { provide: LoggerConfig, useValue: config },
        { provide: LogFormatter,
          useClass: config.formatter ?? DefaultLogFormatter },
        { provide: LogAppender,
          useClass: config.appender ?? ConsoleLogAppender }
      ]
    }
  }

}
Although other names for this method are possible, the name forRoot has become popular in the community. It reflects the fact that this method is only to be called once in the application's root module, which is commonly referred to as AppModule:
imports: [
  [...],
  LoggerModule.forRoot({
    enableDebug: true,
    formatter: CustomLogFormatter
  })
],
It may surprise you to learn that Angular never calls this method at runtime. The Angular compiler handles this during the build. It interprets such methods as modules and outputs the corresponding JavaScript code. This is reflected in the ModuleWithProviders return value, which is used for such methods. It is a data structure that adds additional providers to an existing module. The considered case extends the LoggerModule by three providers for the discussed extension points. In order for the Angular compiler to treat the ModuleWithProviders like a module, the forRoot method must be appropriately simplistic. A conditional creation of providers with the ternary operator (condition? yes: no) or a fallback to default values are possible. Other control structures, however, should be avoided.
Unit tests with Jest
Nx also generates unit tests for the popular unit testing framework Jest [3] for all generated building blocks such as components or services. This is a further development of the tools Jasmine and Karma, which are well-known in the Angular environment and were created at Facebook. One of the advantages of Jest is its higher execution speed. This is because the DOM emulation jsdom is used for test execution rather than a browser. Listing 3 shows a Jest-based unit test for our LoggerService.
Listing 3
describe('LogFormatterService', () => {
  let logger: LoggerService;
  let appender: LogAppender;
  let config: LoggerConfig;

  beforeEach(() => {

    TestBed.configureTestingModule({
      imports: [
        LoggerModule.forRoot({ enableDebug: true })
      ]
    });

    logger = TestBed.inject(LoggerService);
    appender = TestBed.inject(LogAppender);

    jest.spyOn(appender, 'append').mockImplementation(() => null)

  });

  it('should debug', () => {
   config.enableDebug = true;
   logger.debug('debug!');

    expect(appender.append).toHaveBeenCalledTimes(1);
    expect(appender.append).toHaveBeenCalledWith('DEBUG', 'debug!');
  });

  [...]

});
Since logging cannot be tested on the JavaScript console, this test sets up a spy for the append method of LogAppender using jest.spyOn. This is a mechanism that logs how often a method or function is called and with what parameters during test execution. By default, spies delegate to the observed method or function. However, to prevent messages from being seen on the console during test execution, unit testing sets up a mock implementation. This executes instead of the actual append method and, for simplicity, ignores any messages received. At the end, the test case uses toHaveBeenCalledTimes and toHaveBeenCalledWith to check whether append was called exactly once with the expected parameters.
The execution of the unit tests for the logger can now be controlled with
ng test logger
(Fig. 4).
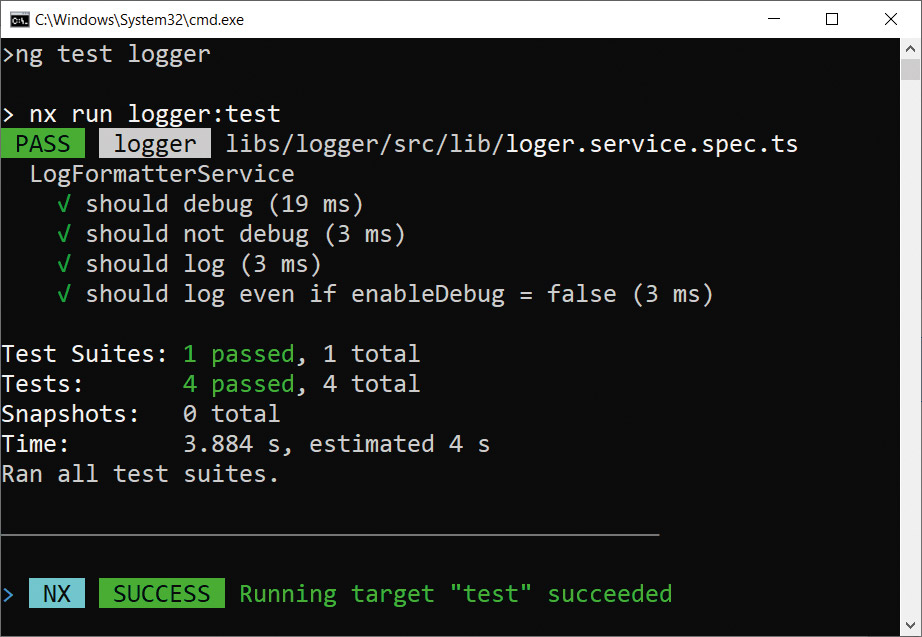
Fig. 2: test execution
Documentation with Storybook
Of course, reusable libraries must be documented as well. Components pose a unique challenge because their behaviour can only be described conditionally textually. Therefore it is common to offer interactive documentations for components.
The Storybook [4] supported by Nx helps with this. We only need to specify metadata for so-called stories for each component. A story is a scenario that shows the component with specific properties and, if necessary, in interaction with other components (Fig. 5).
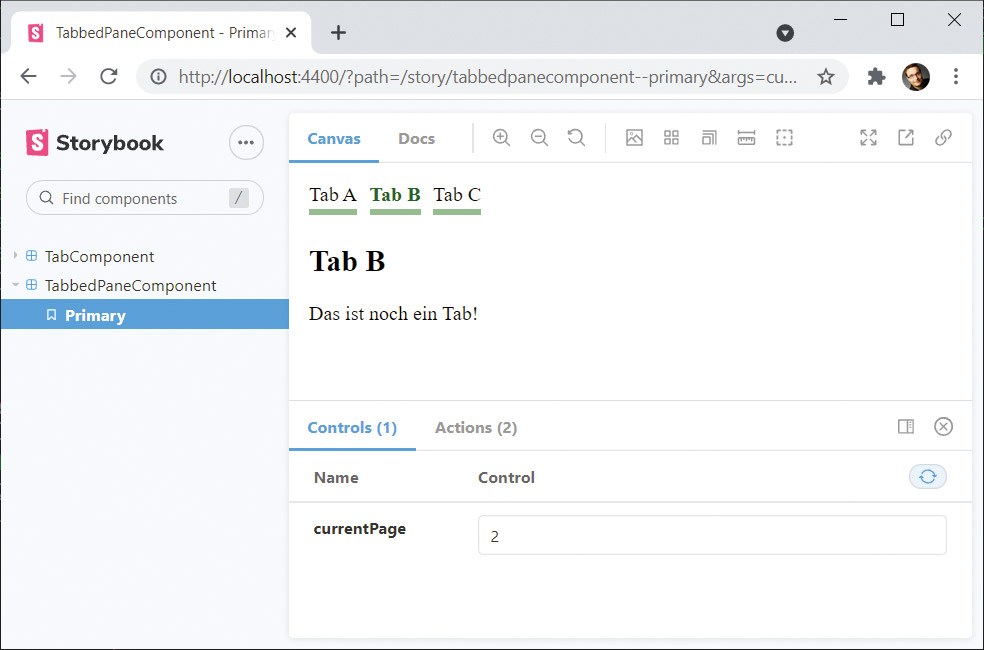
Fig. 4: Storybook
To generate the necessary configuration for Storybook, Nx provides the following schematic:
nx g @nrwl/angular:storybook-configuration tabbed-pane
It not only sets up Storybook for the tabbed-pane library, but also generates a story description file for each component placed in it (Listing 4).
Listing 4
export default {
  title: 'TabbedPaneComponent',
  component: TabbedPaneComponent,
  decorators: [
    moduleMetadata({
      imports: [],
      declarations: [TabComponent]
    })
  ],
} as Meta<TabbedPaneComponent>;

const Template: Story<TabbedPaneComponent> = (args: TabbedPaneComponent) => ({
  component: TabbedPaneComponent,
  props: {
    ...args,
    currentPageChange: action('currentPageChange')
  },
  template: `
    <mp-tabbed-pane [currentPage]="currentPage" (currentPageChange)="currentPageChange($event)">
      <mp-tab title="Tab A">Hallo Welt!</mp-tab>
      <mp-tab title="Tab B">Das ist noch ein Tab!</mp-tab>
      <mp-tab title="Tab C">Und noch einer!</mp-tab>
    </mp-tabbed-pane>
  `
});

export const Primary = Template.bind({});
Primary.args = {
  currentPage: 1,
}
The default export describes the component and contains an Angular module with all the building blocks that the component requires. The object behind the template constant specifies the template to use, but also default values for inputs and outputs. The template property is optional. By default, Storybook creates only one instance of the respective component. However, since we want to show the TabbedPane interacting with individual tabs, this default behaviour is not sufficient.
While the inputs for the individual stories are usually designed to be parameterizable, outputs are usually wired directly. Furthermore, generic event handlers are used, which are supplied by the auxiliary method action. Such event handlers inform Storybook about the occurrence of events. This is followed by a corresponding output in the interactive documentation.
Primary is a first story that sets a value for the currentPage input. Further stories can be set up analogously.
End2End testing with Cypress
Using Storybook has another advantage: since each story represents a component more or less in isolation, they can be used as a basis for End2End tests. When you set up Storybook, Nx automatically creates an application for End2End tests. Its name in our case is tabbed-pane-e2e. It also contains the basic framework of a first Cypress test [5, which I have slightly modified] (Listing 5).
Listing 5
describe('tabbed-pane', () => {
  beforeEach(() => cy.visit('/iframe.html?id=tabbedpanecomponent--primary'));
  it('should render the component', () => {
    cy.get('a').eq(2).click();
    cy.get('mp-tab').contains('Tab C');
    cy.screenshot();
  });
});
The URL passed to cy.visit points to the story primary of the TabbedPaneComponent. The test case then simulates a click on the third hyperlink in the component. The call to -- eq(2) points to the element with index 2 and thus to the third hyperlink. The test case then checks whether the text Tab C is visible in the active tab. In addition, the test case generates a screenshot for better traceability. However, this is primarily for illustrative purposes, especially since the Cypress configuration set up by Nx logs each test case in a video. You can find out the location of such videos and screenshots during the test execution, which can be triggered with
ng run tabbed-pane-e2e:e2e
In addition, the following can be executed with
npx cypress open --project apps\tabbed-pane-e2e
to start the Cypress test runner. After selecting a test, it displays information about its execution on the left side (Fig. 6).

Fig. 6: Cypress
Besides, you can determine a CSS selector for individual elements on the page. This is useful for referencing these elements in the Cypress test.
Summary and outlook
Thanks to Nx, we can draw on solutions established in the community without further intervention: Jest and Cypress help with test automation, for example, and Storybook generates interactive documentation for component libraries. In addition, our logger library uses the forRoot pattern common in the Angular world to deploy configuration and exchange services.
In the second part of this series, we look at other tools that support the creation of professional component libraries. We discuss generating source code documentation and automatically creating a change log. We also use linting for our commit messages and create a schematic for ng add that generates typical code lines for consuming the library.
Links & References
[1] https://github.com/manfredsteyer/nx-libs.git
[2] https://nx.dev
Manfred Steyer is an Angular-focused trainer and consultant, a Google Developer Expert, and a Trusted Collaborator on the Angular team. He contributes to O'Reilly Media, Java Magazine, and Heise Developer. Steyer and his team provide in-depth Angular training and consulting at www.ANGULARarchitects.io.
Recommend
About Joyk
Aggregate valuable and interesting links.
Joyk means Joy of geeK