

Manage devices in Azure AD using the Azure portal - Microsoft Entra | Microsoft...
source link: https://docs.microsoft.com/en-us/azure/active-directory/devices/device-management-azure-portal
Go to the source link to view the article. You can view the picture content, updated content and better typesetting reading experience. If the link is broken, please click the button below to view the snapshot at that time.

Manage device identities by using the Azure portal
- Article
- 08/03/2022
- 9 minutes to read
In this article
Azure Active Directory (Azure AD) provides a central place to manage device identities and monitor related event information.

You can access the devices overview by completing these steps:
- Sign in to the Azure portal.
- Go to Azure Active Directory > Devices.
In the devices overview, you can view the number of total devices, stale devices, noncompliant devices, and unmanaged devices. You'll also find links to Intune, Conditional Access, BitLocker keys, and basic monitoring.
Device counts on the overview page don't update in real time. Changes should be reflected every few hours.
From there, you can go to All devices to:
- Identify devices, including:
- Devices that have been joined or registered in Azure AD.
- Devices deployed via Windows Autopilot.
- Printers that use Universal Print.
- Complete device identity management tasks like enable, disable, delete, and manage.
- The management options for Printers and Windows Autopilot are limited in Azure AD. These devices must be managed from their respective admin interfaces.
- Configure your device identity settings.
- Enable or disable enterprise state roaming.
- Review device-related audit logs.
- Download devices.

Hybrid Azure AD joined Windows 10 or newer devices don't have an owner. If you're looking for a device by owner and don't find it, search by the device ID.
If you see a device that's Hybrid Azure AD joined with a state of Pending in the Registered column, the device has been synchronized from Azure AD connect and is waiting to complete registration from the client. See How to plan your Hybrid Azure AD join implementation. For more information, see Device management frequently asked questions.
For some iOS devices, device names that contain apostrophes can use different characters that look like apostrophes. So searching for such devices is a little tricky. If don't see correct search results, be sure the search string contains the matching apostrophe character.
Manage an Intune device
If you have rights to manage devices in Intune, you can manage devices for which mobile device management is listed as Microsoft Intune. If the device isn't enrolled with Microsoft Intune, the Manage option won't be available.
Enable or disable an Azure AD device
There are two ways to enable or disable devices:
- The toolbar on the All devices page, after you select one or more devices.
- The toolbar, after you drill down for a specific device.
Important
- You must be a Global Administrator, Intune Administrator, or Cloud Device Administrator in Azure AD to enable or disable a device.
- Disabling a device prevents it from authenticating via Azure AD. This prevents it from accessing your Azure AD resources that are protected by device-based Conditional Access and from using Windows Hello for Business credentials.
- Disabling a device revokes the Primary Refresh Token (PRT) and any refresh tokens on the device.
- Printers can't be enabled or disabled in Azure AD.
Delete an Azure AD device
There are two ways to delete a device:
- The toolbar on the All devices page, after you select one or more devices.
- The toolbar, after you drill down for a specific device.
Important
- You must be a Cloud Device Administrator, Intune Administrator, Windows 365 Administrator or Global Administrator in Azure AD to delete a device.
- Printers and Windows Autopilot devices can't be deleted in Azure AD.
- Deleting a device:
- Prevents it from accessing your Azure AD resources.
- Removes all details attached to the device. For example, BitLocker keys for Windows devices.
- Is a nonrecoverable activity. We don't recommended it unless it's required.
If a device is managed by another management authority, like Microsoft Intune, be sure it's wiped or retired before you delete it. See How to manage stale devices before you delete a device.
View or copy a device ID
You can use a device ID to verify the device ID details on the device or to troubleshoot via PowerShell. To access the copy option, select the device.

View or copy BitLocker keys
You can view and copy BitLocker keys to allow users to recover encrypted drives. These keys are available only for Windows devices that are encrypted and store their keys in Azure AD. You can find these keys when you view a device's details by selecting Show Recovery Key. Selecting Show Recovery Key will generate an audit log, which you can find in the KeyManagement category.
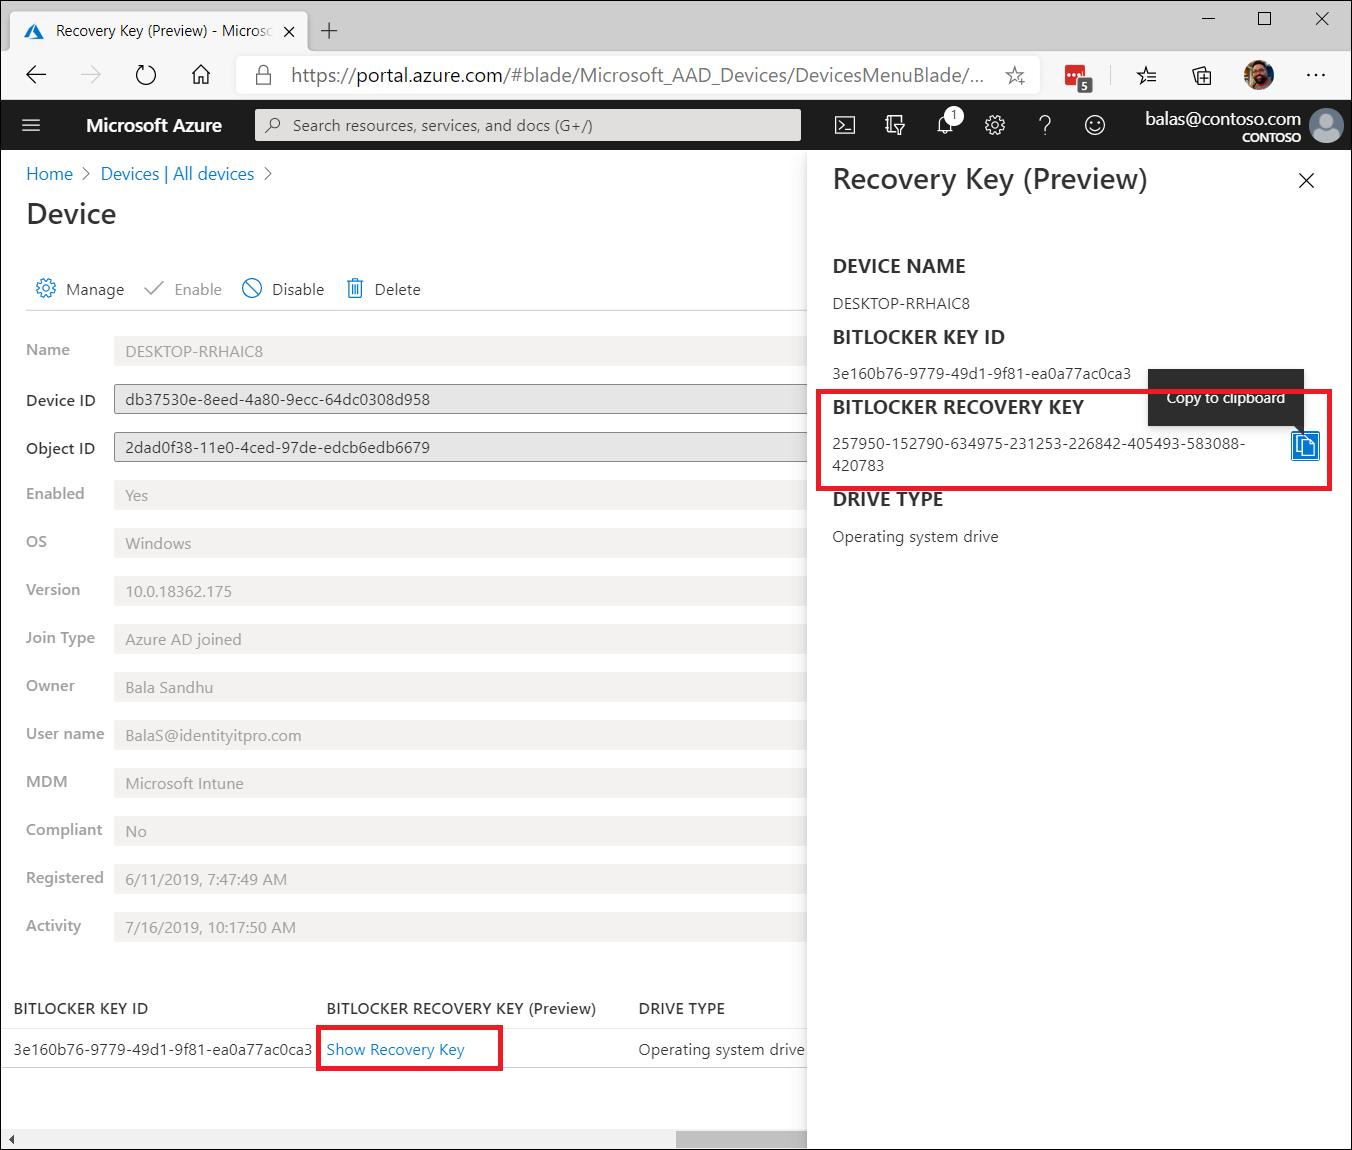
To view or copy BitLocker keys, you need to be the owner of the device or have one of these roles:
- Cloud Device Administrator
- Global Administrator
- Helpdesk Administrator
- Intune Service Administrator
- Security Administrator
- Security Reader
Block users from viewing their BitLocker keys (preview)
In this preivew, admins can block self-service BitLocker key access to the registered owner of the device. Default users without the BitLocker read permission will be unable to view or copy their BitLocker key(s) for their owned devices.
To disable/enable self-service BitLocker recovery:
Connect-MgGraph -Scopes Policy.ReadWrite.Authorization
$authPolicyUri = "https://graph.microsoft.com/beta/policies/authorizationPolicy/authorizationPolicy"
$body = @{
    defaultUserRolePermissions = @{
        allowedToReadBitlockerKeysForOwnedDevice = $false #Set this to $true to allow BitLocker self-service recovery
    }
}| ConvertTo-Json
Invoke-MgGraphRequest -Uri $authPolicyUri -Method PATCH -Body $body
# Show current policy setting
$authPolicy = Invoke-MgGraphRequest -Uri $authPolicyUri
$authPolicy.defaultUserRolePermissions
View and filter your devices (preview)
In this preview, you have the ability to infinitely scroll, reorder columns, and select all devices. You can filter the device list by these device attributes:
- Enabled state
- Compliant state
- Join type (Azure AD joined, Hybrid Azure AD joined, Azure AD registered)
- Activity timestamp
- Device type (printer, secure VM, shared device, registered device)
- Extension attributes
- Administrative unit
- Owner
To enable the preview in the All devices view:
- Sign in to the Azure portal.
- Go to Azure Active Directory > Devices > All devices.
- Select the Preview features button.
- Turn on the toggle that says Enhanced devices list experience. Select Apply.
- Refresh your browser.
You can now experience the enhanced All devices view.
Download devices
Global readers, Cloud Device Administrators, Intune Administrators, and Global Administrators can use the Download devices option to export a CSV file that lists devices. You can apply filters to determine which devices to list. If you don't apply any filters, all devices will be listed. An export task might run for as long as an hour, depending on your selections. If the export task exceeds 1 hour, it fails, and no file is output.
The exported list includes these device identity attributes:
accountEnabled, approximateLastLogonTimeStamp, deviceOSType, deviceOSVersion, deviceTrustType, dirSyncEnabled, displayName, isCompliant, isManaged, lastDirSyncTime, objectId, profileType, registeredOwners, systemLabels, registrationTime, mdmDisplayName
Configure device settings
If you want to manage device identities by using the Azure portal, the devices need to be either registered or joined to Azure AD. As an administrator, you can control the process of registering and joining devices by configuring the following device settings.
You must be assigned one of the following roles to view or manage device settings in the Azure portal:
- Global Administrator
- Cloud Device Administrator
- Global Reader
- Directory Reader
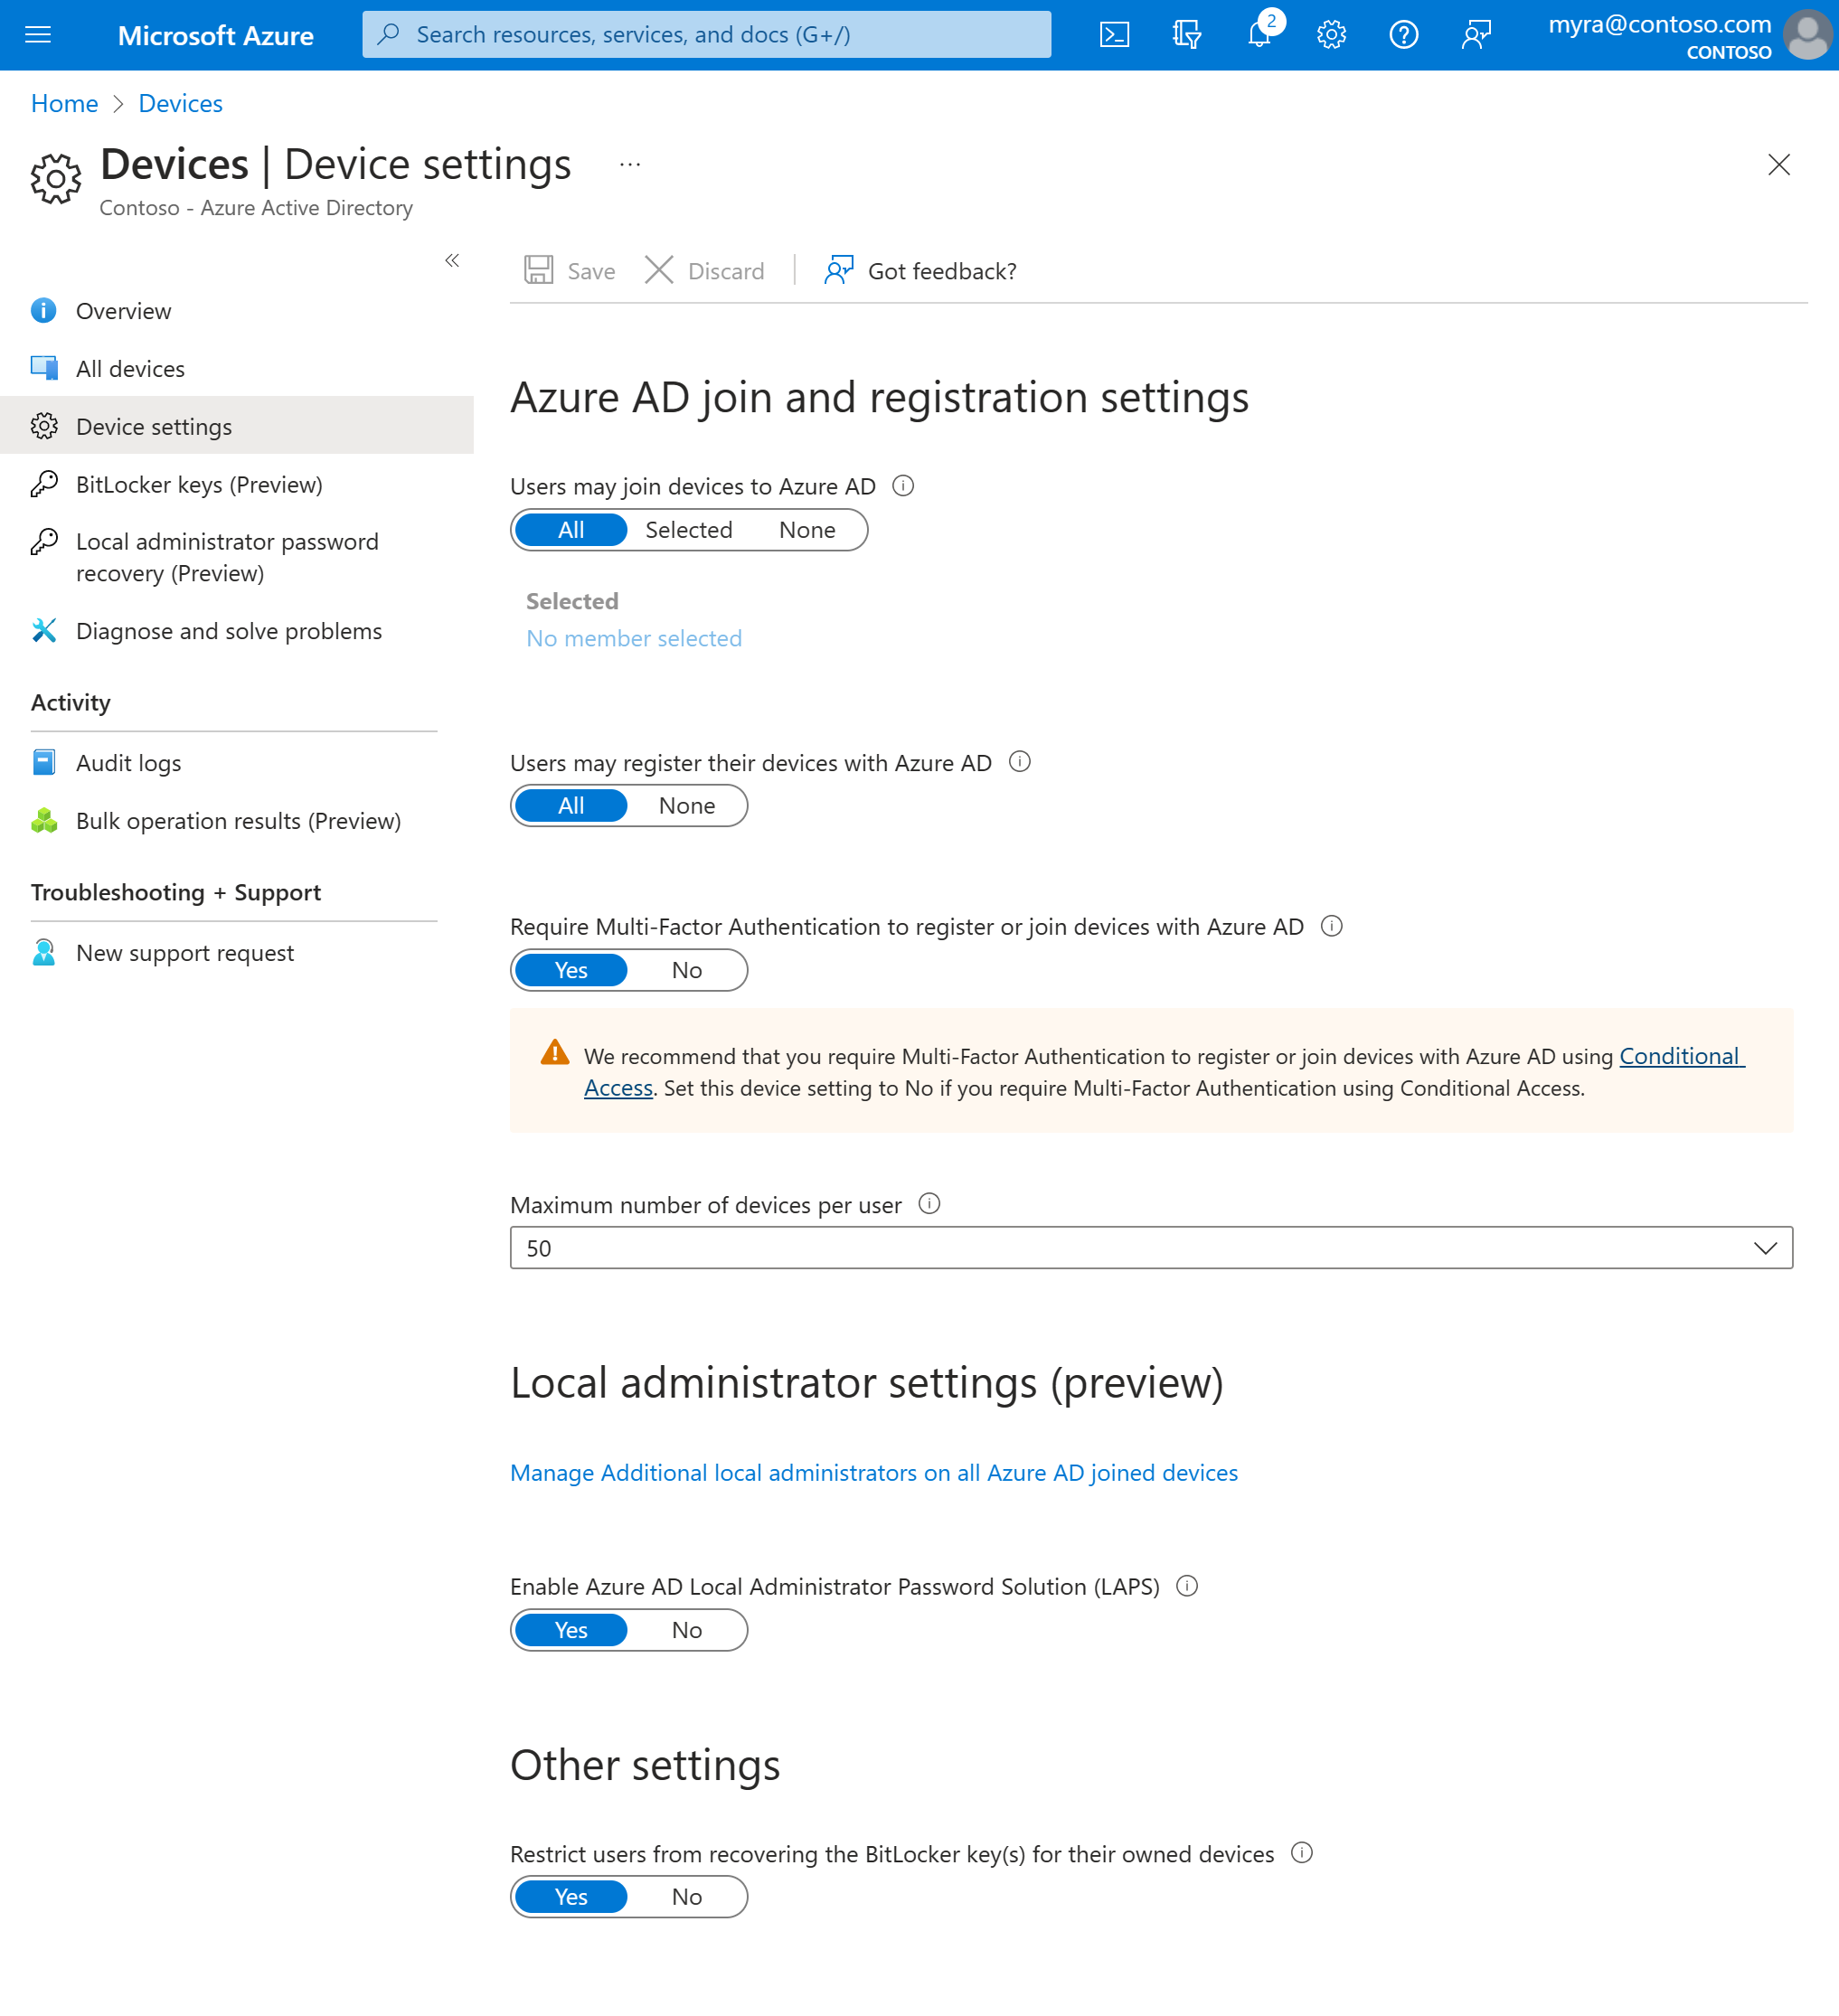
Users may join devices to Azure AD: This setting enables you to select the users who can register their devices as Azure AD joined devices. The default is All.
The Users may join devices to Azure AD setting is applicable only to Azure AD join on Windows 10 or newer. This setting doesn't apply to hybrid Azure AD joined devices, Azure AD joined VMs in Azure, or Azure AD joined devices that use Windows Autopilot self-deployment mode because these methods work in a userless context.
Additional local administrators on Azure AD joined devices: This setting allows you to select the users who are granted local administrator rights on a device. These users are added to the Device Administrators role in Azure AD. Global Administrators in Azure AD and device owners are granted local administrator rights by default. This option is a premium edition capability available through products like Azure AD Premium and Enterprise Mobility + Security.
Users may register their devices with Azure AD: You need to configure this setting to allow users to register Windows 10 or newer personal, iOS, Android, and macOS devices with Azure AD. If you select None, devices aren't allowed to register with Azure AD. Enrollment with Microsoft Intune or mobile device management for Microsoft 365 requires registration. If you've configured either of these services, ALL is selected and NONE is unavailable.
Require Multi-Factor Authentication to register or join devices with Azure AD: This setting allows you to specify whether users are required to provide another authentication factor to join or register their devices to Azure AD. The default is No. We recommend that you require multifactor authentication when a device is registered or joined. Before you enable multifactor authentication for this service, you must ensure that multifactor authentication is configured for users that register their devices. For more information on Azure AD Multi-Factor Authentication services, see getting started with Azure AD Multi-Factor Authentication. This setting may not work with third-party identity providers.
The Require Multi-Factor Authentication to register or join devices with Azure AD setting applies to devices that are either Azure AD joined (with some exceptions) or Azure AD registered. This setting doesn't apply to hybrid Azure AD joined devices, Azure AD joined VMs in Azure, or Azure AD joined devices that use Windows Autopilot self-deployment mode.
Important
- We recommend that you use the Register or join devices user action in Conditional Access to enforce multifactor authentication for joining or registering a device.
- You must configure this setting to No if you're using Conditional Access policy to require multifactor authentication.
Maximum number of devices: This setting enables you to select the maximum number of Azure AD joined or Azure AD registered devices that a user can have in Azure AD. If users reach this limit, they can't add more devices until one or more of the existing devices are removed. The default value is 50. You can increase the value up to 100. If you enter a value above 100, Azure AD will set it to 100. You can also use Unlimited to enforce no limit other than existing quota limits.
The Maximum number of devices setting applies to devices that are either Azure AD joined or Azure AD registered. This setting doesn't apply to hybrid Azure AD joined devices.
Enterprise State Roaming: For information about this setting, see the overview article.
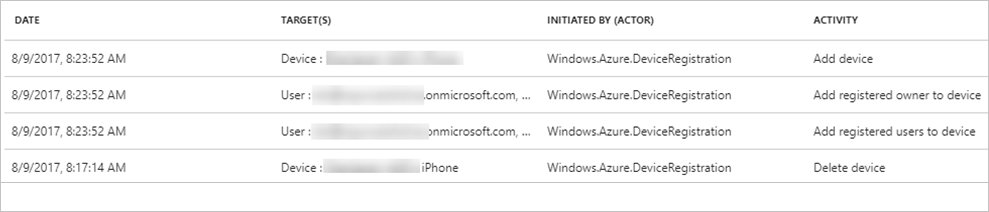
Audit logs
Device activities are visible in the activity logs. These logs include activities triggered by the device registration service and by users:
- Device creation and adding owners/users on the device
- Changes to device settings
- Device operations like deleting or updating a device
The entry point to the auditing data is Audit logs in the Activity section of the Devices page.
The audit log has a default list view that shows:
- The date and time of the occurrence.
- The targets.
- The initiator/actor of an activity.
- The activity.
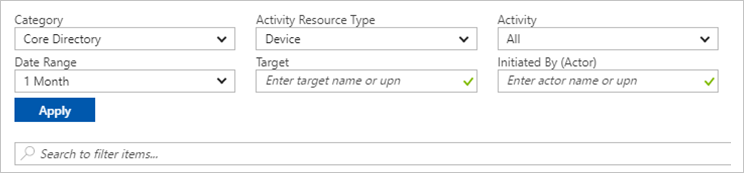
You can customize the list view by selecting Columns in the toolbar:

To reduce the reported data to a level that works for you, you can filter it by using these fields:
- Category
- Activity Resource Type
- Activity
- Date Range
- Target
- Initiated By (Actor)
You can also search for specific entries.
Next steps
Recommend
-
32
How to manage the local administrators group on Azure AD joined devices 06/28/2019 5 minutes to read In this article To manage a Windows device, you ne...
-
13
-
8
How it works: Device registration Article 02/15/2022 9 min...
-
6
Microsoft Entra Verified ID now generally available Published...
-
6
ASP.NET Core authentication using Microsoft Entra External ID for customers (CIAM) This article looks at implementing an ASP.NET Core application which authenticates using Microsoft Entra External ID for customers...
-
4
为了简化产品命名并统一产品系列,Microsoft 正式宣布将 Azure AD 更名为 Microsoft Entr...
-
9
What does Azure AD renamed Microsoft Entra ID mean for .NET developers?
-
8
Few days back, Microsoft announced the general availability of Lifecycle Workflows, a ne...
-
3
Hello Microsoft Entra ID, good bye Azure Active Directory Randolph West, 2023-12-19 A couple of months ago where...
-
2
Resources > Blog > Tech Configure NGINX Plus for SAML SSO...
About Joyk
Aggregate valuable and interesting links.
Joyk means Joy of geeK