

7 common Figma design problems (and how to fix them)
source link: https://uxdesign.cc/7-common-figma-design-problems-and-how-to-fix-them-e07a71ce917e
Go to the source link to view the article. You can view the picture content, updated content and better typesetting reading experience. If the link is broken, please click the button below to view the snapshot at that time.

7 common Figma design problems (and how to fix them)
Practical ways to overcome 7 common Figma design issues, caused by auto layout, constraints, groups, frames, components, and duplicates.
These are either great abstractions, or terrible app icons.
Figma has made designing for digital accessible to millions, but even the most eagle-eyed designers still run into trouble. Whether you’re a beginner or a seasoned veteran, the old adage is true: it pays to learn from our mistakes. Here’s a record of those problems, what they’re typically caused by, and how to fix them—being practical with our time.
1: Alignment to the wrong side
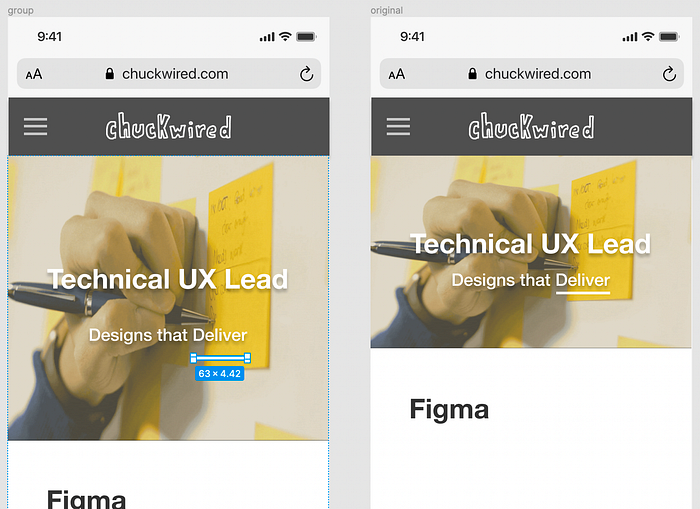
Leave behind centre alignment for school essays — it’s proven that left-alignment is easier to read.
Common causes: auto layout or constraint settings.
If some of the layers are on the wrong side or centred after applying auto layout, there’s 2 main things you can check.
Text alignment
For text layers, it’s worth double checking the text alignment settings. Often, you may accidentally duplicate other text layers with settings that are different to what you want.
Auto layout and horizontal resizing
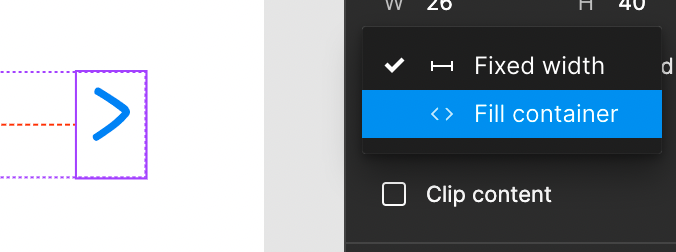
If that doesn’t work, you’ll want to change the auto layout alignment settings and set all the children layers to “fill container” horizontal resizing behaviour.
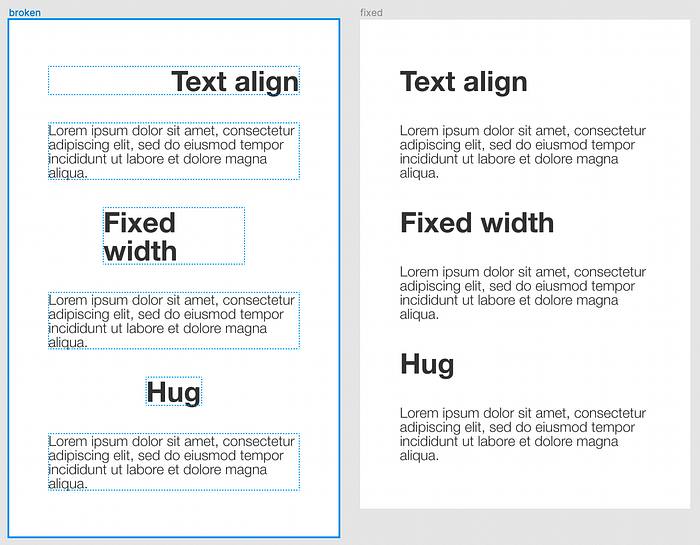
I recommend using the “top and left” behaviour, as shown here.
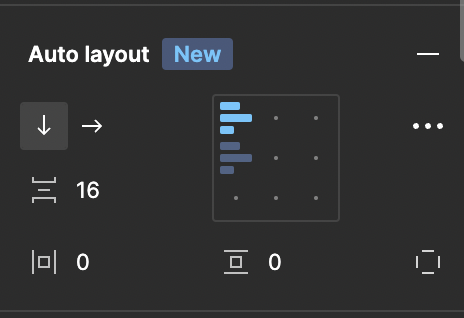
Change the auto layout alignment settings until you’re mostly happy with the result. The settings are visible in the right-hand “design” pane, when the parental frame is selected.

The “bounding box” when you hover on the parent Frame can give you a clue.
Once that’s done, ensure the problem layers have “fill container” horizontal resizing behaviour. As you can see above, both “fixed width” and “hug contents” examples don’t produce the left-align results I wanted. On the right, setting them to “fill container” fixes that up.
Why “fill container” is king

All this talk of bacon and wraps is making me hungry.
It’s tempting to use left-align and leave layers at “hug contents”, but consider the case of text wrapping. Above, the left side shows using the “hug” approach, and the right side is using the “fill” approach. Text wrapping will behave more naturally, and not resize your parental Frame by using the latter approach.
2: I can’t combine different alignments or auto layout behaviours together
Even this plain example can get tricky, fast.
Common causes: auto layout settings, or not using frame nesting.
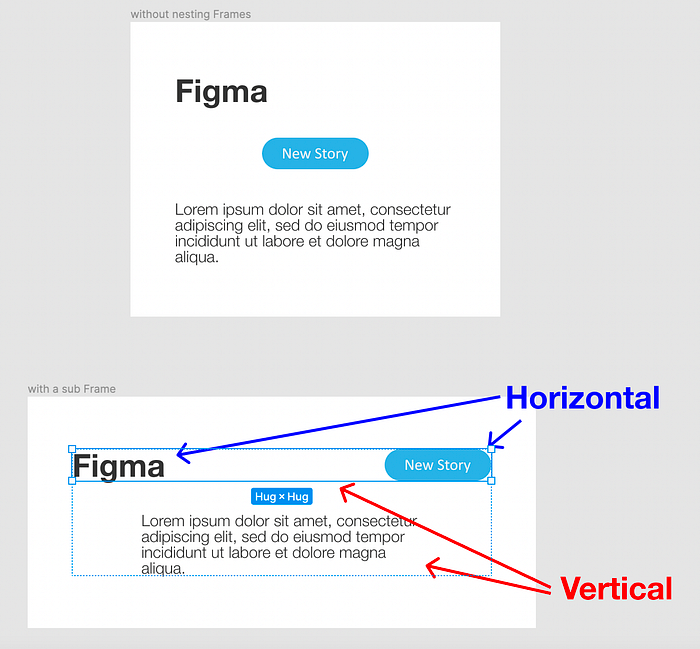
Since auto layout only works on frames, if you naturally compose your designs using nested frames you’ll be able to mix and match directions. In the image above, the top example uses a single direction. By using a “sub frame” like I’ve done in the bottom example I can compose them together.
You’ll probably need to adjust the auto layout settings and the horizontal resizing settings afterwards, as it often affects the width of my parent Frame. For a horizontal row I typically have most of the child layers using “hug”, and one element using “fill container”. This way, they’ll always take up the full space of the parental Frame.
Don’t forget to set your “row” frame to “fill container”, too!
If you’re not sure, I usually pick a text layer as my “fill” layer.

I also set the auto layout alignment to dead centre.
Alternatively if you aren’t working with text and have multiple fixed-width elements to “fill” out the entire row, look at the spacing mode setting. The auto layout update released in May 2022 allows you to set a “space-between” behaviour.

Maybe a trivial example, but it it’s a common design pattern.
3: Resizing my Frame or artboard isn’t working correctly
Either I’ve done something wrong, or I have a case of body dysmorphia… on my hand.
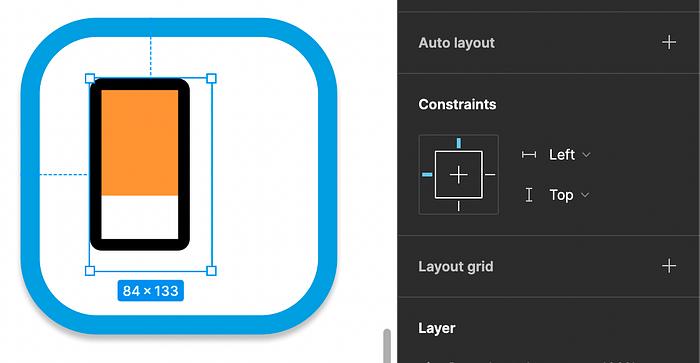
Common causes: using groups instead of frames, or constraint settings.
Typically, this happens when you use a group instead of a frame. Groups will scale the dimensions of layers much like a Powerpoint presentation, whereas frames will adjust based on constraints more like a browser. Unless that’s intentional, for example images or vectors, frame your layers instead.
When I’m not using auto layout, I make this mistake at least once per Figma file.
If you have used a frame, then it’s going to be a problem with your constraints on a child layer. Lack of resizing can be fixed by updating the constraints from the defaults. Undo or resize the parent frame to match the content inside. Then, set the constraints of the content to “left and right” to adjust to the width, and “top and bottom” to adjust to the height.
If this keeps biting you, it’s worth brushing up on when to use a group or a frame.
One more thing to mention…
If you’ve got a fraction or decimal dimension like 4.42, STOP!
Unless you’re absolutely sure, try to avoid these fractional units. While CSS does have a “scale” function to help replicate this in the browser, it’s only compatible with 18.97% of users globally. Not great if we’re trying to be inclusive and accessible.

Browser compatibility of the “scale” property, correct as of 31 July 2022.
4: Stretching of my layers and components on resize

I almost prefer the wide version. Almost.
Common causes: using the wrong tool for your Component or layers.
If the previous advice didn’t work, it can be as simple as having the wrong tool. Using the pointer tool (shortcut v ) will work best on constraint based components to preserve your content dimensions (as if it were on the web). If you’re not using constraints or it’s a complex object, you may be better off using the scale tool (shortcut k).
5: “Hug contents” horizontal behaviour is missing
Dude… this isn’t where I parked my… horizontal resizing behaviour!
Common causes: auto layout not applied.
A frame will only have the “hug contents” behaviour available if it has auto layout enabled. In my example above, I didn’t set auto layout because it was only a single text layer. Turning it into a component will frame that layer, but you still need to add auto layout to allow you to configure the “hug contents” behaviour.
6: My duplicate or instance doesn’t work or look the same
When in doubt, throw it out! …the custom changes, I mean.
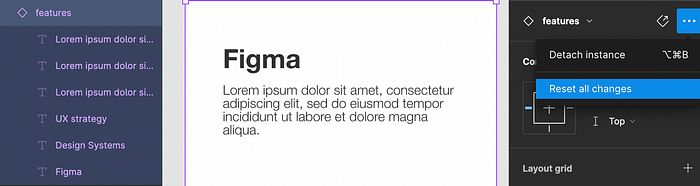
Common causes: attempting to edit an instance, or a botched duplication.
If it’s an instance of a master component, you can verify this by reseting all changes to that instance. Select your instance, select the three-dot “more” menu on the right of the instance options, and select “reset all overrides”.
If that doesn’t work, or it’s not a component, don’t fret. You’ll want to perform these in this order:
- Use the “undo” function—only works if you’ve been editing it recently. You can take a copy of your work with
Cmd + c(Ctrl + cfor everyone else) before undoing, then pasting once you’ve found the last known working configuration - Check the resizing or constraint settings—it’s a bit time consuming, but these can often change accidentally when double clicking a layer or a frame. Select the problem layers, and inspect their settings.
- Rebuild your design—it can take a while, but if you can’t quite find the config that’s causing you grief then it can be quicker to start again. It’s a great opportunity to start componentising if you haven’t already.
7: I can’t edit my component
Have a quick look at the layers panel when you try to delete something. If this happens, read on..!
Common causes: attempting to edit an instance.
I get this all the time, and I forget that you cannot edit, add to, or remove layers from an Instance. The master component can be edited freely, but an instance can only have the contents of the layers changed, or the layers hidden with the visibility toggle.
There’s 3 methods to make the changes you want, and a quick note of when you’ll want to use each:
- Make a new variant—great if you’ll use this a few times or want to keep copies of your thinking as you design. Make a duplicate of your master component, and “combine them as variants” if not already.
- Detach instance—if you’re under time pressure and likely won’t come back to this again, simply right-click, detach instance, and make edits as normal. It’s not cheating, it’s being pragmatic.
- Swap instance—if your instance uses nested subcomponents, you can perform an instance swap on it. It can be fiddly as an advanced technique, but it has its place.
Conclusion
As powerful as Figma enables you to be, it still requires an awareness of how all the different tools and techniques interact with each other. Once you’ve seen these problems a number of times, it always comes down to one of the following:
- Misconfiguring auto layout or resizing behaviours
- Misunderstanding the difference between groups and frames
- Simply trying to edit a component 🙈
Keep calm, check my troubleshooting advice above, and carry on designing the future of the web.
Recommend
About Joyk
Aggregate valuable and interesting links.
Joyk means Joy of geeK