

uniapp离线打包流程_生成安卓APP
source link: https://www.fly63.com/article/detial/11913
Go to the source link to view the article. You can view the picture content, updated content and better typesetting reading experience. If the link is broken, please click the button below to view the snapshot at that time.

开发的时候经常遇到问题,uniapp打包限制次数限制,超过次数好像是2元一次,同时对包的大小有限制的,一般不能超过40M,超过40M则需要缴费打包,好像十块钱一次,虽然不贵,但是长此以往也是一笔不小的费用,且不是解决根源问题的处理方式。所以推荐使用离线打包的方式,下面主要介绍uniapp离线打包生成安卓APP的流程步骤。
一、环境准备
1、下载android studio软件,地址:Android Studio官网 OR Android Studio中文社区
2、下载uniapp的App离线SDK下载,地址:最新android平台SDK下载
3、在开发者中心申请Appkey,具体请点击链接
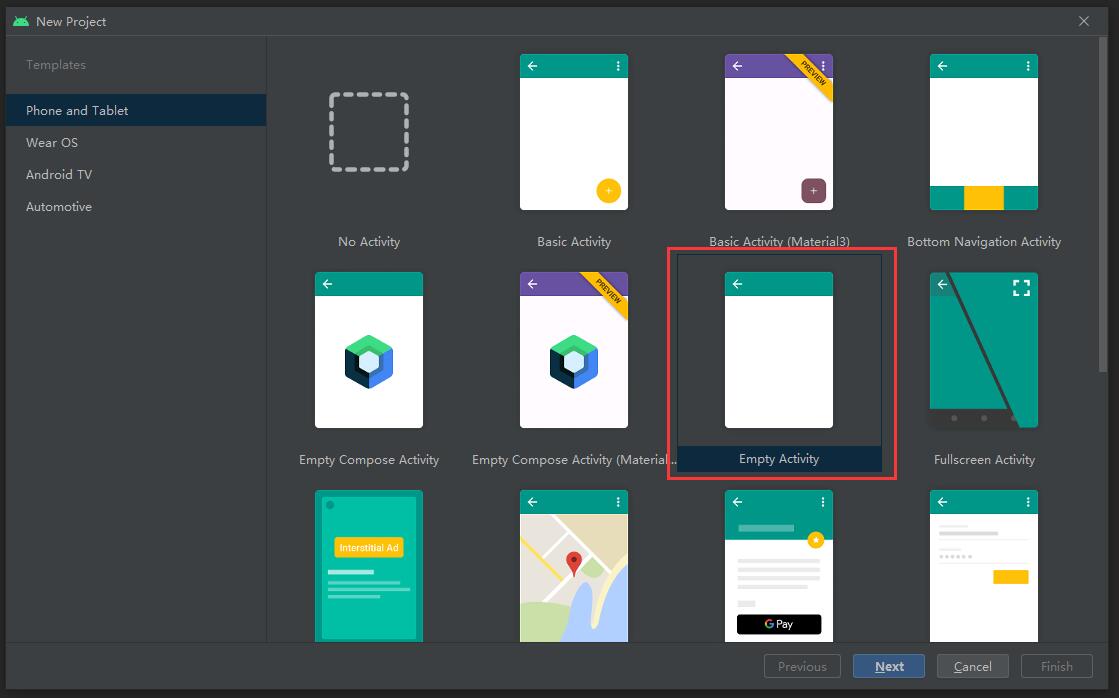
二、新建工程
选择新建->创建Empty Activity项目
填写应用名称,包名,路径,语言选择java,minSDK建议选选21及以上。
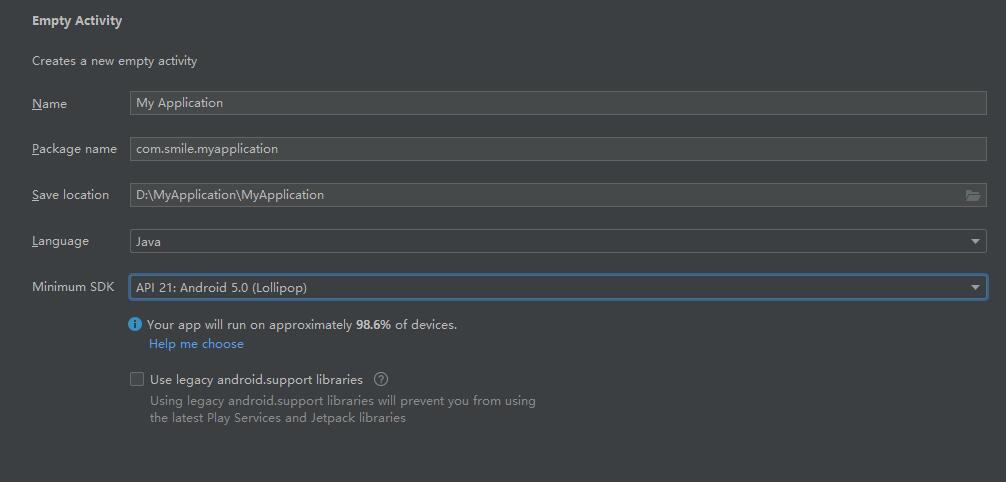
Package name作为应用标志,涉及申请第三方平台账号,一般情况下不建议修改,包名一般设置反向域名,如:com.fly63.www,点击 Finish 完成创建。
注意:App离线SDK不支持Kotlin,所以语言必须选择Java。
三、工程配置
1、app->libs目录复制jar包
找到官方下载的SDK目录按照官方找到里边的四个jar包复制到新工程libs中,包括:lib.5plus.base-release.aar、[email protected]、uniapp-v8-release.aar、oaid_sdk_1.0.25.aar。
2、修改app->build.gradle文件
示例代码如下:
plugins {
    id 'com.android.application'
}

android {
    compileSdk 32

defaultConfig {
        applicationId "com.fly63.www"
        minSdk 21
        targetSdk 32
        versionCode 1
        versionName "1.0"
        testInstrumentationRunner "androidx.test.runner.AndroidJUnitRunner"
    }

signingConfigs {
        config {
            keyAlias 'fly63'
            keyPassword 'asdfghj'
            storeFile file('fly63.keystore')
            storePassword 'asdfghj'
            v1SigningEnabled true
            v2SigningEnabled true
        }
    }

buildTypes {
        release {
            minifyEnabled false
            proguardFiles getDefaultProguardFile('proguard-android-optimize.txt'), 'proguard-rules.pro'
            signingConfig signingConfigs.config
        }
        debug {
            signingConfig signingConfigs.config
        }
    }

aaptOptions {
        additionalParameters '--auto-add-overlay'
        ignoreAssetsPattern "!.svn:!.git:.*:!CVS:!thumbs.db:!picasa.ini:!*.scc:*~"
    }

compileOptions {
        sourceCompatibility JavaVersion.VERSION_1_8
        targetCompatibility JavaVersion.VERSION_1_8
    }
}

dependencies {
    implementation 'androidx.appcompat:appcompat:1.3.0'
    implementation 'com.google.android.material:material:1.4.0'
    implementation 'androidx.constraintlayout:constraintlayout:2.0.4'
    testImplementation 'junit:junit:4.13.2'
    androidTestImplementation 'androidx.test.ext:junit:1.1.3'
    androidTestImplementation 'androidx.test.espresso:espresso-core:3.4.0'

implementation fileTree(include: ['*.jar'], dir: 'libs')
    implementation fileTree(include: ['*.aar'], dir: 'libs')
    implementation 'androidx.appcompat:appcompat:1.0.0'
    implementation 'androidx.legacy:legacy-support-v4:1.0.0'
    implementation 'androidx.recyclerview:recyclerview:1.0.0'
    implementation 'com.facebook.fresco:fresco:2.5.0'
    implementation "com.facebook.fresco:animated-gif:2.5.0"
    implementation 'com.github.bumptech.glide:glide:4.9.0'
    implementation 'com.alibaba:fastjson:1.1.46.android'
}
versionCode为应用的版本号(整数值),用于各应用市场的升级判断,建议与manifest.json中version -> code值一致
versionName为应用的版本名称(字符串),在系统应用管理程序中显示的版本号,建议与manifest.json中version -> name值一致。
applicationId为应用的包名,一般设置为反向域名,不建议修改。
targetSdkVersion建议设置为30或以上,上架谷歌市场要求不低于30。
minSdkVersion最低支持21,小于21在部分5.0以下机型上将无法正常使用。
signingConfigs为证书签名设置,需要将生成的证书fly63.keystore(或者jks证书)文件放到app目录下。
如果不知道如何生成证书的同学,请参考:Android平台签名证书(.keystore)生成指南
注意:配置完gladle文件记得点击右上角Sync Now按钮进行配置同步
3、修改AndroidManifest.Xml文件
位置:app->src->main->AndroidManifest.Xml
在application节点中添加meta-data节点和activity节点,以下代码(记得删除原有的activity节点)
示例代码如下:
<?xml version="1.0" encoding="utf-8"?>
<manifest xmlns:android="http://schemas.android.com/apk/res/android"
    xmlns:tools="http://schemas.android.com/tools"
    package="com.fly63.www">

<application
        android:allowBackup="true"
        android:allowClearUserData="true"
        android:icon="@drawable/icon"
        android:label="@string/app_name"
        android:largeHeap="true"
        android:supportsRtl="true">

<activity
            android:name="io.dcloud.PandoraEntry"
            android:exported="true"
            android:configChanges="orientation|keyboardHidden|keyboard|navigation"
            android:label="@string/app_name"
            android:launchMode="singleTask"
            android:hardwareAccelerated="true"
            android:theme="@style/TranslucentTheme"
            android:screenOrientation="user"
            android:windowSoftInputMode="adjustResize" >
            <intent-filter>
                <action android:name="android.intent.action.MAIN" />
                <category android:name="android.intent.category.LAUNCHER" />
            </intent-filter>
        </activity>

<activity
            android:name="io.dcloud.PandoraEntryActivity"
            android:exported="true"
            android:launchMode="singleTask"
            android:configChanges="orientation|keyboardHidden|screenSize|mcc|mnc|fontScale|keyboard|smallestScreenSize|screenLayout|screenSize"
            android:hardwareAccelerated="true"
            android:permission="com.miui.securitycenter.permission.AppPermissionsEditor"
            android:screenOrientation="user"
            android:theme="@style/DCloudTheme"
            android:windowSoftInputMode="adjustResize">
            <intent-filter>
                <category android:name="android.intent.category.DEFAULT" />
                <category android:name="android.intent.category.BROWSABLE" />
                <action android:name="android.intent.action.VIEW" />
                <data android:scheme="h56131bcf" />
            </intent-filter>
        </activity>

<!-- 替换为自己申请的Appkey,参考:https://nativesupport.dcloud.net.cn/AppDocs/usesdk/appkey -->
        <meta-data  android:name="dcloud_appkey"  android:value="*****" />

</application>

</manifest>
每个activity节点加了个android:exported = "true"
必须要申请离线的Appkey,将生成的sha1密钥在Dcloud开发中心去配置离线打包key。参考文档
部分节点说明:package为包名,android:label应用名称,android:icon指向应用图标。
4、添加图标,闪屏图、应用名称修改
在app/src/main/res/drawable目录下新增icon.png(应用图标)、push.png、splash.png(闪屏图)
应用名称:
打开app-> src -> main -> res -> values -> strings.xml文件,修改“app_name”字段值,该值为安装到手机上桌面显示的应用名称,建议与manifest.json中name(基础配置中的应用名称)对应。
5、AndroidX 配置
需要在项目根目录下的gradle.properties文件中添加如下内容
android.useAndroidX=true
android.enableJetifier=true
在真机模拟运行时如果手机的usb验证应用无法开启添加以上代码解决(一般是vivo和oppo)
三、uniapp资源添加
1、新增目录
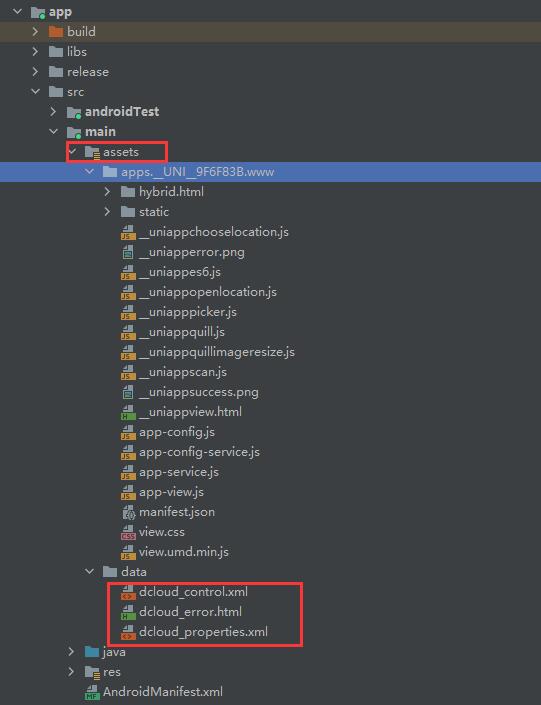
Android studio默认项目没有assets文件夹,需手动创建,创建位置与java目录同级。
在app/main/目录下新增assets目录和2个子目录data和apps,其中:
data: 放下载的sdk下assets里的data里的三个文件复制粘贴到我们新建的data文件夹,dcloud_control.xml,dcloud_error.xml,dcloud_properties.xml。
apps:存放hbuliderx运行本地打包资源的目录。
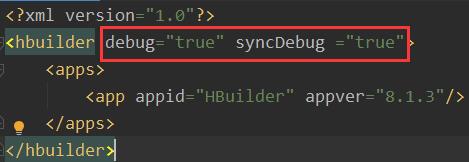
注意:需要在dcloud_control.xml文件中修改自己的uniapp AppID,确保dcloud_control.xml中的appid与manifest.json中的id与文件夹名一致
生成自定义基座,需要在根节点下添加debug="true"和syncDebug="true",如下图,详细步骤可参考链接。
2、导出uniapp资源:
选择“运行” - “原生APP-本地打包” - “生成本地打包APP资源”,如果不清楚的,请参考文档
确保uni-app编译器的版本号和离线 SDK 的版本号一致。如果版本不一致,app启动时会弹出版本不一致的提示框。
四、运行和打包
1、运行:
连接手机或者模拟器,点击按钮,运行即可。

ps:如果没有模拟器和真机那么需要去配置一个模拟器
2、打包:

打线上包需要填写证书相关信息,如下:

key store path:证书文件的地址
key store password:证书密码
key alias:证书别名
key password:私钥密码(一般和证书密码一样)
选择打包版本,debug是测试包,release是正式包。
打包完成后在app中可以看到debug或release文件夹,打开进入则可以看到们的.apk或者.aab文件了(aab文件选择Android App Bundle)。
链接: https://www.fly63.com/article/detial/11913
</div
Recommend
About Joyk
Aggregate valuable and interesting links.
Joyk means Joy of geeK