

Superwall: Remote Paywall Configuration on iOS [FREE]
source link: https://www.raywenderlich.com/31484602-superwall-remote-paywall-configuration-on-ios
Go to the source link to view the article. You can view the picture content, updated content and better typesetting reading experience. If the link is broken, please click the button below to view the snapshot at that time.

Superwall: Remote Paywall Configuration on iOS
Learn how to integrate and use Superwall to remotely configure and control your paywall to monetize your app.
Version

Subscriptions are a great way to monetize your app. By showing a paywall, you can convert your free users into paying subscribers who help fund that Ferrari you’ve had your eye on. As such, creating a high-converting paywall is extremely important. But accomplishing that’s annoyingly difficult. It typically requires countless hours of iterating on design, messaging, placement, pricing and features to get it just right. Even then, the job is never finished and even the highest-grossing apps still test different paywalls to maximize profits.
Fortunately, Superwall has come to the rescue. It’s created an SDK to let you remotely configure every aspect of your paywall and quickly find the best version.
In this tutorial, you’ll build an app that generates motivational gym quotes behind a paywall that’s remotely configured on Superwall. Along the way, you’ll learn:
- How to integrate and use Superwall to remotely configure your paywall.
- How to build a paywall using Webflow.
- What data tags and variables are in relation to your paywall.
- What a Campaign, Rules and Triggers are.
- How to create an A/B test.
- How to show your paywall.
Getting Started
Download the starter project by clicking the Download Materials button at the top or bottom of the tutorial.
Once downloaded, open GymMotivation.xcodeproj from the starter folder and look around. You’ll find the project provides the interface for a welcome screen and a motivational quote generator.
Build and run. You’ll see a welcome page with a button at the bottom of the screen:
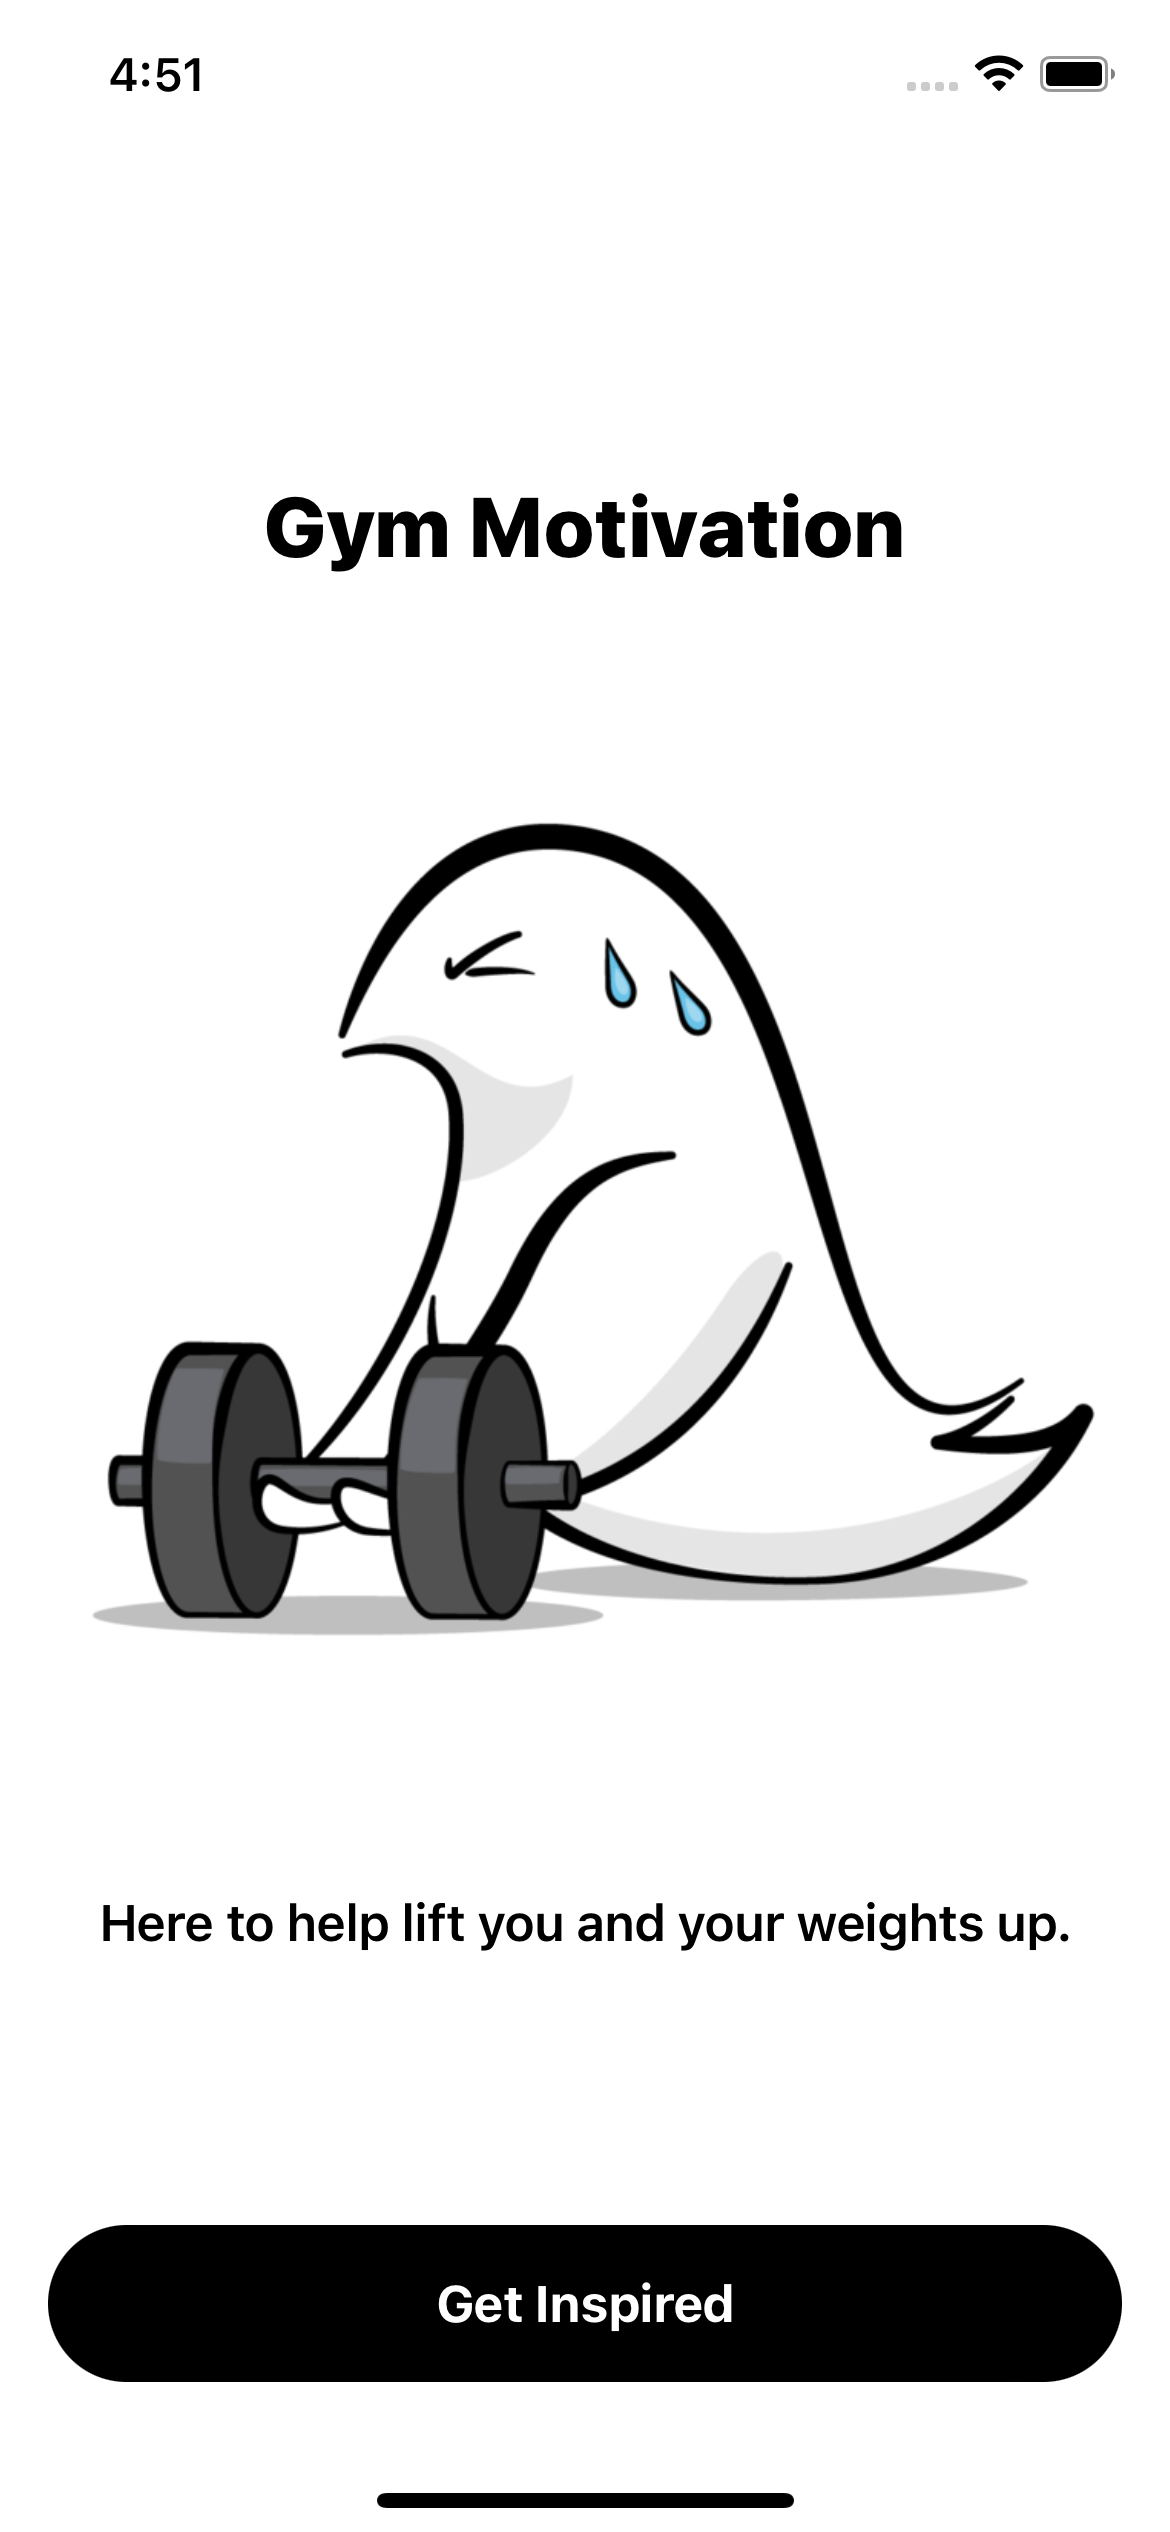
Tap the Get Inspired button to navigate to the motivational gym quote generator:

Refresh the quote by tapping the refresh arrow in the top right.
With motivational quotes like these, someone using your app might just become the next Arnold Schwarzenegger. Why give this content away when people could be paying good money for it?
In Xcode, you’ll see a StoreKit testing configuration called Products.storekit containing three auto-renewable subscriptions that each have a week’s free trial. StoreKitService.swift provides some code to help implement in-app subscriptions.
Your task is to add a remotely configured paywall that uses these products to give access to these quotes.
Understanding how Superwall works
Before diving in, it’s important to understand how a remote paywall setup works from a high-level perspective.
The following diagram shows the Superwall ecosystem:

- Superwall Dashboard: This is your control center, where you configure and enable paywalls, view analytics, manage users and more. The dashboard interacts with the Superwall API to store your configurations and serve them to the SDK.
- Superwall API: The API is the go-between that all the Superwall services use to communicate with each other. The SDK communicates with the API to load your paywall configurations, ready for presentation.
- Paywall Template: All paywalls are webpages that act as templates for you to configure in the dashboard.
-
Configured Paywall: The SDK loads the paywall template into a native-feeling
UIWebViewand executes javascript to replace text and template product information. This is then presented to your users. Which paywall they see and when they see it depends on your configuration in the dashboard. When a user taps an interactive element in the paywall, the SDK gets a callback that you can react to. As the developer, it’s up to you to implement the delegate and handle events that happen on the paywall, such as purchasing and restoring.
Exploring the Dashboard
Without further ado, sign up for a free account on Superwall’s website.
After signing up and entering your app details, you’ll see the dashboard:

This has many uses, including:
- Creating new paywalls.
- Analyzing, editing and controlling existing paywalls.
- Viewing paywall metrics.
- Defining conditions for when to show paywalls to users.
- Viewing users and their user journey through your app and paywall.
In the Paywalls section, you’ll see there’s an example paywall already created for you:

This is a useful starting point. Click Example Paywall and you’ll see an interface with preconfigured data:
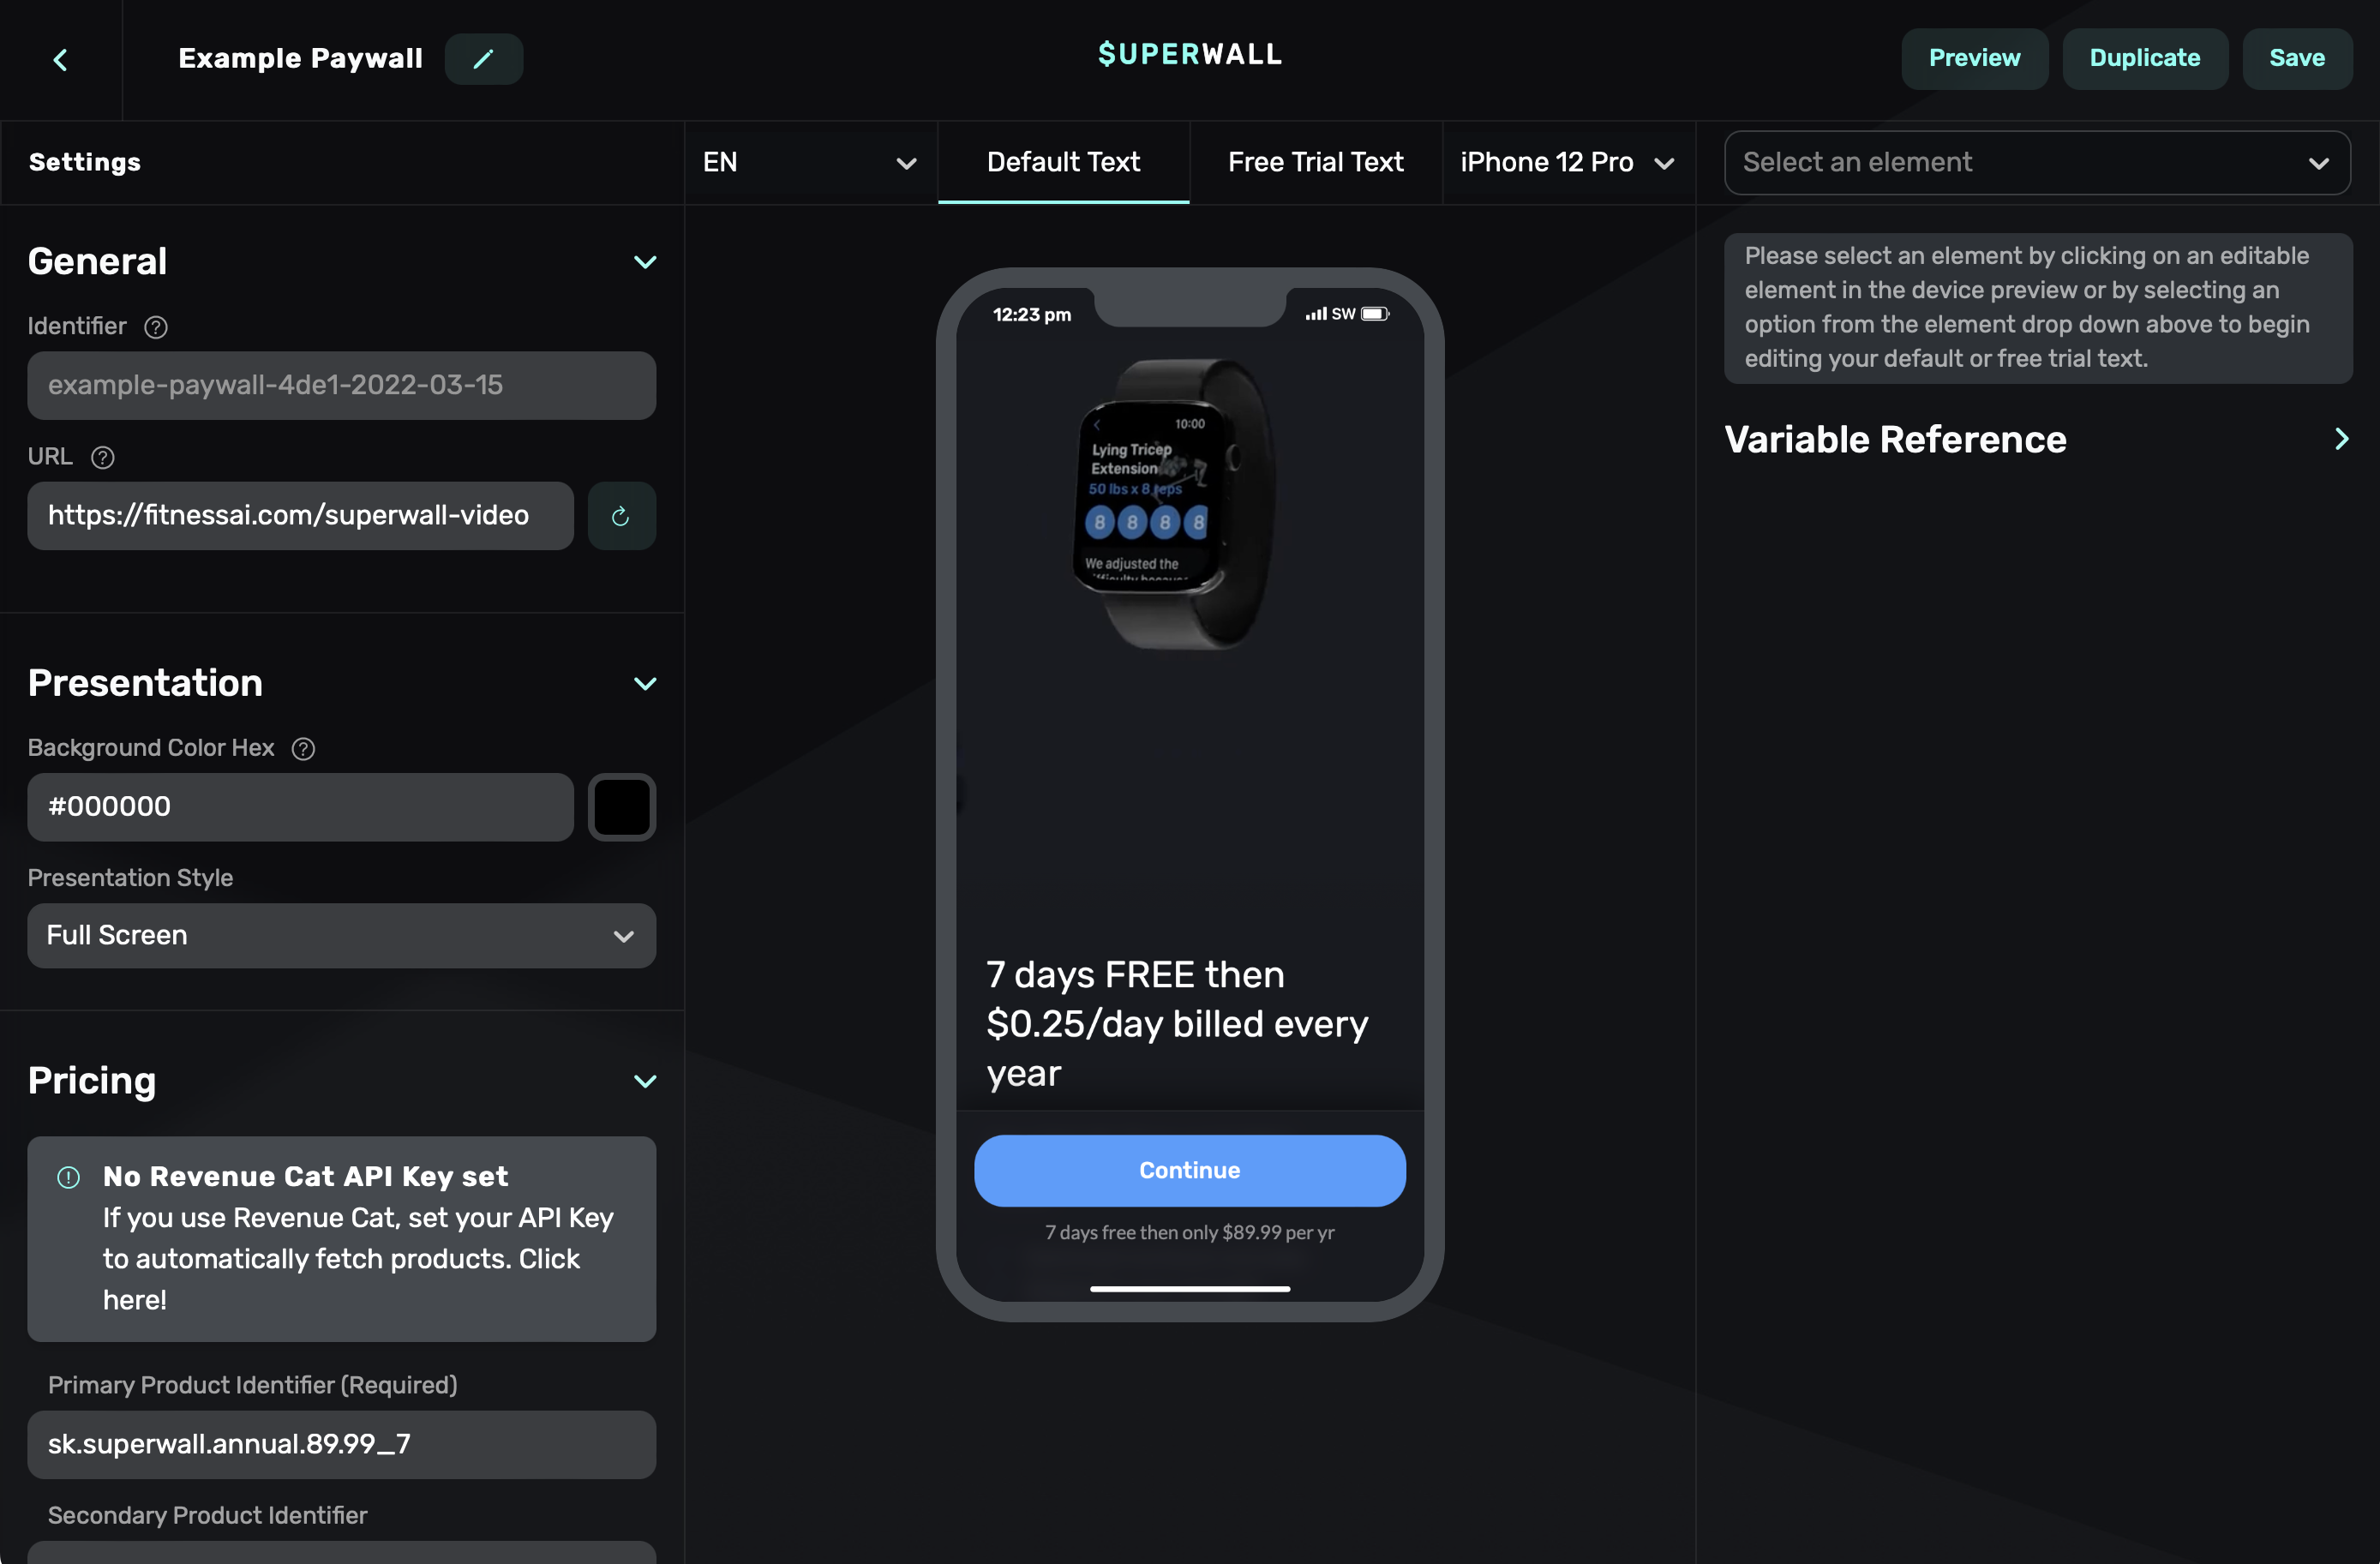
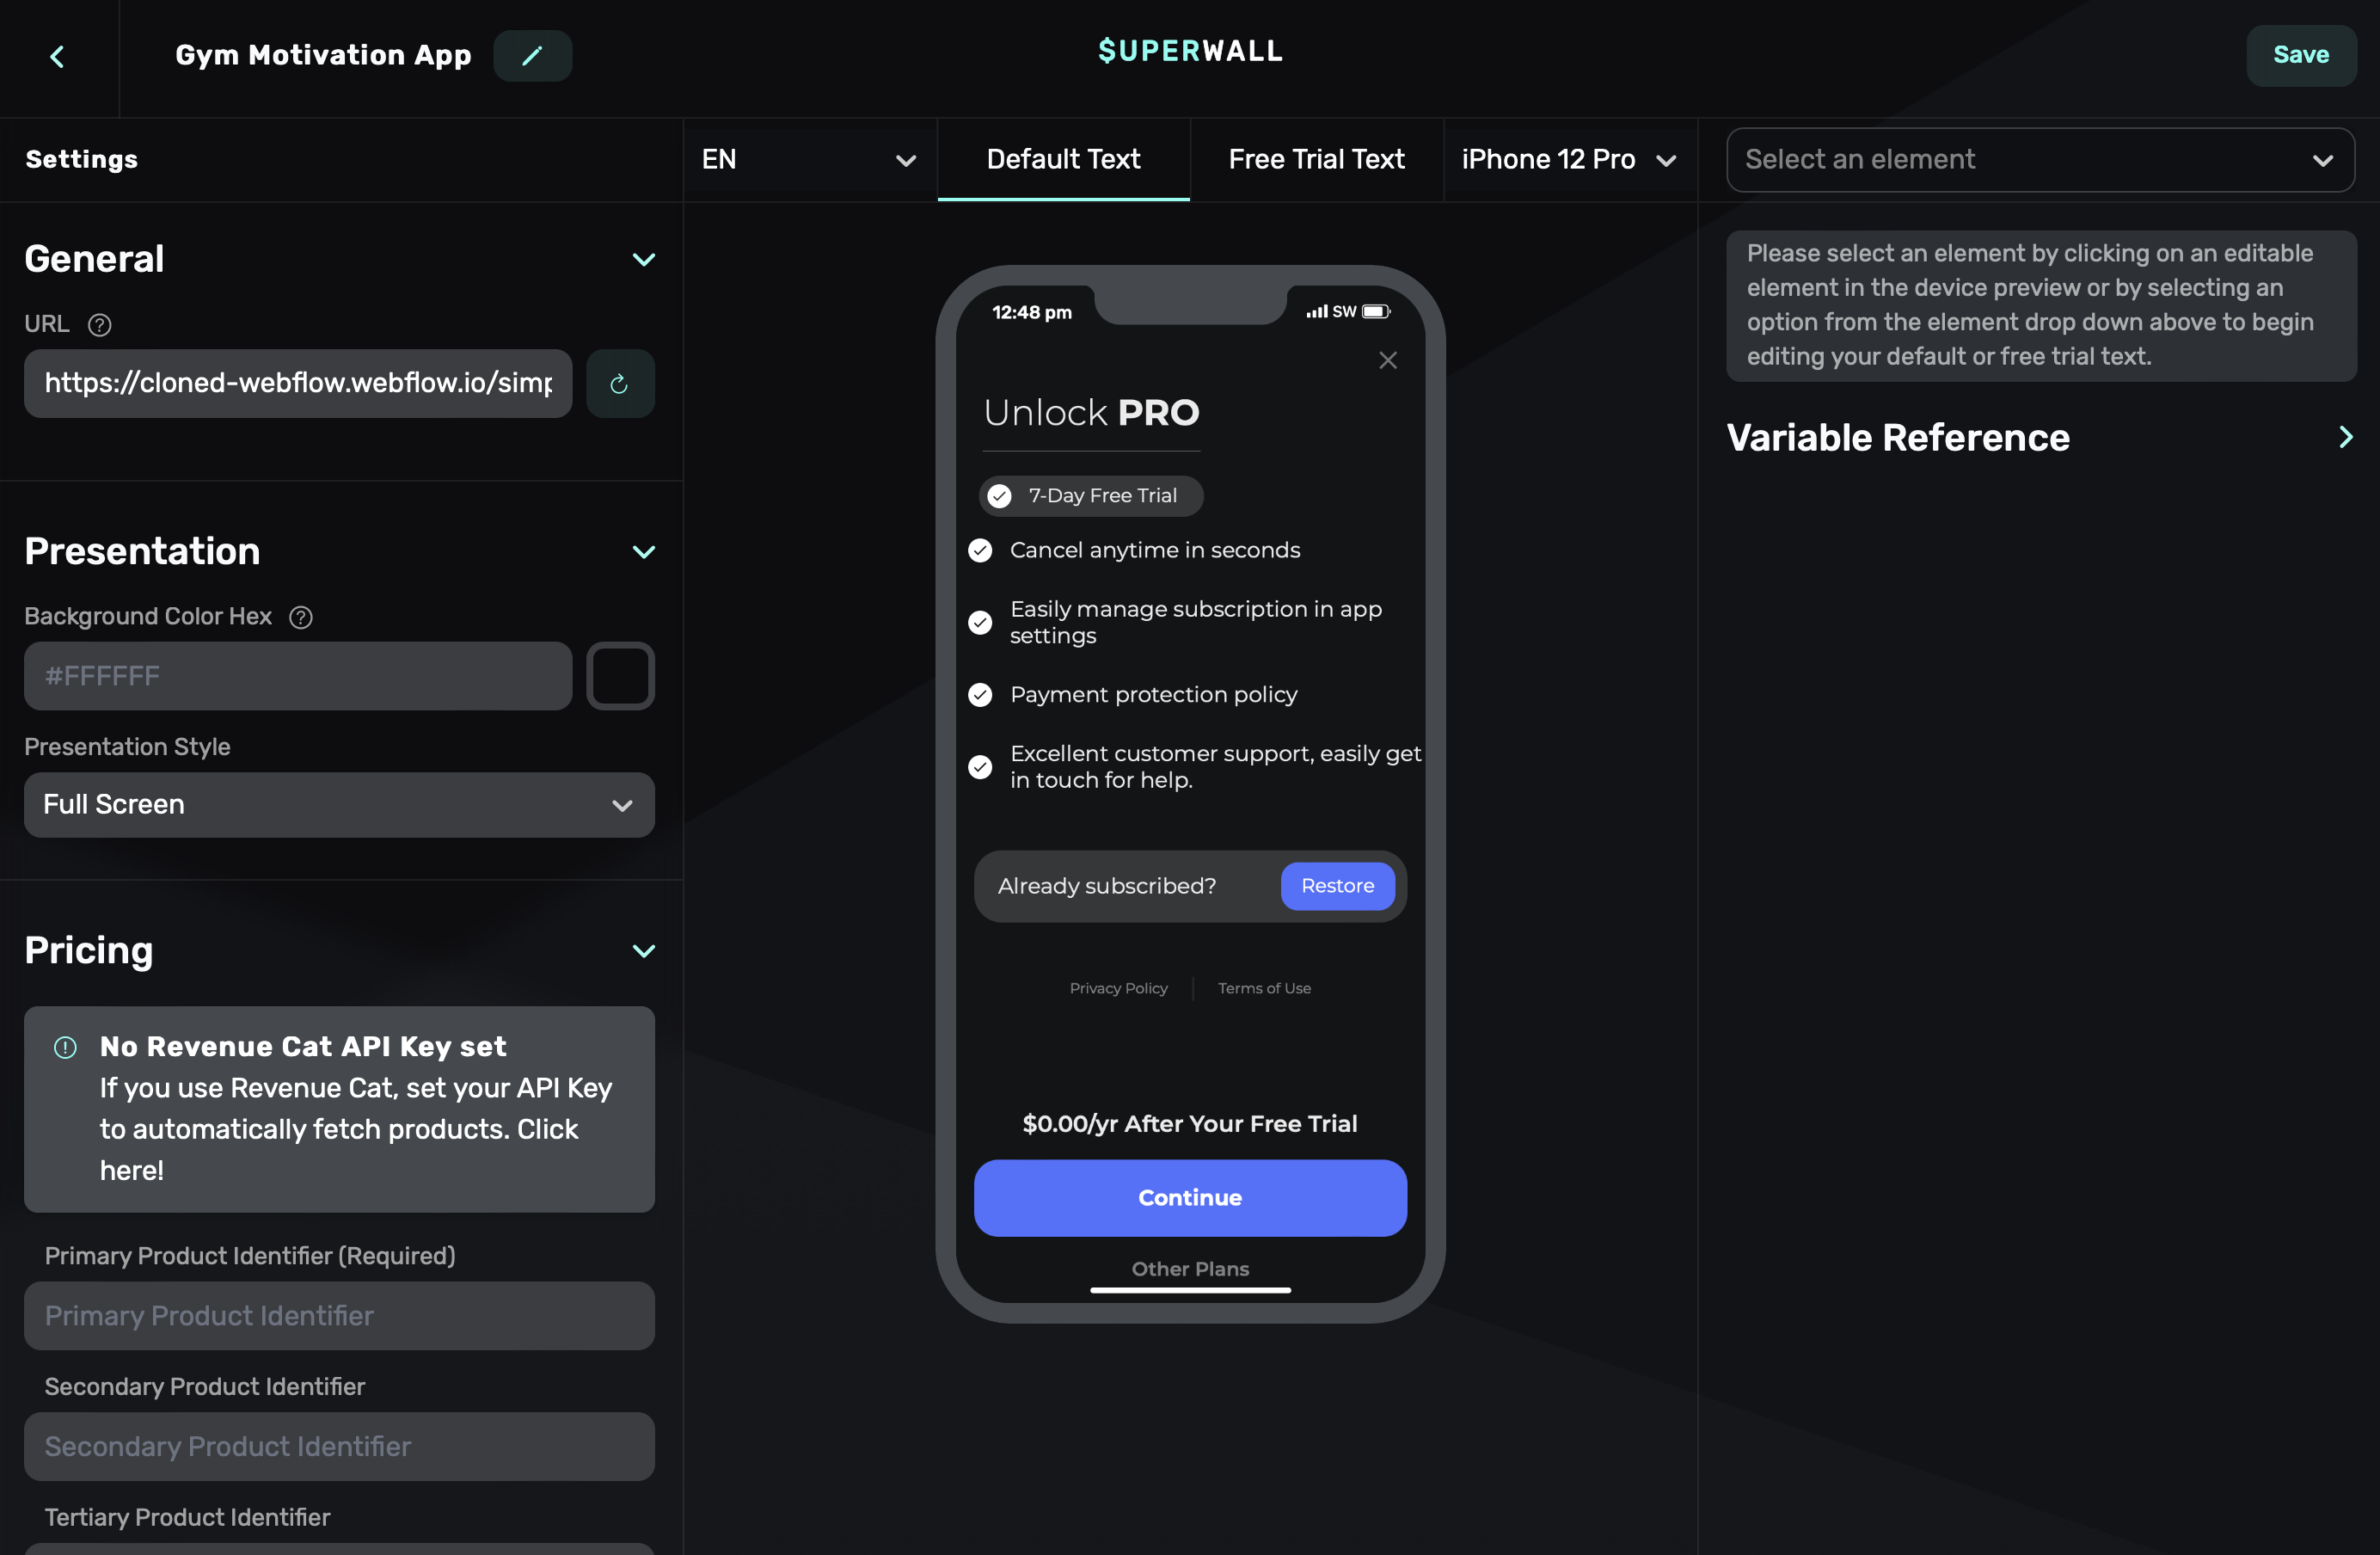
Settings Sidebar
The left-hand sidebar is where you configure your paywall. It’s split into three sections:
General
You’ll see a URL of an example paywall webpage. The iPhone preview in the center displays an interactive preview of this.
Presentation
This controls the presentation style and background color of the in-app paywall view controller.
Pricing
You can specify up to three product identifiers here from which Superwall will draw prices. If you’re using RevenueCat to handle your in-app subscriptions, you can set your RevenueCat API key here or in settings. It’ll automatically load your product identifiers from any product attached to an offering for you to select.
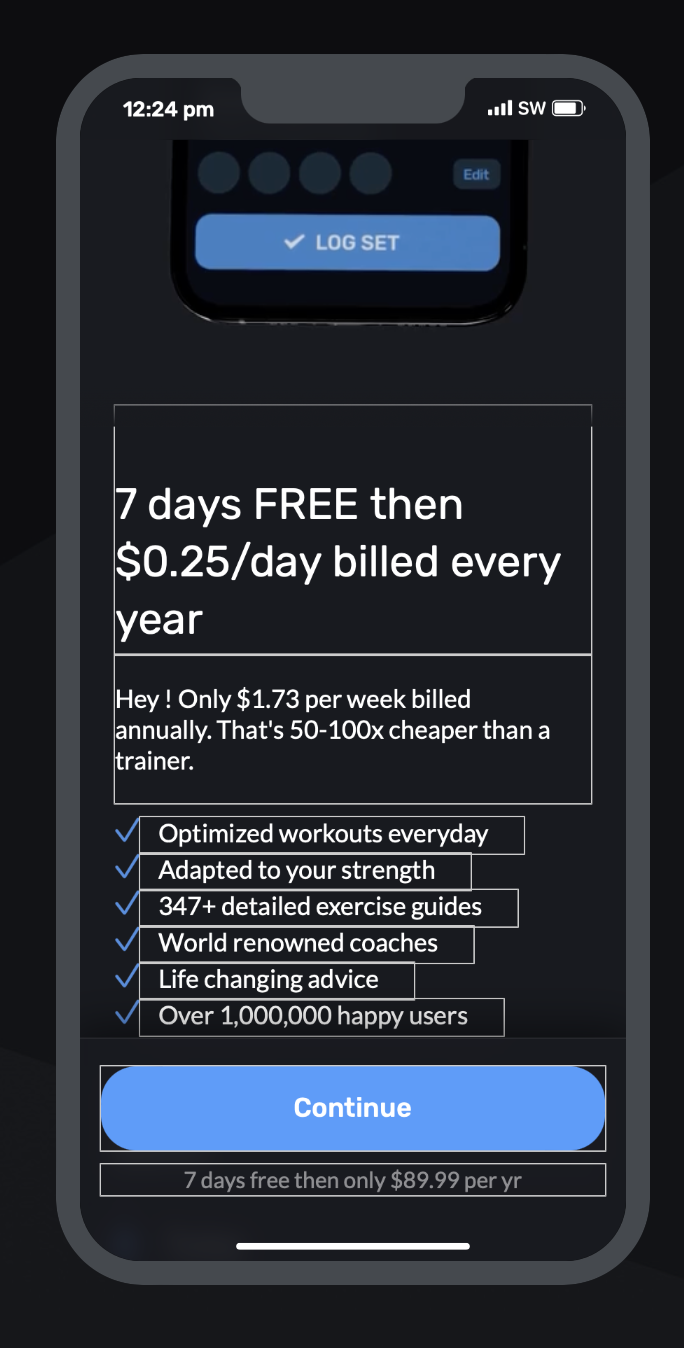
Paywall Preview Section
In the center of the page you’ll see the interactive paywall preview with selectors at the top to change the data it’s displaying:

You can preview different paywall localizations, its appearance with and without a free trial and its appearance on different devices.
Mouse-over the paywall and you’ll see gray borders appear around some of the elements in the paywall:
These are configurable text elements automatically detected due to data tags attached to the elements, which you’ll learn about later. By clicking on an element you’ll see its border turn green and its text appear in the right-hand sidebar:

Here, you enter text for the element’s default and free trial state. The SDK displays the free trial text when it detects a free trial in the primary product and the user hasn’t already used the free trial.
All free trial text inherits from the default text. For this app, you won’t use this extra field.
Click on Variable Reference and you’ll see a list of sample product data, which you can refer to in your text:

You’ve now got a feel for how to configure a paywall on the dashboard.
Understanding Campaigns
How do you determine when to show configured paywalls to users? And to which group of users? That’s where Campaigns come in.
A campaign allows you to define conditions for when to show paywalls to users. They tie together three concepts:
- Triggers: Analytical events sent from your app.
- Rules: Logic that determines when to show a paywall.
- Paywalls.
You can think of a campaign as follows: When firing these triggers, evaluate these rules and show these paywalls.
Head back to the dashboard and scroll down to the section named Campaigns:

You’ll see there are already two Campaigns there: Manual Presentation and Example Campaign. Click Example Campaign.
Triggers
At the top of the page is where you add your event triggers. In this campaign, there’s already one there called campaign_trigger:
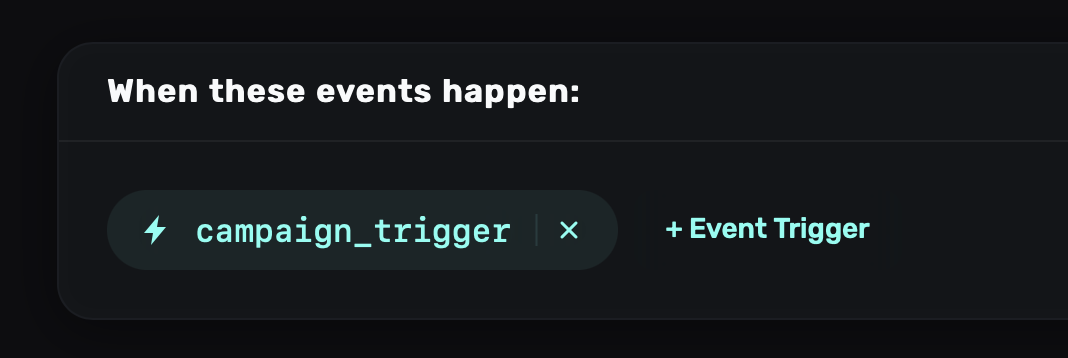
Later on, your app will send this event via the SDK. You can name a trigger almost anything you like, as long as you’re sending it from your app.
Superwall automatically tracks events and some of these can be triggers. Specifically:
- app_install: On configuration of the SDK for the first time.
- app_launch: On app launch from a cold start.
- session_start: On app open either from a cold start or after at least 30 seconds since the app left the foreground.
Rules
Further down the page you’ll see a rule set to true:

As this is true, all users will match the rule. However, you can have more complex rules as well as multiple rule sets. Rules get evaluated in order and once a user matches a rule, no other rules get evaluated. If a user doesn’t match a rule, they aren’t shown a paywall.
Rules use a language called Liquid, which is a framework written by Shopify. You’ll see this used again later on with product data. When writing rules, you have the ability to access user data, as well as parameters sent with the trigger from the SDK. Here are some example rules you could use:
user.days_logged >= 3user.genre == "jazz" or user.genre == "classical"params.outcome contains "substring"
Check out the Superwall docs for a full list of operators.
Paywalls
Underneath each rule is a group of paywalls. You’ll see one paywall assigned to 100% of users. In fact, that’s the example paywall that you saw earlier:

If you wanted to, you could add multiple paywalls to this rule and assign each paywall to a certain percentage of users. If instead of 100% of users, you assigned only 10% of users to the paywall, the remaining 90% wouldn’t see a paywall, meaning they are in a holdout group. All these features make it possible to run A/B tests to determine the most effective paywall, which you’ll do later on.
This above is a very simple set up, however, advanced setups are possible. Check out the Superwall docs for more info.
You’ve now got a feel for how the dashboard works. The next step is to integrate the SDK into your app and trigger your first paywall!
Integrating the Superwall SDK
Adding the Superwall iOS SDK
To show the paywall in your app, you first need to add the Superwall iOS SDK called Paywall to your project as a Swift Package.
In Xcode, select File ▸ Add Packages…, then paste the Paywall package URL into the search bar.
https://github.com/superwall-me/paywall-ios
Set the Dependency Rule to Up To Next Major Version and specify 2.0.0 as the lower bound. Then, click Add Package:

Initializing the SDK
Next, you need to initialize the SDK when the app launches. In the Paywall folder, add a new file: PaywallService.swift. Then, add the following code:
import Paywall

final class PaywallService {
  static let shared = PaywallService()

  static func initPaywall() {
    Paywall.configure(
      apiKey: "YOURAPIKEY",
      delegate: shared
    )
  }
}
Here, you create a singleton class with a function configuring the paywall and setting the delegate to the shared PaywallService instance.
Open the Superwall dashboard, click the cog wheel in the top right, select Keys and copy the Public API Key:
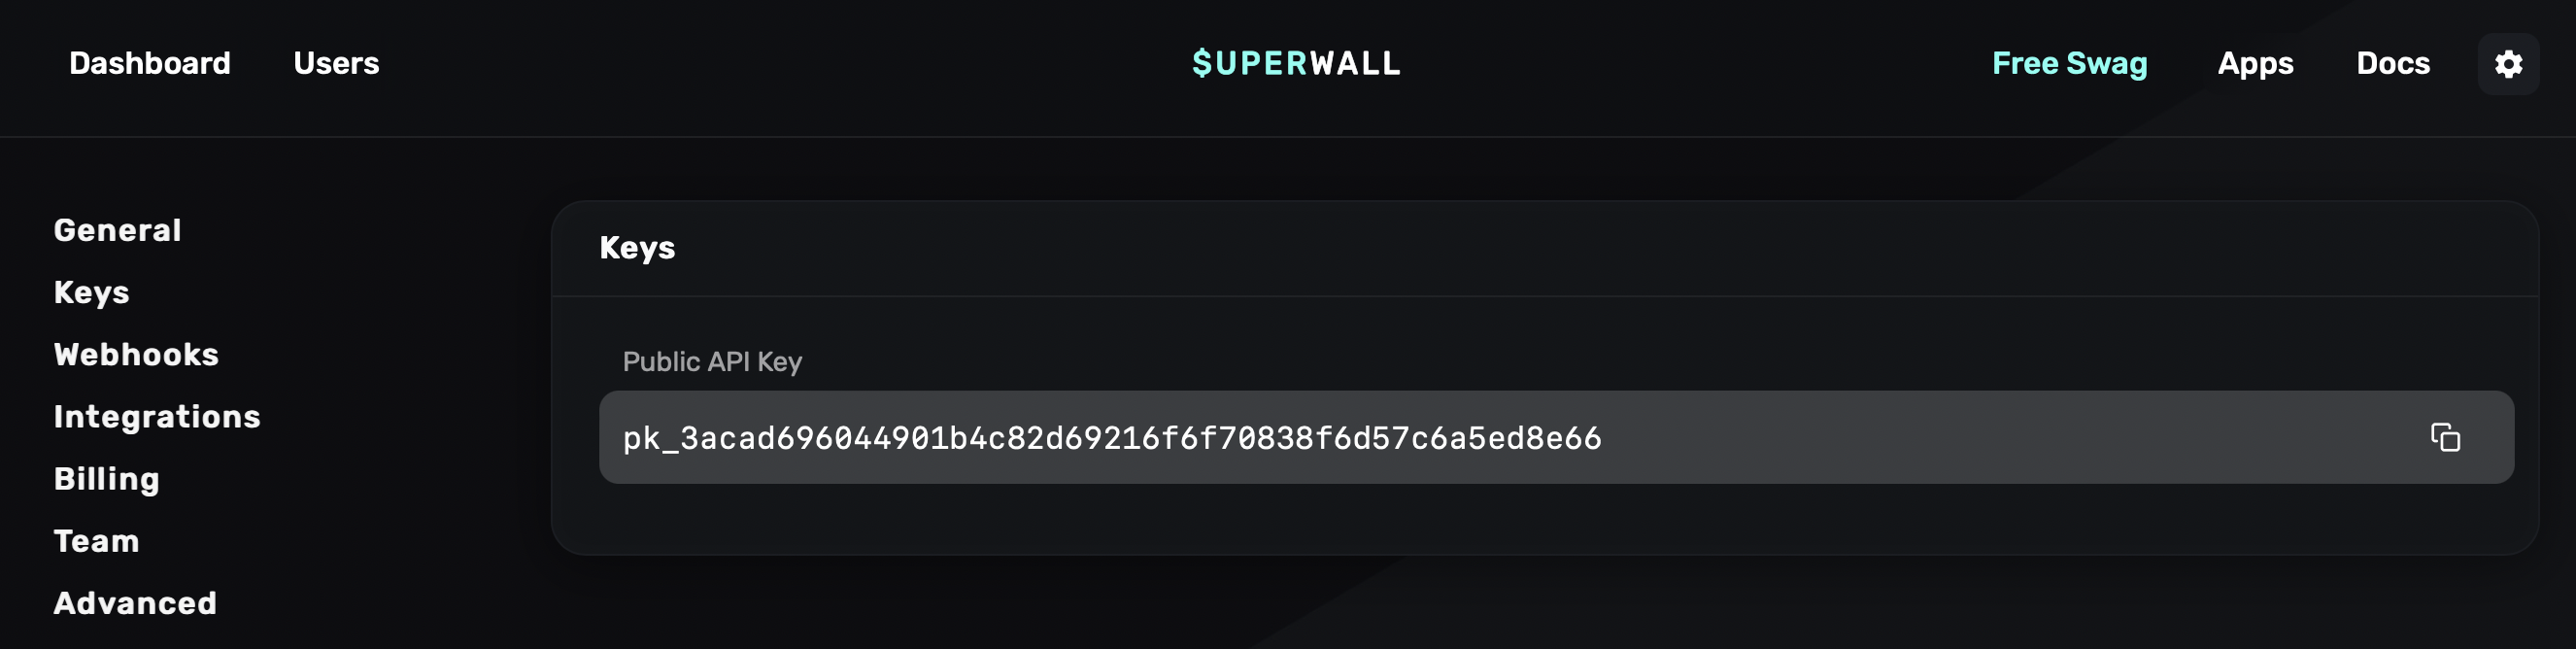
Back in PaywallService, replace YOURAPIKEY with your Public API key.
Conforming to Delegate
Next, you need to conform to PaywallDelegate. This handles callbacks from the SDK.
At the top of the file, add:
import StoreKit
Then, add the following extension to the bottom of the file:
extension PaywallService: PaywallDelegate {
  // 1
  func purchase(product: SKProduct) {
    Task {
      try? await StoreKitService.shared.purchase(product)
    }
  }

  // 2
  func restorePurchases(completion: @escaping (Bool) -> Void) {
    let result = StoreKitService.shared.restorePurchases()
    completion(result)
  }

  // 3
  func isUserSubscribed() -> Bool {
    return StoreKitService.shared.isSubscribed
  }
}
Here’s what each of these methods does:
- Purchases a given product.
- Attempts to restore purchases and tells the SDK whether the restoration was successful.
- Tells the SDK whether the user has an active subscription.
Open AppMain.swift and add the following to the top of the struct:
@UIApplicationDelegateAdaptor(AppDelegate.self) private var appDelegate
This gives you access to app delegate functionality from your app. Next, add a new file, AppDelegate.swift, in the root project folder and paste the following:
import UIKit

final class AppDelegate: UIResponder, UIApplicationDelegate {
  func application(
    _ application: UIApplication,
    didFinishLaunchingWithOptions launchOptions:
  [UIApplication.LaunchOptionsKey: Any]? = nil
  ) -> Bool {
    PaywallService.initPaywall()
    Task {
      await StoreKitService.shared.loadSubscriptionState()
    }
    return true
  }
}
When your app finishes launching, it calls PaywallService.initPaywall() and loads the subscription state.
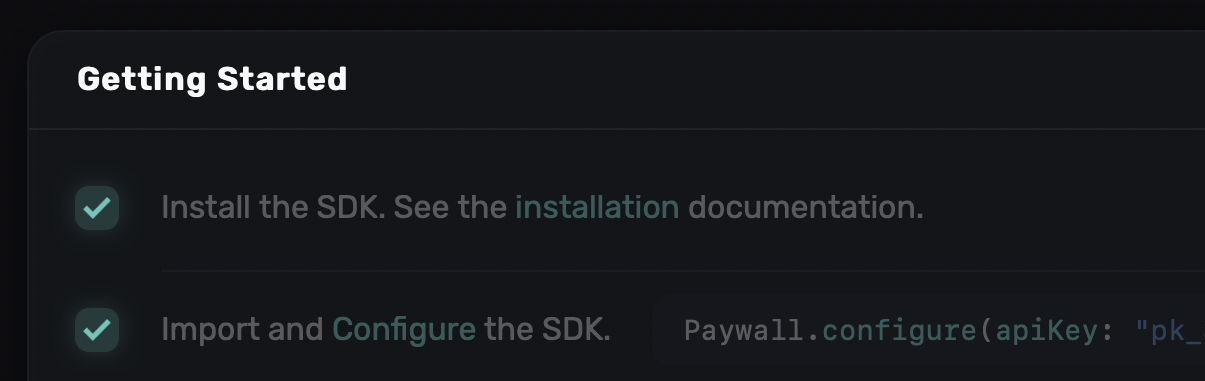
Build and run your app. You won’t notice any visual changes. But if you head to the Superwall dashboard, you notice the first two items checked off in the onboarding checklist. You’ve successfully configured the Paywall SDK:
Triggering the Paywall
The ideal place to show the paywall in your app is when the user presses the Get Inspired button. When that happens, you’ll need to trigger the event campaign_trigger. There are two types of triggers you can use: implicit and explicit.
Triggering a Paywall Explicitly
You can explicitly trigger a paywall by adding the triggerPaywall(forEvent:withParams:shouldPresent:onPresent:onDismiss:onFail:) view modifier to a view. This gives you completion handlers associated with the paywall presentation. A paywall shows when:
- The event name you provide has an active trigger inside a campaign on the dashboard.
- The user matches a rule in the campaign.
- And a binding to a Boolean value that you provide is true
It takes the following parameters:
-
event: The name of the event you wish to trigger. -
params: Optional parameters you can pass to the trigger. You can refer to these parameters in the rules you define in your campaign. -
shouldPresent: A binding to a Boolean value that determines whether to present a paywall. -
onPresent: An optional closure called after presentation of the paywall. This accepts an optionalPaywallInfoobject containing information about the paywall. -
onDismiss: An optional closure called after dismissal of the paywall by way of purchasing, restoring or manually dismissing. It accepts aPaywallDismissalResultobject. This has apaywallInfoproperty containing information about the paywall and astatethat gives you the reason for dismissal. This closure isn’t called if you programmatically setisPresentedto false to dismiss the paywall. -
onFail: An optional completion block that gets called when the paywall’s presentation fails. Accepts anNSErrorwith more details. You should check the error code to handle the onFail callback. If the error code is4000, it means the user didn’t match any rules. If the error code is4001it means the user is in a holdout group. Any other code means an error occurred.
Triggering a Paywall Implicitly
If you don’t need completion handlers, you can implicitly trigger a paywall by calling track(_:_:):
Paywall.track(
  "DidViewFiveMotivationalQuotes",
  ["totalTimeSpentInApp": 2034]
)
It’s recommended to track all your analytical events like this incase you need to attach a paywall to them in the future!
Adding a Trigger to Your App
For your app, an explicit trigger is the way to go. To do this, open WelcomeView.swift and add the following to the top of the struct:
@State private var showPaywall = false
Then, add triggerPaywall(forEvent:shouldPresent:onDismiss:) below the overlay(_:alignment:) modifier in the body:
.triggerPaywall(
  forEvent: "campaign_trigger",
  shouldPresent: $showPaywall,
  onDismiss: { result in
    switch result.state {
    case .purchased,
      .restored:
      showMotivationView = true
    case .closed:
      break
    }
  }
)
This passes the showPaywall variable as a binding to the view modifier and attempts to trigger the paywall for the event campaign_trigger when showPaywall is true. When you purchase or restore a product, it shows MotivationView on dismissal.
Finally, inside continueButton(), replace showMotivationView = true with:
if StoreKitService.shared.isSubscribed == true {
  showMotivationView = true
} else {
  showPaywall = true
}
This checks to see whether the user has a subscription. If they do, tapping the button navigates to the MotivationView. If they don’t, the app shows the paywall.
Build and run your app. Tap the Get Inspired button and see your paywall triggered!

Head to the dashboard and you’ll see the next few steps checked off in the onboarding list:

You now have working logic in your app to show a paywall. Unfortunately, the product pricing doesn’t show and the Continue button to purchase products doesn’t work! You could go back to the paywall configuration and input the product data to fix this. But you’ve decided you want to build and host your own paywall webpage rather than use the provided example paywall. Good for you! To do that, you’ll use Webflow.
Creating a Webflow Account
Webflow is an easy, no-code website builder with a free starter plan. Also, Superwall provides a clonable Webflow template containing many common elements found in mobile payment screens. By using these elements, you’ll be able to get a paywall set up in no time!
If you’re new to Webflow, you need to create a new account. Head to the Webflow website and click the Get started – it’s free button:

Next, fill out your name, click through the setup screens and hit the Finish button. It doesn’t matter what responses you give to the setup questions:

You’ll redirect to a website building tutorial, but you can ignore that because it’s unnecessary for this tutorial. If you signed up via email, you need to verify your email address by following the instructions in the email they sent you before continuing.
Building a Paywall With Webflow
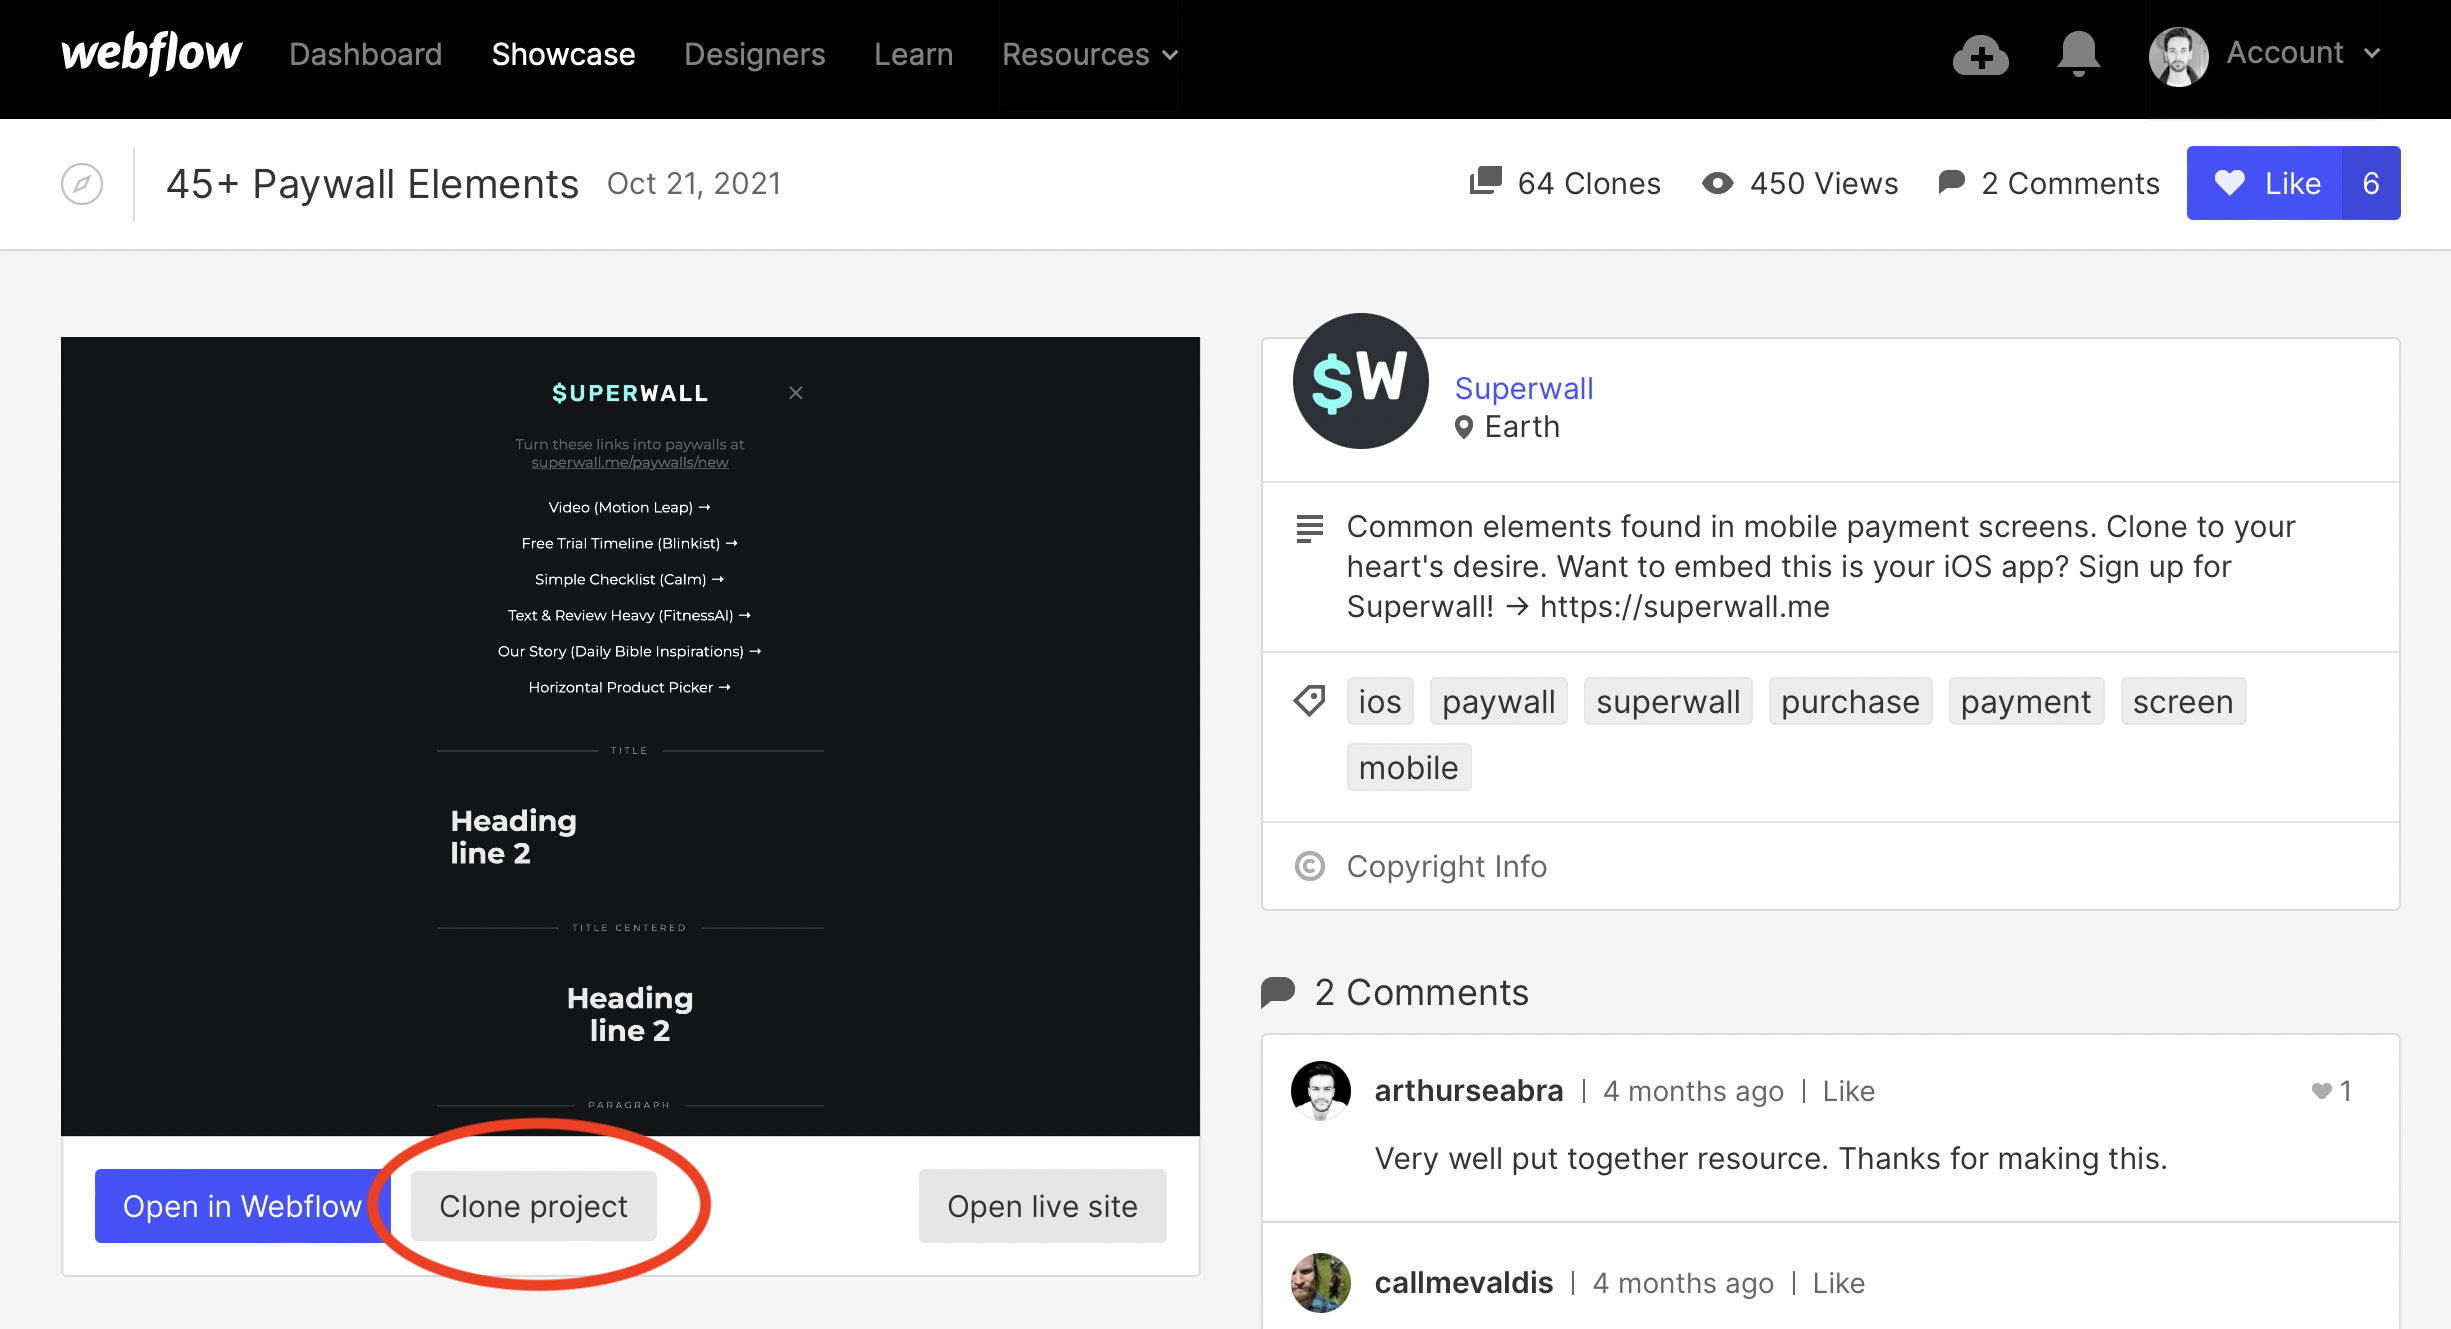
Now, visit the Superwall clonable project on Webflow and click Clone project:
You’ll see the Clone site, where you should click Create site to confirm your choice. Next, enter a name for your project and click Clone project:

You’ll see a website builder containing loads of elements you might see in a mobile paywall. If you were creating a paywall from scratch, you could pick useful elements from here and copy and paste them into your own design:

To reduce complexity, you’ll adapt one of the pre-designed pages. Click Page: All Components in the top left to bring up the Pages panel. This shows you the structure of your website. Find the Simple Checklist (Calm) page and click it:

You’ll see a paywall based on the Calm app paywall design:

Adding Paywall.js to your Paywall
When creating a paywall webpage for Superwall, you must include its magical script called Paywall.js. This acts as the interface between the Superwall client SDK and the webpage presented to the user.
Usually, you’d place the following code inside the <head> tag of your page to add Paywall.js to your webpage:
<script async src="https://cdn.superwall.me/runtime/entrypoint.js"></script>
To do this in Webflow, you need a paid account. But don’t worry about that because the Superwall templates already have this.
Paywall Data Tags
At the core of Paywall.js are data tags. These are specific attributes with corresponding values attached to elements on the webpage. They allow Paywall.js to interpret user feedback and transmit information to and from the client SDK. Paywall.js also interfaces with the Superwall dashboard and supports seven types of data tag. The following are the most commonly used:
-
data-pw-close: This closes the paywall. Its value isn’t used. -
data-pw-restore: This restores purchases on a device. Its value isn’t used. -
data-pw-var: This tells Superwall the content of the HTML tag is configurable via the Superwall dashboard. Its value defines the variable name of the tag to show in the dashboard. -
data-pw-purchase: This initializes a purchase. Its value must beprimary,secondaryortertiary. This refers to the corresponding product defined in your Superwall paywall configuration (more on this later).
For a full list of data tags, see Superwall’s documentation.
To see how to use these, click the 7-Day Free Trial link and then the cog wheel in the top right to open the Element Settings panel. In Custom Attributes, you’ll see a data tag added to it:

You’ll visit this panel and press the + button to add a custom attribute whenever you need to add a data tag. Take a few minutes to click the different elements to see what’s going on inside this paywall.
When you’re ready, click Publish and then Publish to Selected Domains:

After a few seconds, you’ll have successfully published your paywall to a domain hosted by Webflow! Click the link icon next to your paywall destination to view your paywall website:

Copy the address of this webpage because you’ll need it in the next step.
Integrating Your Paywall With Superwall
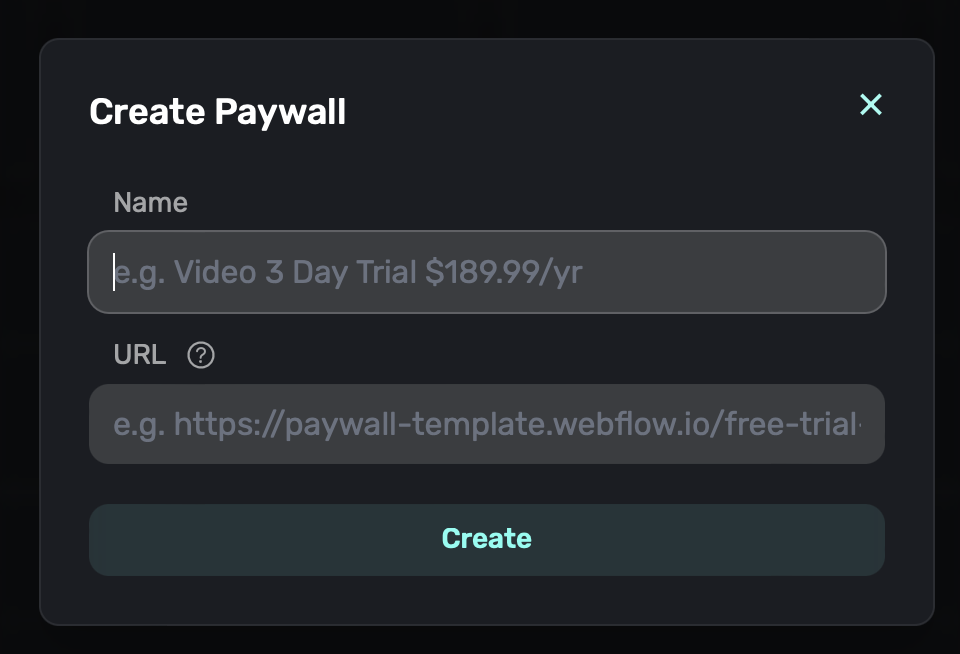
You can now configure your new paywall. On the Superwall dashboard, click the Create New button under Paywalls:

In the popup that appears, enter the name Gym Motivation App and the URL of your paywall webpage from the previous step in the URL field. click Create:
You’ll see an interface for creating a paywall. In the settings sidebar, set the Background Color Hex to #000000, which is black. Leave Presentation Style as-is.
Settings Sidebar
In Xcode, open Products.storekit and copy the Product ID for the Yearly 20.99 product:
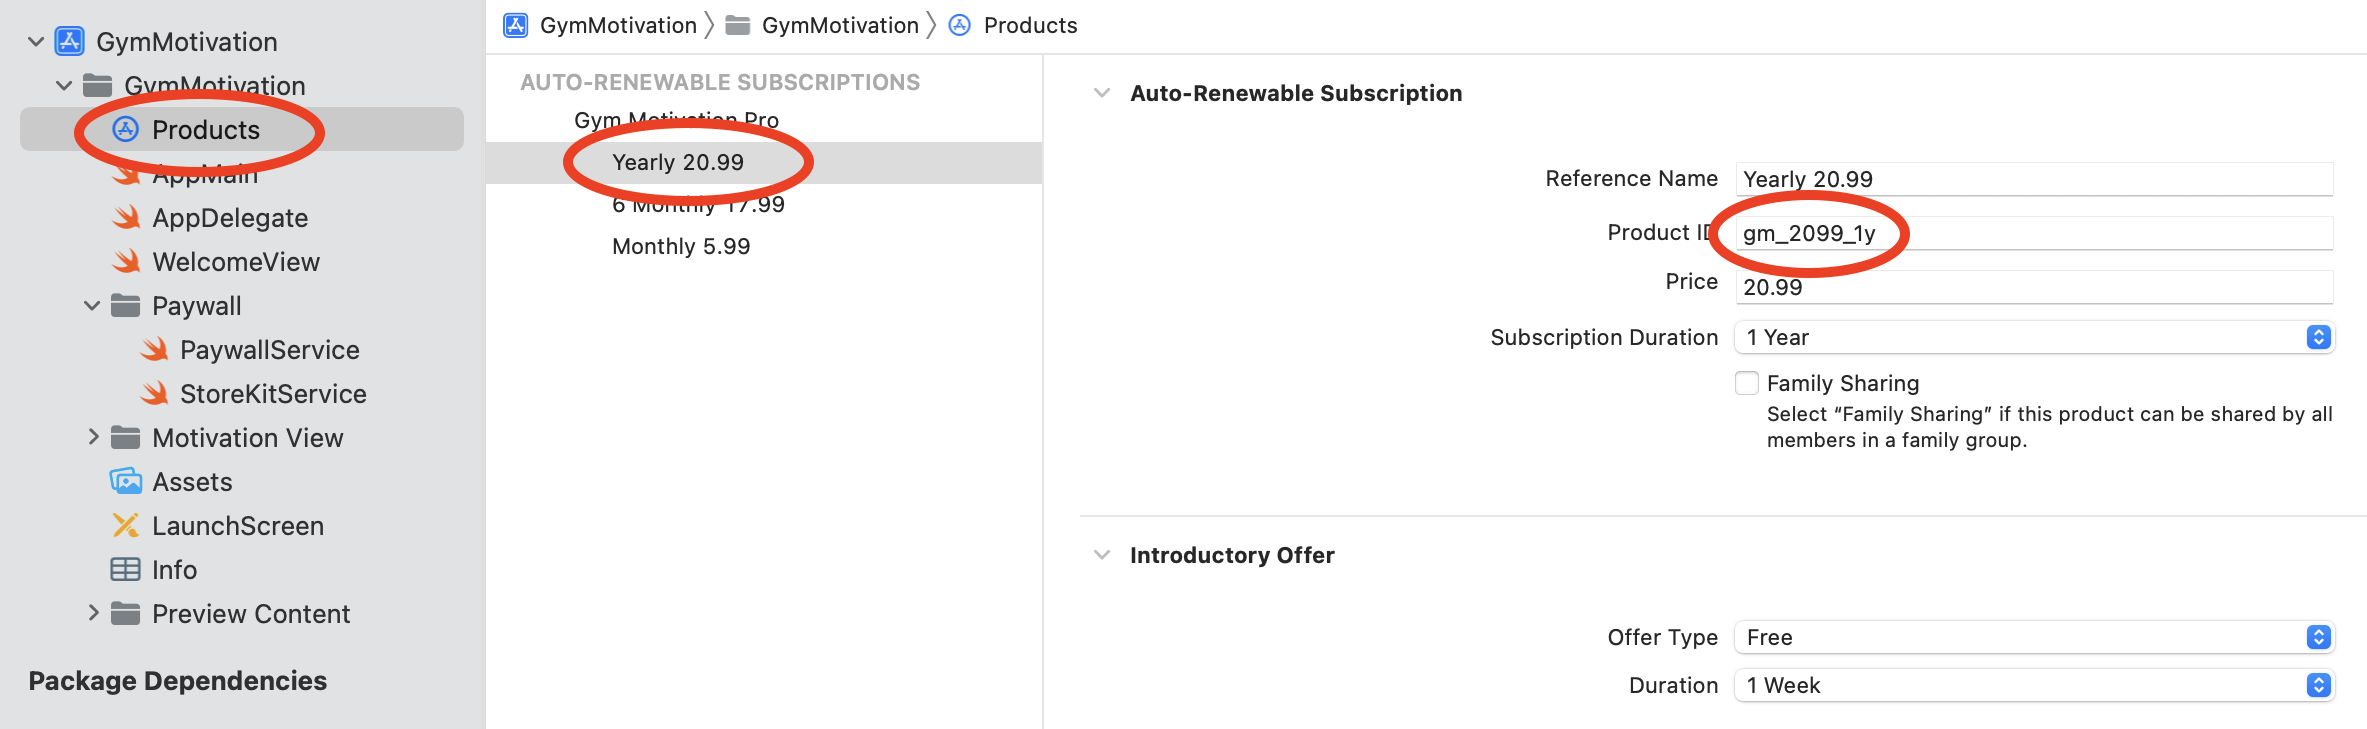
Then, back on the Superwall website, paste your product ID into the Primary Product Identifier field. Repeat this with the six-monthly and monthly product IDs for the Secondary Product Identifier and Tertiary Product Identifier, respectively:

Mouse-over the paywall preview and you’ll see gray borders around all elements that have data tags specified in your paywall:
Accessing Product Properties via Liquid
Paywall elements can access and operate on any product properties specified using the language previously mentioned called Liquid.
You access product objects using double curly brackets. Here are a few examples of things you could do:
-
{{ primary.price }}: Outputs the primary product price. -
{{ primary.rawPrice | divided_by: 12 | round: 2 }}: Divides the primary price by 12, then rounds it to (at most) two decimal places. -
{{ secondary.currencyCode | downcase }}: Outputs a lowercase version of the secondary product’s currency code.
Liquid is quite versatile, and it’s worth looking through its documentation.
Paywall Preview Section
Currently, your fields are using hard-coded values and text taken from your paywall webpage. It’s time to change that.
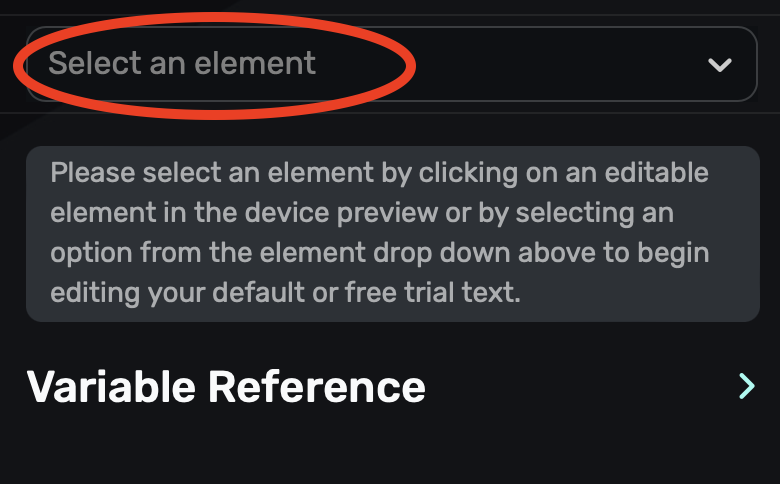
For the purposes of this article you’ll use the element dropdown on the right to select elements on the paywall:
Click the dropdown, type Badge Text and edit the default text to say:
{{ primary.trialPeriodText }} Free Trial
This grabs the trial-period text from your primary product and outputs it.
As you type text into these fields, the text in the preview updates in real-time. It substitutes product data with the sample data under Variable Reference. In your app it will use real product data.
Click Other Plans at the bottom of the preview to bring up the full list of plans:

Your prices are all $0.00, which isn’t ideal! Change that by replacing the Primary Product Strike Through element with:
{{ primary.currencySymbol }}{{ primary.rawPrice | plus: 10 }}
This adds $10 to the price of the primary product.
Replace Primary Product Line 1 with:
{{ primary.price }} per {{ primary.period }}
and replace Primary Product Line 2 with:
{{ primary.trialPeriodText }} free trial
Look at the paywall preview and you’ll see the primary product’s prices have changed from all zeros to reflecting the sample data (you might see a different result depending on your sample data):
Continuing through the rest of the items, replace Secondary Product Line 1 with:
{{ secondary.price }} per {{ secondary.periodAlt }}
Notice how you’re using periodAlt instead of period. This is because your secondary product will be a six-month product and periodAlt considers the period unit.
Next, replace Secondary Product Line 2 with:
{{ secondary.trialPeriodText }} free trial
Do similar replacement for Tertiary Product Line 1 with:
{{ tertiary.price }} per {{ tertiary.period }}
and for Tertiary Product Line 2 with:
{{ tertiary.trialPeriodText }} free trial
Now, replace Primary CTA Subtitle with:
{{ primary.price }}/{{ primary.period }} After Your Free Trial
and next Secondary CTA Subtitle with:
{{ secondary.price }}/{{ secondary.periodAlt }} After Your Free Trial
Finally, replace Tertiary CTA Subtitle with:
{{ tertiary.price }}/{{ tertiary.period }} After Your Free Trial
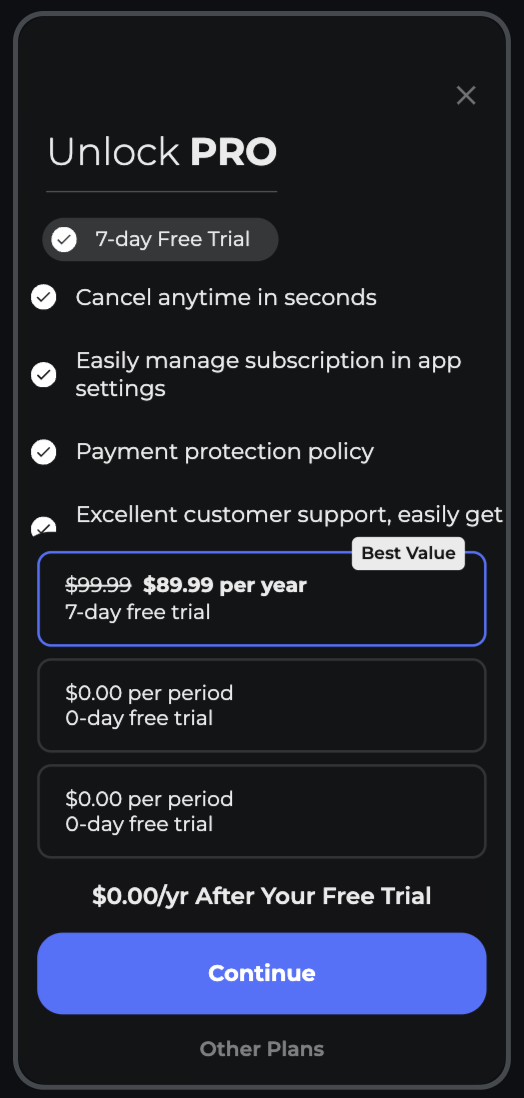
Your paywall now has all its product values filled:

Creating and Enabling Paywall
Click the Save button at the top, then head back to the dashboard.
You’ll see your newly created paywall in the Paywalls section:

In your Example Campaign, you’ll need to reassign users to your new paywall, so click Example Campaign and click the x in the the corner of the example paywall to remove it:

Then, click confirm to remove the paywall:

Next, click + Add Paywall:
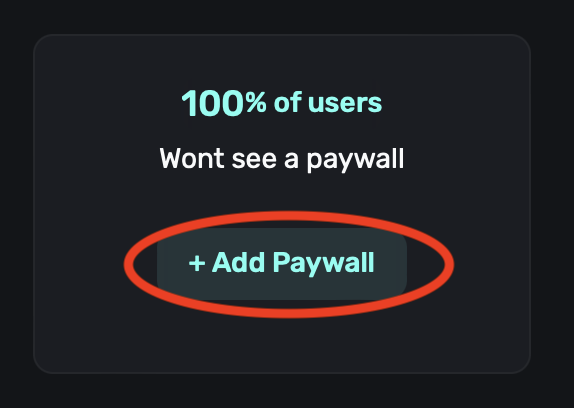
Then, select your Gym Motivation App paywall from the dropdown and click Create:

Your new paywall is now part of your campaign. However, by default it won’t assign anyone to it. Change that by clicking 0% of users, changing it to 100 and clicking the check mark to confirm:
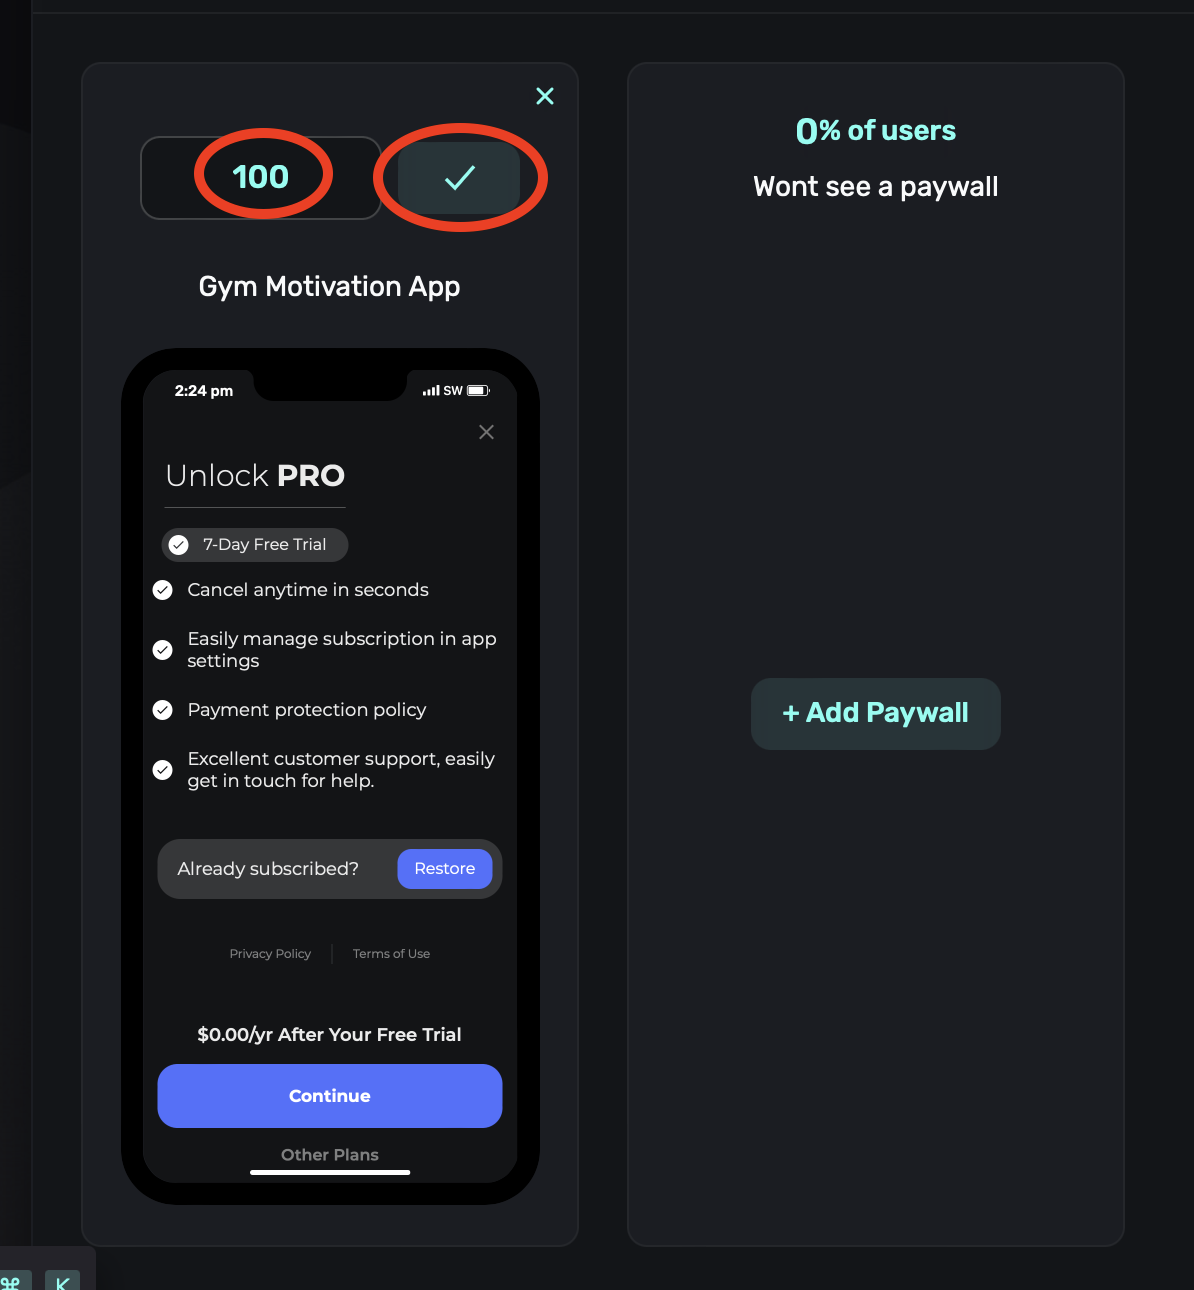
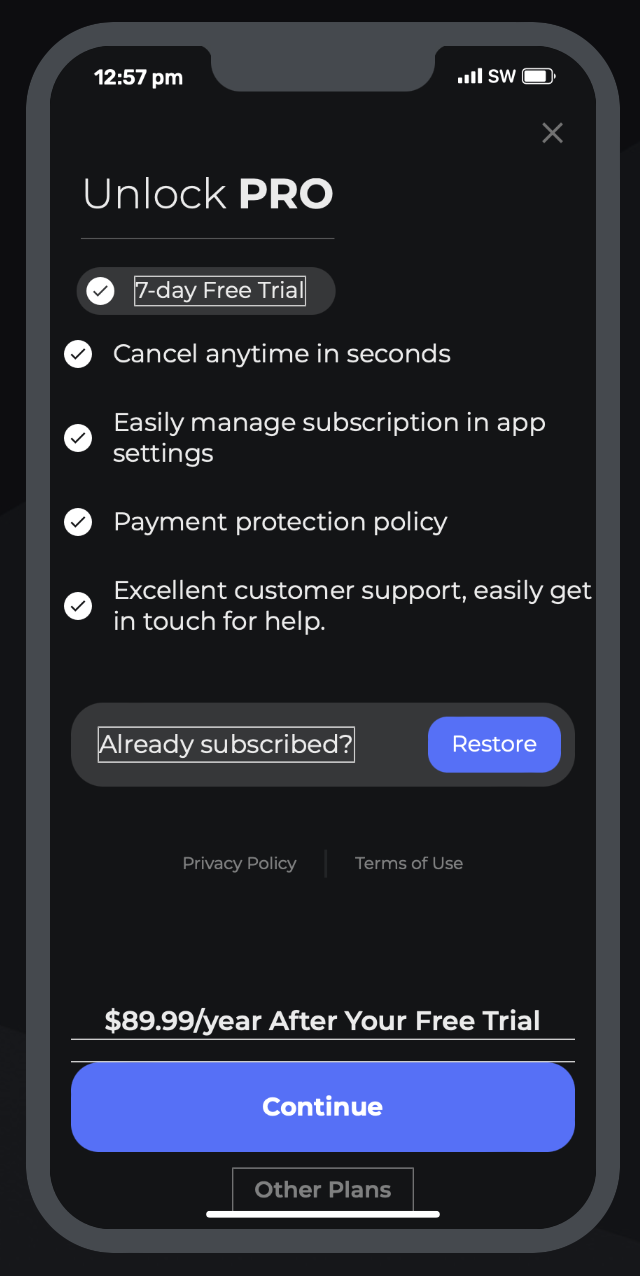
Now build and run your app. Tap the Get Inspired button and you’ll see your new paywall filled with your product data:

Tap the Continue button and tap Subscribe to buy the product. After purchasing, the paywall will dismiss and you’ll navigate through to the MotivationView:

Open the Superwall dashboard to confirm five onboarding steps checked off:

Testing Paywall Variants
Say you’ve launched your app on the App Store but have a feeling the yearly subscription price is too expensive. You want to introduce a lower value to see if you get more buyers. With Superwall, you can run multiple paywalls at the same time.
First, open Products.storekit in Xcode. Add a new auto-renewable subscription by tapping the + button in the bottom left and then Add Auto-Renewable Subscription:

Add the subscription to the Gym Motivation Pro subscription group and click Done:

With the new subscription selected in the sidebar, fill out the details:
- Reference Name: Yearly 18.99
- Product ID: gm_1899_1y
- Price: 18.99
- Subscription Duration: 1 Year
Add an introductory offer:
- Offer Type: Free
- Duration: 1 Week
Then, double-click the English (U.S.) localization to set the Display Name to Gym Motivation Pro and Description to Yearly Subscription:

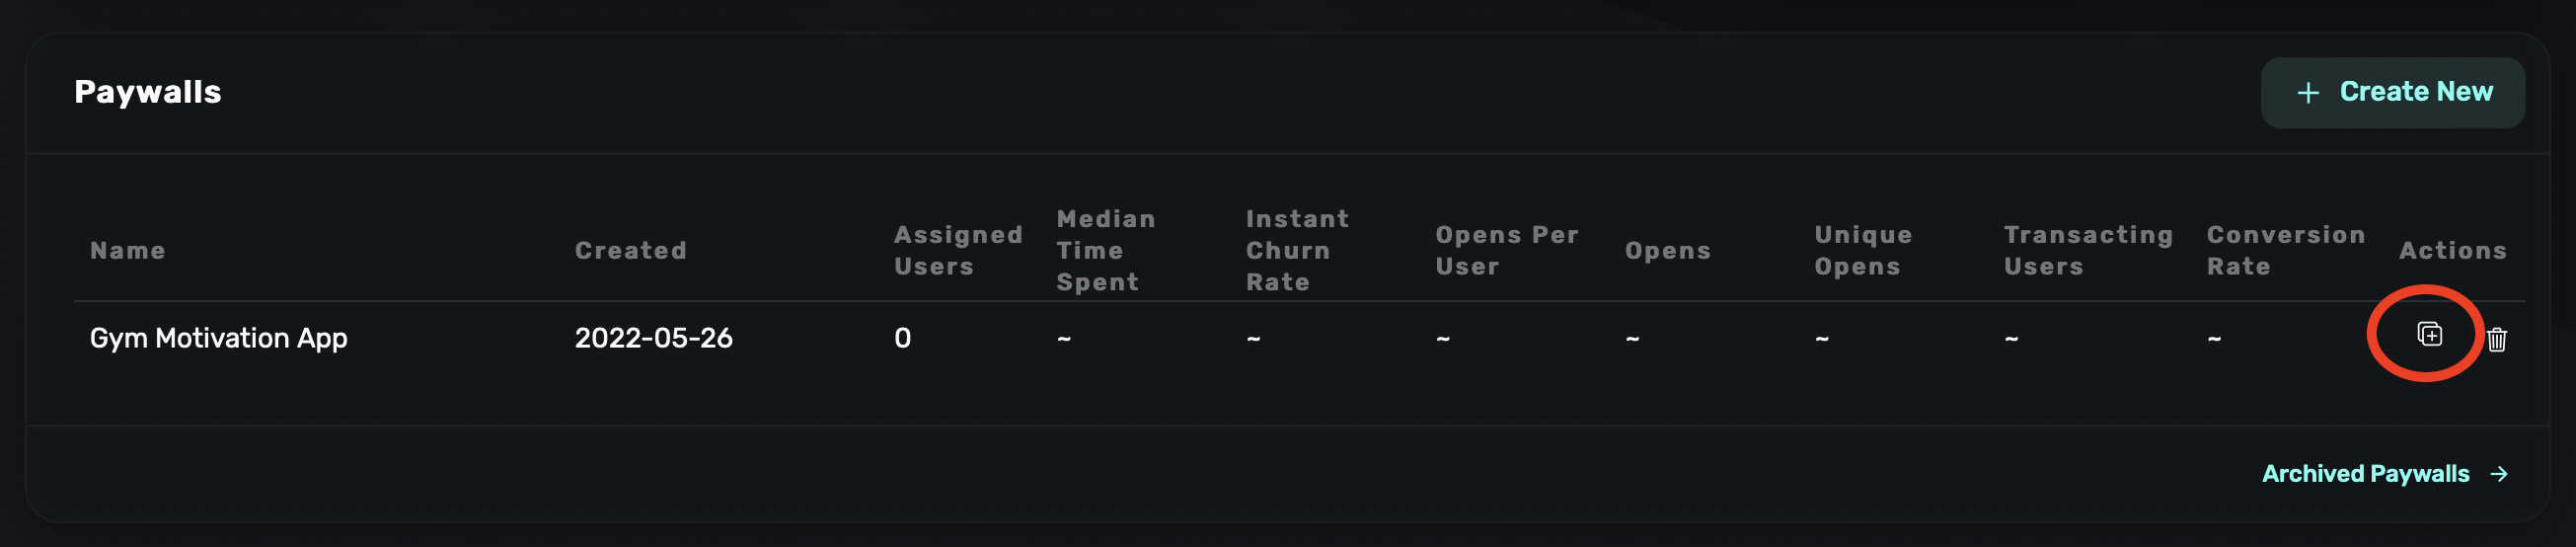
Now that you’ve set up your new product, head to the Superwall dashboard. Under Paywalls, click the duplicate icon for your paywall:
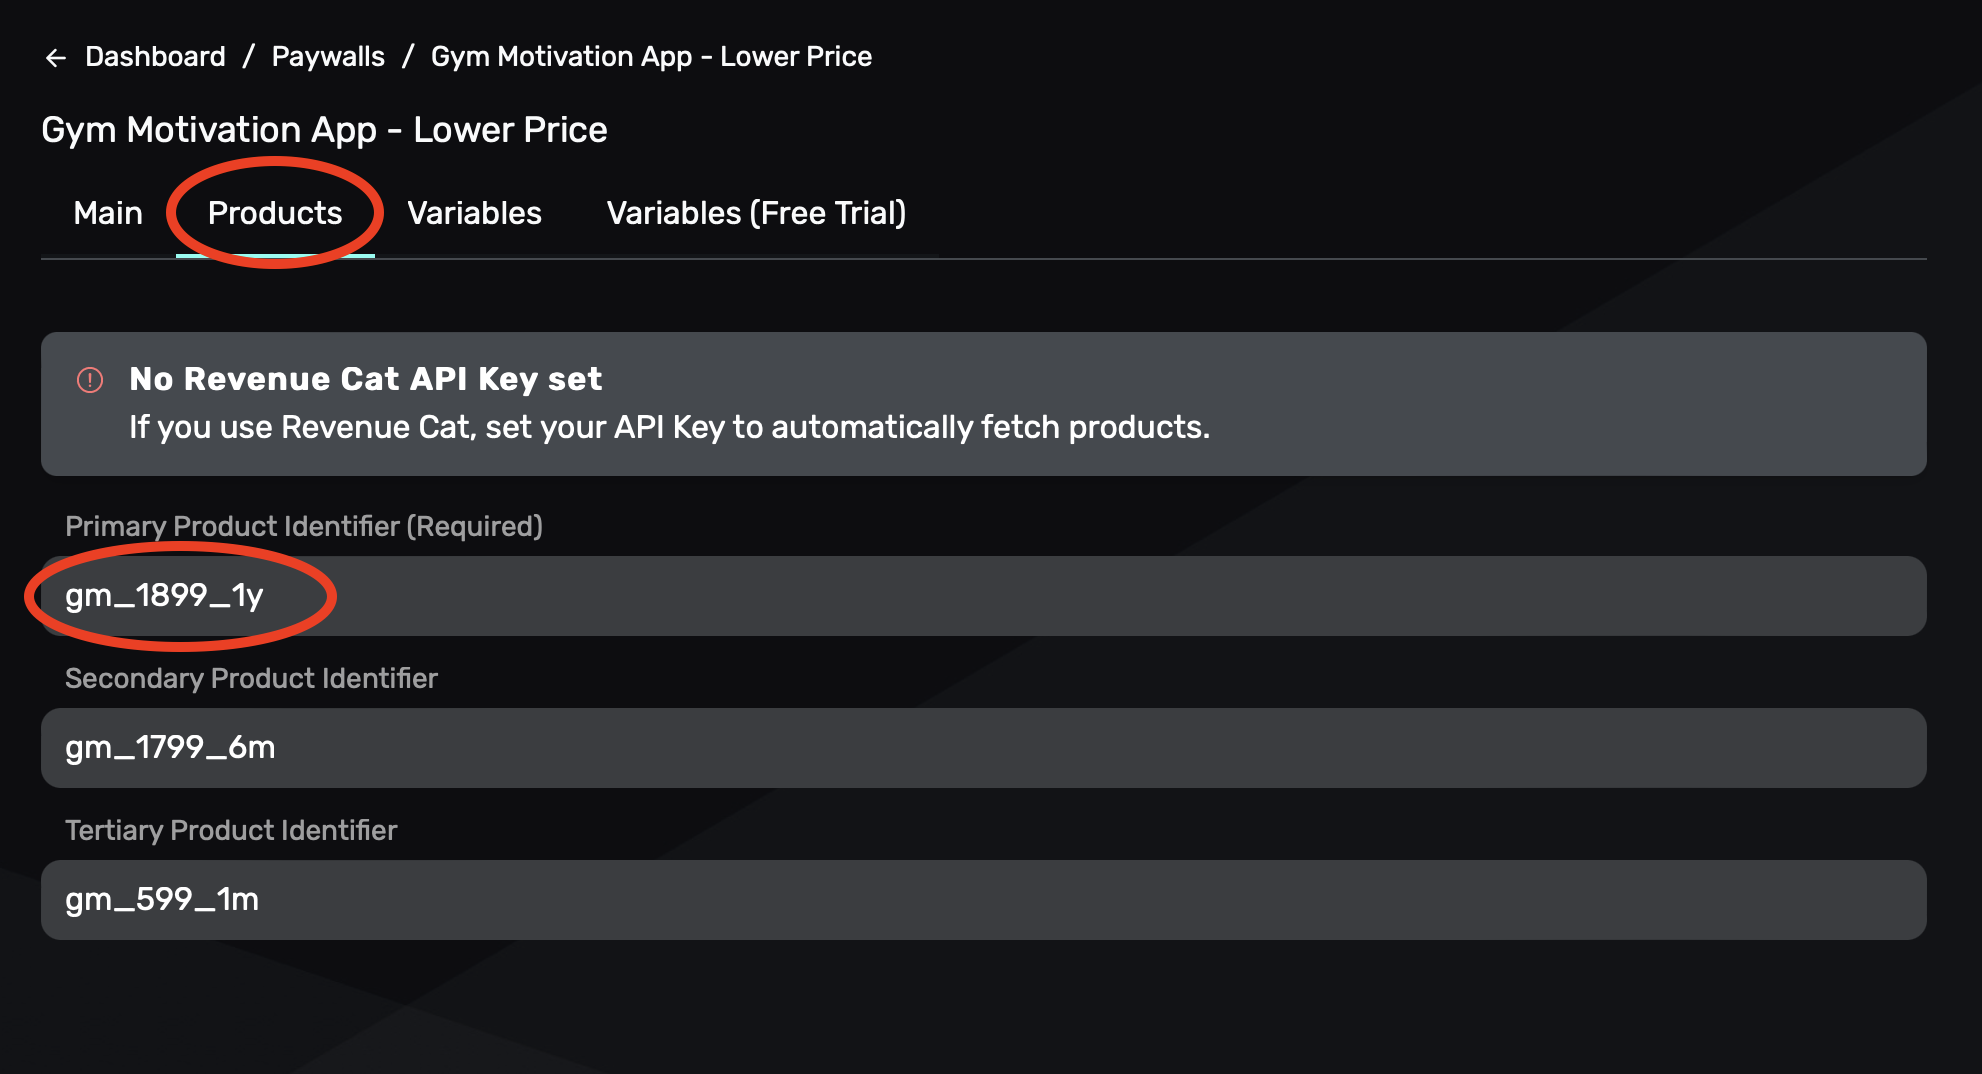
Name it Gym Motivation App – Lower Price and click Duplicate. This takes you to the paywall editor. Select the Products tab and change the Primary Product Identifier to gm_1899_1y:
Click Save and head back to the dashboard. Under Campaigns, click Example Campaign and add a new paywall variant to your rule by clicking + Add Paywall:

Select your paywall Gym Motivation App – Lower Price from the drop down and click Create:

Then, above your newly added paywall, click 0% of users, set both paywall values to 50 and click the check mark to confirm your new traffic distribution:

You now have an A/B test running two paywalls at the same time, with a 50/50 traffic split between them.
Where to Go From Here?
You can download the complete project by clicking the Download Materials button at the top or bottom of this tutorial.
This project scraped the surface of what you can do with Superwall. There’s still plenty to learn, including:
- Identifying users.
- Assigning user properties.
- In-app paywall previews.
- Game controller support.
- Charts and analytics.
- 3rd-party analytics.
- Custom paywall buttons.
If you want to learn more about Superwall’s capabilities, check out its documentation.
To learn more about configuring in-app subscriptions, check out In-App Purchase Tutorial: Auto Renewable Subscriptions.
I hope you enjoyed this tutorial. If you have any questions or comments, join the discussion below.
raywenderlich.com Weekly
The raywenderlich.com newsletter is the easiest way to stay up-to-date on everything you need to know as a mobile developer.
Recommend
About Joyk
Aggregate valuable and interesting links.
Joyk means Joy of geeK